Check out my first free printable template! These two templates will allow you to create a 6 inch paper medallion or paper rosette. On Monday I showed you how to create your own DIY medallion, but if you are making a lot of them or want an easy template to get started with simply print these on the backside of any 8.5 X 11 inch sheet of paper.
The first printable template will make a paper rosette with flat edges like the red one on the left side and the second printable will make a pointed medallion similar, but larger, than the blue one on the right. I haven’t made one with the scalloped edges… Why? Because honestly I wasn’t thrilled with them when they were done. Reminded me to much of flowers… Instead of fireworks. But after I cut out, folded, pressed, glued, etc. I wasn’t about to not use them on my 4th of July Mantel. I am meticulous; not insane.
Printable Templates are right here in case you skim websites like me:
Pleated paper medallions, also known as paper rosettes, are easy to make. The following step by step tutorial will show how I created paper medallions for a Fourth of July inspired mantel decoration. You only need a few tools (namely scissors, paper, and glue) to create these pretty rosettes.
Supplies
Paper
Scissors
Glue (hot glue recommended)
Ruler
Thing that you can trace and make a circle
Writing implement
Step 1: Math & Preparation
The first step in creating a paper medallion is deciding what diameter you want. This particular tutorial creates a rosette that is 6 inches across. In order to get 6 inches each pleated strip of paper needs to be half that size (Just go with me here it will make more sense in a minute). I used the ruler to mark two 3 in (half of the six inches b/c I want the finished medallion to be 6) strips of my 8.5 X 11 in paper and cut them out. You can see the faint lines here marked by arrows. Hold on the that extra 2.5 in piece left over. We will need that in a minute.
Step 2: More Math and Decisions
While the previous step only involved dividing by two, the math gets a little more complicated here. Your next step will be to figure out the pleating. Perhaps there is a website that offers a golden ratio for making these dang things but let us just say you want it to come out kinda close to even. (Scroll to the “Notes” section at the bottom for a discussion on pleat sizes and paper) In this case 1/2 in pleats look good on 6 inch medallions. You can mark all your pleats if you are Martha or be like me… Mark the first one and fold it very well then eyeball the rest.
I figure if you start off good that’ll do. It’s crafting not surgery.
Step 3: Folding
Accordion fold both pieces of paper.
Step 4: Oh yeah that other piece
Remember that other piece of left over paper? Extract it from where ever your cat/3 year old/baby has removed it and grab your “Thing you can trace to make a circle”. In my case it was this little decorative globe. Trace a minimum of two circles and cut them out. You can cut more in various sizes and stack them for a decorative look.
Someone please remind me to lotion up my hands before I do another tutorial in which they show. Scaly is all that is coming to mind.
Step 5: Yes more steps… You can do it!
Back to the folded pieces of paper. Get out your glue. I suggest hot glue for a few reasons, namely it sticks and it dries fast. But as long as it glues you are good to go. First, glue the two strips end to end to make one long strip. Then circle it around to make a tube.
Kinda looks like a really crappy lampshade when you have glued them correctly.
Step 6: Transformation
This really isn’t a step in itself but mastering the gathering of folds is slippery at best. You kinda loosely gather the pleats into a cone and begin pushing down. Try to keep the cussing down to a minimum, as it pops out of shape. Or wait until nap time, and feel free to make a sailor blush.
Step 7: Pressure Pushing Down On Me
Gently push the cone down. As the edges fan out the center will begin to flatten. Now, is why I recommend hot glue. The medallion will want to pop back up until you set the center. I use the “Thing I could trace and make a circle” to hold it down while I pop some hot glue on one of the circle centers and then again while it dries (cools? what is the appropriate term for hot glue?). For added firmness use the second circle and hot glue it on the back.
One Medallion Down!
Notes:
Pleats are a beotch and there are a number of things to keep in mind. The bigger (larger diameter) a medallion then the more pleats you will need.
More pleats can mean many smaller pleats or greater length of paper (2-3 strips attached). Though at some point you have to add length. I have made very small medallions with a single strip, but it needs to be lightweight paper.
Stiffer (heavier weight) paper will require more pleats (see above)
Hot glue is hot. Paper is thin. Be careful and don’t blister your finger tips like me.
Don’t limit the center to a circle. The center simply holds the medallion together, consider adding contrasting papers, shapes, and symbols for unique touch. It also has the added benefit of covering up a multitude of craft sins… Such as when you might have smooshed the center a little too vigorously.
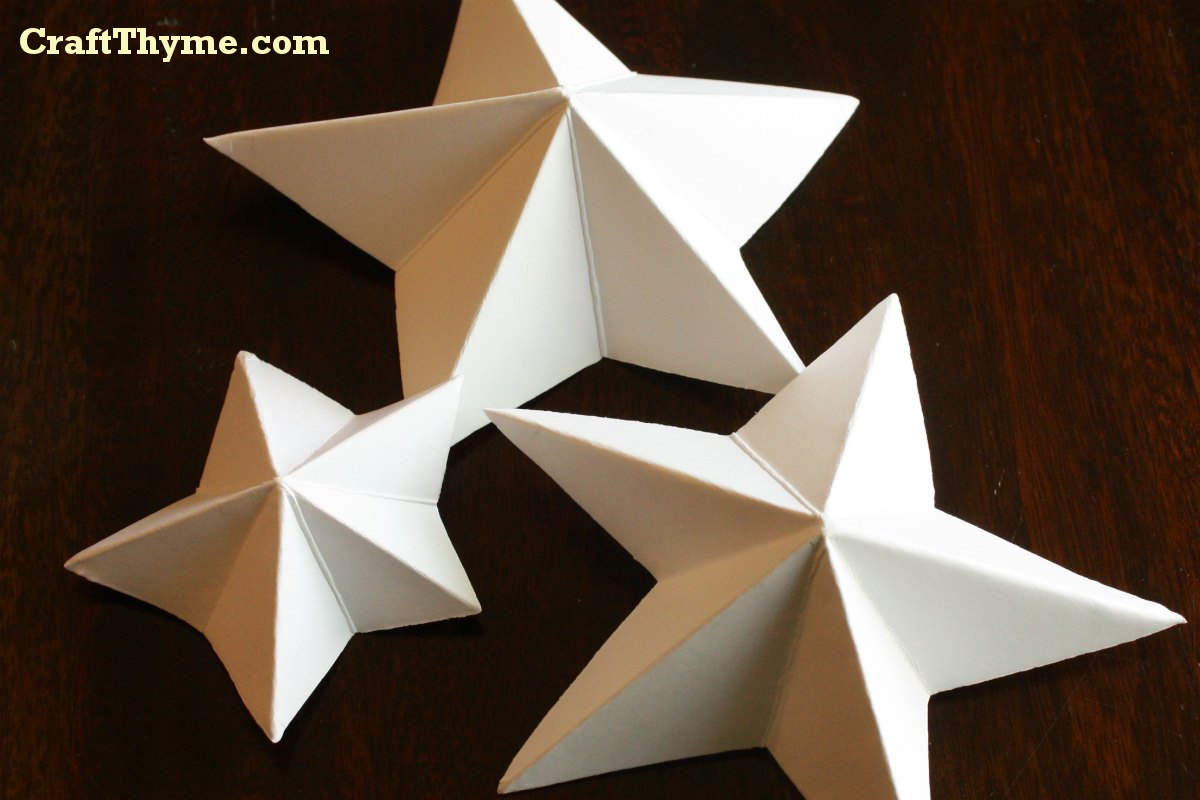
The following tutorial shows how to create a folded paper star that was used in my Fourth of July mantel. The final star is raised, 3-dimensional, with 5 points.
Come on… I’m perfect for Pinning! Just hover your mouse.
Supplies:
Rectangle of Paper (ratio like 8.5 X 11 in but can be smaller or larger) The small stars in the above 4th of July mantel were a single sheet of 8.5 X 11 inch paper cut in half. Thick/Cardstock Paper* holds its shape well.
Scissors
Folding steps:
Fold paper in half
I know this is a doozy of a step. You can never be to careful folding in half…
Take the left hand corner and fold it over to middle of the opposite side (halfway between 1 & 2)
Honestly, just eyeball the halfway mark. You didn’t see a ruler recommended in supplies did you?
Take the point you just lined up halfway and fold it back on itself making a nice sharp crease from the point down
Fold’er? I barely even knew’er!
Take the right hand corner that has just been hanging out till now and fold it as far over as it can go.
We are just wrapping the paper around itself in this step. Giving it a nice paper hug.
Take that same point and fold it back on itself just like you did on step 3
For added fun, I crease the hell out of everything when I am done.
Cutting:
Here is where the magic happens! Depending on how steep or shallow you cut the star will come out with fat or sharp points.
We won’t discuss how the waste paper makes me cringe…
Makes a fat almost round star
Normal American Flag 5 pointed star. (try to make the angles match)
Pointy Christmas Star
Voila, unfold and re-crease the points make a 3 dimensional point.
Notes:
For good dimensional quality a thicker paper like a medium weight cardstock work the best because it holds its shape. Also making nice sharp creases makes the final folds look the best.
The 4th of July is right around the corner and I wanted to create some mantel decorations to move into Summer and mark the holiday. We have had some job/educational changes recently so full blown decorating had to be done on the cheap. In comes stars and firework paper-craft mantel decorations. The entire thing was created with 6 sheets of decorative paper (.20 a sheet on sale) and 8 sheets white cardstock (from a giant pack so more around .10 a sheet).
Paper fourth of July Mantel
$2.00 for the new supplies put this mantel within budget. I had a few supplies, like super sticky Zots, and staging items such as candles already on hand. In fact the mirrors and candlestick were revamped Goodwill finds from a few years ago.
The mantel was supposed to invoke a vintage Americana feeling. I used a palette of subdued reds, blues, and golds with pops of clean white for interest. Kind of a faded “old glory” theme.
The gold and mirrors act to reflect a little light reminiscent of the stars. It twinkles nicely at night.
The decorative paper was used to create the paper medallions to represent fireworks.
This look would be easy to recreate yourself. I’ll post tutorials on making paper medallions and 3-D stars later this week and next. You will find the links here when they are live.