Posted on 4 Comments

Remove Paint From Brick Part II

How to strip paint from a brick fireplace

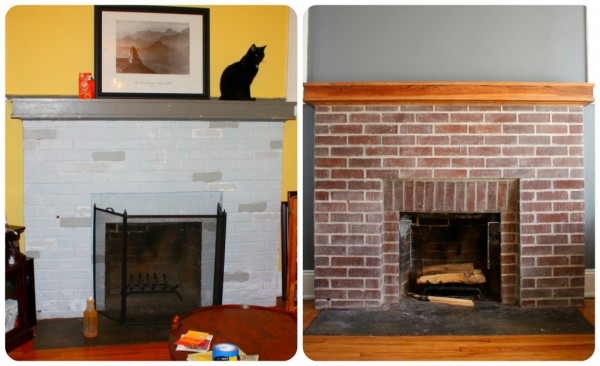
Interested in other ways to strip paint from brick? See Part I of ‘How To Remove Paint From Brick’.

Using SOY-Gel* is pretty easy but there are a few things you can do to make the product work a little better. So let the paint stripping process begin!

How to strip paint from a brick fireplace

Supplies: Drop Cloth*,tape, newspaper, SOY-Gel*, cheap/old paint brush, 2-3 inch STIFF Paint Scraper* (about the size of one short side of a brick), Stainless Steel Wire Brush* (best size is one you can grip comfortable, if it is too big then your will not be able to get the necessary pressure. Having two is better than one!), thick rubber gloves, old rags/towels

Useful extras: Second or third stainless steel brush (we didn’t have this), coarse steel wool, someone with lots of upper body strength

1. Begin by covering your work area: I can not stress this enough; I’m a neat painter but even I couldn’t control the mess. The stripper makes the old paint into a sticky goo that will repaint anything it lands on. I suggest putting a layer of painters cloth or plastic over whatever you want to protect. The painter’s tape does an okay job of keeping the gel off of woodwork. On top of the drop cloth I would lay a layer of newsprint (more on that later).

2. Glop (yes this is my technical term) the stripper on the brick: The directions suggest spraying it, but as I didn’t have the necessary equipment so I used a cheap paint brush. It is important to put a much thicker layer than your would paint; at least 1/8″. As you work you’ll discover the correct amount, but it is better to start thicker.

3. Wait: Yes, this is the boring part. I got into a rhythm of glopping it on in the morning and then scrapping it after I got home from work and the baby went to bed. However, there is a point at which it doesn’t make any difference how long you leave it. For me that was around 8 hours after that it didn’t seem to work any better. If you are going to let it set more than a couple of hours I suggest covering it with plastic wrap. I tried to be eco-conscious and reuse plastic bags or not use plastic at all. Trust me it was a fail, if the gel starts to dry then it becomes hard and tacky and you’ll have to use a lot more muscle to get it off. Plastic bags just didn’t cover it well enough but plastic wrap worked great.How to remove paint from brick

4. Scrape, now the fun part begins: Don your rubber gloves, these will protect your hands from scraping against the brick and the sticky mess. Make sure you have newspaper under the area your going to scrape. Then take your scrapper and go to town. The old paint should fall on the newspaper and you can use the newspaper to wipe the scrapper on periodically.

Depending on how many layers of paint you have the four above steps can be repeated. For six layers of paint and rough-faced brick it took three layers. Two scraping and one scrubbing. Ah yes, the scrubbing…How to remove paint from brick

5. Scrub with your brush: If you have smooth faced brick this may not be as big of a deal, however I was cursed blessed with rough brick. Basically once you have scraped as much paint off of the brick you’ll want to get that stainless steel brush out and start scrubbing. You can use any method as long as it involves scrubbing till your arms feel like rubber. Periodically the brush will get full of paint crud, at this point use the edge of the scraper to remove as much as possible (this is where another brush would come in handy b/c you can remove the goo much easier when it sets a bit). Also, you can rub any smoother areas down with steel wool.How to remove paint from brick

6. Scrub with brush again: IMPORTANT, if you still have paint left and are going to do this scrub put a thin layer of paint remover on and let it set a couple of hours. The paint is pretty loose, but with out this lubricant (yes I used lubricant in a sentence) you will burn the brick with the brush. This last layer is a good time to enlist whichever person has the most upper arm strength (Patrick) in, but warn them if they over scrub it will literally blacken the front of the brick.How to remove paint from brick

7. Wash down: I used an ancient towel and a bucket of water with another old towel to soak up the water at the bottom. You might even do this step periodically while scrubbing. It isn’t necessary, but cuts down on the scrubbing.

8. Realize some paint will remain: Unless you have some nice smooth brick your going to have particles of paint left. Or let’s put it this way; I got to a point where I liked the look and decided it was time to stop scrubbing.

How to remove paint from brick
This is after one set of scrape and scrub. If you are willing to go the extra mile you can repeat the process to remove more…

Notes:   Please, please, please remember to check for lead when working with old paint.  Also, This is a physically exhausting process. I worked in 2 ft sections so as to make progress but not be overwhelmed. This took many hours over multiple days weeks. Always remember to test these products in your home first because your results might not be exactly like mine. In other words if this messes your home up don’t come looking for me.


Posted on 3 Comments

How to Remove Paint From Brick

So, you want to remove the paint from brick work? Good Luck! This is a messy, labor-intensive job.  However, I know that it can be done. Just remember, if you and a spouse/family/friend attempt this project together you may need to add in the cost of therapy above and beyond what I list here. So now down to PART I of the tutorial.  Skip to: Part II

paint-strippers1

Before beginning to strip the paint from the bricks I researched various means of completing this project. I ended up with 5 top competitors. Here are the pros and cons of each of these methods:

If you have old paint you really do not want to mess around with lead!  Get it tested before beginning this process.

Heat Gun*:

  • Cost: around $50 for a cheap one $100-120 for good one.
  • Pros: Can do small sections at one time. Once you own the gun you do not have to purchase further equipment.
  • Cons: Can emit dangerous fumes especially with older (probably lead paint), May not loosen paint enough to remove from brick/masonry

Sand Blasting:

  • Cost: $ 85- $150 per hour (Usually hire a professional)
  • Pros: You hire a professional
  • Cons: This will harm the surface of the brick and can really loosen mortar. Even with professionals there is going to be a good amount of escaped dust (Lead worries again)

Peel Away® One*:

  • Cost: An Entire Peel Away Set*  (covers 80 sqft) runs about $110.  You’ll need special covering paper, neutralizer, and pH tester in addition to the chemical if you want to buy them all separately.
  • Pros: Supposedly it will just peel away the paint
  • Cons: Product can burn skin and you have to clean the brick afterward which can be pretty messy inside a home.  Some people complain it requires multiple applications.

Regular Paint Stripper*:

  • Cost: $40-$80 per gallon
  • Pros: Easy to find at any major hardware store, will bubble and strip all types of paint
  • Cons: Doesn’t stay workable long enough to remove from the surface of the brick, may take multiple coats, has major ventilation issues

Biostrippers: SOY-Gel*/Citri-Strip*:

  • Cost: $45.00 Soygel per gallon (covers 200 sqft)/$40.00 Citristrip per gallon (covers 80 sqft)
  • Pros: Eco friendlier (bio-degradable but remember it doesn’t make the paint bio-degradable) Soygel is good for oil and latex paint on wood and brick, Citristrip does better for latex and can be purchased at major retailers
  • Cons: May take multiple coats and Citristrip was rated poorly for removal of paint from brick. Soygel is harder to find for purchase

After weigh all the options we went with Soygel. Why? We had to think about how this mammoth project would fit into our lives. Here was what we (mostly I) took into consideration.

  • Logistics: With a 10 month old baby we were going to have to start and stop the project over many days (make that weeks)
  • Home Health: With a 75+ year old house it was good bet we have lead paint in at least one of the 6 layers. (Please note using this process does not insure lead safety.  Seek professional guidance). Plus we didn’t want the baby subjected to a ton of fumes
  • Cost: Seriously, I would have rather hired a professional
  • Most likely to work

The paint gun seemed noisy and not as likely to work. Since, I am doing this primarily while a baby sleeps then I needed something quieter. The chimney is already have mortar issues, which a professional will be addressing, so we didn’t want to exacerbate this with sandblasting. Plus the mess and cost were a turn off. Peel Away 1 seemed really neat, but it bothered me that it was so caustic and it looked like the cost was quickly going to add up. The regular paint stripper just had too many fumes. Finally, while it was easier to find the citristrip most people agreed it just wasn’t very good with masonry. Also, we knew we had a mix of acrylic and oil paint to go through. We found a local distributor for Soygel and tried a quart of it before committing to a whole gallon.

soygelTo see the results of the Soygel and how to actually remove the paint from brick you can check out Part II of the tutorial.

Images courtesy of Lowes, Home Depot, & Franmar

Posted on 39 Comments

Faux Cast Iron Finish

The final finish has a lot of texture and is matte in nature like real cast iron.

I developed this paint technique to create a cast iron finish on a HID-E-OUS brass lamp we had in our living room.  My husband and I have a lovely cast iron legged side table and a shared like of Restoration Hardware.  Also a shared like of not spending that type of money.  I tried to find a good tutorial to fake a cast iron finish but gave up and started playing with paint.  After multiple attempts, hauling the side table around to compare, and scraping off bad finishes I found a way to paint a faux cast iron finish.

Faux Cast Iron Tutorial


It looks great on furniture but also works to make an ‘urn’ like finish for Halloween.

Supplies

Supplies to create a faux cast iron finish.


For the basic finish you need:

Rustoleum American Accents Stone Finish in Mineral Brown* (long enough title?)

Bronze Spray Paint*

Matte Clear Finishing Spray*

Sand Paper (higher grit is better for smoother finish)

If you want to paint glass:

Add a glass primer or frosting spray*

Step 1 We All Hate It: Priming

Depending on the piece you are covering you’ll need to prime it.  Glass required a coat of frosting spray.  My horrible brass lamp needed a clear coat sanded off.  Google directions for the piece you want to cover.

Step 2 Using the Rustoleum American… Ah to hell with it: The Stone Paint

Faux Cast Iron: Spraying Stone

I’m just going to call it stone spray paint from here on out.  The title in supplies should let you know what I mean.  By the way, I am only suggesting that particular brand for the stone paint because it is the only one I have used.  I tried a variety of bronze paints and they worked fine, but I haven’t had a chance to try a different texture brand.  If you do please leave a note in the comments.

Lightly cover the whole piece with a splattering of the texture.  I moved waaaay back than my usual spray painting technique.  You can see if just splattered a coating.

Step 3: Bronzer instead of Blush

Cast Iron Paint Finish: Adding bronze

You can go ahead and spray a covering coat of bronze spray paint before the stone paint is dry.  Save some time and it doesn’t hurt anything.  However, let the bronze mostly dry.  I say mostly because I am impatient and if it is a bit tacky and peels up you’ll be fine. If you are doing it right it will look shiny and warty and you’ll be thinking “what the hell is this?”

Step 4: More OMG This Looks Awful

After the bronze ‘mostly’ dries take the sand paper and give it a buff.  It will knock off a lot of the texture leaving pits, holes, and scuffs.  Then cover in bronze paint again.  Repeat step 3 & 4 if you don’t feel like it had a lot of varied texture, or you were impatient (like me) and gummed up the paint into a wad.

Step 5: Now It Will Come Together

Finishing the faux cast iron finish
From What? to Wow! all in one coat of paint.

Let everything dry and then cover the whole item with a thick coat of matte spray.  By thick, I mean disregard the manufacturers guidelines and get that puppy about 3-6 inches from the surface.  You want the matte paint to pool in the pits and any decorative carvings.

That is pretty much that!  There aren’t really notes with this process other than more layers of paint give a richer finish.  You can see how I styled these cast iron ‘urn’ vases for a Halloween Vignette.

The final finish has a lot of texture and is matte in nature like real cast iron.

Enjoy these articles? Get biweekly updates by joining my mailing list (no spam, no way, no how)

See more great DIY, Decor, & Crafts at these Link Exchanges: 52 Mantels, Lambert’s Lately, The Crafty Blog Stalker, Craftberry Bush, The Pin Junkie, The Stitchin Mommy, I Should Be Mopping The Floor, Craft-O-Maniac, Dream A Little Bigger, By Stephanie Lynn, Kitchen Table Art

Posted on 11 Comments

Halloween Vignette

Halloween Decorations; cast iron vases

Halloween is just around the corner and I hope this display gives you some Halloween decoration ideas.   It is one of my FAVORITE holidays.  I pretty much love every bit of it, from gaudy plastic spiders to sophisticated decorations.  Costumes! Candy!  I could go on and on.  This particular vignette was going for an old-timey, sophisticated macabre.

Halloween Decorations; cast iron vases
Before you make hot-glue spider webs read further down this post.

The cast iron vases were created from two cheap glass vases.  You can see the tutorial for faux cast iron here.

Detail of Halloween hot-glue spider web

I added an old picture, and lord my Mama would smack me, but I can’t remember which relative this is.   Surrounding it are spider webs made from hot glue.  I thought I was a genius making all those strings…  And I was EXCEPT, marble is porous.  And the tabletop is marble…  *scrape* *scrape* *scrape* Make sure to attach the hot glue to items you know will release the glue easily.

Idea for Sophisticated Halloween Decorations
Check out how well the faux cast iron finish on the vases matches the real cast iron table!

Topping it all off is my lovely bouquet of dead daisies.  The whole display makes me feel like someone left these fresh flowers by a lovely picture and then abandoned them for 100 years.  I love that dark Halloween feeling!  Must be a closet goth at heart.

Tutorials Used

Faux Cast Iron Finish 

Enjoy these articles? Get biweekly updates by joining my mailing list (no spam, no way, no how)

See other great crafts, DIY, and decor at these link parties: 52 mantels, Katherine’s Corner, Realcoake.com, Lambert’s Lately, Two Yellow BirdsCraftberry Bush, Pin Junkie , Craft-o-Maniac, Twigg Studios, Dream A Little Bigger , I Should Be Mopping The Floor, By Stephanie Lynn

Posted on 16 Comments

Bean Arts and Crafts Transformed

Detail of bean gluing process.

Have you had children? Were you a child? Then you should probably have made bean or macaroni art at one point and you are probably a homosapien. Have been recently gifted with some lovely artwork from my son I wondered if you could transform the homely bean art into something adult and sophisticated. Why yes, yes you can. Enter the Chevron Bean Table Runner.

Create a Textured Table Runner from bean crafting
Bean Craft At It’s Finest

Thank this is easy? Add a small child to the mix…

Supplies

Beans (various colors, split peas, rice, macaroni, whatever works)

Thick Craft Paper (this is the kind you can put down to catch paint splatters)

Pencil/Pen (to draw design)

White PVA Glue (thin lightly with water or you’ll be using a ton)

Patience

For the Chevron

Ruler

A way to mark 45 degree angles (I used a Triangle)


Step 1: Design

Supplies for textured bean runner


Decide on your design and cut out the length of paper you needed. I went with a straight forward chevron and penciled the pattern onto the paper.

Step 2: Distract Your Children

Sooo… If you have kids and there are tiny objects and glue they will want to help… Stop what you are doing cut them off some paper, add glue, beans, then begin your craft project again.

Child doing bean crafts
Don’t ask about the Mardi Gras beads. Its a ‘thing’ in my house.

Then give up and let the kids/cats/dogs/parakeets/slow loris help in the end. Tell me you don’t want a slow loris?

Child helping with bean art
McClain says he is my “Little Helper”. He is my “Best Helper”.

Step 3: Glue beans, and glue beans, and glue beans

The technique matters, because after you put a lot of beans on the project you aren’t going to want to pick it up and shake it like when you are applying glitter. I found putting a thick layer of glue for one color of bean and pressing a single layer of beans into the project worked well. I watered the glue down until it was easy to brush (using an old brush) onto the paper, but not so much that it soaked into the paper. Don’t fill to much space with glue or it will dry before you can get it all filled in.

Allot way more time than you think this will take. Well if you are anal like me and apt to go back and fill in empty spots. Which is my final suggestion. If an area looks bare just dab a bit of glue and press in a few more beans.

Detail of bean gluing process.


Notes

Uh this is pretty straightforward. If it isn’t then feel free to comment or email me for clarification.

Check out my fall table decor to see this bean craft runner in action… Well as actiony as a table runner gets.

Enjoy these articles? Get biweekly updates by joining my mailing list (no spam, no way, no how)

See other great DIY’s, Crafts, & Decor at these link parties: Lambert’s Lately, 52 Mantels, Live Laugh Rowe, Shabby Creek Cottage, The Pin Junkie, DIY Vintage Chic, Today’s Creative BlogC.R.A.F.T, Craft-o-Maniac, Home Coming