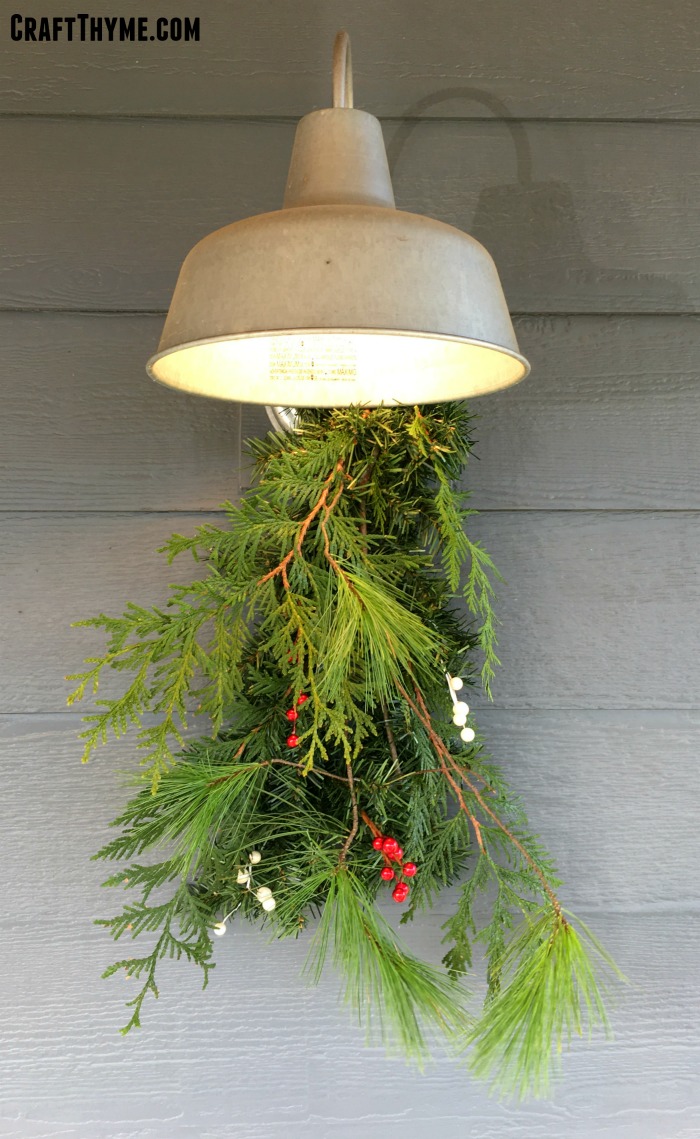
Evergreens are always in style for Christmas time so why not make your own teardrop garland or swags? They add Christmas cheer to doors, mailboxes, and below lights. The following teardrop swag tutorial can be make with artificial or real evergreens. I use a combo of evergreens in the porch light teardrop garlands. For specific tips on handling real evergreen garland you can see my evergreen garland video and written tutorials or my evergreen wreath tutorial. Otherwise read on to learn all about what you will need to make teardrop garland.
The supplies are minimal for making a teardrop garland (affiliate links may follow). The only item you might not be able to buy is a wire coat hanger. Trust me, just ask around and I bet you will find someone that has wire coat hangers in spades. I use them as a base form for the teardrop shape because they are cheap (free) and they already have a built in hook! How freaking nifty!
Let’s Make a Teardrop Garland

Supplies
- Wire Coat Hanger/ Rustic 18 Gauge Wire: You can use the thick wire to make a form too. I link to an Amazon reference but you can easily get this cheaper at a craft store.
- 24 Gauge Floral Wire: My fav because it holds but is easy to work with!
- Wire Cutters: My husband assures me these are also called dykes… Yeah…
- Cheap Rope Garland or live evergreens: I like to borrow the live stuff from the neighbors.
- Floral Picks: If you are going the artificial route I love some frosted floral picks. White pine, cyprus, bittersweet and dried grasses can usually be collected free as you only need a couple of handfuls.
Step 1: Making a Teardrop Swag Form
This is the hardest part of the whole project. Cutting the dang wire hanger! The wire is much thicker than it first appears. I find cursing a bit at it while squeezing the hell out of the wire cutters works well. You can do some additional work with that potty mouth as you straighten the bends our of the hanger to make two downward v-shaped lengths from the hook. That will be the basis of your teardrop garland. I wanted a fuller bottom swag. You can bend the wire wider at the top and then taper at the bottom if you want a more traditional upside down teardrop shape to the swag.

Step 2: Making the Teardrop Base
Take your cheap garland and cut two pieces to the desired length of your teardrop garland. Attach the floral wire right below the hook. You can do some fancy-schmancy knot your you can be like me and just wrap it around a few times till it seems secure. Lay the chopped up garland on the hanger and lightly wrap the wire around it to attach it. Do this to both sides and then fluff out the garland. Don’t worry that it looks a bit hellacious at the moment. I swear it will get better in the next couple of steps.

Step 3: Fill in the Teardrop Shape
Cut another piece of the cheap garland the same length as the other two and lay it in the middle of the two sections. Time to bring those elementary craft skills into play. Remember how to weave? In out. In out. Take the floral wire and kind of weave it in-between all three sections securing the middle. It may look like it is time to panic when making your teardrop as this is not the prettiest step, but again stick with it! After you have all three pieces attached the fun begins.

Step 4: The Finishing Touches
Now that you have the basis for your teardrop garland you are literally going to stuff other items in. Cut up more of your cheap evergreen garland and stick the ends to the back of the teardrop. Stuff in floral picks or real evergreens until the teardrop shape looks full and lush. I like to hang mine at this point and add in some touches. You can wire pine cones, add ribbon, or flock the entire teardrop swag with my homemade flocking recipe.

Making a Teardrop Garland is this simple! They look fabulous swagged below lights but you can easily use them instead of a wreath on the door. Add a decorative bow on top to cover the hook and you are all set! If you have any questions about this tutorial please leave them in the comments below.

Loved this idea and the tutorial ! Awesome. Only thing I would have also like is a good picture of the completed product ! Maybe even hanging on your porch “. Lovely post. Thank you !
Thoroughly enjoy the snarky humor. Thank you :)
Loving your fuller bottomed swag Brianna ;-) and we’re one of those people who have tons of wire hangers lying around. I’m going to have to get my dyke (yikes really) out and start making a few of these. Great tutorial BTW