Posted on Leave a comment

Green Thumbs Up: Your Ultimate June Garden and Homestead To-Do List

Welcome to June, the month where gardens and homesteads are in full swing! As the summer heat begins to ramp up, it’s time to roll up your sleeves and get to work. But don’t worry, we’ve got you covered with our ultimate June garden and homestead to-do list. Whether you’re a seasoned green thumb or just starting out, this list will help you stay on top of all the tasks you need to complete to keep your garden and homestead thriving for USDA zone 6 and zone 7. So grab your tools and let’s get started!

Let’s get started with checklists suitable for  zones 6a, 6b, 7a, and 7b and specially targeted towards the mountainous regions of North Carolina, Tennessee, and Virginia.

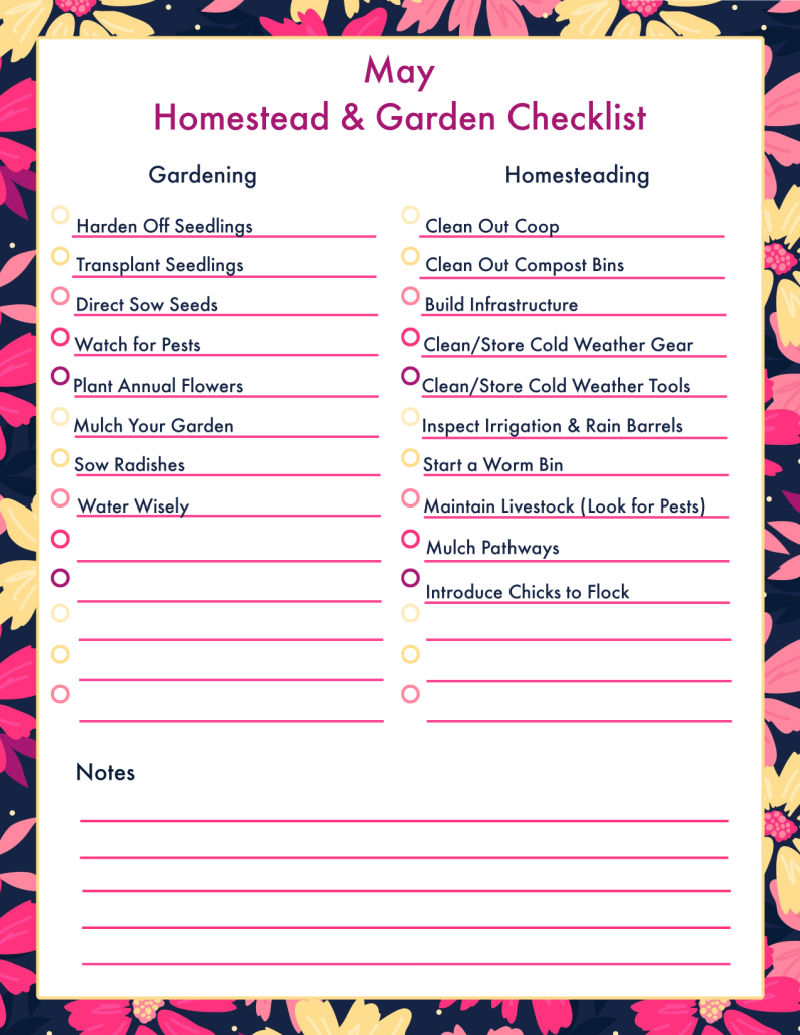
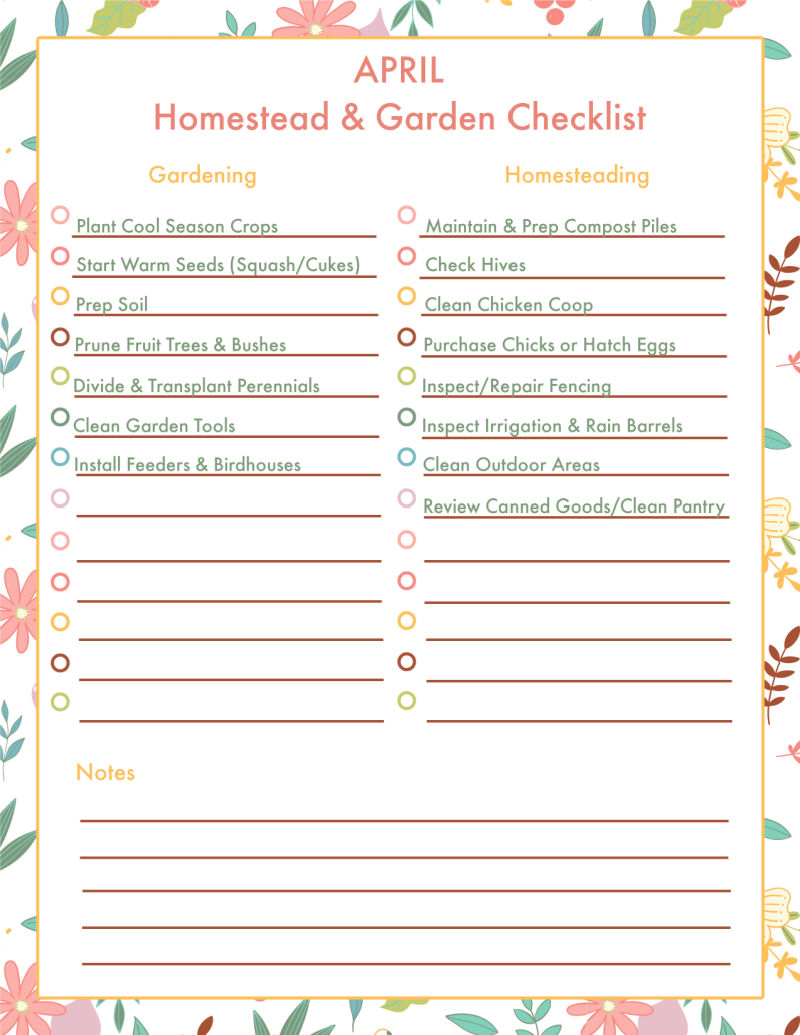
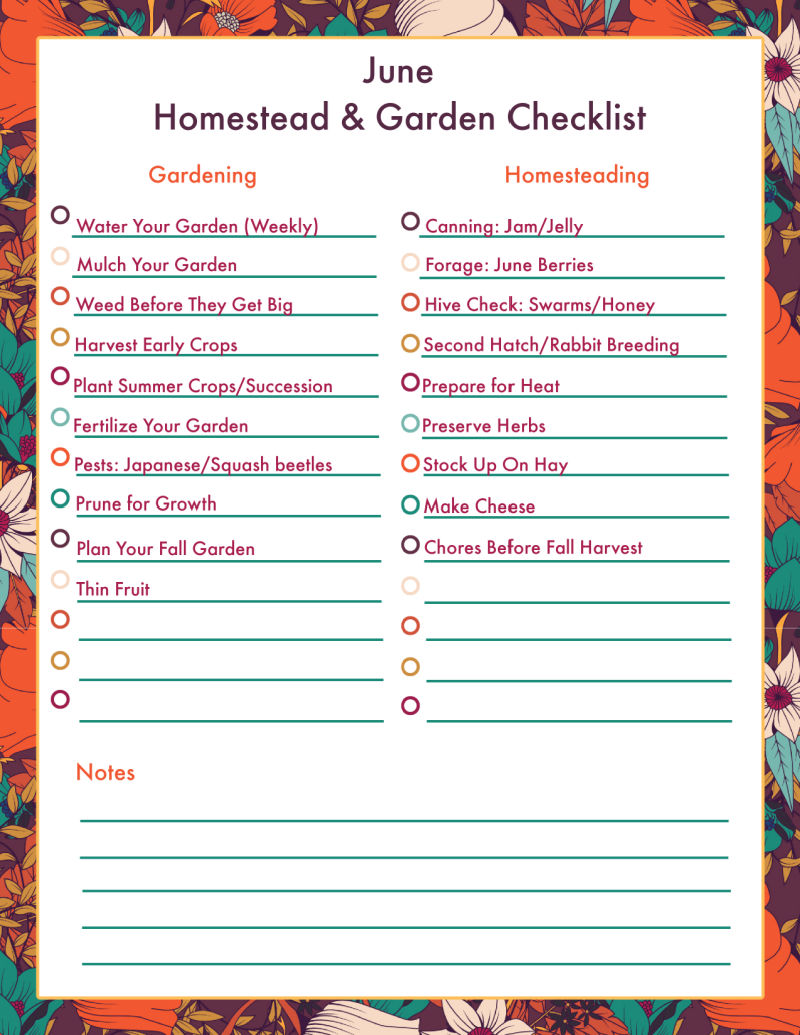
June Urban Homestead and Garden Chore Checklist

Gardening Checklist:

  1. Water your garden – As the weather starts to warm up, make sure to keep your plants hydrated by watering them regularly.  They should have a good root system by now so make sure to not overwater.  A rain gauge can help you monitor for at least 1 inch of rain per week.
  2. Mulch your garden – Mulching can help to conserve moisture in your garden, reduce weed growth, and regulate soil temperature. Consider adding a layer of mulch around your plants in June if you did not do so in May or were waiting for seeds to sprout.
  3. Weed your garden – With the warmer temperatures and increased rainfall, weeds can quickly take over your garden. Stay on top of them by weeding regularly.  See number 2 as a way to really cut down on how much weeding you need to do
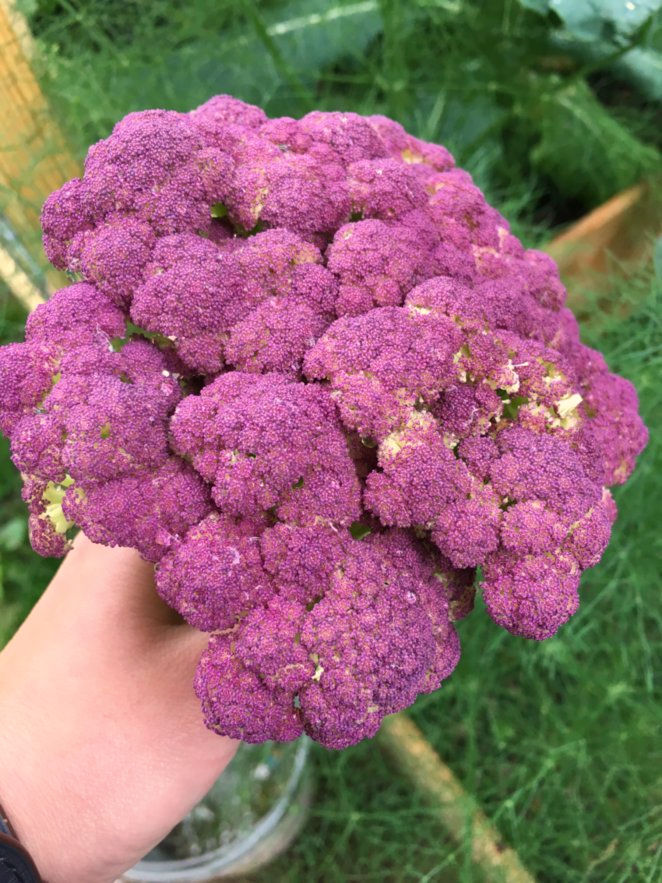
  4. Harvest early crops – Depending on what you’ve planted, some of your early crops may be ready for harvest in June. Be sure to pick them promptly to encourage continued growth.  It also may be too warm for cold weather crops.  Remove lettuces, brassicas, and other crops that are bolting to make room for #5
  5. Plant summer crops – June is a good time to plant heat-loving summer crops like corn, tomatoes, peppers, and squash.  If you already planted once set this is the time to plant more for succession harvest
  6. Fertilize your garden – If you haven’t already done so, apply a balanced fertilizer to your garden to give your plants a boost.  We like a slow release organic fertilizer
  7. Monitor for pests – Keep an eye out for pests like Japanese beetles.  Check for early squash and cucumber beetles before the lay yellow eggs. If you spot any, take action to control them before they cause serious damage.  For organic control you can use Japanese beetle traps (Our chickens also love to eat Japanese beetles).  We walk around with a small jar of alcohol and knock any squash beetles into the alcohol.  Instant death!
  8. Prune your garden – Prune any dead or damaged branches from your trees and shrubs, and deadhead spent blooms from your flowers to encourage more growth.  If you are doing espalier or intensive orcharding make sure the new growth doesn’t get out of hand.
  9. Plan for fall – Believe it or not, June is a good time to start thinking about your fall garden. Consider what you plan to plant (cool-weather crops like broccoli, cauliflower, and Brussels sprouts) and order seeds.  A lot of seeds will start to go on sale in June and July.
  10. Thin Fruit – While peaches are pretty good at thinning themselves (Peach drop) you may need to thin apples, pears, and plums to get larger, quality fruit, and reduce limb strain of smaller trees.

Urban Homestead Checklist:

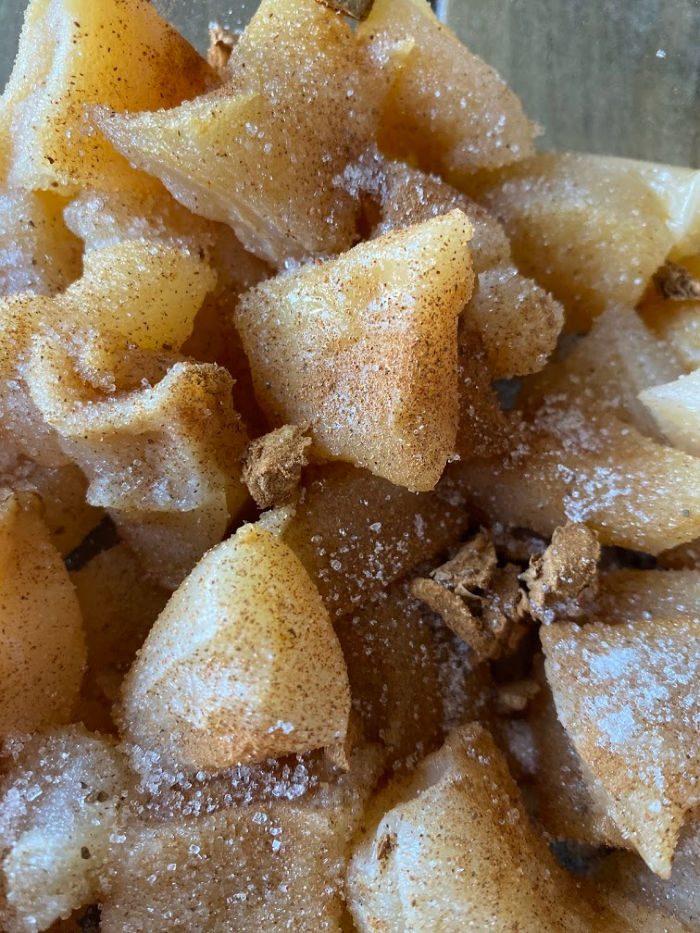
  1. Jam/Jelly Time – Nothing beats homemade berry jams! This June, grab your water bath canner and start preserving those delicious fruits. Not only is it a great way to enjoy your harvest year-round, but it’s also a fun activity to do with friends.  Make an afternoon canning session.
  2. Forage for fruit – Have you tried foraging for Juneberries or Serviceberries yet? They’re in season, and they make for a tasty snack or a unique addition to your homestead recipes. Just be sure to properly identify any wild fruits before eating them!  In other words, if you don’t 100% know what it is do NOT eat it.
  3. Hive Checks – If you’re a beekeeper, now’s the time to check your hives for swarms and honey. Even if you’re not a beekeeper yet, it’s always good to learn about these fascinating creatures and the role they play in our ecosystem. While we aren’t beekeepers (yet) here is a handy guide.
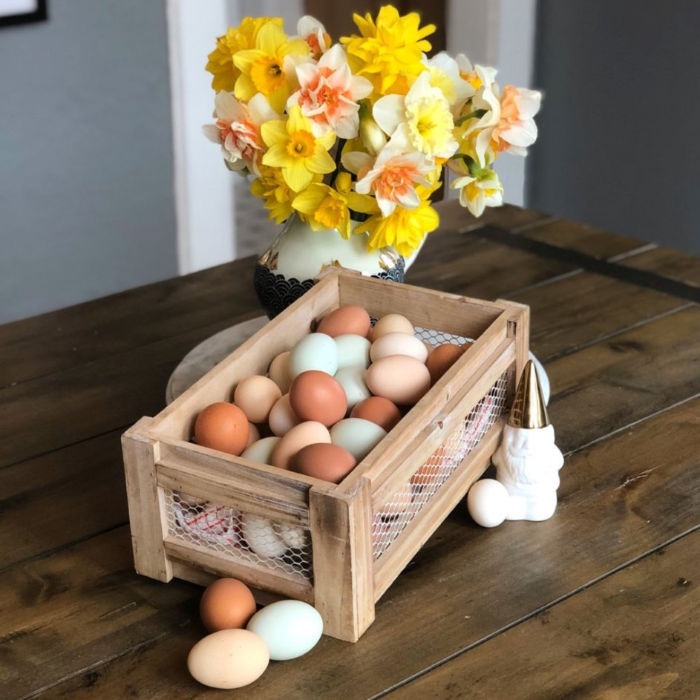
  4. Second Hatch/Breeding – For those who raise quail, rabbits, or chickens for meat, it’s important to plan ahead for the hot weather that’s coming. Start a new hatch or complete rabbit breeding before the summer heat hits, so you can ensure a steady supply of protein for your family.
  5. Prepare for Summer Heat – Make sure all your animals have access to shade and plenty of water during the hot summer months. Consider adding shade cloth to your greenhouses or high tunnels, or installing fans to keep your animals cool and comfortable.  In the mountains, I rarely have to add fans for the animals as they have access to forest and shade, but we absolutely have to add them to the greenhouse.
  6. Preserve Herbs – With cooler weather herbs like cilantro and basil in season, it’s the perfect time to collect and dry them for tea and cooking. You can also freeze your herbs for use throughout the year.
  7. Plan for Fall/Winter – While the summer is in full swing, take some time to plan ahead for the fall and winter months. Stock up on hay and other feed for your animals, and order any necessary supplies in advance. Don’t forget to take advantage of seed sales, too!
  8. Catch up on Chores – With a slower garden month in June, it’s the perfect time to catch up on any homestead chores that may have fallen behind. Mend clothing, build infrastructure, try out a new skill like basket making or leather working, or even brew some beer or make cheese if you have goats in milk!  We have goat envy for sure.
Background floral used with permission from https://www.freepik.com/

Resource List for June

  1. FREE PRINTABLE PDF of the June Homestead and Garden Checklist
  2. Bee Keeping Checklist for June
  3. Infrastructure Updates: Pea Gravel and Timber Stair How-To
  4. ALL the Berries: Check out a list of perennial berries you can forage, plant, and eat, many ripening in June.
  5. Shade Cloth: Here is the 40% version we use for semi-shade tropical plants growing in the greenhouse.  Go with a higher percentage if you are shading animals.

Get ready for summer on your urban homestead with our June to-do list! From making delicious berry jams and foraging for fruit to checking on your hives and planning for fall, we’ve got you covered. Plus, catch up on chores and try your hand at new skills like basket making or leather working. Keep your livestock happy and healthy with shade cloth and cooling methods, and stock up on hay and feed while it’s plentiful. With our tips, you’ll be ready for whatever homesteading adventures come your way!


Posted on Leave a comment

Maximizing Your Homestead: A May To-Do List for Peak Productivity

As spring turns into summer, it’s time to turn your attention to your urban homestead and garden. For those residing in zones 6a, 6b, 7a, and 7b, May marks the start of a busy gardening season. This is THE busy season when it comes to gardening and homesteading with garden, livestock, and general maintenance piling up! With a little planning and elbow grease, you can ensure your homestead and garden are productive and beautiful all season long. From sowing seeds to maintaining your compost pile, there are plenty of essential tasks to tackle this month. In this article, we’ll cover some of the key May garden and urban homestead chores to help you make the most of this exciting time of year.

Let’s start with some gardening and homesteading checklists and then move on to resources to help you get the most out of your urban homestead and garden.  This is a big month, with a big list, don’t get overwhelmed and check off what is applicable to your garden and urban homestead.

May Urban Homestead and Garden Chore Checklist

Gardening Checklist:

  1. Harden off seedlings – Gradually expose indoor seedlings to outdoor conditions over the first two weeks before transplanting. This helps them adjust to the outdoor environment and reduces transplant shock.
  2. Transplant seedlings – By Mother’s Day weekend, it’s typically safe to transplant seedlings outdoors in most regions. Make sure to plant them in nutrient-rich soil and provide adequate water and sunlight.  You may think you can plant before Mother’s Day, but as my Great-Granny always said: ‘No’.
  3. Direct sow seeds – Sow 1/2 to 1/3 of your corn and bean seeds directly into the ground to ensure a succession harvest throughout the summer. Also, consider sowing a second group other succession veggies like beets and carrots.
  4. Watch for pests – Keep an eye out for common garden pests like cabbage worms, aphids, and squash vine borers, which can damage your plants. Consider using natural pest control methods like companion planting, neem oil, or insecticidal soap.
  5. Plant flowers to attract pollinators – Flowers like marigolds, zinnias, and cosmos attract pollinators like bees and butterflies, which help to fertilize your plants and increase yields. Marigolds also help deter pests and make your garden look pretty.
  6. Sow radishes – Sow radish seeds in between your other plants to help fill in empty spaces and deter pests like cucumber beetles. Radishes are fast-growing and can be harvested in as little as 30 days.
  7. Fertilize your plants – May is a good time to fertilize your plants with a slow-release fertilizer to provide them with the necessary nutrients for growth.  You can also top dress with compost as you plant.
  8. Mulch your garden – Apply a layer of mulch around your plants to help retain moisture, suppress weeds, and regulate soil temperature.  I switched to pine straw for my beds.  No weeds (from hay or straw) and according to several agricultural extensions the needles do not significantly acidify your soil! We use a wood mulch on flower beds and pathways that aren’t brick.
  9. Water wisely – As the weather heats up, it’s important to water your plants deeply and infrequently to encourage deep root growth. Consider using a soaker hose or drip irrigation system to conserve water and reduce evaporation.  Seedlings are at their most tender and usually need some additional moisture to establish good root systems.

Urban Homestead Checklist:

  1. Clean out coop – If you didn’t get to this in April give your chickens a fresh start for the new season and make sure they have a clean and healthy environment.
  2. Clean out compost bins – turn and mix your compost to ensure proper decomposition and make room for new materials.  We usually use 90% of our compost when prepping my beds.  This is a great time to clean them out and repair any issues before filling them again throughout the growing months.
  3. Build infrastructure – take advantage of the mild weather and build new trellises, raised beds, or fencing before the summer heat sets in.
  4. Clean bedding and pack away clothes – pack up your winter clothes and bedding to make room for summer items.  This is a wonderful time to line dry blankets and get that fresh spring smell into all your items before packing them away.
  5. Store winter tools – put away snow shovels, sleds, and other winter tools to free up space in your shed or garage.  Don’t be like us and end up with a pile of dirty sleds behind the house in June.
  6. Start a worm bin – create a worm composting bin to help reduce food waste and create nutrient-rich soil for your garden. It will be warm enough to get worms shipped to your house if you don’t have a local supply
  7. Check irrigation systems – If you didn’t get to this in April, inspect and repair any leaks or clogs in your irrigation system before the summer heat sets in.  You will need the irrigation in May or June to get that garden rooted deeply enough to handle smaller droughts of rain.
  8. Mulch Paths- apply a layer of mulch to well used pathways to keep weeds at bay and reduce mud during spring rains.
  9. Start moving chicks outside – Depending on the temperature and when you got your chicks it may be time to start introducing them to the flock.  Once they have enough feathers for warmth we move them to a sectioned off area of the run so they can see the flock for a week or two before learning to free range with the rest of the chickens.
  10. Maintain your livestock – If you have goats, bees, chickens, or other small livestock this is the time to check for mites, deworming, etc.  Pests start coming out of the woodwork this time of year.
See Link Below for a Free Printable PDF version. Background imagery used with permission by https://www.freepik.com/

Resource List for May:

  1. Printable PDF of this Checklist
  2. Use our Seed Starting Calculator to ALSO plan out your Succession Planting 
  3. Looking for a new Infrastructure Project?  We have Composting Fence v1 and Composting Fence v2 OR a nifty goat wire trellis tutorial
  4. Here is a lovely article from The Living Farm on how to harden off your seedlings in 7 days or less!

May is a busy time for urban homesteaders and gardeners, but with a little planning and effort, you can ensure a bountiful harvest and a healthy, thriving homestead. Use this checklist and resource list to help guide your efforts and make the most of this exciting time of year. Happy gardening and homesteading!

Posted on Leave a comment

Spring into Action: Essential April Garden Chores for a Blooming Season

As spring settles in, it’s time to turn your attention to your urban homestead and garden. For those residing in zones 6a, 6b, 7a, and 7b, April marks the start of a busy gardening season. With a little planning and elbow grease, you can ensure your homestead and garden are productive and beautiful all season long. From sowing seeds to maintaining your compost pile, there are plenty of essential tasks to tackle this month. In this article, we’ll cover some of the key April garden and urban homestead chores to help you make the most of this exciting time of year.

Let’s start with some gardening and homesteading checklists and then move on to resources to help you get the most out of your urban homestead and garden.

April Urban Homestead and Garden Chore Checklist

Gardening Checklist:

  1. Prepare your soil – Remove any weeds and debris from your garden beds and add a layer of compost or organic matter to improve soil health.  If you have left last years seeds and leaves to sustain wildlife now is the time to clean it all out
  2. Plant cool-season crops – April is the perfect time to sow seeds for cool-season vegetables such as peas, lettuce, and spinach.  If you live in the mountains consider row covers to assist with late frosts.  No matter how warm it gets and how much you want to plant those tomatoes outside… DON’T.  You will regret it.
  3. Start fast growing warm weather crops – If you have managed to hold out this long, it is finally time to start your fast growing warm-weather vegetables like squash and cucumbers.  They only need 4-6 weeks to be ready to plant out (Just in time for Mother’s Day!)
  4. Prune fruit trees and shrubs – Prune any dead or damaged branches from your fruit trees and shrubs to promote healthy growth and a bountiful harvest. Be careful not to prune out limbs or remove plants that haven’t leafed out yet.  Some species like figs and paw paws leaf out much later.
  5. Divide and transplant perennials – Divide and transplant overcrowded perennial plants like day lilies, hostas, and irises.
  6. Clean garden tools – Clean and sharpen garden tools to ensure they’re ready for use. If you are anything like us, its also a good time to sort out that piled up garden shed or greenhouse.
  7. Install birdhouses and feeders – Set up birdhouses and feeders to attract beneficial birds to your garden.

Urban Homestead Checklist:

  1. Maintain your compost pile – Keep your compost pile well-maintained by adding a balance of “green” (nitrogen-rich) and “brown” (carbon-rich) materials and turning it regularly to ensure proper decomposition.  If it has been sitting all winter this is a great time to get it stirred back up and finished off in time for planting in May.
  2. Check on your bees – If you’re keeping bees, now is the time to check on your hive and make sure your bees have enough food and space to thrive.  We aren’t bee keepers but we suggest taking a class from Oxx Beekeeping (often at Organic Growers School) and reading more here.
  3. Clean your coop – If you’re raising chickens or quail, be sure to clean out their coop and nesting boxes to keep them healthy and happy.  We like to take down window covers, do a full clean out of the run/coop, and inspect for any pests at the end of April to give them chickens and quail a nice healthy place for the summer months.
  4. Purchase and Brood Chicks or Hatching Eggs – This is the time that eggs and chicks are plentiful.  You will find chicks for sale at local feed and seed stores, on craigslist, and on mail order.  Its a little late to order chicks, but you can find some hatcheries that ship throughout May OR start prepping your list for fall orders. Hatching eggs can be found on facebook groups, craigslist, and Ebay, just note that hatch rates are lower after eggs have been bounced through the mail.
  5. Inspect and Repair Fencing – This is the time of year where your small livestock want to get out and graze and your predators are waking up and looking for food.  Make sure fencing is secure and undamaged as all animals start roaming further from dens and coops.
  6. Inspect irrigation and Rain Barrels – Review your irrigation/collection system and make any necessary repairs or adjustments.  Specifically look for freeze/thaw damage at taps and connectors
  7. Clean Tools and Outdoor Areas – It will finally be warm enough to start really gardening, lounging outside, and making use of your outdoor areas.  Prep for warmer weather by cleaning hammocks, outdoor furniture, and tools.  It will make the most of warm days without giving you the latitude to plant those warm weather starts too early!
  8. Clean out jars and review the pantry – Make plans for what you want to preserve this year, what you ran out of, and what canned goods you still have left over.  Adjust your planting plans accordingly so you don’t end up with those 15 extra cans of pickled okra this year.
See Link Below for a Free Printable PDF version. Background imagery used with permission by https://www.freepik.com/

Resource List for April

  1. PRINTABLE PDF of This Checklist
  2. When to plant: Reaganskopp Planting Calculator: See when to start seeds indoors, outdoors, and for succession planting.  All you need is to know your average last frost date
  3. Which Chickens to Get: Use our years of chicken owning experience to pick out the perfect chicken breeds for an Urban Homestead.
  4. How to Use Incubators: We have a few guides on our YouTube Channel
  5. Garden Tool Maintenance: We are using this great guide from EcoGardener to get all our tools back in shape this year.

April is a busy month for urban homesteaders and gardeners in zones 6a, 6b, 7a, and 7b. From preparing soil for planting to starting seedlings indoors, there are plenty of tasks to tackle to ensure a successful growing season. Other essential chores include planting cool-season crops, mulching garden beds, watering plants, and harvesting early crops. It’s also important to monitor for pests, prune fruit trees, and maintain compost piles and garden tools. With proper planning and care, you can set up your urban homestead for success and enjoy the bounties of a thriving garden throughout the season.

Remember, gardening and homesteading is a process and it’s important to take it one step at a time. Don’t feel overwhelmed by this list – just focus on the tasks that are most important for your garden and take the time to enjoy the process. With a little effort and attention, you can create a beautiful and productive garden that will bring you joy throughout the growing season.

Posted on 8 Comments

How to Make Kombucha Scoby Gummy Candies

Marinading scoby to make gummies from kombucha

If you brew Kombucha you might be wondering “What the hell am I supposed to do with all these Scoby’s?” (I’m sure everyone is thinking ‘Scoby Gummy?’) I mean, each batch makes a new scoby and after 4 or 5 of the gelatinous masses you may be wondering what you can do with them. Because let’s face it, if you are making Kombucha you might be a little into not throwing everything away. In comes a use for the Kombucha Scoby! You can eat them. Even better, you can make kombucha scoby gummy candy.

I’ll let you digest that for a moment. (get it?)

If you want to skip down below I’ll walk you through how to make a sweet cinnamon, ginger scoby gummy. But if you are along for this insane ride, then read on:

Cross section of a kombucha scoby that is being prepared to make scoby gummy candy
We are going to make an edible food product out of this Kombucha gummy?

I had too many scoby (scobies? scoobies?) cluttering up my Kombucha jar already when, Adam, came home from work one day and said: “I ate a kombucha gummy at work today”. For those of you that know, Adam, I swear this is true. Like on my grave, this actually happened! The exchange went like this:

Me: You ate what?

Adam: A kombucha gummy one of my employees made.

Me: I’m sorry, I don’t think I heard you correctly. What was it made out of?

Adam: You heard me, I ate a gummy made out of that gross thing that grows on your kombucha

Me: *blinking a few times as I try to reconcile the man I know, who wouldn’t take an acidophilus pill after the stomach flu, but suddenly ate a random kombucha scoby gummy at work*

Adam: It was pretty good. He says he just dips them in honey and to cut them with scissors cause they are hard to cut.

The Adam went on about his business and I started googling things like “Kombucha Gummy”, “Can I eat a Scoby”, and “Are Scoby edible”. At that point lunch break was over and I gave Adam firm instructions to figure out how they were made. He did ask but came back with vague instructions like “Dry them” and “Dip in sweetener”. Sooooo not like a recipe and then I promptly forgot my plans to make kombucha scoby candy.

Until now! Hence:

How to Make Kombucha Scoby Gummies aka Scoby Candy

Kombucha scoby that is being prepped for cinnamon ginger scoby gummies

Step 1: Regret Your Decision to Make Kombucha Gummies

No, seriously. Have you really spent any time with your scoby? I desperately want to be an earthy hippy, but damn, scoby are nasty. I always try to transfer my scoby over with the least amount of thought and attention, lest I forever am unable to drink kombucha.

Learning how to make a kombucha scoby gummy is going to get you up and personal with your kombucha slime plug. And folks, it ain’t pretty. You have been warned.

  1. Get a bunch of Kombucha Scoby
  2. Cut them into 1 inch chunks

There are so many cringe factors during this process I began to question my life choices. I finally equated it to cutting raw chicken fat in my brain. FYI, That didn’t help.

Use a sharp knife, use scissors, pull it apart. I don’t care how you do it. But get them into smaller pieces.

Use scisors to cut a kombucha scoby for making scoby gummy candy
Soo… Yum… Yeah scoby does not generally equal candy in my mind….

Step 2: If You Actually Want to Go on After Step 1: Marinade

So now that you have this chunked pile of rubbery scoby you will need to sweeten it. (Am I being too real about the process? Let me know in the comments!) Scoby supposedly doesn’t taste like hardly anything by itself. It would take a large sum of money for me to verify this myself. If you want to send me the money I’ll see about tasting a plain kombucha scoby, but otherwise I was content to let the internet be my guide.

I treated my scoby gummies like any other pickling or sugaring process. I layered the scoby gummies in a dish and then covered them with a layer of sugar, cinnamon, and chopped ginger root. Don’t be picky here folks. I found some shriveled ginger on the counter and threw in sugar and cinnamon till it looked “okay”. Then I did layer after layer until it was all covered.

Mix cinnamon powder, ginger, and sugar to marinade scoby chunks for sweet gummies

TLDR:

  • Cinnamon Powder
  • Chunks o’ ginger root
  • Sugar
  • Scoby

Layer all ingredients and marinate overnight. Stir occasionally.

Making a dry rub of cinnamon, sugar, and ginger to marinate the scoby in overnight
I mean it looks a little more appetizing with a layer of cinnamon and sugar. Maybe…

Step 3: Oh hell, you are really going to see Kombucha Gummies through

Now that you have your bowl of awesome kombucha scoby gummy goodness marinated, its time to get it in gummy form. This part requires cooking or drying. I opted for marinating and drying, because if I have gone this far I am going to go hole hog and try to preserve the most probiotic qualities of the Kombucha Scoby. HOWEVER, if you too, severely questioned your life choices in step 1 but don’t want to throw away the bowl of scoby gummy goodness you made in step 2? Then you can use this cooked Scoby Candy tutorial I found. Otherwise, if you want to go balls out on this whole process continue on. I’m a lady balls out kind of girl:

  • Prep a cookie sheet or dehydrator rack with parchment paper.
Prepping drying racks for kombucha scoby with parchement paper
I just cut out a piece to fit slightly inside the rack and leave holes for air flow on the sides.

The Scoby is wet… Like really wet. So I left air circulation slits on both sides and just lined the trays down the middle. If you are using an oven go with 110 degrees for 48 hours. But dehydrate these puppies until they are firm and rubbery, but not brittle.

Prepping dehydrator racks with marinated scoby
Make sure to leave space around each one as they will stick together as they dry.

Why? Because you have a gelatinous mass covered in sticky sugar… You are going to need to get that puppy of the rack somehow. I have this AMAZEBALLS dehydrator I found at a yard sale. If you ever liked late 80’s early 90’s infomercials then you too will covet my original Ronco Food Dehydrator. Covet away.

Dried cinnamon ginger Kombucha Scoby Gummy
They come out looking much like dried fruit. I wonder if you could use them as such in recipes?

Step 4: Make Scoby Gummy Candies Visually Appear Like Something You Would Eat

Well, we have come this far on our Kombucha Scoby Gummy adventure. And while they look more like some type of holisitic, natural gummy (read: Dried Fruit) when dried I still think they need fancying up. Aka, made to look like a candy.

Again this is pretty simplistic:

  • Powdered Sugar
  • Cinnamon Powder

I mixed some together then dusted the pieces for a bit of sweetness and to keep them from sticking together.

Cinnamon & Ginger Kombucha Scoby Gummies finished with a light dusting of powdered sugar.

Step 5: Taste one. I dare you.

Welp, the big event: Tasting one of these ‘things’ you made. Because we aren’t wusses up in here, and we made this shit, so we will taste it. (Say this with me)

SURPRISE these are actually edible and good!

Also a surprise, a few of my treats got some real ginger fire! I’ll likely use ginger powder next time to even the distribution.

I’m treating mine like other dehydrated foods and assuming they have a limited shelf life (couple O’ months at best in non-hot, non-humid environments). I doubt they will make it that long, but if they do, I plan to wrap them individually in some wax paper twists and freeze or refrigerate.

10/10 would make kombucha scoby gummies while questioning my life choices. Glad I finally found a use for all these scoby!

Please let me know if you try this and any other uses you have for those extra Scoby!

How to make kombucha scoby gummies.  These natural gummy candies are simple to make and use all those extra kombucha scoby you have laying around.
Posted on 3 Comments

50+ Ways to Make Money on an Urban Homestead

We are excited to announce that we plan to take Craft Thyme and the Reaganskopp Homestead from a hobby to a money making side business over the next year. In theory, we are starting what I have dubbed: the Urban Homestead Side Hustle. I expect to be throwing a lot of stuff against the wall to see what sticks over the next year and might actually make money. Though it is my expectation that none of the trials will be ‘profitable’ over the first year. This is the perfect time to start a homestead side hustle, while we are employed full time and have income to use on capital expenditures.

If you want to skip the plan and scroll down I have compiled a HUUUUUGGGEEE list of ways a small homestead might make some side money. Otherwise read on to our plans.

Plans to Make Money on Our Urban Homestead

Right now we are bouncing ideas on how to make money on our urban homestead:

  1. Chicken Egg sales
  2. Quail (Meat & eggs)
  3. Herb starts and potted herbs
  4. Chicken coop dried herbs
  5. Honor system vegetable sales
  6. Online classes, guides, and utilities for purchase
  7. In person or online permaculture & gardening consultations
  8. Affiliate and advertising revenue on the website and YouTube (We will always be transparent about income made from this source. Right now we do NOT do sponsored posts, so, any reviews of products are just because we like them. Speaking of! Some of the below links may be affiliate links)
Urban homestead eggs for sale with daffodils.  Multiple colors of blue, green, brown, tan and white eggs.

Why We Won’t Make Money

Why would start a venture that we don’t think will make money? For one major reason: Capital Expenditures. While I can probably start herbs and make a profit after seed, dirt, and pots are accounted for, it will take me forever to make back the investment we are considering for a small greenhouse. And that is okay by me. We work full time outside of the home so that we can afford some of the luxuries it might take other, more full time homesteaders awhile to afford. There isn’t one right way to start a business! This is just how we plan to do it. Slow and steady is fine too.

Why are You Posting About Money?

I grew up in the South and talking about money sure is tacky, but here is the deal. I see a lot of guides about how to make money for homesteaders, multilevel marketing, and other home business. It breaks my heart because most of it just does NOT give you the truth about what it takes to be successful. I used to teach business plan classes at the local community college. I have seen what it takes to both plan and grow small businesses. There are just so many expenses and other items (licenses, insurance, etc) that people do not plan on. These eat into your bottom dollar and often people find themselves losing way more money on their side hustle than they are making. Statistically if your business is making a profit by year 2 or 3 you are doing really good! A break even by year 4 or 5 is much more likely. You have to be READY to not make money, in order to make money.

We are hoping that our transparency in costs can help save our readers a lot of monetary grief in the future. Plus, it may keep us a little more accountable… Ask us how much we are in on an incubator and how none of our eggs have hatched *le sigh*.

Okay, okay, now that we have scared you here is what you came for:

50+ Ways to Make Money on Your Small Homestead aka Urban Homestead Side Hustle

I lied, one more note. These are geared to small homesteads, especially urban ones with access to lots of free yard sales and markets. I am sure some of these would work for larger farms and rural areas, but frankly, I wanted to find things that might work for me as well as my readers ;). That’s why we are focusing on the urban homestead side hustle. Enjoy!

Small Livestock

  1. Chicken Egg Sales: In North Carolina you can sell 30 dozen eggs a week without a license. 30 DOZEN! Just have to follow some easy rules.
  2. Chick Sales: Buy in bulk or hatch your own. May want to go for your NPIP certification
  3. Feather Sales: Check your local and international laws. Some places do not allow sales of untreated feathers. You can dye and decorate as well.
  4. Quail Egg Sales
  5. Quail meat sales
  6. Duck egg sales
  7. Hatching Eggs: If a rooster is allowed or you want to try a rooster collar. Ebay has tons of examples of ‘wanted’ breeds. May want to go for you NPIP certification.
  8. Worms for compost sale: Have you seen how much 600 worms cost on Amazon?! Also, who is tasked with counting out 600 worms…
  9. Mealworms for sale: Apparently, you just need oatmeal and a strong stomach . Not sure why, but these creep me out way more than compost worms.
  10. Bees for pollinating farms: There is literally nothing you can’t find on amazon…
  11. Bees for honey sales: Extractors can be rented or shared with local beekeeping clubs
  12. Rabbits for fur or pelts: Angora Rabbits for example. Keep in mind the best price take finishing fur products so you may need to partner with fiber specialists or tanners
  13. Rabbits for meat: If you have a local meat market or slow food area interest in rabbit meat is growing

Plants

  1. Veggie Starts: Heirlooms (tomatoes especially) and odd colors do particularly well in my area.
  2. Herb Starts
  3. Small Nursery: Grafting takes practice but one tree can provide tons of grafts
  4. Flower or other plant starts: I have seen research that plants with even one flower sell better than other plants at markets. We have a local grower who rents a green house and only does perennial plant sales. His are fabulous!
  5. Microgreens
  6. Topiary: Pretty round boxwoods in vintage pots are always desirable
  7. Mushrooms: Especially good for shady or north facing lots
  8. Mushroom logs: For others to grow their own mushrooms
  9. Fresh cut flowers: Dahlias grow back year after year (in some places you may have to lift the tubers) and make great cut flowers. They can be grown in a small space and staked.
  10. Hoop or hot house vegetables: Offering local greens and veggies when not in season can be a specialty if you live in a slow food market.
Bare root farkle berry and yellow root
Yes, this is me, happy to buy sticks! I mean bare root nursery plants.

Crafts

I am focusing on crafts that take a little bit of learning and equipment. If you have specialized knowledge such as fine woodworking or welding skills then focus on those first! These can be very lucrative ways to make money on a small urban homestead. Especially if you have a lot of craft fairs and craft oriented events in your area.

  1. Sew Clothing: Especially upcycled & refab clothing
  2. Alterations: My mom did this when I was a kid. Not her favorite activity, but it was side money.
  3. Sew items: Ask me how much my egg apron cost? (Spoiler: Much cheaper at Southern States) I also need pot holders, tool covers, tea pot warmers, hand towels, etc
  4. Leather belts & bags: Burned or embossed leather
  5. Basic Stained Glass: Our community college teaches basic courses and even focuses on easy on items that sell well
  6. Hand veggie prints: I saw some beautiful flour sack towels someone made by cutting shapes in potatoes and using them as prints
  7. Linoleum cut prints: Starter kits are very affordable and if you mount them to wood you can sell them as custom stamps
  8. Silk screening: This one takes a bit more investment. I have a degree in art with a concentration print making and sculpture (don’t ask, I don’t use it). Once you learn it you can churn out prints, clothes, etc.
  9. Crochet or Knitting: Bless you if you have the patience for this
  10. Cross stitch or embroidery: Double bless you for having patience with this. Look at alternative embroidery with funny sayings or different materials such as ribbon embroidery (the only one I have patience for)
  11. Handmade soaps, lotions, and other cosmetics: Even better if you have your own beeswax
Collecting eggs in an egg apron.  Great craft to make and sell on your urban homestead.
I never knew I needed an egg collection apron, until I got one!

Food

Check your local laws, people! Technically, you aren’t supposed to do provide a lot of food products in the State of North Carolina without a commercial kitchen. Even something as simple as having a pet in the home can disqualify you. I know plenty of people who do not follow that law, but you open yourself up to liability if you don’t. That being said, there are commercial kitchen times for rent at local community colleges and start up incubators in Western North Carolina. Your state may have different laws, but be compliant. It may take more time but probably less heartache and money in the long run. Plus you want your urban homestead side hustle to be compliant and safe! Right?!

  1. Jams & Jellies
  2. Breads: Think outside the box; crackers, pretzels, buns
  3. Cakes & cookies: Sweets with alternatives; gluten free, stevia/honey sweeteners, vegan
  4. Kombucha or kefir
  5. Fermented or pickled veggies: Pickled ones marketed for cocktails are always fun.
  6. Other Canned Goods: Please, please make sure you know when to water bath and when to pressure can. Killing people or making them explosively puke is not an ideal way to start a business.
  7. Dried Herbs: Teas, coop & home herbs for cleaning and scent, cooking
  8. Dried Spices or spice mixes: Now you have a use for the 1,000 hot peppers you dried.
  9. Small fruits: Berries, grapes, and small orchard fruits from heirloom varieties sell well in markets where these products can’t ship well to groceries
  10. Sell fresh vegetables & herbs
Yummy purple cauliflower.  Bright colored and heirloom vegetables are great ways to earn money on your urban homestead side hustle
Even the kids were willing to try this pretty purple cauliflower! Imagine how it would look at the farmers market.

Other

  1. Sell compost: This one is tricky to get enough green matter but local markets and coffee shops may provide items for free
  2. Sell vintage or fixed up finds: Homesteaders are great at recycling, fixing, and finding deals.
  3. Repair items: If you have the knack I know a man who repairs lawn mowers. Just lawnmowers. In his shed in Canton, NC. He is busy all summer long.
  4. Teach classes: Planting, foraging, animal husbandry, crafts, canning. Community colleges are often looking for continuing ED teachers and local nurseries and homestead stores often will allow you to offer classes or hire teachers.
  5. Teach online courses: Free platforms and plugins are available
  6. Website: Advertising is hard to make money from unless you have a lot of views, but you can make some tidy pocket money with affiliate sales
  7. Online products: Downloadable canning labels, pdf guides, ebooks
  8. Homestead Tours/Workshops: On site classes in butchering, canning, and other homestead skills are popular. Our local organic growers school teaches everything from on-farm poultry classes to life skills such as starting a fire from scratch
  9. Build custom chicken coops or plans: This takes a bit more skill but we often have people ask for plans for our custom coops. We also saw an old chicken coop we built fetch $400 on the local market when sold by the people who purchased our old home.
  10. Consulting or Design Services: I recently completed my permaculture design certification, and this does require an investment in time and money, but if you have a built reputation you may not need to be certified. I am just starting to offer these types of services and wanted to go the extra mile.
  11. Air BNB: Or other stay location service. People are interested in agrotourism and will look for camping sites and rooms on farms. Especially if you live in a tourist destination city. Be careful, our city has strict laws about who can and cannot rent out space on their property.

What other things can we add to this list?! Help us add more ideas to our urban homestead side hustle. Please place them in the comments below and we will get them added so everyone can make money with their small homestead.

50+ ways to make money on an urban homestead