Pea gravel stairs? Timber stairs? Outdoor garden stairs? We really aren’t exactly sure what to call the new outdoor staircase that we built in our tiered raised garden beds, but we figured we had better get a ‘how to build timber and pea gravel staircase’ article up pretty quick after posting a picture on our Facebook page. People started asking! Which is kind of a big deal for a tutorial here at Craft Thyme. It seems kind of funny because we almost did not go to the trouble to build these timber stairs. We had been mulling over just using pre-fab risers when Adam got a nice Lowes gift card for his birthday (Thank you In-Laws!). With that little extra bump we decided to go all out and make, what I consider, really fabulous timber and pea gravel stairs. Of course this tutorial is for just one of three staircases we will end up building. On to the tutorial on building: pea gravel, timber, outdoor, (insert name), really freaking awesome stairs!
Building Fabulous Outdoor Timber and Pea Gravel Stairs
Below are directions on how to build four 12″ deep and 3′ wide stairs that rise around 3′ in height. There are a lot of rise over run calculators on the web you can use to figure out a different installation. Just remember that dimensional lumber is never the exact dimensions. 6″ was closer to 5.75″! Measure your wood! Also affiliate links may follow.

Supplies to Make A Small Outdoor Staircase
30′ – 4″X 6″ Copper Treated Timbers (You can read about our thoughts on copper treated wood in the garden)
8- 8 Inch Spike Nail
6- 10 Inch Spike Nail
Pea Gravel (Or some other pretty filler)
Landscaping Fabric (Optional)
Useful Tools
Saw (Our miter saw is one of my absolute favorite powertools)
Tape Measure
Small Sledge Hammer or Hammer
Small Level
Mattock (Also known as my favorite digging tool ever)
Shovel
Heavy Duty Stapler (Optional)

Step 1: Dig and Sweat
We will save you the details of this part, but suffice to say you are going to need to dig. A lot… We have some pretty nice topsoil on our property but after a certain point we have hard red clay, roots, and rocks. So many roots and rocks… Anyway, we took turns removing the dirt far back enough to set the first stair. We cut in the sides of the soil just wide enough to fit the legs of the ‘U’ shaped stairs. Trust me you don’t want to dig anymore than necessary.
You are going to be building these stairs from the bottom up. So, plan to leave a little mound of dirt that will go through the center of your steps up to the top. Less dirt removal = less dirt to return to each step AND less digging!
Step 2: Is Actually Step 1
The second step is to build the first step! You are going to cut your timbers and form a ‘U’ shape. First cut your front timber the width of your opening. In our case it was slightly under 36″. Then cut two timbers to make the legs of the ‘U’. We opted to not place the timbers the entire way to the back of the wall. We did this for two reasons. First we have (as mentioned in the digging/sweating part) hard packed clay. This dirt is S.O.L.I.D. and digging it out is a beotch. Secondly, since the dirt is so stable we opted to save timber length. We opted to go 3′ back on the legs. We figured this would give us the stability needed and save us an extra 2′ on timbers(and digging!).
After cutting the timbers you are going to need to make your ‘U’. We pre-assembled ours and slid it into place. How did we assemble?

Use the long width of your board (5.5″) side to make the rise of your stair. Place one of the 3′ legs behind it and hammer your 8″ spike right down the center. We had concerns about the wood splitting and considered pre-drilling a pilot hole. Of course being the way we are, we opted to just hammer away. And by we, I mean Adam. Those spikes take some real force to get into the wood. My job was to hold the wood and close my eyes so that I wouldn’t flinch every time he hammered in the spike. Want to talk about a trust-fall of marriage proportions. Will you hold a piece of wood, while your significant other hammers in a large metal spike with a small sledge hammer, by your hands and face? Yeah… Complete this same set of shenanigans on the other leg and then slide the first stair into place.

Step 2.5: Leveling the Step
While this is kinda part of the above step it is super important to get the first step in level and firm. All other stairs are going to be built off of this one so you need to make certain you have this one right. As you can see in the photos above we couldn’t find our ‘not 18ft long level’ so we ended up using a post level. It worked fine, but it probably would have been a lot easier with a 1 foot to 18 inch level. If you look closely at the bottom stair you will see that it appears to be floating. This is because we have several shims under it to make certain the step is nice a straight. We plan to go and back fill the step once we have made the path in front of it level as well. So much leveling…
Step 3: Making Your Stairway to Heaven Or the Road
The next parts of the process are very similar to step 1. You will make a second ‘U’ shape with the timbers. Simply make the arms of the ‘U’ two feet instead of three. Place it directly on top of the first stair and set it back 12 inches. You are going to want a nice 12 inches of clearance for those of the larger foot variety. I imagine that might not be deep enough for some gargantuan feet but it worked well enough for our family. Once you have your stair in place make sure it is level. Shim if necessary! Picking out straight timbers in the store makes this process a lot easier. I might occasionally yawn and roll my eyes as Adam carefully stares at each board, but in situations like these, a nice straight beam makes for a much faster installation.

Once you have the stair in place it is time to drive in another spike. It is questionable as to whether this step is necessary but we wanted to make very sure this staircase wasn’t going anywhere. Plus I kinda liked the industrial look of the spikes. Just make sure to hammer your spike inside the 12 inch range. Otherwise you are going to have a wobbly step when you put the next level on. As an alternative, if you did not want to see the spike you could pre-drill a hole to countersink the head of the spike. In case you think I was making up the muscle strength needed to drive in a spike if you do not drill a pilot hole I made a tiny video! If you are upper-arm strength challenged (me) you are going to want to drill first then hammer.
Step 4: More of the Same
Continue the same process as step 3. We made the next tier have arms that were also two feet to tie them into the dirt better and give a good base for the last step that only had 12 inch arms. Our particular installation was constrained by the city road and curb so the wooden arms of each ‘U’ could only go back so far for stability. Because of this we did tie in a few hidden screws to the raised beds on either sides just to make sure that the hundreds of times the kids run up and down the stairs they never pull away from the curb. It really seemed to me that, if you have the ability to put in longer wooden arms and bury them in the dirt you wouldn’t need to worry about these stairs going anywhere.

Step 5: Styling and Profiling
After all the steps on your pea gravel and timber staircase are in place the next part is super easy! Take any dirt you have and pack it firmly into each step, while trying to get the dirt semi level. We packed the dirt 2-3 inches below the top of each step. You could pack more but I have this huge deal with landscaping fabric… I loathe the stuff and did not want to see it, but I also wanted a good permeable weed barrier underneath my pea gravel. So I needed to leave enough space to get a good thick coat of rock, but not so much that we were buying 50 bags of rock to fill up each step.
To insure the horribleness that is landscaping fabric was trapped forever I made sure to staple it to the inside of the staircase and bury the backside underneath each stair. This is optional as you could just fill the stairs, but I really wanted to try to cut down on weeds and also how much rock sunk into the dirt.
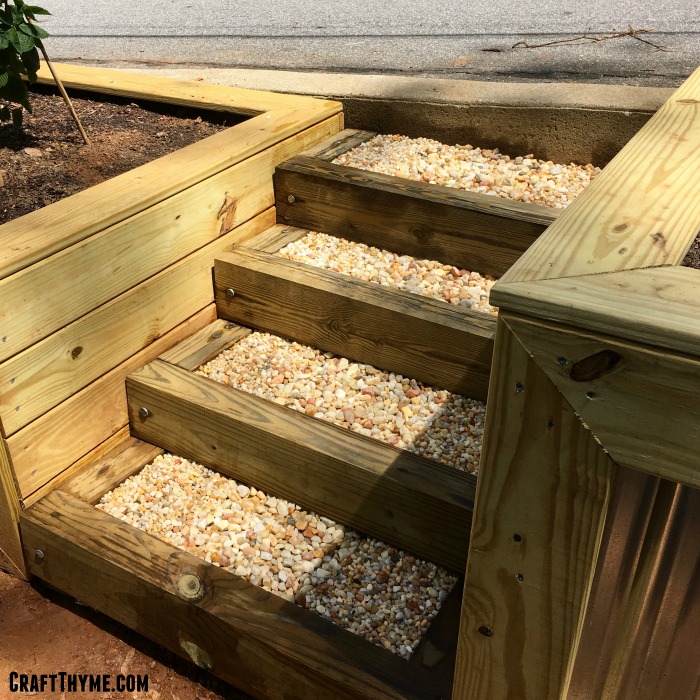
After that it is simply a case of filling in your steps! We used a mix of two sizes of pea gravel. As you can see there is a larger gravel in the middle and smaller at the edges. Why? Cause we think it looks cool. I think it would also look cool with a black river stone, mulch, flagstones and pea gravel, crushed marble, bricks, you name it! There are a lot of options for styling these outdoor timber stairs.

You will be seeing more of these type of stairs on Instagram as we have two more of these outdoor staircases to build! Follow us there to get more behind the scenes construction shots as we build two more tiers of raised beds!


[…] Infrastructure Updates: Pea Gravel and Timber Stair How-To […]
[…] offer a nice aesthetic and provide security when entering and exiting the slope. This guide on how to make timber and pea gravel stairs will make it easier for you to do it […]
Nice tool, i also did such type of work by using this type of tools. That’s was the really nice experience and that tool from the calcu
and help me a lot in such a way of measurement.
How do you anchor the steps to each other? Or to the ground? Did you use rebar?
We did list the second spike to secure the stairs to each other but we did not use any other form of reinforcement. We buried them back far enough and have clay soils. Those two combined did not require any other connection to the ground. I believe they have been in ground over three years now. Still nice, firm, and level since then.
10 inch galvanized spikes. Pre-drill the holes
Yeah we figured out easier ways over the years so good idea for others! But this method does work, if you have the patience and muscle for it :)
three years later. How is it doing without a french drain at the bottom?
Absolutely rock solid, still. Kids use them all the time. We are going to build another tier with another staircase this fall once we are done with the greenhouse.
Hello Brianna,
I’m in the middle of figuring out how to build a four foot wide timber stairway going from a metal gate to ground level. My distance is 24 feet in length and a height of five feet six inches. I noticed you used what I believe were 4*6 timbers or were they 6*6’s. Planning this build in next three weeks. Look forward to hearing from you.
Okay, stairs are super tricky. One easy cheat? Go put the calculation in here and see which timbers work best for your space: https://www.calculator.net/stair-calculator.html
You may want the bigger size so you don’t have as many steps, or the smaller one for aesthetics.
Nice tool, here is also a good one https://concalculator.com/stair-calculator/
Thanks!
We built beautiful similar stairs and used copper green on all cuts and six years later need to pull out and teplace all landscape timbers touching ground where irrigation is used. Looks beautiful but cannot last with earth contact plus irrigation. Thinking about cortens steel timbers size and look as a trial fix and look.
Good point. Ours are in a very dry area and not in contact with irrigation. You would need to plan that out in damp areas. Also 6 years is a pretty good run for damp wood!
These stairs are beautiful. Congratulations on your feature on Wonderful Wednesday Blog Party. Thank you for sharing this post.
Thank you!
[…] How To Make Timber Pea Gravel Stairs – Craft Thyme […]
[…] How To Make Timber Pea Gravel Stairs – Craft Thyme […]
[…] How To Make Timber Pea Gravel Stairs – Craft Thyme […]
Looks great! Need to try it here at my house :) I saw your post linked at the WONDERFUL WEDNEDAY 240 party. I pinned it on Pinterest.
Thank you so much! I am really happy it turned out so well.