I don’t know about you, but I’ve got a lot of wood. After building string art projects for the boys, crafting a few salvaged wood coffee and side tables (post forthcoming), building a chicken coop capable of passing human occupancy code (also a future post), and saving some beautiful walnut hardwood flooring from the construction dumpster next door, I had managed filled both our porch and crawlspace with stacks of “one day I’ll do something with this” wood. So while Brianna was in Seattle for her cousin’s college graduation, I figured it was finally time to get crafty!
The one room in our home where we have done absolutely NOTHING to make the space more “us” is our bedroom. Shocker, right? We spend a third of our day (and on a good day more than that) in this space, and it’s easily the blankest canvas outside of the stairwell – and even that has an industrial pop to it! (Yes, another future Adam post) For about a month following our move into the house, every time B and I would head to Target we’d find new bedding on clearance, and with Cartwheel, we’d walk away with a King set for around $25-$40. So great, we’re got some funky lamps we made with Edison-style bulbs and a few sets of bedding. Not a single other piece of hardware or decoration…. For two people that run a craft blog, this is a sacrilege!

Brianna and I had built our own bedframe prior to moving in, and it’s got a very rustic/industrial feel to it. Big, stained, thick lumber with 3/4″ hex bolts to hold it together. I wanted to stick with this look and feel and take it vertical. Project decision: Headboard.

From building the chicken coop (or “palace” as many of our neighbors have proclaimed), I had a few scraps of 3/4″ sanded pine plywood left over. Each piece of scrap was 48″ tall, but the widths of the pieces varied: 10.25″, 12.5″, 27.5″ and 36″. Luck should have it that 12.5 + 26.5 + 36 = 76; a perfect backplane for a kind headboard! I trimmed each piece to a height of 36″, laid them side by side, and began to lay out the pieces of scrap and salvaged wood in a perfectly haphazard mosaic arrangement.
Did I mention that a lot of the left over wood was painted, marred, chipped, slightly twisted, or naturally weathered? I incorporated failed projects that were painted orange, blue and white, lumber I’d left out in the rain, thin lumber used as makeshift paint stands, and a few pieces of furniture grade wood purchased for endeavors never embarked upon as well. Each piece of lumber was dimensionally 1″ (meaning an actual thickness of 3/4″). I tried to mix textures and colors fairly evenly throughout, made cuts when necessary to fit the salvaged wood onto the backplane, and in the end came up with the following general layout:

Next step? Staining!
Using left over stains from the (to be written) Edison bulb light fixture project, I chose pieces out of the pictured layout to stain different colors. I used Rust-Oleum Dark Walnut and Minwax Early American stains and allowed for varying set times before wiping off the stain with a cotton rag. When doing this, I wanted to make sure each piece of white wood got a good dose of color. The end result?

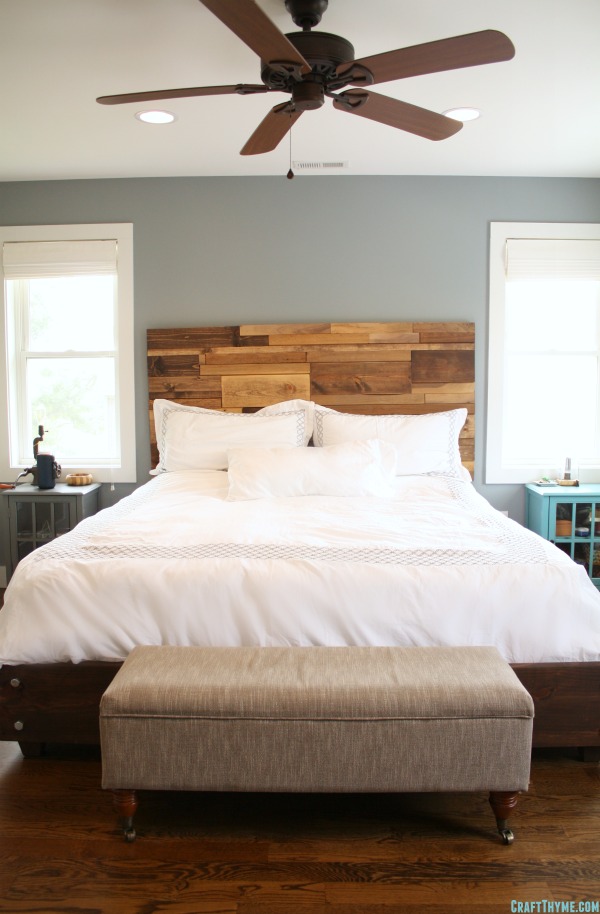
Now remember that at this point nothing has been attached to the backplane. I’d gone back and forth between wood glue, liquid nails, and 1-1/4″ finishing nails to accomplish this goal. In the end, because I was terribly impatient, I opted for the physical nail option. So I pulled out my good old Porter Cable pancake air compressor and my 18-gauge brad nailer nail gun and got to work. The nice thing about finishing nails is that they have a relatively strong hold and leave virtually no visible holes with this type of wood finish. After 5 minutes of nailing, the headboard was complete. All that was left to do was move this baby upstairs and mount it!
Getting this thing upstairs, especially by myself, was quite the task. The finished product weighed in around 75lbs, and while that weight is more than manageable, at 76″ x 36″ it is terribly awkward to carry up a turning flight of stairs without hitting the first floor ceiling. Nevertheless, I finally made it to our bedroom.
Knowing how much the headboard weighed, I now had to find a means to mount this baby to the wall. After a bit of searching through different options, I chose to use an 18″ French Cleat* capable of supporting up to 200lbs. Why the extra support? With four boys, I envisioned at least one of them with a misfiring neuron doing pull ups on the headboard while playing on the bed. The french cleat cost us just under $9 from Lowe’s and was the only out-of-pocket expense for the whole project.
I followed the provided installation instructions for mounting the wall portion of the bracket while making sure to hit at least one stud in the process. In some cases you should be able to hit two studs over a span of 18″. The particular cleat we used came with a built in level thereby making installation a breeze! I then mounted the second part of the cleat to the headboard in the same horizontal position. Once everything was securely fastened, it was time to hang this sucker on the wall.


This is so lovely in so many ways. I love how you used the scrap wood and turned it into something beautiful! Inspiring!
Angela, thanks for stopping by! We’re still so very in love with the headboard. We can’t get over how cheap and easy it was to accomplish!
[…] Building a Salvaged Wood Headboard from Craft Thyme […]
[…] Craftthyme showed us how to DIY a salvaged wood headboard […]
Thanks for the feature!
[…] Salvaged Wood Headboard […]
[…] I didn't know that I needed a new bed, but Craft Thyme has convinced me otherwise with this gorgeous […]
Wow! I love how this turned out! You would never know it is not “authentic” weathered wood! Thanks so much for linking up to The Handmade Hangout. I’ll be featuring this project later today when the new linky goes live at 6pm ET. Hope to see you there again this week!
Thank you for the feature! So glad you can’t tell that they aren’t authentically weathered wood.
[…] is BEAUTIFUL. I am so in love with this headboard from Craft Thyme. This looks like a room from a magazine. I would love to do this in our guest room. So […]
[…] Salvaged Wood Headboard via Craft Thyme […]
[…] Salvaged Wood Headboard […]
[…] Salvaged Wood Headboard […]
[…] a Salvaged Wood Headboard by Adam and Brianna at Craft Thyme. I am in love with this headboard, Adam did a great job putting […]
I love the headboard and the chicken -coop please could you make a trip to Ireland the pair of you :) Thanks for linking up to Pin Worthy Wednesday, I have pinned your post to the Pin Worthy Wednesday Pinterest Board
Thanks for the feedback! We’re thinking about making the trip over your way sometime next year – who knows, maybe we’d be able to connect!
That is gorgeous with all those beautiful wood tones!
It’s amazing how much the different tones have warmed up our bedroom. It wasn’t necessarily cold to start, but the rich hues really have an impact!
[…] Globe / DIY Upholstered Wingback Headboard / Faux Boxwood Wreath / DIY Grill Cart / Salvaged Wood Headboard / Rustic Arrow Wall Art / Bathroom Refresh / Media Stand Playroom Storage / Driftwood Crab Art / […]
[…] Globe / DIY Upholstered Wingback Headboard / Faux Boxwood Wreath / DIY Grill Cart / Salvaged Wood Headboard / Rustic Arrow Wall Art / Bathroom Refresh / Media Stand Playroom Storage / Driftwood Crab Art / […]
[…] Globe / DIY Upholstered Wingback Headboard / Faux Boxwood Wreath / DIY Grill Cart / Salvaged Wood Headboard / Rustic Arrow Wall Art / Bathroom Refresh / Media Stand Playroom Storage / Driftwood Crab Art / […]
What a great headboard! I love your creativity and thrift!
You have inspired me to try some new projects around my home!
Glad to find your site. I came over on the Fabulous Friday link up today. And, I followed you on Pinterest.
Hope you have a great weekend.
Blessings,
Melanie
Thanks for the follow! Adam is both amazingly creative and amazingly thrifty!
Brianna this is an absolutely gorgeous addition to your room. What a centerpiece. Adam did a great job not only putting it together but writing a well thought out, easy to read and follow post about it. I can imagine that your services would be utilized by many people, the workmanship is quality. Thanks for adding to “What are you working on?” Wednesday, I have been thinking about a plank wall somewhere in our home and this is a great article for me to begin it with. Thanks again!
Nikki, thanks for the vote of confidence! We’ve got a ton of new posts coming in the next few weeks, and it’s our hope that our readers will get a real sense of your own ability to easily (and affordably) transform any space in your home.
This turned out beautifully—I love the different shades of wood and the contrast to the paint color (great color, too!). Well done…and I’m happy to have stumbled across your blog :) (stopping by from the view in here!)
-kristiina
Needless to say, we love the colors ourselves. :-) The original color was a relatively awful shade of goldenrod. Needless to say, we changed that immediately upon moving in. Thanks for the feedback, and stay tuned for more awesome project ideas!
I can’t believe you made this beautiful headboard for only $9! It really transforms the room and adds so much character. Makes me wish I had more building skills (and the tools to go along with them). I’m sure this would go for a pretty penny if you chose to sell it. :)
Thanks for the great feedback! With 4 boys, we’re getting good at making beautiful things at an affordable price. It’s our hope for our readers to be able to do the same after sharing in our experiences.
Want to make me one? LOL. We’ve been here for over 20 years, and I’m still waiting on my headboard. LOL I guess I need to gather up some wood and just make myself one. Right now, I have a room divider as a headboard. It’s too small for my Queen sized board. I’m thinking of getting some 1 X 4s and making it out of that. I may have to get the building supply to cut them to length for me if they don’t come in the correct length. I’m also thinking of a 1X 4 to connect the boards to. Think it’ll work, or do I need thicker boards for that?
Deborah, 1x4s would work wonderfully well for both the front and back. And having your local building supply store cut things to length for you is an excellent idea. I can fit most anything in my CRV, but in the off chance that I need something larger than what I can easily haul, or forget my tie-downs, I always have their associates cut things to size for me.
As for making one for you… Absolutely! This is a space we’ve been looking into exploring. While you may have been kidding, one of our plans is to begin offering such services in the near future.
Wow, you headboard project turned out beautiful. So simple and modern looking yet warm and cozy too.
“Warm” is exactly how we described the addition ourselves
That turned out so pretty!!
Thanks Ashley! We’re pretty fond of it ourselves. Looking at the before photo, we can’t believe we didn’t do something sooner!
ypu are right, it is such an important room but most neglected. We have been in our house 8 years have had 3 children. Have decorated and even redecorate their rooms and my husband and I still have done nothing with out bedroom.
I’m hoping to not lose momentum in this space. Up next, we’ve got plans for a black iron pipe shelf installation. I hope to bring that idea into reality within the next month!