Posted on 2 Comments

Upcycling to Make an Adjustable DIY Pulley Light Fixture

Boat cleat used as an anchor for an adjustable pulley light.

When we first moved into our 1927 home in Asheville, one of the first things we noticed was the severe lack of electricity.  Not that electricity was entirely absent, but by today’s standards, there wasn’t much for us to work with.  There were no outlets in any of the bathrooms, bedrooms had two outlets placed in what seemed like after-thought locations, and all rooms (regardless of size) were only wired for a single ceiling or wall light fixture.

Our new master bedroom was easily twice the size of the one we had just moved out of, but the outlet placement and lighting left a little to be desired.  The new master contained what we thought of as a reading/sitting area that sat inside of one of the home’s two front dormers.  The space was roughly 8′ x 8′, and we thought it would make a perfect reading nook with two chairs and a low bookcase.  There was only one problem with the reading nook plan… there was no lighting in the space.  There was however an outlet, and that opened up some possibilities!  We could have put a lamp in the space, but that would have dictated a layout different that what we had envisioned.  Ceiling lighting in that space would have been ideal, but with nothing available, we were forced to get creative. DIY Pulley Light to the rescue.

Our reading niche was dark before we installed a pulley light.

Bring on Craigslist

Always looking for something to upcycle, we immediately turned to Craigslist to see what was being offered up to the masses.  It just so happened that we found someone selling lights from a factory they helped salvage a few months back.  At $20 a pop, they seemed like a good deal, so we made the trip across town to check these babies out.  Suffice to say, after a coat of satin nickel spray paint, they were a perfect fit for the space.

Cream colored bleh lights we found on craigslist before we transformed them into fresh, modern pulley lights.

BUT!  We still had to make them work as ceiling lights….

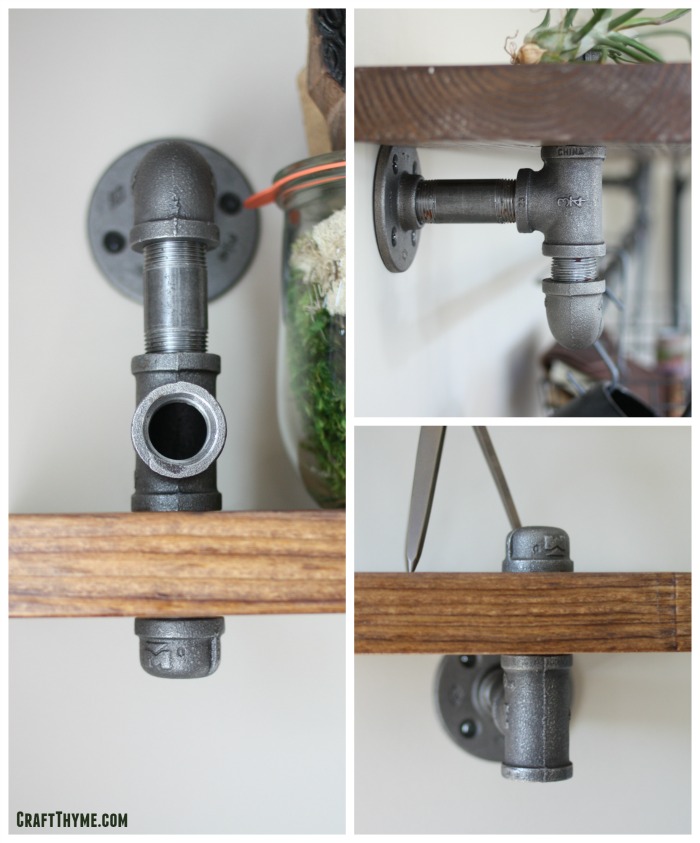
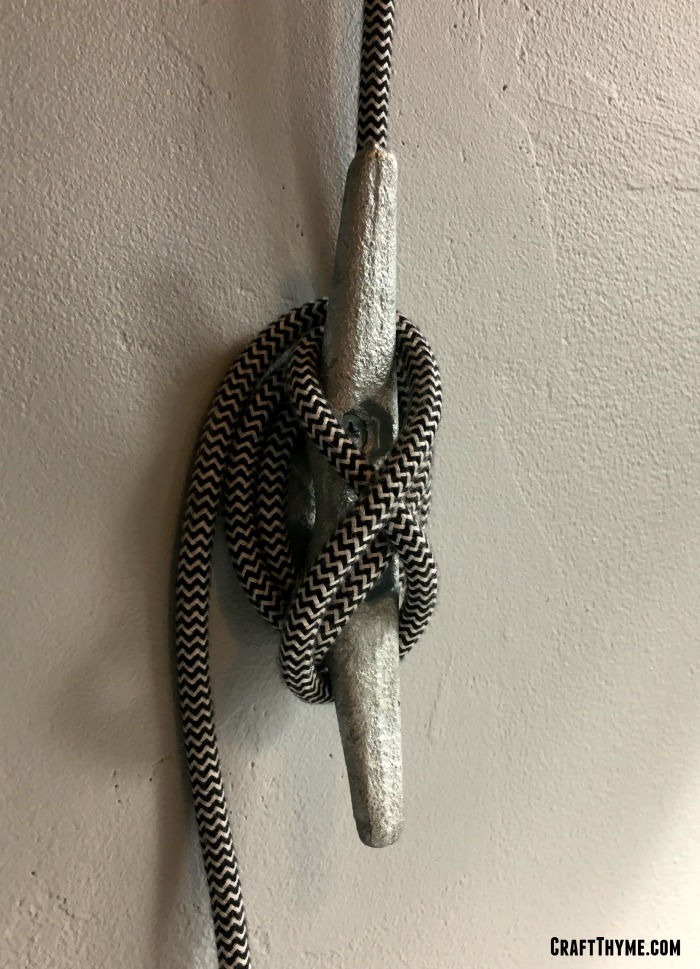
That’s when we had the brilliant idea to use fancy black/white cloth lamp wire, a nautical rope cleat, and galvanized pulleys to 1) hang the light from the ceiling, 2) make a functional DIY pulley light that could be raised or lowered based on lighting preference.

Painted Craigslist light before finishing the pulley light

Supplies

Installing a DIY Pulley Light Fixture

The first step to this process is to install your pulleys:

  1. Mark the location on the ceiling from where you want your light to hang.  For us, this was the center of the space.  Make a small, tiny, erasable mark – you won’t be covering it up.
  2. Envisioning what it would be like for your lamp to hang from your pulley, place your pulley to one side of the mark you just made.
  3. If using the model of pulley we used for this project (see above), mark the four holes that you’ll use to mount your pulley to the ceiling.
  4. Install your center pulley!
    1. If mounting into a stud/rafter, go ahead and install your pulley directly.
    2. If mounting into ceiling drywall, we recommend using heavyweight anchors installed as per the manufacturer’s instructions.  (Something like these should do you just fine).   After your anchors are in place, go ahead and install your pulley
  5. Repeat steps 1-4 for Pulley #2, but this time, the pulley should fall near the corner of the ceiling/wall where your outlet lies.

Ceiling mounted pulleys to create an adjustable light.

When your pulleys are in place, go ahead and install your boat cleat:

  1. Mark the location on the wall where you want to be able to access the lamp wire wrapped around the cleat.
  2. Mark the two holes that you’ll use to mount your boat cleat to the wall.
  3. Install your boat cleat!
    1. If mounting into a stud, go ahead and install your cleat directly.
    2. If mounting into drywall, we recommend using drywall anchors installed as per the manufacturer’s instructions.   With your anchors in place, go ahead and install your cleat.

Boat cleat used as an anchor for an adjustable pulley light.

Next, wire/re-wire your light to ensure you have enough length to get you where you need to go:

Our light came with only 3 feet of old, dingy, and yellowed wire still attached.  Needless to say, that wasn’t going to do the job or give us an awesome design for our finished product.  This is where the 20′ of cloth lamp wire comes into play.

  1. Disconnect the the old lamp wire from your light.  This is often easier said than done, but you should be able to access where the wires actually connects to the light socket.  Once removed,
  2. Attach the new lamp wire.
  3. Do NOT install the plug at the other end of the lamp wire.  We’re not ready for that quite yet.

Finally, run your lamp wire through the pulleys, around the cleat, and prepare for awesomeness:

  1. Run the open end of the wire through pulley #1, over to and through pulley #2, and down the wall towards your cleat.
  2. When your light is at the right height, start wrapping the extra length of your cloth lamp wire around the wall cleat.
  3. When you feel that you have enough line around the cleat to raise and lower the light (assuming that you want this functionality), measure out enough slack on the bottom end of the cleat so that you can reach your outlet.
  4. Either cut your lamp wire here or neatly organize the remaining slack.
  5. Install the plug onto the end of your wire.  We find that there is always a wide variety of plugs available at your local big-box home improvement store, and a lot of them have an awesome retro feel!

With the circuit complete, you can now test out your new light creation!

Completed diy pulley light and reading niche

DIY pulley light makes an adujustable light for our reading niche.

Posted on 71 Comments

How to Build Potato Boxes

Potato boxes

Short on garden space? Then a potato tower or potato box may be just what you need and we can show you just how to build a grow tower.  We currently have a smaller yard that we have worked hard to create an attractive edible landscape.  Growing potatoes in the ground doesn’t exactly conform to the small tidy asethetic we have going on.  I had taken a class on intensive gardening and recalled there was such a thing as a potato tower.  You can google potato boxes, potato towers, grow towers, and grow bags to get a visual on options.  All of these items are ways to grow potatoes in a small spaces, however, some are more aesthetically pleasing than others.

The basic idea of a potato box is you start at a bottom level and plant potatoes.  Then as the potatoes grow you add a level of wood, fill in with dirt, leave a few leaves poking out the top, and continue on up. Growing potatoes in this method should yield potatoes all along the buried stems.  The drawback to this method is you usually have to screw in each level as you go, buy tons of dirt, and it ends up looking like a plain wooden box. Don’t even get me started on the aesthetics of grow bags… While, we can’t help you with the dirt (it will take a lot), we did design a box with slide in slats, that matched the porch and trellises we have around the yard.  Using untreated wood (we aren’t huge fans of tons of chemicals around food we plan to eat), conduit, and some bolts, we made two potato towers that should last a few years.Potato boxes

How to Make a Potato Box

Materials

  • 1 – 2″ x 4″ x 144″
  • 1 – 2″ x 4″ x 96″
  • 5 – 2″ x 6″ x 96″
  • 2 – 3/4″ x 120″ Conduit
  • 16 – 5″ Hex Lag Bolts
  • 2.5″ Wood Screws
  • 1/2″ Drill Bit
  • Drill
  • Hammer (may be optional)
  • Nail set/Hole Punch (may also be optional)

Cut List

  • 4 – 2″ x 4″ x 33″ (From the 144″ board)
  • 2 – 2″ x 4″ x 24″
  • 2 – 2″ x 4″ x 21″
  • 10 – 2″ x 6″ x 24″
  • 10 – 2″ x 6″ x 21″
  • 8 – 3/4″ x 30″ Conduit

Potato Tower Construction

Construction of a potato box is rather straightforward – you’re just going to build a box several times over!  But first, we need a frame….

Potato Tower Frame

Lay two of your 33″ boards side-by-side with approximately 14″ between.  Use one of your freshly cut 2″ x 4″ x 21″ as a guide (3.5″ + 14″ + 3.5″ = 21″) to make this step a breeze.  Once evenly spaced, place one of the 2″ x 4″ x 21″s on top of one end the 33″ lumber and securely fasten with screws.  Your finished product should look something like a big U:

basic frame for a potato box

Repeat this same process using your two remaining 33″ sections and single remaining 2″ x 4″ x 21″.

Next, connect your two frames using the 2″ x 4″ x 24″ sections you’ve already cut. The 24″ board should fully overlap the existing frame.  Once fastened with screws, the resulting frame should be 24″ square around the bottom.

Conduit Slat Bracing

This is by far the hardest part of this project.  This is where you put in the work ahead of time to make management of your potato boxes easy.  This is where you wonder why you chose this route in the first place.  This is where the desire for an awesome look and feel comes together and you realize it was worth all the effort.

Why is this step so tough?  In order to use conduit as a bracing mechanism, you’ll first need to drill a through-and-through hole at the top and bottom of each piece of conduit.  Prior to drilling, mark your conduit 3/4″ from each end (and make sure your marks are in alignment!).

If you’re using a drill press (highly recommended to make this process a breeze), clamp your conduit to your drill press base and slowly drill a hold completely through the conduit where marked.

If you don’t have a drill press (like us), get ready for some fun….  Using a nail set/hole punch, make a small dent in the conduit where marked.  This small dent will allow your drill bit to grab enough of the conduit to start drilling.  Manually drilling into conduit is hard work.  Even after punching the conduit, starting the hole may be easier said than done.  Take your time and don’t rush the process.  Wear safety goggles, be patient, and stay safe.

Once you’ve drilled your 16 (gasp!) holes, it’s time to attach them to your potato box frame.  Using you 5″ hex lag bolts, begin screwing the conduit to the frame at the BOTTOM of the frame just above the bottom of the U.  As you do this, use one of your 2″ x 6″ boards as a spacer.  Repeat at the top of the conduit, then repeat for all remaining conduit pieces around the frame.Attaching bolts to potato tower

Make sure not to over tighten the conduit at this step.  You need to be able to slide the 2″ x 6″ boards in and out easily.  If you did over tighten, back the lag bolts out just a bit and you should be good to go.  Test sliding boards in and out of each side to ensure proper installation.

Test Fitting the Potato Box
We test fitted all the slats before installing

Slats

If you’ve already cut your 2″ x 6″ x 21″ and 2″ x 6″ x 24″ sections, this step is complete!  What do you do with them?  Keep reading….

Installing Your Potato Tower

If you have a nice level surface all you will need to do is put your tower on the ground, remove all the slats, and fill the bottom with dirt.  The frame and conduit make it nice and sturdy without a lot of fuss.  Unfortunately for us we live in the mountains; level surfaces are in short supply.  In those cases you may need to dig down slightly and make a level surface.  Since we had gone to the trouble to make such pretty boxes we used them to screen our HVAC unit.  The location meant that the backside of our boxes were slightly covered.  I figured, no big deal, as we were going to fill the first level with dirt.  In fact I used some of the excavated soil to begin filling the bottom of the boxes.Installing a potato box

Growing Potatoes in a Potato Box

While there are lots of techniques and details for growing potatoes in potato towers we are just going to go over the basics in this post. I highly suggest starting with a quality seed potato (Affiliate links to follow).  Luckily my favorite seed store, Sow True Seed, also has seed potatoes!  They even taught a potato planting class for free.  Love local companies!   We pre-sprouted (chitted) our potatoes, which involved setting a bunch of potatoes next to our grow lights a few weeks in advance.  Then we simply made sure each piece had at least a few viable sprouts put them in the dirt and covered them up.  Just water and go.  They have shot up much faster than expected so we have already had to put in a few levels and more dirt.  The one drawback of this method is the need to haul in soil.  However, my plan is to use the pile the dirt behind the boxes at the end of the year and mix in chicken manure to let it mellow all winter.  I figure after a couple of uses I’ll move it to the raised beds and get some fresh soil.  Basically making an in-place crop rotation.First tier of the potato tower

The nice piece about using the slide in slats is that we are going to attempt to pull out some potatoes mid-summer.  Slide out a slat, reach and and pull some potatoes, replace the dirt and put the slat back.  Not sure if it will work as expected but figured that is half the fun of gardening: Experimentation Potato Box Style!

growing potatoes in a potato tower

How to make a potato tower

Posted on 14 Comments

Building a Composting Fence

Finally an alternative to compost bin plans! Detailed instructions on how to make your own composting fence.

Do you have excessive yard waste in the form of tree branches, long grasses, leaves, annuals, and flowers past their prime?  We sure do!  With the veritable brush jungle behind our home, regular pruning of trees, a relentless landscaping habit, and the endless results of “being a good husband” – aka dead flowers – we’ve built quite the pile of yard waste in our back yard with no real plan of what to do with it.  After all, what do you do with a heap of dead, slow to decompose material? Composting fence!

Some time ago, Brianna came across the concept for a “composting fence”; a landscape architecture concept that would modernize your large, long-term compost pile.  With her birthday just around the corner, I thought that I would surprise her by taking a day off work and building it for her.

Plans for our composting fence.

As it turns out… this project isn’t really doable in a single day. But I get a pat on the back for effort, right? Keep reading to find out how to build your own!

Composting Fence Supplies

  • 60-in x 50-ft Silver Galvanized Steel Welded Wire
  • 4 – 4″ x 4″ x 96″ Treated Lumber
  • 1 – 2″ x 4″ x 96″ Treated Lumber
  • 1 – 2″ x 4″ x 120″ Treated Lumber
  • 12 – 5/4″ x 6″ x 120″ Treated Decking Lumber
  • 3 – 50-lb Fast Setting Concrete Mix
  • 2-1/2″ Exterior Wood Screws
  • Staple Gun & Staples
  • Metal Snips (In Some Cases)
  • Drill
  • Saw

Cut List

  • 2 – 4″ x 4″ x 66″
  • 2 – 4″ x 4″ x 78″
  • 2 – 2″ x 4″ x 48″
  • 2 – 2″ x 4″ x 60″
  • 2 – 5/4″ x 6″ x 120″
  • 4 – 5/4″ x 6″ x 102″
  • 4 – 5/4″ x 6″ x 62″
  • 4 – 5/4″ x 6″ x 84″

Brianna Here: I’m jumping in on Adam’s post because he has been busy building an under-deck storage area, planter boxes for a shade garden, and a chicken coop extension. Plus he didn’t actually get this done in a day sooo… I was there for a lot of the process. Here is reason #1 you can not do this in a day.

Step 1: Digging It?!

You are going to need to dig post holes. And then pour concrete. If you do not have post hole diggers see if there is someone you can borrow them from. We found a neighbor who let us borrow his for a long time. However, we keep doing projects like espalier of fruit trees and kiwi trellises so we just opted to buy one. Dig around 18″ deep, put in your post and level it. It is helpful if someone can hold it while another person pours in the fast dry concrete. Pour water in with the concrete and then wait. You are going to need these posts to be FULLY set before step 3.

Learn to make your own compost and bin detailed directions on making a compost fence.
We are leveling these posts after a few steps because we realized we needed concrete. Follow the directions and learn from our mistakes!

Step 2: Cutting

While you wait for the concrete to dry you can go ahead and make all of your cuts for the composting fence. You might be wondering what all this wood is for, however, you are going to use this wood to cover your stapled wire and make an attractive pergola-like top. We had plans to plant grapes at the bottom and use the top as an arbor. Additionally we hung some bird feeders above to attract more wildlife to the yard.

Step 3: Tug, pull, and curse

Unroll your welded wire and get it flat as possible. I personally worked on this while Adam cut lumber. He also added a 2X4 spacer to one side of the post. This gave closer to 6 inches of space between the wire for twigs and yard waste to be placed. When you begin unrolling the wire I suggest gloves as the ends of the rolls are sharp. I can not offer much advice other than rolling the wire face down and manually flattening as you go. It is a PITA, but the flatter you get it the easier the installation goes.

The reason that you want to wait until your posts are FIRMLY set in the ground is that you are going to need to attach the wire and PULLLLLLLL. I picture a ships-master whipping the rowers yelling ‘Pullll Damn Ye’. Anyway, take your wire cloth and line it up near the middle of your 2X4 attached to your post. You want to cover enough wood so that you can get a firm staple, but remember in the end the post will be totally covered so don’t waste a lot of expensive metal by covering your posts. We pulled the metal and figured out the minimum needed to staple it to the next spacer-post then cut the metal. We had to work in sections as our ground was not flat. Also getting more than 6 feet of this stuff straight at one time is a nightmare. I believe if you had a nice level yard you could probably just pull it straight across and skip the cutting, but that was not in our cards.

Learn to make your own compost and bin detailed directions on making a compost fence.
Note the red level on the wire! It comes in handy.

Here is where the partner comes in really handy. One person can pull on the attached sheet of metal while the other checks to see if they are close to level. Then that same person can staple. Pulling the metal helps get it taunt and reduces the bowing. Note I say reduces! We were not very happy with the wavy look when you peered down the length of the fence at first. However, in the final product this didn’t matter. I’ll explain at the end!

So you will repeat this process 5 more times if you are making 3 sections. As you will need put the metal cloth on both sides of the posts to make a channel that can be filled with your yard waste materials. The hardest part of this was getting everything around the same height and keeping all the metal squares in nice straight verticals. Let’s just say there were some potty words spoken over this particular process. These words may or may not have been used to describe peoples prowess with a level and/or their strength when pulling metal.

Finally an alternative to compost bin plans! Detailed instructions on how to make your own composting fence.

Step 4: Adding your decorative ‘Skin’

At this point you are going to add the decorative finish and height to the arbor over the composting fence. Take your long boards and screw them to the front and backs of your posts. We wanted a variable height so the longer ? length went on the fronts and backs of the two middle posts and the ? lengths went on the ends. You are going to be placing the boards over the stapled metal so feel free to really drill those screws in tight. It will act as an additional layer to secure the metal to the post and hide the unsightly seams.


When your now taller posts are in place take your crossbeam of 10 feet in length and attach that to the front and back of each middle upright. Adam, cut each of the ends at an angle for a nice decorative finish. The middle crossbeams will have the angular cuts on both sides. These are the hardest to place as you want to make sure to have the same overhang on both sides. Just measure the difference to insure an equal overhang on both sides. The other two crossbeams will only have a decorative touch on one end. The flat side will be easy to install as the straight cut will go flush to the edge of the middle posts. We installed our outside arbor sections about a foot down from the one in the center. We chose this height as we thought it was the most visually attractive result.

Learn to make your own compost and bin detailed directions on making a compost fence.

Step 5: Additional Bracing

This step is optional but we added additional bracing between the crossbeams. We did this for two reasons, first to create a place for vines to grow, and secondly provide a place to add hooks to hang bird feeders. I felt like the additional bracing made the entire structure more sound as well. To create the bracing we simply cut some 4X4’s and slotted it in-between the middle of each section and screwed it in place. The cut piece of wood usually fit tight enough between the two boards that no one needed to hold it when screwing, but it might be handy to have a partner to hold when securing it.

The Final Product

Finally an alternative to compost bin plans! Detailed instructions on how to make your own composting fence.

Unlike a regular composting bin we are not expecting to pull compost out of the composting fence. The added yard waste is for creating a screen and should slowly feed the soil at the base. So far the various layers of sticks and leaves are miking for a really interesting and attractive backdrop. I can’t wait to see how it looks when I get green vines growing up the arbor!

So now is the time to discuss the bit of waviness to the metal. First, we are not usually looking down the fence line. When you look straight on the fence you do not see it. Secondly, as we added lots of wood it filled out the metal making everything much more taunt. I have been quite happy how everything has held up over the winter. To complete the look we created a bed in front of the fence and planted flowers, cranberries, raspberries, and two grapes. The bird feeders have been a huge hit. I have seen so many more cardinals, jays, and finches flitting about the yard. I am really hoping they will help control the insect population this year in the garden. As birthday presents go this composting fence has been wonderful! It has created a nice windscreen, arbor space, and place to deposit yard waste, all while covering the unattractive brush berm between us and the neighbors. I’d call this project a win for the garden in so many ways.

Learn to make your own compost and bin detailed directions on making a compost fence.

Posted on

Building a Custom Industrial Wooden Desk

DIY stacked wood desk tutorial

The only thing that appears to be constant in our lives is change.  Our youngest son just began walking, he and the next youngest have moved into the same room, Brianna and I cleaned out our master closet, moved a dresser into said closet to further our organization effort, our oldest started Kindergarten, and Brianna had a career change that sees her working from home periodically.

Realizing that we have no good place to work (much less concentrate) amidst the chaos of our family of six, creativity was forced upon us.  We’ve always lacked an office space in our home (and with 6 people, we have no free rooms!), so our ability to set aside such a space has been significantly limited.  Moving Keaton in with Cooper freed up a nice little corner of our master bedroom.

We’d looked at buying an industrial desk for our space, but we couldn’t find that perfect piece.  Everything we’d looked at was either the wrong size or the wrong price.  So, as typical, we decided to build something of our own!

DIY stacked wood desk tutorial

Supplies

Craft Thyme

Brianna and I measured our available space, and after drawing out a few different options, our plan was to build an industrial desk that was 18″ D x 40″ W x 30″ H that matched the general décor of our home.  Follow along below to see how we got there and let us know how we did!

Lumber Selection and Initial Cuts

As always, pick out lumber that speaks to you.  On the random Tuesday that I took off of work to focus on this build, the hardware store had some great, partially grayed untreated lumber.  (Stress the on the untreated) Selection of colorful, knotted, and straight wood was easy. On to the lumber prep….

Step in creating DIY industrial desk from lumber and pipe

Given that the actual dimension of a 2″ x 4″ is 1.5″ x 3.5″, the easiest way to get to 18″ was to stack 12 2×4’s together (18 / 1.5 = 12).  Super easy!

To get to 40″ wide, all we had to do was cut 40″ sections out of our lumber.  If you’ve done the math, you’ll see that I have waaaaay more lumber than I needed for this project.  Why have have 600″ when all I really need is 480″?  I do this for two reasons: 1) I want to be able to use the most interesting sections of the lumber, and 2) I’m probably going to mess something up at some point.

There are multiple ways to handle your cuts.  You can cut all 40″ sections and call it good, or you can strategically cut random length sections whose total lengths equal 40″.  I chose the latter.  With this, I don’t have a true final cut list for you, constant reader.  Make it random and make it awesome.

But we didn’t stop there… oh no, that would be too easy.

Step in creating DIY industrial desk from lumber and pipe

While stacking 2×4’s together gave us the right depth dimension, there were two readily apparent design flaws:  1) 2×4’s aren’t square, they’re rounded squares; and 2) the thing was going to be really freaking heavy.  To remedy, we broke out the table saw and ripped both sides of the previously cut 2×4’s to make everything nice and square.  We ended up taking off around 1/4″ from each side.  The end result was nice, square lumber that weighed an average of 7% less.

“Assistance Needed in the Pipe Cutting Area”

Having drawn out the basic design for our industrial desk’s frame (using Pencil*), we already had an idea of how we wanted to put things together.

Sketch for our tutorial on creating a DIY pipe desk for our industrial decor.

We’d ordered everything except for the long length of pipe from Zoro.com and started calculating the lengths we would need to finish the frame’s build-out.  I pre-assembled the feet of the frame, connected the front feet to the back using the 12″ nipples (such a silly term for a foot-long pipe), and started measuring.  We needed the bottom of the desk for fall at 27″ high, and with some simple subtraction, we’d come up with the following pipe cut list:

  • 2 – 24 (Front legs)
  • 2 – 20 (Back legs)
  • 1 – 32 (Back brace/Foot rest)

At that point, it was off to Lowe’s!  Remember, your local big-box home improvement store will cut and thread pipe for you – most of the time for free!

Putting the Pieces Together – Industrial Desk Frame

Hands down, the easiest part of this project is the desk frame assembly.  In a nice, open area, lay all of your pipe parts out and start putting things together as you’d planned.  There’s no right or wrong order in this step.  Give everything a good hand tightening as you get the pieces in their final position.  Once you secure the frame to the desktop, everything will be stationary, so there’s no need to use any tools to aid you in this step.

Tutorial on how to create an industrial desk from wood and pipe
(Colorful Balls and Toy Cars Optional)

If you’ve got a long enough level, go ahead and check your frame at this step in the process.  Yes, you can always make adjustments later if necessary, but it is easiest at this point.

Putting the Pieces Together – Desktop

This step takes both time, and patience (frankly, personality traits I typically lack)….

Using large clamps and as flat of a surface you can find, lay out 2-3 pieces of your previously cut lumber in the order you’d like them glues together.  Liberally apply wood glue to the back of your face board (I am a big fan of the squiggle application method), but it up against the second piece of lumber in the series, and clamp that baby together as hard as you can.  For best results, clamp both on the ends AND in the middle.  Repeat this steps as many times as you have clamps on hand.

Step in creating DIY industrial desk from lumber and pipe

Then wait….

Most wood glues actually have a drying time of only one hour.  So while this process takes patience, you can probably knock it out over the span of the afternoon.  Once your newly glued sections have set for their hour, continue this process for your remaining pieces of lumber.  When you have 6 stacks of two, start gluing those together.  And so on, and so on.

Depending on the size of the clamps you have, the last step of combining two stacks of 6 may be difficult (or frankly impossible).  I had this problem, and for me, this spawned creativity.  I went under the house and pulled out my crank straps.  You know, the ones you use to tie a king-sized bed to an SUV that’s as wide as a full-sized bed?  Believe it or not, these types of tie-downs make excellent large application clamps.  Do your final gluing, wait an hour, and drink a beer as most of the hard work is complete.

Flattening out your Desk Surface

There are multiple ways to achieve that perfectly milled work surface.  The BEST way is to use a mechanical planer to do the job for you.  Unfortunately, we don’t own one of these bad boys.

So… we did what we could the old-fashioned way and used multiple grits of sandpaper to knock down edges quickly.  As you’ll see below, there are lots of wood joints, knots, and saw blade “imperfections” that would make writing on this newly made solid surface rather difficult.  Hitting the desk top with heavy-grit sandpaper on the powered hand-sander will take care of any significant surface changes.  When finished with the high-grit, move to medium-grit across the whole surface, and finish it off with a fine-grit.

Tutorial on how to create an industrial desk from wood and pipe
Before Sanding
Tutorial on how to create an industrial desk from wood and pipe
After Sanding

Time to Stain and Poly

Choose your favorite stain(s) and desired polyurethane and get to work.  For this project, we alternated the use of Minwax Early American with Rustoleum Dark Walnut.  “Color blocking” best describes my technique on this particular piece: A block of one color here, a block of the other color there.  Randomize the application of the stains (if you’re using more than one), wipe away, and see how it’s turning out.  You can always make areas darker if need be by allowing for longer set-times or applying a darker stain over a lighter area.

Tutorial on how to create an industrial desk from wood and pipe

Step in creating DIY industrial desk from lumber and pipe

I’ll admit, once the stain had been applied and had dried, I couldn’t wait to see how the industrial desk looked on the frame.  So… rather than apply the coat of poly on my nice grocery-bag covered work space, I hauled it outside and set it on the frame to get a sneak peek of what the final product might look like.

Tutorial on how to create an industrial desk from wood and pipe

Being happy with the progress we’d made, I decided just to keep the desktop sitting on the frame in order to apply a coat of Minwax Semigloss Polyurethane.  I also went ahead and used some bronze colored wood screws to mount the desktop to the frame.  One coat of poly was enough for this project.  Let things dry as per the provided instructions.

Tutorial on how to create an industrial desk from wood and pipe

Finished Product

Pipe legged desk and stacked wood top. Tutorial included.


Tutorial on creating an industrial desk from black iron pipe

How to make an industrial desk from pipe

Posted on 72 Comments

Industrial Pipe and Wood Bookshelves

Using pipe to make industrial brackets for shelves.

Remember our posts on Achieving an Industrial Décor with Black Iron Pipe – Part I, Part II, and Part III?  In this post, Brianna and I are back for more tips on adding functional industrial décor with a quick tutorial for building some pretty awesome industrial pipe bookshelves with – you guessed it – black iron pipe and spare lumber.

Using pipe to make industrial brackets for shelves.

Throughout our travels, Brianna and I have collected knick knacks from across the globe to remind us of where we’ve been, what we’re capable of, and where we can go if we put in the effort.  Unfortunately, these precious mementos rarely have a place in our home at the time of purchase.  This can lead to what might as well be a four-letter word: CLUTTER. (gasp)

Trying to get a handle on cleaning and clutter management in the new year, I can’t tell you the number of clickbait posts we’ve admittedly clicked on this January claiming hold the secrets to the latest storage and organization techniques that will completely transform your home.  Let me save you the trouble of clicking through the masses and boil everything down into one simple point for you:  Everything has a place.   If your clutter isn’t in it’s place, put it there.

Our problem?  We’d run out of space.  The solution?  Build more space! (In the form of bookshelves in our master bedroom)

Supplies

You can take a lot of liberties on how you attack this project.  Styles and wall sizes vary, and the supplies listed below are those used for this particular adaptation.

Industrial pipe bookshelves from pipe tutorial with step by step how to

In this project, we built 4 industrial pipe bookshelves in three different styles:

Short Shelves (times 2):

Long Shelf (Standard)

Long Shelf (Over Desk):

Craft Thyme

For each shelf, the basic steps are the same:

  1. Select your lumber,
  2. Cut your lumber to size,
  3. Sand, rough, and buff,
  4. Cut your mounting holes,
  5. Test fit,
  6. Stain and poly,
  7. Assemble, Mark, Disassemble, Install, and Reassemble

Select Your Lumber

Selecting your lumber is strictly a matter of personal preference.  You’ll do best to find a piece of wood that speaks to you.  Spend time digging through the lumber stocks searching for that perfect knot, grain, or imperfection.  For this order, I decided to leave the lumber we used up to the random choosing of a Lowe’s employee by ordering online for in-store pickup.

Cut your Lumber to Size

Each wall we were looking to fill was 62″ wide.  Not wanting to fill the space from edge-to-edge, we chose 46″ for the widest (bottom) shelf and a smaller 20″ shelf to be placed as a higher accent piece.  Cut your lumber to size using whatever mechanism you have at your disposal.  We used our smaller miter saw to make the cuts.

Sand, Rough, and Buff

Once your cuts have been made, you’re going to want to distress your wood a bit.  Why?  1) It looks cool, and 2) SAFETY!  The way we’re going to mount the shelves will leave them sticking out 8″ from the wall.  Sharp, fresh cut lumber corners jutting out from a wall are just an accident waiting to happen.

Industrial shelves from pipe tutorial with step by step how to

Take some time to sand down your newly cut corners and edges.  Feel free to be overly drastic in how you do this – it will surely make your end result that much better!  And leave those imperfections there for everyone to see.

Cut your Mounting Holes

Symmetry comes naturally to me; it’s just the way my mind thinks.  (Brianna loves and hates this about me all at the same time.)  For this project, I chose to drill out the mounting holes in the same position on either side of the shelves-to-be.  Symmetry could be optional for you, just ensure that your shelf is properly supported in the design you chose to go with.

Industrial shelves from pipe tutorial with step by step how to

Use a 1-1/8″ hole saw or drill bit to cut the holes for your 3/4″ wide pipe.  I’ve tried this many different ways (including rocking a 1″ bit when drilling) in an attempt to find the perfect hole size.  Trust me, 1-1/8″ is the way to go.  There’s no need to sand these cuts (unless you’re more of a perfectionist than I am), because the actual opening will be hidden in the final product.

Test Fit

It goes without saying that you should test fit your pipe into your newly drilled holes.  Use the 2″ nipples to make sure that they fit well.

Industrial shelves from pipe tutorial with step by step how to

If they fall right through, don’t worry and remember that you’ll have a pipe cap and an elbow or tee on the other end for support.  If the opposite happens and you find that your pipe doesn’t fit into your hole, you can either try the rocking method mentioned earlier (not recommended – you can hurt yourself if you aren’t careful), or use a rubber mallet to tap the nipple into place.

Stain and Poly

Once your lumber has been properly cut, sanded, and drilled, break out your favorite stain and polyurethane finish.  For this application, we used Minwax Early American as the stain, and Minwax Semi-Gloss Polyurethane as a finish.  Apply the stain, let it dry overnight if possible, and apply the poly the next day.  Waiting for everything to dry is the hardest part, but the end result is well worth the wait.

Assemble, Mark, Disassemble, Install, and Reassemble

Yes, it sounds like a lot of steps in one, but at least they’re simple:

  1. Go ahead and assemble each shelf as you intend.  HAND TIGHTEN ONLY.   (Interested in what we did? See the final orientation of parts in the photos below.)
  2. With a partner, hold and level the shelf where you’d like it to hang.
  3. Mark the holes in the flanges with a pencil.  (Pro tip: Have two pencils – one for each of you.  You’ll avoid yelling about loosing level status this way)
  4. Pull the shelf down, and disassemble.
  5. Install your drywall anchors where your marked your flange holes.  (I go over the top here and use anchors capable of supporting 143 lbs each)
  6. Install your flanges (only) using your freshly installed anchors and provided screws.
  7. Into the flanges, install all of the hardware you plan to install besides the shelf itself and the black pipe caps.
  8. Install your shelf over the nipples that you test fitted earlier.
  9. Secure your shelf by adding the black pipe caps to the nipple peering out of your shelf.  A strong hand-tightening should be sufficient to ensure stability.

The Final  Industrial Pipe Bookshelves

DIY pipe shelf tutorial with directions

DIY pipe shelf tutorial with directions

Industrial shelf made from pipe.

DIY industrial shelves. Tutorial and instructions.

DIY pipe shelf tutorial with directions

DIY industrial shelves and pipe desk. Tutorial and instructions.

How to make diy industrial shelves from black iron pipe.