Posted on Leave a comment

DIY Pokémon Christmas Tree

It was time to up our nerd game and move to a Pokémon themed Christmas Tree. Over the years we have featured all types of theme trees, but since the entire household plays Pokémon it was like serendipity for this year’s theme. Of course we had to add DIY elements to our Pokémon Christmas theme, but did mix in a few purchased elements. Doing an entire theme tree from scratch can get pricey so this is how we created our budget friendly Pokémon theme Christmas Tree.

We will start with the DIY Pokémon elements, and give you not one, not two, but really just two tutorials, with a third honorable mention. If you want to skip around we will look at the following in this order:

  • How to make a Pokémon energy garland
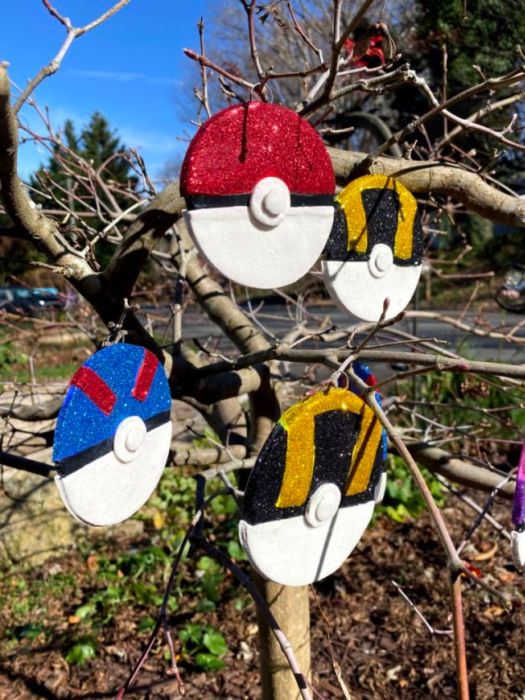
  • How to make flat Pokéball glitter ornaments
  • How to make pokeball pom pom ornaments. (Or die trying)
  • Pictures and inspiration of the DIY Pokemon Christmas Tree
  • Finally, How to remove glitter from your pets and nether regions (Oh wait, no. We don’t know how to do that)

Pokémon Energy Garland

If you play or collect Pokémon trading cards you are going to end up with loads of energy cards. If you don’t they are suuuuupppper cheap (affiliate links ahead). This tutorial is so easy I didn’t even take pictures. You need the following:

I laid out all of my energy types and decided I just wanted to repeat the same pattern. I unrolled a length of ribbon, fired up the hot glue gun, and then just hot glued a card to the ribbon. Then I skipped the space of two cards on the ribbon and glued down the next. After burning my finger tips and cursing the size of my tree I was done! No wait I wasn’t…

For some reason I thought blingy glitter was a good idea. So, proceeded to had touches of elmer’s glue wherever I wanted garland, then sprinkle glitter in the color that matched the card, and then proceeded to lose my mind as I repeated the process, over and over. Good news the garland is on year two and is just fine. Bad news the dog, cat, and I are covered in glitter from this year and last.

DIY Pokeball Ornaments

Alright, now for a more advanced DIY Pokémon Christmas Tree ornament. For these are are going to need the following:

I found it easiest way to create these pokeballs are to make two ornaments at a time. First roll out your white clay to a little more than 1/4 inch thick and cut a large circle.

Second, roll out your red and do the same as above.

Finally, cut a small strip of black the length of the diameter of the circles. It is very important to start from lightest clay to darkest. It is super easy to get dots of red or black into your white, unless you meticulously clean your cutters. So either go in order (or cover your mistakes with a heap of glitter like me).

Cut both circles in half and lay the out red, black strip, white and lightly mush them together. Then take your rolling pin and roll over the clay to firmly stick them together. This will make your final clay about 1/4 inch thick. Obviously, your circle is now gonna be a little wonky. Use your large cutter to bring it back into shape.

Once you are happy with your striped pokeballs you can use the small cutter (and the lid to your exacto knife) to cut out smaller circles. I rough up the center of the clay and the new circles to make sure it sticks to the flat piece.

When you are done assembling the pokeball Christmas ornament, cut a small slit and insert your metal ring or piece of wire. Close the clay around it, and when you bake the ornament it will become part of it for easy hanging.

Follow your clay baking instructions. I suggest covering your baking dish in tin foil. It keeps the white from turning tan.

Once the clay is cool then you can use glue to glitter. Unless you have sense. If you have sense and don’t want to be covered in glitter for years, you can skip this step. But if in your heart of hearts you want a Pokémon ornament so blinging it brings a tear to a shiny Charizard’s eye? Well then glitter away.

Pom Pom Pokeball

Nope, just no. I thought this was going to be an easy craft, but it wasn’t. If you want to follow my tutorial then it goes like this:

  1. Watch a Pom Pom making tutorial on YouTube using a cardboard ring. Fail
  2. Go buy a cheap Pom Pom maker and try again. Fail
  3. Go buy a more expensive Pom Pom maker and get a decent Pom Pom
  4. Use the expensive Pom Pom maker and try to incorporate red, white, and black into a ball. Make something that looked like poke dots. Fail
  5. Try again. Now the red and white are on one side of the black. Fail
  6. Fail
  7. Fail
  8. Finally figure out how to wrap one so it comes out like a pokeball.
  9. Manage to repeat this process a couple more times.
  10. Stop for the day and forget how to do it
  11. Fail
  12. Fail
  13. Make lots of pretty single color pompoms

Other Pokémon Christmas Decorations

Since this is year two of the Pokémon theme tree we did buy a few ornaments and a tree topper of Pokémon center (not an affiliate link). We added the led lights with glue to make it more festive. I also used part of my fancy card collection to make ‘ornaments’. I used hard card cases and glued on hooks. The cards are perfectly safe.

All in all we are very happy with out nerd tree. I miss our old Star Wars theme, but it felt good to give a new fresh look too! Hope you enjoy and can make your own Pokémon theme tree.

Posted on 2 Comments

First Time Home Buyer Boot Camp

buying a house

Most of Craft Thyme’s exploits revolve around the little Reganskopp homestead, but occasionally we do projects in other’s homes. When our friends, Trevor & Justine, decided this would be the year to get married and buy a house we wanted to cheer them on. We also gave them LOTS of advice (solicited & unsolicited) as first time home buyers. They, at least, seemed appreciative (thanks for pretending guys) of our first time home buyer boot camp. While most real estate agents should help a first time home buyer, we thought we would distill our experience into a quick first time home buyer guide in case you don’t have the helpful sort.

First, let’s set the stage: Western North Carolina real estate is an odd market. Houses around Asheville, range from pricey to ridiculous. They are a mix of old (40’s-60’s), really old (1900’s-30’s), and brand spanking new (which are the ridiculous prices). It makes it very hard to find a first time home that can be afforded and also isn’t a dump. Which is where we come in! We offered to help look at houses and then do some basic cosmetic transformations when they finally found ‘the house’… Guess what? They found ‘the house’! Of course, the house came with some awesome items like cracked ceilings, faded eggplant paint, stale cigarette smell, but also large open living/dining area, and spacious yard. We looked it over with them and saw lots of the potential they also saw. Offer was made but that is just the beginning!

First Time Home Buyer Boot-camp

Please note we are NOT licensed real estate professionals, but we have bought, sold, refinanced, and fixed up a number of houses in Western North Carolina. Between Adam and I, we have purchased 5 houses. Three of them built before 1935! Talk about a lot of repairs, mortgages, and learning experience shooo, but always double check our advice with the paid professionals.

First Time Home Buyer Bootcamp

The Search

Before you begin any search make a list of the things you must have and want to have. If you are shopping with a spouse you might find that your ‘need to have’ list isn’t exactly the same.

When comparing lists our friends found that they had to pay attention to find both a large yard and a location that was not so far away from the city/civilization. The need list and your price range will inform your buyers agent and your search. Your ‘want list’ will help you make the final decision and allow you flexibility in your budget. Once you have a budget and your lists remember the following.

  1. Be prepared to look at a lot of properties. Most first time home buyers will not have a good idea of what items are in their price range. Hopefully you will be pleasantly surprised! However, in a lot of cases you may find you need to reign in your expectations to meet your budget.  Or you can be like us and buy the first house you saw (Brianna) or decide you will buy a house when you walk in the door (Adam).  Don’t be like us!
  2. Once you have seen a few properties start doing your own web searches. Many property websites will set up alerts to your email when something new comes in the market in your search criteria. Being the first to put an offer in on a property can make a huge difference in a hot market.  You will also get lots of spam.  Trust me I am still getting email about houses in and area I lived in 5 years ago… Which leads to #3
  3. Be prepared to make decisions quickly. One of the reasons I tell you #1 (Look at a lot of properties) is so that when you find a good home you can jump on an offer and not be stuck in indecisive mode. We have lucked out on a number of properties because we came in quickly with a fair offer. Our friends did too!  Pro Tip: Have that pre-approved mortgage letter.  It makes your offer much more attractive, plus it is a lot less worrisome if you know you can afford the offer you are placing.
  4. If you have a buyers, agent look at properties they suggest too. We found our previous house at the suggestion of our buyers agent. We actually would not have looked at the house. We had seen it online and made the assumption that the seller was going to place another house next to it and subdivide the lot. Our buyers agent knew they had plans to sell the house with the larger lot instead of developing it further. We would have passed on our perfect house!
  5. Bidding wars are just not worth it. It is tempting to pony up some more cash when you have been on a lengthy search, already fallen in love with your house, and then someone is out-bidding you by a few 1000 dollars. Don’t, just don’t. There is always another house. Being house poor and paying at the very top of your market value is never a good way to start off your first home. Leave the bidding war to more experienced home buyers. Even then…  I still give it a “don’t” no matter how experienced a buyer you may be.
  6. If you aren’t using a buyers agent make sure to have a reputable real estate lawyer.   Actually make sure to have one of those no matter what.  We had the worst time closing on our current house because the previous owner’s lawyer had been barred from practicing real estate law and there were title questions.  Anyway, a good lawyer can help you put in a formal offer (Buyer’s agents can do this part in many states) and close on your home (Buyers agents can not do this part in many states). This process is not one you want to scrimp on as a first time home buyer. A house is probably the largest investment you are going to make, you are going to want to protect yourself throughout the process.

buying a house

When Buying an Older Home or Any Home!

Great, now you have put in an offer and it has been accepted! Let the panic begin! Just kidding, don’t panic but do move fast. Hopefully, you have set a certain due diligence period to check out the house and back out of the offer if you found something cray, cray.  If you haven’t, well then, you probably didn’t pay attention to #6 from above.  Tsk, Tsk.

If you are a first time home buyer we must stress the importance of spending a little extra cash and getting an excellent home inspector. We have a great home inspector that we recommend. When he is done you basically end up with a 100 page manual and a 2 hour walk through that explains everything about your house. Not all home inspectors are the same! Ask around for recommendations and do not just use the first person on your real estate agent’s list. But Do book this person ASAP. Your due diligence period is likely small and home inspectors, contractors, surveyors, etc can often be booked up.

Older Home Buying
I see potential in older houses, but you also want to see electric, and foundation, and running water ;)!

Once you have your home inspection use that to negotiate repairs. Sometimes this works and sometimes it does not.

Our friends were able to get plumbing fixed and some money at closing. I have been able to negotiate money back for new electric. Sometimes, in the case of our current house, you are getting a cheap price so as NOT to negotiate repairs. It never hurts to ask, but you may not get anything. At that point you can make the informed decision if the work/DIY is something you are interested and capable of completing or if you need to accept the loss of a little money and move onto another property.

ALWAYS remember that cutting a loss of a few hundred dollars is better than being saddled with a house you are unhappy with and/or is so costly to repair you end up being house poor just to keep the lights and water on. That being said make sure to do the following as soon as you have an accepted offer.

  1. Notify your mortgage company: The time it takes to close a mortgage is really quite insane. Do yourself a favor and get the process moving as quickly as possible.
  2. Once you notify your mortgage company they will set up an appraisal. If for any reason, you think you might be backing out of the property have them hold the appraisal to you have the home inspection. BUT NOTE: holding the appraisal can hold up closing. Again, this seems like it shouldn’t be a big thing, but the bank ordering the appraisal to the actual time of completion can be pretty lengthy. You are not going to be able to close that mortgage till the bank makes sure you have enough equity to cover the purchase price.
  3. Home Inspection: Book one ASAP. If you really aren’t going to hire a professional at least get your home-knowledgeable friends to do a walk through and make a list of everything you want to repair upfront plus everything that may need fixing in the first few years (so you can start saving).
  4. Survey: Any time there might be property line questions it is worth it to get a fresh survey. You may need to ask for them to mark the line if you are trying to notify the neighbors that the line is not exactly where they thought it might be.
  5. After your due diligence: Go ahead and call cable/internet, power, water, and electric companies. I made this rookie mistake and forgot to book the internet provider till almost at closing. They were not able to come for 2 weeks! Talk about eating through data on our phones.
  6. Keep in contact with all parties. While in a perfect world the various home inspectors, real estate agents, lawyers, mortgage companies etc would be doing their job it never hurts to check in. You don’t have to be obnoxious, but a simple email or call to ask if they need anything else is a good reminder for them to pick up your file.

Great You Made It!

Great you made it…Almost!  You haven’t closed yet.  If you have gotten through all the hurdles it is time to start pestering your laywer for the HUD-1 Settlement Statement.  Depending on your state, they have to produce this a certain number of days prior to closing.  I know, I know, there are lots of numbers and columns.

Look Over your HUD-1 ASAP!

I am pretty sure I have never had a pre-closing HUD where it was correct.  You need to diligently contact the laywer, mortgage company, real estate agent, or any one else to correct any mistakes.  The HUD is the be all and end all of closing and if it isn’t right you may delay closing and/or spend an entire flipping day in a lawyer’s office (true story I even left for a lunch break).

Once your HUD is settled the only thing left to do is go get a cashiers check for closing from the bank, and bring your ID to closing.  You will be asked to sign or initial about 1000 documents.  It is impossible to read every piece of it (which is why we suggest the reputable lawyer), but make certain to pay attention to the high points.  You want to verify the title information, mortgage, etc matches what you have been discussing the whole time.  Once you close you should get some keys and be good to go!  We had a few closings that ran late and were registered at the court house till the next day.  You will want to consult that lawyer on whether you should move in or remain out of the house at that time.

But anyway once you have closed you are now a HOME OWNER!  Enjoy!

And if you want to grow some insta-equity we will be going over tips shortly on quick fixes that add a lot of equity to your home for little upfront cost!

Posted on 4 Comments

How to Make a Goat Wire Fence Trellis

Completed goat wire trellises mounted to various raised beds

Goat wire fences are kinda the rage around Asheville at the moment. Trend or not, I personally enjoy the aesthetic. So why not build a goat wire trellis?! Craft Thyme tries to use similar materials for a lot of our builds so that everything in the outdoors has a more cohesive feel. In the last house it was a series of conduit structures. This one, well, Adam was kind enough to work with my goat wire obsession. We have lots of plans for the yard but are currently adding the goat wire in a series of trellises. I’m a big fan of growing food upwards in small urban environments and these DIY goat wire trellises are sturdy and perfect for everything from squash to grapes.

This build requires a few more tools than the usual, so I would rate this one intermediate. Not so much for the skill level, but mostly for the extra tools necessary.  As always be careful, don’t sue us, and build at your own risk! Affiliate links to follow.

Completed goat wire trellises mounted to various raised beds

Goat Wire Trellis Supplies

  • Goat Wire Fence Panel (4ft x 16ft)  You will need to get this from your local farm store (Think Southern States, Tractor Supply, etc).  The rolls of wire are impossible to get nice and flat.  Which is fine for a composting fence but not so great for a decorative trellis.
  • 2″ X 6″ or 2″X 4″ Lumber in lengths for your project. I discuss this more in step 1. Also if you want to get into that whole treated versus untreated controversy read the first few paragraphs of my How to Make Raised Garden Beds that Last.
  • 3″ Wood Screws
  • Waterproof wood glue (Or if you are forever forgetting supplies like us then regular gorilla glue works pretty well too)

Tools

Step 1 Deciding on Frame Size

In the supplies above you will note that I have two different wood sizes recommended. This is all because of proportion. We made some small goat wire trellises to replace some old ones that had been attached to the house. These looked nice with just plain 2X4 lumber. We also made some big honking trellises to go on the back of the aforementioned raised beds. Those were large and in charge and made with 2X6’s. Those large trellises also almost ended with a screaming match in the middle of the yard, but since neither of us decided we wanted to entertain the neighbors or get divorced we managed to remain civil and finally get the goat wire trellises in place. So you have been warned. The larger you make a goat wire trellis the more of a pain in the arse it becomes to install. THOUGH, we did actually work out a reasonable installation method by ginormous trellis #3.  You are welcome to skip our pain!

Now that your public service announcement and marriage saving tips are out of the way; plan out a simple box as follows.

You will have two long legs for installation. With the small goat wire trellises the legs just rested on the ground and attached the frame to the brick. With the larger ones we made extra long legs that were buried and screwed to the back of the raised beds.  You can see a back view below. Just remember to leave enough leg for your application!

Step 2 Time to Saw

We went to the trouble to miter cut the top board and side supports. Just a simple 45 degree miter looked a little more professional than a flat join. The bottom board fits flush on the inside of the side supports and does not need a miter.

Pro Tip: It is a little easier to create these goat wire trellises if you are a bit flexible in the finished interior height of the trellis not counting the legs. The wire will be set in channels and getting that wire set to an exact depth in the channels… Let’s just say even we weren’t silly enough to try that level of perfection.

Step 3 Channel Inner Peace or at least Channel your Wood

If you want the nice seamless finish that you see in these goat wire panels you are going to need to set them in channels in the wood. There are a few ways to make channels in wood but we opted for using the table saw. Even with the table saw there are two different was to make the channels. The first is the easiest and most expensive. It requires a dado blade. This blade is actually multiple blades you can set to create a channel in 1-2 passes. These are wonderful and also around $100! Though I did find one on Amazon for the 50ish range, but, I can not vouch for the quality. Since I don’t see a need to channel lots of wood in my life, and Adam didn’t see any immediate need to continue to channel after this project he opted to go the more labor intensive but cheaper method.

I heartily seconded his decision as I saw that as an extra $100 savings just asking to be spent on plants. I was informed math doesn’t work that way…

So how did Adam make the channels? Here is his description:

  1. Set the blade 1/4″ off center for the small width of your wood. You only need to set the height about 3/4″ inch deep to hold the goat wire.
  2. Run the board(s) down the entire length of wood
  3. Flip the board and run it down a second time.
  4. If you flipped it correctly you should now have a 1/2″ wide section in the center of your board. Now move your board slightly (1/8″ ish) in towards center. Run the board down, flip and repeat.
  5. Repeat step 4 if necessary.

After that you should have a 1/2″ channel in the center of your wood with lots of thin pieces of wood. Simply pull those out and break them off. I may have caught Adam using my old garden clippers and weeding tools to knock the wood bits out of the channel.

Ripping a channel in wood to make a slot for the goat wire fence

Step 4 Assemble Time!

You might notice that I haven’t had you cut the metal yet. There is a reason. it is a heck of a lot easier to adjust the goat wire panel than it is to reframe all the wood again. So let’s get to assembling! The small ones can be fully assembled on the ground. DO NOT try to assemble the large ones and then put them in place. Just don’t!  Recall marriage advice above step 1?

We made that mistake as you can see in the above framing picture. It broke and had to be reassembled in place. Feel free to dry fit it together and check to see if your channels are clear (seen in this smarter second attempt). Then do as we say and not as we did in the assembly.Test fitting the goat wire fence panel in the trellis frame

For both types of trellises start with your top bar and side bars. Line up your miter joints put in some glue and the angle screws into the wood. Next do the following:

Small Goat Wire Trellis

Now is time to cut the wire. We found it easier to measure the inside dimension and add 1 inch. Then you can lay the panel over the top of the wood and refine. Once cut, slide the wood into the channels. It is helpful to have two people to slide each side in but Adam manages to do the small ones with no help. I’m sure I was off eating bonbons or some such while he was making them.

Trimming the goat wire to fit in the channeled wooden frame.

After sliding the wire in, simply slide the bottom piece of wood into place and screw it in. Voila trellis done. We just installed by hammering masonry nails straight through the wood and into our brick..

Small goat wire trellis with muscadine grape

Large Goat Wire Trellis

After a lot of trial, error, and minor recriminations, we worked out the best method for installation of the larger trellises. Take your joined top and side supports and install them in place. You may be wondering how to get the goat wire into the trellis but trust us it works out just fine. Once you have your posts in place and the top leveled cut your wire to size. In the larger lengths it will bend enough in the middle that you will be able to slot the sides into the channels and then push it up to the top. It is super useful to have an assistant to hold the wire in place while someone else places the bottom board and screws it in.

Measuring goat wire to trim the panels to fit in the trellis frames

That’s it folks. With some wood, screws, a little glue, and a lot of patience you can have these very sturdy goat wire trellises. We have some muscadine grapes already headed up the small ones and have started training thornless blackberries up the largest one. The other side is holding some raspberry canes. Until I get the berries well established and I have some scarlet runner beans planted to add some color during the summer.

We love questions and comments! Please leave one below if you need any clarification from our tutorials.

Mounted goat wire trellis from the back
Back view of how we connected the trellis to the raised bed

How to build a trellis out of goat wire fence

Posted on 2 Comments

Upcycling to Make an Adjustable DIY Pulley Light Fixture

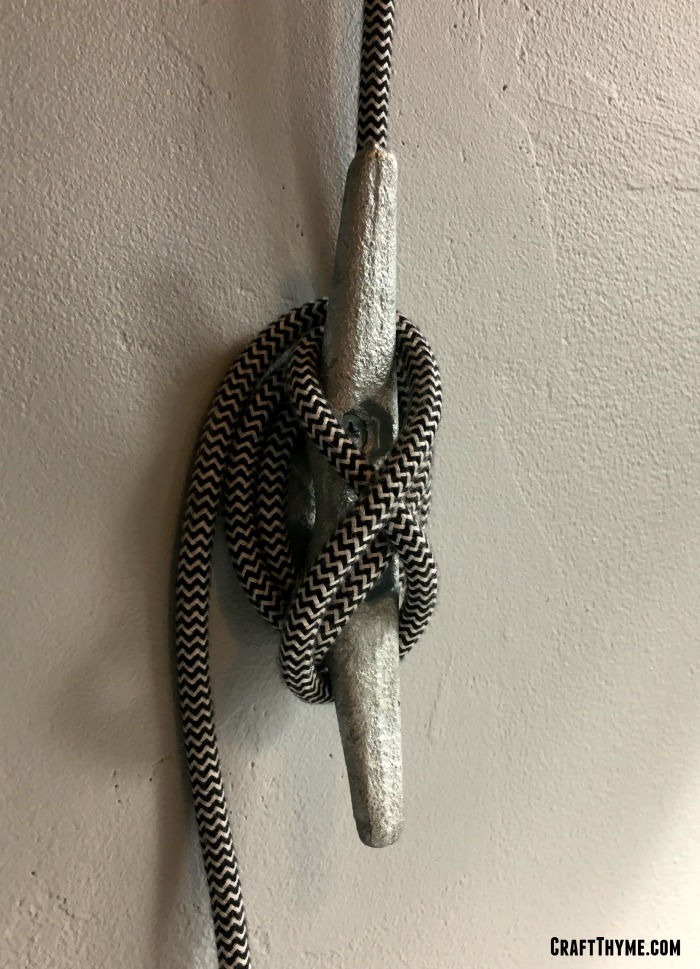
Boat cleat used as an anchor for an adjustable pulley light.

When we first moved into our 1927 home in Asheville, one of the first things we noticed was the severe lack of electricity.  Not that electricity was entirely absent, but by today’s standards, there wasn’t much for us to work with.  There were no outlets in any of the bathrooms, bedrooms had two outlets placed in what seemed like after-thought locations, and all rooms (regardless of size) were only wired for a single ceiling or wall light fixture.

Our new master bedroom was easily twice the size of the one we had just moved out of, but the outlet placement and lighting left a little to be desired.  The new master contained what we thought of as a reading/sitting area that sat inside of one of the home’s two front dormers.  The space was roughly 8′ x 8′, and we thought it would make a perfect reading nook with two chairs and a low bookcase.  There was only one problem with the reading nook plan… there was no lighting in the space.  There was however an outlet, and that opened up some possibilities!  We could have put a lamp in the space, but that would have dictated a layout different that what we had envisioned.  Ceiling lighting in that space would have been ideal, but with nothing available, we were forced to get creative. DIY Pulley Light to the rescue.

Our reading niche was dark before we installed a pulley light.

Bring on Craigslist

Always looking for something to upcycle, we immediately turned to Craigslist to see what was being offered up to the masses.  It just so happened that we found someone selling lights from a factory they helped salvage a few months back.  At $20 a pop, they seemed like a good deal, so we made the trip across town to check these babies out.  Suffice to say, after a coat of satin nickel spray paint, they were a perfect fit for the space.

Cream colored bleh lights we found on craigslist before we transformed them into fresh, modern pulley lights.

BUT!  We still had to make them work as ceiling lights….

That’s when we had the brilliant idea to use fancy black/white cloth lamp wire, a nautical rope cleat, and galvanized pulleys to 1) hang the light from the ceiling, 2) make a functional DIY pulley light that could be raised or lowered based on lighting preference.

Painted Craigslist light before finishing the pulley light

Supplies

Installing a DIY Pulley Light Fixture

The first step to this process is to install your pulleys:

  1. Mark the location on the ceiling from where you want your light to hang.  For us, this was the center of the space.  Make a small, tiny, erasable mark – you won’t be covering it up.
  2. Envisioning what it would be like for your lamp to hang from your pulley, place your pulley to one side of the mark you just made.
  3. If using the model of pulley we used for this project (see above), mark the four holes that you’ll use to mount your pulley to the ceiling.
  4. Install your center pulley!
    1. If mounting into a stud/rafter, go ahead and install your pulley directly.
    2. If mounting into ceiling drywall, we recommend using heavyweight anchors installed as per the manufacturer’s instructions.  (Something like these should do you just fine).   After your anchors are in place, go ahead and install your pulley
  5. Repeat steps 1-4 for Pulley #2, but this time, the pulley should fall near the corner of the ceiling/wall where your outlet lies.

Ceiling mounted pulleys to create an adjustable light.

When your pulleys are in place, go ahead and install your boat cleat:

  1. Mark the location on the wall where you want to be able to access the lamp wire wrapped around the cleat.
  2. Mark the two holes that you’ll use to mount your boat cleat to the wall.
  3. Install your boat cleat!
    1. If mounting into a stud, go ahead and install your cleat directly.
    2. If mounting into drywall, we recommend using drywall anchors installed as per the manufacturer’s instructions.   With your anchors in place, go ahead and install your cleat.

Boat cleat used as an anchor for an adjustable pulley light.

Next, wire/re-wire your light to ensure you have enough length to get you where you need to go:

Our light came with only 3 feet of old, dingy, and yellowed wire still attached.  Needless to say, that wasn’t going to do the job or give us an awesome design for our finished product.  This is where the 20′ of cloth lamp wire comes into play.

  1. Disconnect the the old lamp wire from your light.  This is often easier said than done, but you should be able to access where the wires actually connects to the light socket.  Once removed,
  2. Attach the new lamp wire.
  3. Do NOT install the plug at the other end of the lamp wire.  We’re not ready for that quite yet.

Finally, run your lamp wire through the pulleys, around the cleat, and prepare for awesomeness:

  1. Run the open end of the wire through pulley #1, over to and through pulley #2, and down the wall towards your cleat.
  2. When your light is at the right height, start wrapping the extra length of your cloth lamp wire around the wall cleat.
  3. When you feel that you have enough line around the cleat to raise and lower the light (assuming that you want this functionality), measure out enough slack on the bottom end of the cleat so that you can reach your outlet.
  4. Either cut your lamp wire here or neatly organize the remaining slack.
  5. Install the plug onto the end of your wire.  We find that there is always a wide variety of plugs available at your local big-box home improvement store, and a lot of them have an awesome retro feel!

With the circuit complete, you can now test out your new light creation!

Completed diy pulley light and reading niche

DIY pulley light makes an adujustable light for our reading niche.

Posted on Leave a comment

How To Make Galvanized Pipe Curtain Rods

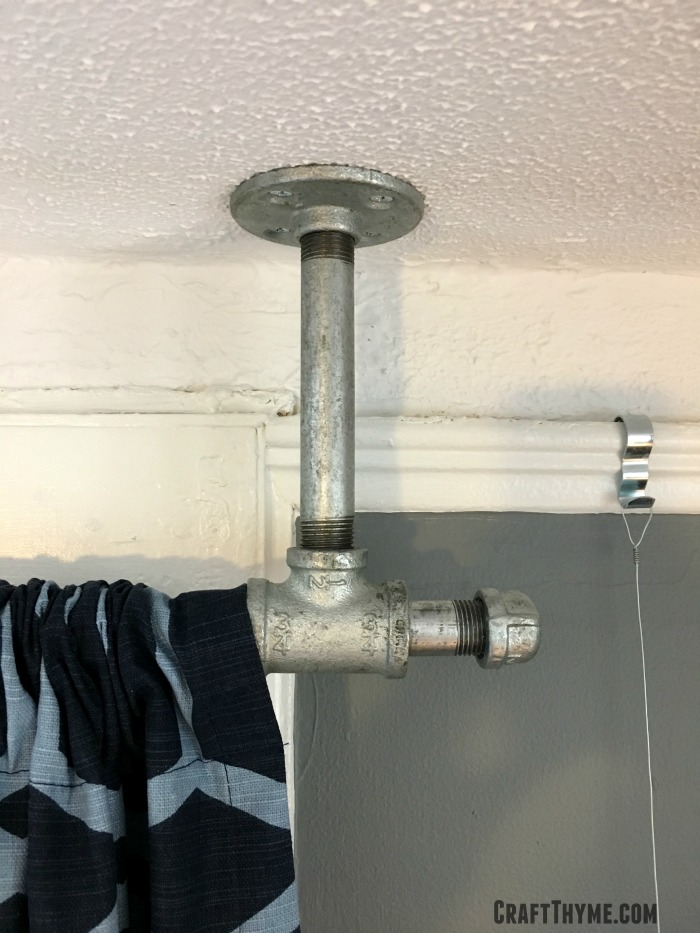
Tee ceiling mount pipe curtain rod

In our previous house we used black iron pipe for almost every single fixture. From pipe curtain rods to toilet paper holders we made them all.  Black iron pipe curtain rods were economical, easy to install, and fit the industrial decor of the previous home.  Once we moved down the street to a 1927 fixer upper we just didn’t feel the black iron was doing it for us.  Still it is hard to beat the price of a pipe curtain rod… Especially when you are looking at putting curtains and blinds over 54 windows (le sigh).  In comes our fancy take on pipe curtain rods with a couple of fresh designs in galvanized (silver) pipe.

Details of galvanized ceiling mount pipe curtain rods

Using galvanized pipe for curtain rods is not quite as economical as black iron, but still a shit-ton better than pre-made curtains rods, especially in the 8+ ft lengths needed.  We originally made replicas of the former pipe curtain rods that you can read about here.  However, it just wasn’t working for the installation and new space.  We needed something more ‘interesting’.  I came up with the random idea to install them from the ceiling.  Adam took that idea and ran with it!  He even came up with a few new end joints.

As typical for us we got most of the fittings from Zoro (affiliate links to follow) and got the actual lengths of pipe custom cut at our local home improvement store.

Supplies T- Connected Ceiling Mount Pipe Curtain Rod

Tee ceiling mount pipe curtain rod

Supplies Curved Ceiling Mount Pipe Curtain Rod

T – Connected Galvanized Pipe Curtain Rod

Step 1

Usually Adam writes these instructions since these pipe curtain rod styles are his creations, but I thought I would take a stab at it.  Plus how often do I get to write about nipples, rods, and elbows?  Ah yeah!

You’ll need to make two brackets to hold your rod.

  1. Connect a nipple to a flange.
  2. Connect a tee to the other side of the nipple.
  3. Hand-tighten everything

Step 2

Install one of the brackets in position from the ceiling.  Use appropriate fasteners.  We were able to hook into the lathe behind the plaster, but I highly suggest at least one or two drywall anchors meant to hold a lot of weight.  Maybe that is because we have small kids and I just picture them hanging on the curtains regularly…

If you are working solo then mount both brackets, measure, and try to line everything up so you can simply slide your rod into place when done. There is a little wiggle room on the brackets but you need to try to get them the same distance away from the wall and left/right from the window.

If you have two people it can be easier to mount one bracket where you want it and slide the rod with second bracket into place, then have your helper mount the second bracket.  It is a lot easier to measure the distance from your window in multiple places when the rod is already in.  (Insert giggles about rods)

Step 3

Slide the rod in to make sure you mounted everything correctly then back out one side and put your curtains on.  Then cap both ends.  Before you ask, yes, they will shift a bit in the bracket.  It has never bothered me.  When I open the right side it shifts right, then it goes right back to center when I open the left.  If you really hate the shifting aspect you could glue them in place (Use some construction adhesive meant for metal) or follow design option #2.

Galvanized pipe curtain rod

Ceiling Mounted Curved Pipe Curtain Rod

Step 1

Just like previously, you’ll need to make two brackets to hold your rod.

  1. Connect a nipple to a flange.
  2. Connect an elbow to the other side of the nipple.
  3. Hand-tighten everything

Step 2

This is where the assembly differs, step 2 & 3 get combined into one arm weakening installation.  Frankly although it adds a bit in installation time we highly suggest giving your galvanized pipe curtain rod a test fit.  This entails assembling the whole rod, sans curtain. To assemble simply put your elbows brackets on both ends of your rod.

You will likely need a helper at this point to help hold the curtain rod to the ceiling.  We checked to make sure we were centered with the windows and marked our mounting holes.  You can just go balls out if you like and do the next steps without a dry run, but I think you’ll be happier with the outcome if you test the assembly out first.

Then the fun begins! You will need to take one elbow bracket off put and put your curtains on the rod.  Then screw the bracket back in place assembling the whole thing completely.  Yes, now you will need to lift the whole mother-trucker into place, while not yelling at your spouse helper, and mount it.  While not horrifically heavy, you are still going to want to get that portion over quickly.

Galvanized pipe curtain rods and pulley light

After that you can stand back and admire your handiwork!  Oh yeah, that really is a fabulous DIY pulley light we will be showing you soon!

How to Make Ceiling Mount Pipe Curtain Rods