Posted on Leave a comment

DIY Pokémon Christmas Tree

It was time to up our nerd game and move to a Pokémon themed Christmas Tree. Over the years we have featured all types of theme trees, but since the entire household plays Pokémon it was like serendipity for this year’s theme. Of course we had to add DIY elements to our Pokémon Christmas theme, but did mix in a few purchased elements. Doing an entire theme tree from scratch can get pricey so this is how we created our budget friendly Pokémon theme Christmas Tree.

We will start with the DIY Pokémon elements, and give you not one, not two, but really just two tutorials, with a third honorable mention. If you want to skip around we will look at the following in this order:

  • How to make a Pokémon energy garland
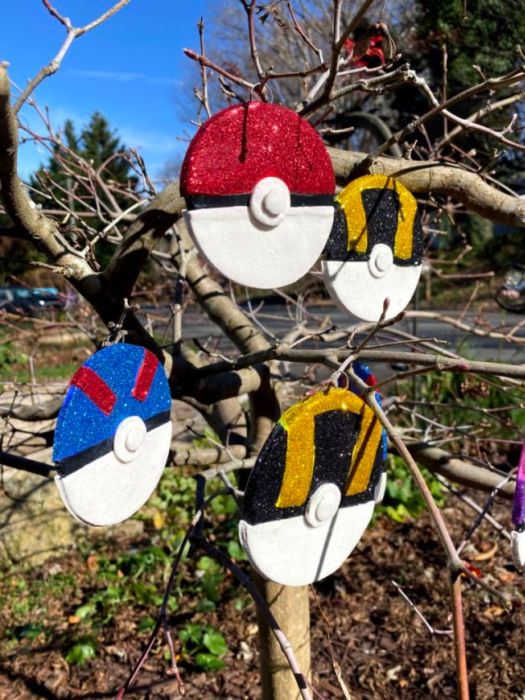
  • How to make flat Pokéball glitter ornaments
  • How to make pokeball pom pom ornaments. (Or die trying)
  • Pictures and inspiration of the DIY Pokemon Christmas Tree
  • Finally, How to remove glitter from your pets and nether regions (Oh wait, no. We don’t know how to do that)

Pokémon Energy Garland

If you play or collect Pokémon trading cards you are going to end up with loads of energy cards. If you don’t they are suuuuupppper cheap (affiliate links ahead). This tutorial is so easy I didn’t even take pictures. You need the following:

I laid out all of my energy types and decided I just wanted to repeat the same pattern. I unrolled a length of ribbon, fired up the hot glue gun, and then just hot glued a card to the ribbon. Then I skipped the space of two cards on the ribbon and glued down the next. After burning my finger tips and cursing the size of my tree I was done! No wait I wasn’t…

For some reason I thought blingy glitter was a good idea. So, proceeded to had touches of elmer’s glue wherever I wanted garland, then sprinkle glitter in the color that matched the card, and then proceeded to lose my mind as I repeated the process, over and over. Good news the garland is on year two and is just fine. Bad news the dog, cat, and I are covered in glitter from this year and last.

DIY Pokeball Ornaments

Alright, now for a more advanced DIY Pokémon Christmas Tree ornament. For these are are going to need the following:

I found it easiest way to create these pokeballs are to make two ornaments at a time. First roll out your white clay to a little more than 1/4 inch thick and cut a large circle.

Second, roll out your red and do the same as above.

Finally, cut a small strip of black the length of the diameter of the circles. It is very important to start from lightest clay to darkest. It is super easy to get dots of red or black into your white, unless you meticulously clean your cutters. So either go in order (or cover your mistakes with a heap of glitter like me).

Cut both circles in half and lay the out red, black strip, white and lightly mush them together. Then take your rolling pin and roll over the clay to firmly stick them together. This will make your final clay about 1/4 inch thick. Obviously, your circle is now gonna be a little wonky. Use your large cutter to bring it back into shape.

Once you are happy with your striped pokeballs you can use the small cutter (and the lid to your exacto knife) to cut out smaller circles. I rough up the center of the clay and the new circles to make sure it sticks to the flat piece.

When you are done assembling the pokeball Christmas ornament, cut a small slit and insert your metal ring or piece of wire. Close the clay around it, and when you bake the ornament it will become part of it for easy hanging.

Follow your clay baking instructions. I suggest covering your baking dish in tin foil. It keeps the white from turning tan.

Once the clay is cool then you can use glue to glitter. Unless you have sense. If you have sense and don’t want to be covered in glitter for years, you can skip this step. But if in your heart of hearts you want a Pokémon ornament so blinging it brings a tear to a shiny Charizard’s eye? Well then glitter away.

Pom Pom Pokeball

Nope, just no. I thought this was going to be an easy craft, but it wasn’t. If you want to follow my tutorial then it goes like this:

  1. Watch a Pom Pom making tutorial on YouTube using a cardboard ring. Fail
  2. Go buy a cheap Pom Pom maker and try again. Fail
  3. Go buy a more expensive Pom Pom maker and get a decent Pom Pom
  4. Use the expensive Pom Pom maker and try to incorporate red, white, and black into a ball. Make something that looked like poke dots. Fail
  5. Try again. Now the red and white are on one side of the black. Fail
  6. Fail
  7. Fail
  8. Finally figure out how to wrap one so it comes out like a pokeball.
  9. Manage to repeat this process a couple more times.
  10. Stop for the day and forget how to do it
  11. Fail
  12. Fail
  13. Make lots of pretty single color pompoms

Other Pokémon Christmas Decorations

Since this is year two of the Pokémon theme tree we did buy a few ornaments and a tree topper of Pokémon center (not an affiliate link). We added the led lights with glue to make it more festive. I also used part of my fancy card collection to make ‘ornaments’. I used hard card cases and glued on hooks. The cards are perfectly safe.

All in all we are very happy with out nerd tree. I miss our old Star Wars theme, but it felt good to give a new fresh look too! Hope you enjoy and can make your own Pokémon theme tree.

Posted on 23 Comments

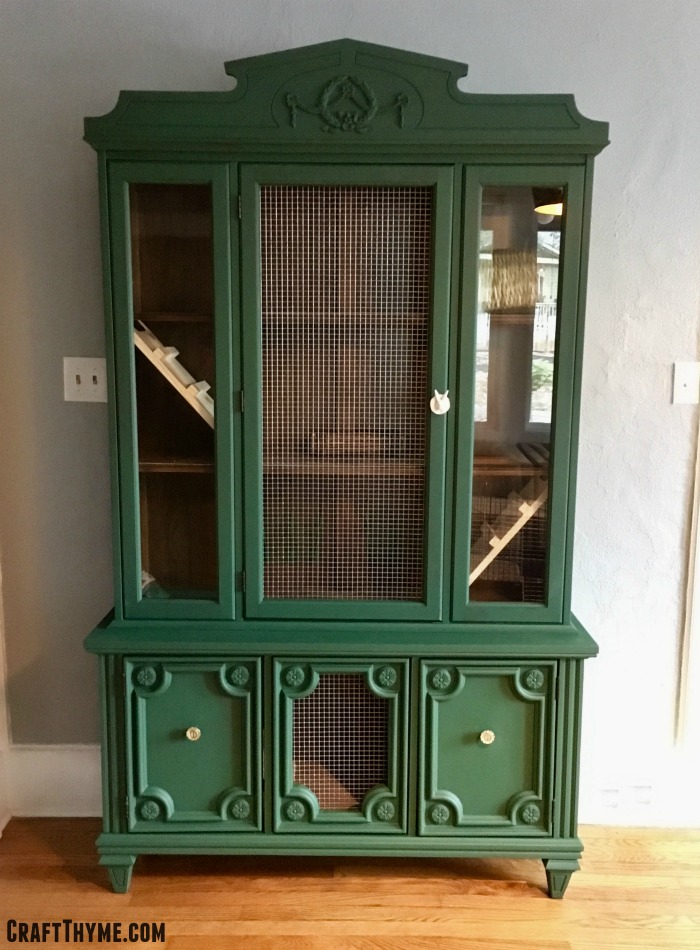
Make a Indoor Rabbit Hutch From a China Cabinet

What?! A twenty-five dollar Craigslist china cabinet becomes what?! An indoor rabbit hutch. Perfect for your pampered bunnies.

Want a rabbit hutch that looks elegant?  Well, we did!  We wanted to DIY an indoor rabbit hutch for our new family members Ollie and Biscuit.  We got these rabbits from Adam’s work as a co-worker’s friend was trying to rehome her bunnies before embarking on a lot of travel.  You might wonder how we decided to get some rabbits and it went something like this:

Forwarded email from Adam: Want to get some rabbits?

Me via Instant message: Ummmm… Sure?

Adam via IM: The boys will love them.

Our new family members; Ollie and Biscuit our mini-lop rabbits

So we have rabbits.  All kids need pets, right?  These rabbits needed a indoor space…  We are talking adorable, cute, pampered, litter trained, indoor rabbits.  So we needed an adorable, awesome, and elegant space for the rabbits.  Queue the DIY indoor rabbit hutch.  We found an old china cabinet on craigslist for $25 that just said: refab me into the most awesome indoor rabbit hutch ever!

Of course, this china cabinet wouldn’t fit in any car we have… Because that would be waaaay to0 easy.  So, thanks again Richard, for helping deliver said china cabinet.  (No really THANK YOU!  I have had rabbits in the middle of my living room for two weeks…)What?! A twenty-five dollar Craigslist china cabinet becomes what?! An indoor rabbit hutch. Perfect for your pampered bunnies.

In comes the china cabinet and before you can even say “DIY indoor rabbit hutch” Adam has already ripped out the middle glass panel.  So yeah, no picture of that!  From that we did a lot of measuring, talking, internet research, and experience from having the rabbits.  Our main goals:

  • More space with interesting areas for the rabbits
  • Something that looked good in our house
  • Reduce how much litter, hay, and rabbit pellets end up all over the floor
  • Provided good ventilation for the buns
  • EASY TO CLEAN!  (Brianna’s major requirement)
  • Make it quirky and interesting

We designed the bottom hutch space to hold litter pans and sleeping areas.  There are ramps that go up to an eating area.  Above that are two more levels with a timothy hay tunnel, chewing twigs, and toys for fun.  We created areas for the hay to stay in the hutch and planned how to make this easy to clean!

What?! A twenty-five dollar craigslist china cabinet becomes what?! An indoor rabbit hutch. Perfect for your pampered bunnies.

Once we had the ideas sketched out we just got going!  It took minimal supplies. Affiliate links may follow:

DIY Rabbit Hutch Supplies

  1. 1 – 1 x 8. UNTREATED.  We used it to cut the ramps and grips.  Make sure it has no chemicals that could harm the bunnies.
  2. Hinges: We bought three hinges so that the ramps can be to clean.  They simply push up so we can just sweep and litter out from underneath
  3. Peel and Stick Tile 13 – 12 x 12 We lined all the shelves with peel and stick tile to make it easy to sweep bedding, litter, and bunny poops out of the hutch.
  4. 1/2″ Hardware Cloth (Chicken wire or other metal wire would work.  Indoor rabbit hutches don’t have to protect the rabbits from predators like an outdoor hutch would)
  5. Screws & Staples

Additional Supplies (Optional)

  1. Paint (We made our own chalk paint with this awesome recipe we had used before)
  2. New Knobs: Oh yes, that is a rabbit knob!  We happened to find three awesome knobs on sale for $2.50 at Anthropologie (Trust me I am too cheap to buy anything there full price)

Equipment

  1. Drill
  2. Saw

Optional Equipment

  1. Miter Saw
  2. Jig Saw
  3. Skil Saw
  4. Hand Sander

Transformation Steps

For this build we really winged it.  Adam used a skil saw to cut out holes for the ramps and a jig saw as a I wanted a fancy opening on the bottom.  Yep, that’s me, “Can we cut this center panel out?!  It will look hella cool and ventilation… But mostly it would look awesome…And RABBITS!”  Once the rough holes were cut, Adam, ran a quick sand on the pretty rough cut holes so the buns wouldn’t get hurt on rough edges.  We didn’t worry about beautiful cuts as we were going to cover the floor in tile anyway.Rough cuts are all that is needed to make this indoor rabbit hutch

Painting a Indoor Bunny House

As soon as the holes were cut on the DIY indoor rabbit hutch I went to work on the paint.  The cheap wood finish was pretty intact in the interior of the cabinet so I focused on a rustic look.  The green came from the deepest green of a painting we have in the living room.  Those poppies were painted by Adam’s grandmother and one of my favorite paintings.  (Poppies are my fav flower…  Now if I could just get them to grow!)

Painting that inspired the green diy rabbit hutch
Love this painting!!!!

Homemade chalk paint decorates an indoor bunny house
I actually taped for once!

Ramps for Rabbits

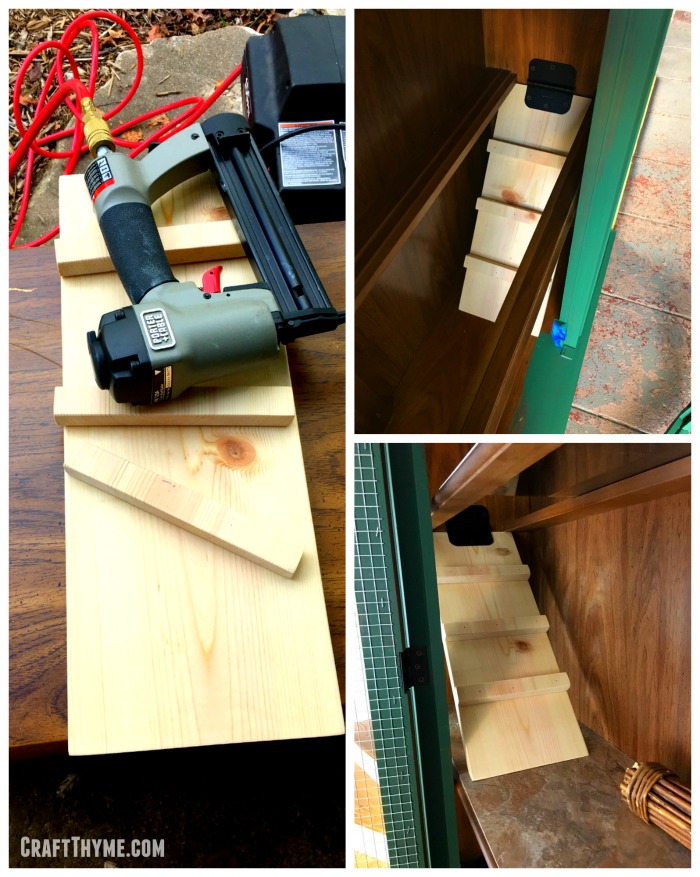
Adam made simple 45 degree cuts on the end of each ramp.  He just measured from holes to floor and took a guess on length.  He made small cuts to make the treads and give the rabbits something to grip while climbing.  Quick nails to hold everything together and then sanding to make sure none of the rabbits could get hurt.  We bought some hinges and connected them to the end to the end of each board and then to the inside of the rabbit hutch.

Details of building a rabbit ramp.

Other Items

Rabbits need lots of good ventilation (according to the internet :)) and make lots of poop (real life experience).  They also need free access to lots of timothy hay and water.  To accomplish all of these we did the following:

  1. We used heavy duty staples to affix the hardware cloth to the open panels.
  2. We lined all the shelves with peel and stick tile.  My hands will never be the same after cutting all that tile to fit the space! BUT poop clean up is as easy as sweeping it out of the shelf an into the trash.
  3. We drilled small holes to hold hay feeders along the back solid wall (helping to reduce the hay all over my living room)

After that it was simply a case of setting it in the living room and adding some fun toys like willow sticks and timothy hay tunnels!

Lots of details for the bunnies! White rabbit cabinet pulls, hay feeders, secret hiding spaces, ramps, and more in this DIY indoor rabbit hutch

OH!  And before I forgot.  The lovely lady who gave us the rabbits also gave us a metal rabbit playpen for them to run around in.  We added hooks to the back of the DIY indoor rabbit hutch so that we can simply hook the play space on.  We open the bottom door and let them run around.  Being litter trained the worst I have had to clean up was a few hard bunny presents from the living room.

In Practice with an Indoor Rabbit Hutch

We LOOOOOVVVVEEEE having something nice in the living room.  It allows the kids to interact with the bunnies and keep them as part of the household.

I might be a bit of a neat freak (As some people might have mentioned, Adam) and super sensitive to smells!  So I am psyched to be able to just renew litter easily and keep it from floating all over the house.  A cage was just allowing them to kick litter everywhere!  I just can’t stand a smelly animal space and want something that is super easy to clean and this fits the ticket.

Details of additional rabbit play space on our indoor rabbit hutch
They also have a play place!

Also, I honestly am over the moon about how cool it looks.  The green was perfect and looks great with the painting.  The chalk paint gave it a soft matte finish that keeps the color fun but not overwhelming.  I, frankly, would be happy with just a china cabinet that looks this good!  But it is even better as a nice home for Ollie and Biscuit!

Before and after of a Craigslist china cabinet turned into an DIY indoor rabbit hutch
Before and After

Posted on 2 Comments

Upcycling to Make an Adjustable DIY Pulley Light Fixture

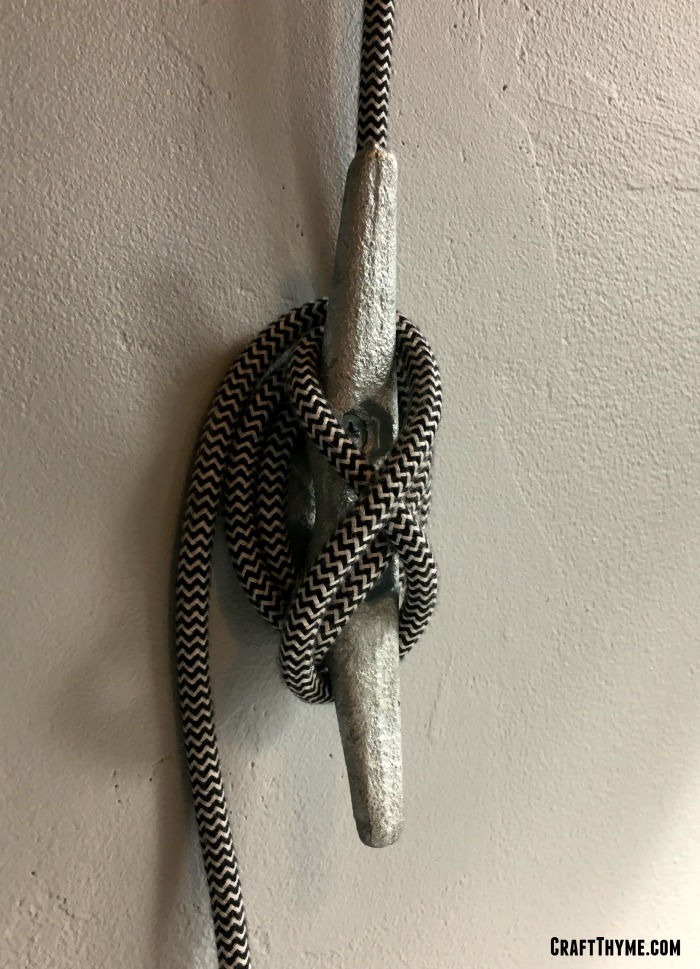
Boat cleat used as an anchor for an adjustable pulley light.

When we first moved into our 1927 home in Asheville, one of the first things we noticed was the severe lack of electricity.  Not that electricity was entirely absent, but by today’s standards, there wasn’t much for us to work with.  There were no outlets in any of the bathrooms, bedrooms had two outlets placed in what seemed like after-thought locations, and all rooms (regardless of size) were only wired for a single ceiling or wall light fixture.

Our new master bedroom was easily twice the size of the one we had just moved out of, but the outlet placement and lighting left a little to be desired.  The new master contained what we thought of as a reading/sitting area that sat inside of one of the home’s two front dormers.  The space was roughly 8′ x 8′, and we thought it would make a perfect reading nook with two chairs and a low bookcase.  There was only one problem with the reading nook plan… there was no lighting in the space.  There was however an outlet, and that opened up some possibilities!  We could have put a lamp in the space, but that would have dictated a layout different that what we had envisioned.  Ceiling lighting in that space would have been ideal, but with nothing available, we were forced to get creative. DIY Pulley Light to the rescue.

Our reading niche was dark before we installed a pulley light.

Bring on Craigslist

Always looking for something to upcycle, we immediately turned to Craigslist to see what was being offered up to the masses.  It just so happened that we found someone selling lights from a factory they helped salvage a few months back.  At $20 a pop, they seemed like a good deal, so we made the trip across town to check these babies out.  Suffice to say, after a coat of satin nickel spray paint, they were a perfect fit for the space.

Cream colored bleh lights we found on craigslist before we transformed them into fresh, modern pulley lights.

BUT!  We still had to make them work as ceiling lights….

That’s when we had the brilliant idea to use fancy black/white cloth lamp wire, a nautical rope cleat, and galvanized pulleys to 1) hang the light from the ceiling, 2) make a functional DIY pulley light that could be raised or lowered based on lighting preference.

Painted Craigslist light before finishing the pulley light

Supplies

Installing a DIY Pulley Light Fixture

The first step to this process is to install your pulleys:

  1. Mark the location on the ceiling from where you want your light to hang.  For us, this was the center of the space.  Make a small, tiny, erasable mark – you won’t be covering it up.
  2. Envisioning what it would be like for your lamp to hang from your pulley, place your pulley to one side of the mark you just made.
  3. If using the model of pulley we used for this project (see above), mark the four holes that you’ll use to mount your pulley to the ceiling.
  4. Install your center pulley!
    1. If mounting into a stud/rafter, go ahead and install your pulley directly.
    2. If mounting into ceiling drywall, we recommend using heavyweight anchors installed as per the manufacturer’s instructions.  (Something like these should do you just fine).   After your anchors are in place, go ahead and install your pulley
  5. Repeat steps 1-4 for Pulley #2, but this time, the pulley should fall near the corner of the ceiling/wall where your outlet lies.

Ceiling mounted pulleys to create an adjustable light.

When your pulleys are in place, go ahead and install your boat cleat:

  1. Mark the location on the wall where you want to be able to access the lamp wire wrapped around the cleat.
  2. Mark the two holes that you’ll use to mount your boat cleat to the wall.
  3. Install your boat cleat!
    1. If mounting into a stud, go ahead and install your cleat directly.
    2. If mounting into drywall, we recommend using drywall anchors installed as per the manufacturer’s instructions.   With your anchors in place, go ahead and install your cleat.

Boat cleat used as an anchor for an adjustable pulley light.

Next, wire/re-wire your light to ensure you have enough length to get you where you need to go:

Our light came with only 3 feet of old, dingy, and yellowed wire still attached.  Needless to say, that wasn’t going to do the job or give us an awesome design for our finished product.  This is where the 20′ of cloth lamp wire comes into play.

  1. Disconnect the the old lamp wire from your light.  This is often easier said than done, but you should be able to access where the wires actually connects to the light socket.  Once removed,
  2. Attach the new lamp wire.
  3. Do NOT install the plug at the other end of the lamp wire.  We’re not ready for that quite yet.

Finally, run your lamp wire through the pulleys, around the cleat, and prepare for awesomeness:

  1. Run the open end of the wire through pulley #1, over to and through pulley #2, and down the wall towards your cleat.
  2. When your light is at the right height, start wrapping the extra length of your cloth lamp wire around the wall cleat.
  3. When you feel that you have enough line around the cleat to raise and lower the light (assuming that you want this functionality), measure out enough slack on the bottom end of the cleat so that you can reach your outlet.
  4. Either cut your lamp wire here or neatly organize the remaining slack.
  5. Install the plug onto the end of your wire.  We find that there is always a wide variety of plugs available at your local big-box home improvement store, and a lot of them have an awesome retro feel!

With the circuit complete, you can now test out your new light creation!

Completed diy pulley light and reading niche

DIY pulley light makes an adujustable light for our reading niche.

Posted on Leave a comment

How To Make Galvanized Pipe Curtain Rods

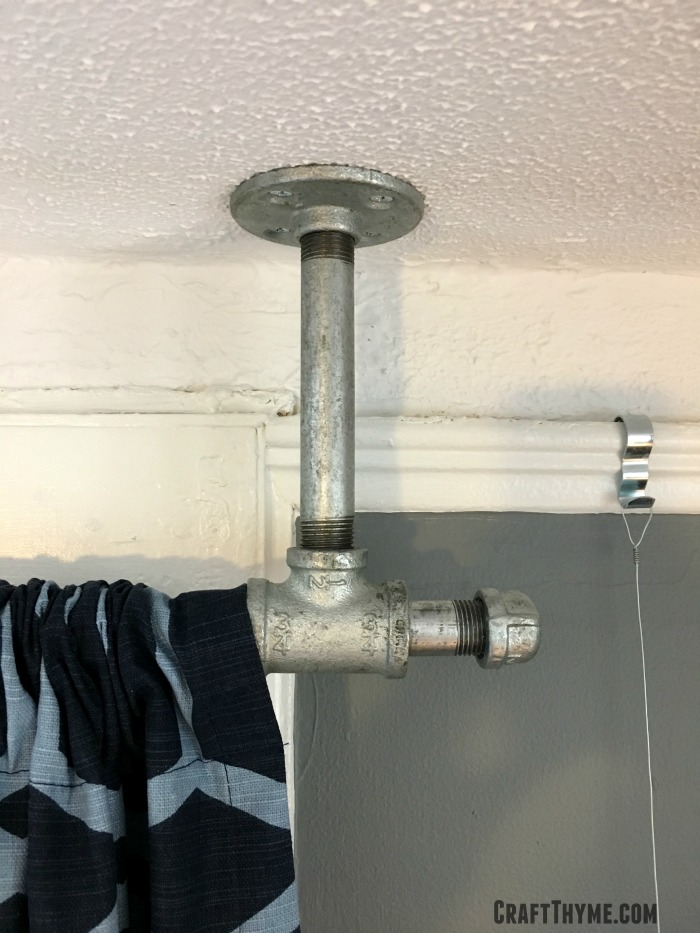
Tee ceiling mount pipe curtain rod

In our previous house we used black iron pipe for almost every single fixture. From pipe curtain rods to toilet paper holders we made them all.  Black iron pipe curtain rods were economical, easy to install, and fit the industrial decor of the previous home.  Once we moved down the street to a 1927 fixer upper we just didn’t feel the black iron was doing it for us.  Still it is hard to beat the price of a pipe curtain rod… Especially when you are looking at putting curtains and blinds over 54 windows (le sigh).  In comes our fancy take on pipe curtain rods with a couple of fresh designs in galvanized (silver) pipe.

Details of galvanized ceiling mount pipe curtain rods

Using galvanized pipe for curtain rods is not quite as economical as black iron, but still a shit-ton better than pre-made curtains rods, especially in the 8+ ft lengths needed.  We originally made replicas of the former pipe curtain rods that you can read about here.  However, it just wasn’t working for the installation and new space.  We needed something more ‘interesting’.  I came up with the random idea to install them from the ceiling.  Adam took that idea and ran with it!  He even came up with a few new end joints.

As typical for us we got most of the fittings from Zoro (affiliate links to follow) and got the actual lengths of pipe custom cut at our local home improvement store.

Supplies T- Connected Ceiling Mount Pipe Curtain Rod

Tee ceiling mount pipe curtain rod

Supplies Curved Ceiling Mount Pipe Curtain Rod

T – Connected Galvanized Pipe Curtain Rod

Step 1

Usually Adam writes these instructions since these pipe curtain rod styles are his creations, but I thought I would take a stab at it.  Plus how often do I get to write about nipples, rods, and elbows?  Ah yeah!

You’ll need to make two brackets to hold your rod.

  1. Connect a nipple to a flange.
  2. Connect a tee to the other side of the nipple.
  3. Hand-tighten everything

Step 2

Install one of the brackets in position from the ceiling.  Use appropriate fasteners.  We were able to hook into the lathe behind the plaster, but I highly suggest at least one or two drywall anchors meant to hold a lot of weight.  Maybe that is because we have small kids and I just picture them hanging on the curtains regularly…

If you are working solo then mount both brackets, measure, and try to line everything up so you can simply slide your rod into place when done. There is a little wiggle room on the brackets but you need to try to get them the same distance away from the wall and left/right from the window.

If you have two people it can be easier to mount one bracket where you want it and slide the rod with second bracket into place, then have your helper mount the second bracket.  It is a lot easier to measure the distance from your window in multiple places when the rod is already in.  (Insert giggles about rods)

Step 3

Slide the rod in to make sure you mounted everything correctly then back out one side and put your curtains on.  Then cap both ends.  Before you ask, yes, they will shift a bit in the bracket.  It has never bothered me.  When I open the right side it shifts right, then it goes right back to center when I open the left.  If you really hate the shifting aspect you could glue them in place (Use some construction adhesive meant for metal) or follow design option #2.

Galvanized pipe curtain rod

Ceiling Mounted Curved Pipe Curtain Rod

Step 1

Just like previously, you’ll need to make two brackets to hold your rod.

  1. Connect a nipple to a flange.
  2. Connect an elbow to the other side of the nipple.
  3. Hand-tighten everything

Step 2

This is where the assembly differs, step 2 & 3 get combined into one arm weakening installation.  Frankly although it adds a bit in installation time we highly suggest giving your galvanized pipe curtain rod a test fit.  This entails assembling the whole rod, sans curtain. To assemble simply put your elbows brackets on both ends of your rod.

You will likely need a helper at this point to help hold the curtain rod to the ceiling.  We checked to make sure we were centered with the windows and marked our mounting holes.  You can just go balls out if you like and do the next steps without a dry run, but I think you’ll be happier with the outcome if you test the assembly out first.

Then the fun begins! You will need to take one elbow bracket off put and put your curtains on the rod.  Then screw the bracket back in place assembling the whole thing completely.  Yes, now you will need to lift the whole mother-trucker into place, while not yelling at your spouse helper, and mount it.  While not horrifically heavy, you are still going to want to get that portion over quickly.

Galvanized pipe curtain rods and pulley light

After that you can stand back and admire your handiwork!  Oh yeah, that really is a fabulous DIY pulley light we will be showing you soon!

How to Make Ceiling Mount Pipe Curtain Rods


Posted on 3 Comments

Replacement Windows, The Finished Project Before and After

1927 house after replacing 52 windows

If you have been following along with our vinyl replacement window saga than you are probably more than ready to see the final product.  Here are some shots of what it looks like to have 52 original single hung windows replaced with new vinyl casement windows.  If you are interested in the process of having replacement windows installed you can read all about the process in the below pages.  Hopefully, all the information provided will allow you to circumvent some of the issues we had with installation of our replacement windows.

Oh and for full disclosure.  We paid for all of this work ourselves.  I am solely providing this information to help others out.  Home renovation is scary and costly at the best of times.  I wish I had some of this knowledge before going in on a major renovation like replacement windows for the first time in one unbiased place.

Everything You Need to Know About Replacement Windows: An Intro Primer

What to Expect When Installing Replacement Windows

Replacement Window Installation: The Actual Process

Capping A Metal Alternative to Finishing your Windows: Got Lead? Got Ugly? Capping Can Help

So now that you have heard all about the process of replacement windows it is time to actually see them in action!

Bam! Before & After

Before and after of vinyl replacement windowsYes, that is two of the 52 replacement windows in all of its finished glory.

And here is a nice set on the front porch

Replacement windows with metal capping for looks and lead safety.

Oh and it looks good from the interior too!

Follow our guide to have smooth vinyl replacement window installation.
I think it modernizes the house!  Which was great but also increased out tax value :(.  This picture is from our local paper by Maddy Jones.  You can see the article at the Citizen Times Website. While the increased taxes made us sad the lack of drafts and the crisp modern look was worth all the effort!