Posted on 7 Comments

DIY Chicken Water Heater

How to make a DIY water heater for your chickens

Disclaimer: This includes heat, electricity, and water.  Build at your own risk.

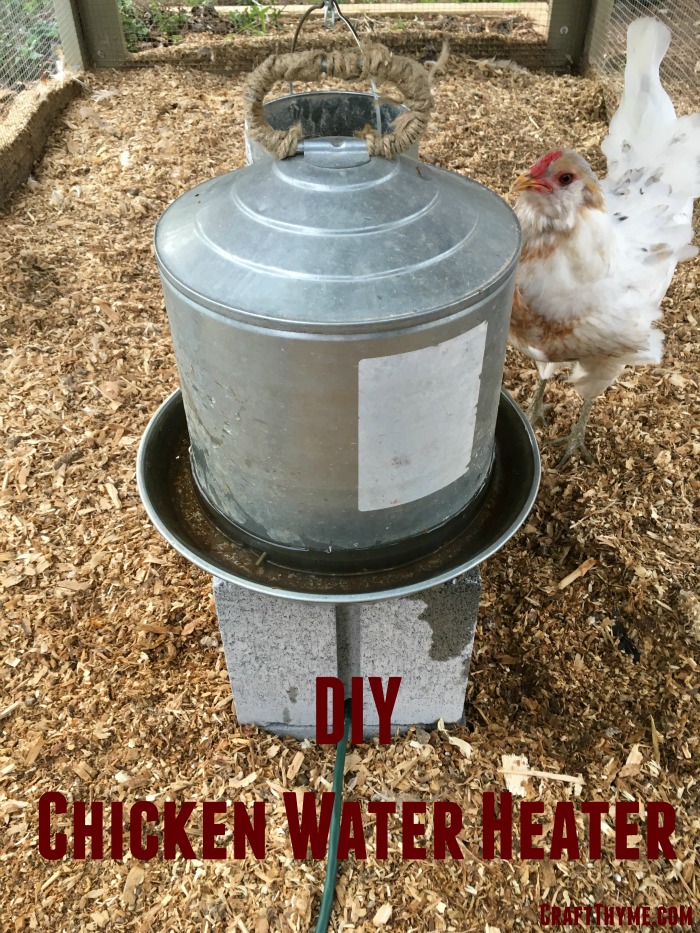
If you own chickens and you live anywhere that it gets below 32 F (0 C) then you will have experienced the fun of hauling chicken water. Well, no more for me! Adam craftily created a DIY chicken water heater. The water heater only required a few simple materials and the best part?! NO electrical knowledge necessary, short of being able to plug a cord in an outlet.

If you want to make your own chicken water heater we saw the idea somewhere online (This is why we should bookmark regularly) but ended up needing to modify it to suit our needs.

Chicken Water Heater

How to make a DIY water heater for your chickens

Supplies and Tools

Concrete Block
Concrete Paver
Extension Cord*: One with a flat socket area works best
Pluggable Light Socket*
Light Bulb(Start with 40 Watt): And yes it has to be one of the old school, electrical hogging, hot masterpieces of bulb work. The new fangled LED, while great for energy savings, does not get warm enough to do squat
Hammer
Flat Head Screwdriver or a Masonry Chisel*(If you are fancy)
Duck (duct?) Tape: Probably the best choice, we couldn’t find our roll so I think we used some packing tape
Metal Chicken Waterer*
4 Kids (optional): To “help” with the shopping

How to make a DIY water heater for your chickens

Step 1 Get Chiseled

Alright, I completely missed this step. I may have been wrangling one of the kids, cleaning out the laundry room, or making some sort of food. In this family of 6 it feels like someone is always eating. Luckily Adam takes care of dinner, but I tend to handle the snack portions of the day. Anywho, I asked for him to explain this step. Here is how he notched out a section of block so the extension cord can poke through:

I used a masonry chisel (because we have one), but a large flathead screwdriver will do the same thing. Just take patience when doing it. It’s not the kind of thing where you hammer a few times and you’re done. Spend about five minutes slowly making the shape, and you’ll ensure you don’t break the cinderblock as a whole.

Who knew we had a masonry chisel?!

How to make a DIY water heater for your chickens

Step 2 Make a Mix Tape

Dry fit the block over the extension cord and onto the paver. Note where the extension cord sits then do this very, very technical maneuver. Tape that sucker onto the paver.

I know that seems a little rigged, but this is for chickens…

Step 3 Plug and Play

Now plug in your extension cord and set the paver in a nice level place inside your coop. What’s that you say? Your extension cord is too short?! Roll that back up and make another trip to Lowes for the correct length. Now that your paver is in the coop and your cord is plugged in, place the cement block over the cord. If you chiseled enough space the block-paver combo should sit nice, flush, and fairly level.

All you have to do now is put a bulb in the socket and plug it into the cord. If the light comes on you are mostly there!

We have a metal waterer that covered the entire hole making sure no water could accidently pour into the hole holding the electric components. However, I am a nervous nelly with electricity so I made sure to check the fit, how hot the chicken waterer was getting, how hot it was inside the block, etc. I think you really should monitor it too! I personally want my chicken fried by KFC and not by accident.

How to make a DIY water heater for your chickens

Tips

We had to play with the bulb size and placement to get it warm enough to keep liquid water when temps dropped to 15 F (-9 C)

The very edge of the water still seems to freeze from time to time, but the heater keeps the water warm enough that the chickens are able to peck through it with no problem.

Surprisingly, even the little bantams were able to reach the waterer. The redneck chickens seem to have giraffe necks.

Posted on Leave a comment

#SoMe2 Pinterest Party

We are so excited to be the feature of this week’s party!  Find some great Pinterest accounts to follow and please join the fun by linking up below!
Thanks for joining us for 
this week’s #SoMe2 Pinterest party!


We want you to get lots of repins and comments, so please be sure you link up a Pin and not a blog post or your Pinterest profile!


 For this week’s party:
**You should link up 
the URL of a PINTEREST PIN**


It's time for the #SoMe2 #Pinterest Party!
But first, let’s take a minute to meet your #SoMe2 hostesses…


Meet your #SoMe2 hostesses!

Image Map


We are pleased to introduce our #SoMe2 featured blogger of the week…
Brianna from Craft Thyme!


Brianna & Adam from Craft Thyme blog!


Brianna has shared this with us:
Craft Thyme is a husband and wife craft blog (Adam & Brianna). We
spend countless hours crafting, gardening, and DIYing so you don’t have
to! Each tutorial is guaranteed to come with detailed instructions,
pictures, and an occasional behind the scenes fight about who is holding
the level straight.
 Thanks, Brianna!


Would you like to be a #SoMe2 featured blogger?
Everyone who enters the Rafflecopter below each week will have a
chance to win a spot as our featured blogger. We will feature your blog,
and links to your social media. Your links will be inserted into the
Rafflecopter for that week – gaining you more followers.


So be sure to enter to win the weekly featured blogger spot!


Note: Please be sure to fill out the Rafflecopter form accurately. Entries are verified.

The rules are simple!  

Please follow your hostesses and featured blogger. (first 4 links)

 Please add the #SoMe2 button (found at the bottom of the post) to your sidebar or link page.

 Tweet about the party! More partiers = More followers! All you have to do is click the “tweet” button!  

Use our hashtag #SoMe2 when tagging or posting so we can find each other!

You will automatically be entered into our email reminder list by entering a link. You may remove yourself from the list by using the un-subscribe option.

If you need help adding your Pinterest post to the party,
this infographic explains how to do it with step-by-step photos. Just
click the photo to enlarge it!

Infographic explaining how to link up to the #SoMe #Pinterest party!


It's time for the #SoMe2 #Pinterest Party!


PLEASE READ & FOLLOW DIRECTIONS CAREFULLY

1) Link up 1 recent Pinterest Post. That’s a PIN – not your Pinterest account or a direct link to your blog post!!

(How? Go to your Pinterest profile page, click on “pins” in the navigation bar below your profile picture, then click on the pin you want to share, copy the URL of that pin, click on the blue “add your link” button, and paste that URL into the link party.)

2) Re-pin, like, and comment on your HOSTESSES’ and FEATURED BLOGGER’S links (first 4 links)

3) Re-pin, like, and comment on at least the 2 links in front of yours. This way everyone will get Pinterest Love! One of hostesses will make sure the last two links get comments.


Thanks for joining our SOcial MEdia link party!
See you next week – same time, same place!

DeDe,  Kim, & Sarah V.

Grab a #SoMe2 Party button!

<div class=”SoMe2-button” style=”width: 250px; margin: 0 auto;”>
<a href=”http://www.enjoytheviewblog.com/search/label/some2″ rel=”nofollow”>
<img src=”http://i59.tinypic.com/o5cj13.jpg” alt=”SoMe2″ width=”250″ height=”250″ />
</a>
</div>

Posted on 10 Comments

How to Make Evergreen Garland Video Tutorial

How to make Evergreen Garland for Christmas

If you have come here to learn how to DIY evergreen garland for Christmas you have come to the right place!  I have revamped the original tutorial with a video showing the tricks and techniques to make lovely, fresh evergreen garland for your home.  You can watch the video below and scroll down for a list of supplies and detail photos.  Or read the original How to Make Evergreen Garland or Swags post.

Supplies Needed

  1. 24 Gauge Floral Wire*
  2. Rustic Wire 18 Gauge* or Rope
  3. Pruning Shears*
  4. Gloves*: Wear the Gloves!!!!
  5. Evergreen pieces

Details: Starting the Garland

To start the evergreen garland make a loop with the thick wire.  This will be useful for hanging your garland later and give you a base to anchor the floral wire.

How to start making an evergreen garland

Really, put on your gloves after this part.  Otherwise be prepared for scratch, resin covered, hands.

Details: Wrapping the Evergreen

While, I may be awful at rapping, I am very good at wrapping.  This simple step is all you need to repeat to make a beautiful hand tied garland.

How to wrap a DIY evergreen garland.

Tips

  1. Evergreen items are cheap to free.  Walk around your back yard.  Ivy, pine, boxwood all make interesting additions.  Ask you neighbors and make sure to just cut small amounts so it does not even appear that you have been there.
  2. Do not be afraid to decorate your garland.  Additional branches, beads, and lights can make it look fabulous!
  3. Work outdoors if possible.  While the video was taken inside due to the wind, you are going to have a lot of pine needles around your house from the construction.
  4. Gloves. I am bad about wearing them. Which is why my hands are always cut and rough.

Remember if you need a full pictorial tutorial you can get a recap of the video.  Just visit my How to Make Evergreen Garland post.

How to make Evergreen Garland for Christmas

Feel like it is too much to make your own garland?  Well then read my tutorial on how to Make Artificial Garland Look Real for tips to cheat the DIY process and come out with beautiful Evergreen Christmas Garland.

Posted on 12 Comments

How to Gold Leaf Everything

How to gold leaf anything and everything. Tutorial on using all types of leaf on variety of materials

In the previous post we looked out various types of gold leaf, foil, gold paint etc.  Basically a run down of all the different types of methods you can use to gold leaf items.  A lot of those techniques work better with certain materials.  Whaaaa????  Trust me, gold foil is going to look a lot nicer on fabric than spray paint!  Not all methods work with all materials, though, traditional gold leaf is going to be pretty dang versatile and look the closest to, well… gold leaf.  If you are looking for gold leaf by technique check out Part I, otherwise on to the list by material that you are gold leafing:

How to Gold Leaf Anything and Everything Part II

Looking for Part I where we break down tutorials by techniques like traditional leaf, Rub N Buff and much more?  Look no further! PART I

How to gold leaf anything and everything. Tutorial on using all types of leaf on variety of materials

How to gold leaf anything and everything. Tutorial on using all types of leaf on variety of materials

Fabric

While you can use traditional gold leaf on fabric, if you really want a nice, smooth, washable gold then gold foil is the way to go.

How to gold leaf anything and everything. Tutorial on using all types of leaf on variety of materials

Gold Foil, the Right Way to Gold Leaf Fabric Step by step tutorial on how to use Gold Foil to add accents to DIY napkins

3 Fabulous Ways to Use Foils on FabricCecile’s Unique Stitching Blog Highlights three different ways to apply fabric foils

DIY Gold Foil PillowHonest to Nod Using iron on fabric gold foil

Modern Art: Concrete Style – Gold leaf and concrete on  cotton canvas

Food

Sprays, powders, and actual edible leaf exist to decorate your food and give you interior some bling!

How to gold leaf anything and everything. Tutorial on using all types of leaf on variety of materials

Golden Birthday CupcakesBetty Crocker Using edible gold luster dust

Homemade Cotton CandyCooking Books Looks like spun gold, just from sugar!

DIY Gold Feather CupcakesThe Cake Blog Using gold luster dust to make a paint for fondant feathers

Glass/Finished Ceramics

How to gold leaf anything and everything. Tutorial on using all types of leaf on variety of materials
Image via Winthrop Chronicles

While you can use just about any technique for a real resilient finish you are going to want a gold leaf pen or specialty glass paint

Gold Leaf Painted MugsWinthrop Chronicles Using a gold leaf paint for permanent finish

DIY Gold Dot VasesLilikoi Joy Using gold paint pen on glass

DIY Gift Guide: Mother’s Day MugsLauren Conrad Gold leaf been to make washable ceramic mugs

Metal

How to gold leaf anything and everything. Tutorial on using all types of leaf on variety of materials
Image via Honey Sweet Home

Pretty much everything is a go.  Spray paint can come off looking a bit ‘fake’, but can easily be toned down with other techniques.

Goodwill Rocks, Rub ‘n Buff for a Gold Leaf Luster Combo of spray paint and Rub N Buff creates an antique gold finish on a metal candlestick

DIY Brass Etagere – Gold Leafed Ikea Vittsjo Hack!Honey Sweet Home Cons of spray paint and finish with traditional gold leaf

DIY Gold Leaf Flower PotsCrafts Unleashed Rusted metal flower pots get gold leaf arrow accents

Paper

Pretty much everything goes.  This one is really open to all types of techniques from liquid leaf to hot transfer gold foil.

How to gold leaf anything and everything. Tutorial on using all types of leaf on variety of materials
Image Via It’s Always Autumn

Liquid Leaf and Paper Clay Paper based clay can have gold leaf too!

10 Minute Fall Decorating: Gold “Leaf” Wall ArtI Heart Organizing Create a gold leaf out line with Rub N Buff

The New Minc Foil ApplicatorIt’s Always Autumn Heat Transfer foil on paper

Gilded Business CardsCamille Styles Take business cards to a new level with gilded edges

Plastic

Say it don’t spray it…  No wait!  Just spray it.  Getting a good gold spray paint base can give you the ability to add more layers like Rub N Buff to give it a more authentic look

How to gold leaf anything and everything. Tutorial on using all types of leaf on variety of materials
Image via Landeelu

DIY Gold Christmas Decor: Mantel DecorationsLandeelu Make plastic Christmas lights look expensive with gold

Golden Safari Mason JarsGiggling Caravan Plastic animals become fancy jar toppers

Gold Leaf, Glue Gun, & a Dollar Store Plastic Easter EggMagia Mia Plastic Easter Eggs turned into faceted golden eggs

Wood

Wood is the base of paper, which makes it kind of like paper.  Open to all types of applications! Just remember to prime in certain cases so the wood doesn’t suck up gold paints and rubs.

How to gold leaf anything and everything. Tutorial on using all types of leaf on variety of materials
Image via This Heart of Mine

Before & After – Wooden Bowls with Gold Leaf This Heart of Mine Wooden bowls with gold leaf touches

15 minute DIY: Gold Leaf on WoodBeautiful Hello Blog Use and adhesive pen to add gold leaf to rustic board

Gold Dipped Log Candle Holders LifeovereasyEtsy Blog Using gold paint to achieve a shiny mirror metal finish on logs

Miscellaneous

Did you know you can add gold leaf to shoes? feathers? rocks? Read on for some fabulous tutorials on all types of strange materials

Image via Fun at Home With Kids

How to Gold Leaf a Lampshade How to use Traditional Gold Leaf Sheets

Gold Leaf FeathersB@H Make gold tipped feathers

Golden Glitter SlimeFun at Home With Kids Not really gold leaf but who doesn’t love some gold slime!

DIY Gold Staples House of Huntley Make fancy gold staples from regular office supplies

Making a Golden Apple Using gold spray paint to make Thanksgiving Decorations


Posted on 36 Comments

How to Gold Leaf Anything

How to gold leaf anything and everything. Tutorial on using all types of leaf on variety of materials

So you want to gold leaf… Fabric? Paper? Plastic?  Not all gold leaf is the same and/or built for the same purpose.  Different materials and different gold leafing techniques render VERY different results.  I have written a number of tutorials on gold leafing, but there are so many other great guides. I wrote this post to be the  source for how to add gold to all of your projects.  I have broken projects down by techniques, such as gold leaf sheets, rub and buff, etc and in my second post I will go over gold leafing different materials such as fabric, wood, etc…  See Part II here

How to gold leaf anything and everything. Tutorial on using all types of leaf on variety of materials

How to gold leaf anything and everything. Tutorial on using all types of leaf on variety of materials

How to Gold Leaf Anything and Everything Part I

Gold Leaf Sheets

This is the traditional method of gold leafing where you use an adhesive, sheets of leaf, and a protective coating.  Not as hard as it sounds!  I promise!How to gold leaf anything and everything. Tutorial on using all types of leaf on variety of materials

How to Gold Leaf a Lampshade How to use Traditional Gold Leaf Sheets

Gold Leaf Embellished CurtainsThe Gathered Home Gold simple leaf on fabric

How to Make Mercury Glass VotivesHGTV gold and silver leaf used to make mercury glass finish


Gold Foil

This method is often used to adhere gold leaf to fabric and sometimes paper for a smoother finish.

How to gold leaf anything and everything. Tutorial on using all types of leaf on variety of materials

Gold Foil, the Right Way to Gold Leaf Fabric Step by step tutorial on how to use Gold Foil

Forget Gold Leaf — Gold Transfer Foil Is the Stuff DIY Dreams Are Made OfBrit + Co Gold foil tote bag

DIY Gold Foil PrintsThe House of Wood Using heat reactive foil on paper

Rub ‘n Buff

How to gold leaf anything and everything. Tutorial on using all types of leaf on variety of materials
Image via Censational Girl

This is a wax based rub that you apply via a small cloth or fingers to a variety of objects

Goodwill Rocks, Rub ‘n Buff for a Gold Leaf Luster Using Rub n’ Buff to give a golden luster to thrift store finds

Gold Leaf versus Rub ‘n Buff City Suburb Sanity The differences between traditional gold leaf and Rub ‘n Buff

French Linen ConsoleCentsational Girl How to dry brush Rub n’ Buff

Gold Paint

How to gold leaf anything and everything. Tutorial on using all types of leaf on variety of materials
Image via Chris Loves Julia

Comes in a variety of spray, enamel, acrylic, etc.  You can brush, sponge, spray, and coat in almost any method you would use a regular paint.

Making a Golden Apple Using gold spray paint to make Thanksgiving Decorations

DIY Gold Leaf PaintThe Creativity Exchange Gold enamel paint on glass

Which Gold Spray Paint is the BestChris Loves Julia Run down of the top 4 gold spray paints

Liquid Leaf

How to gold leaf anything and everything. Tutorial on using all types of leaf on variety of materials
Image via B@H

This is really a specialized paint mixture that has a heavy metallic content.  Beware the smell and use in a well ventilated area.  Stinky stinky!  The look is somewhat closer to traditional gold leaf than a lot of other paints.

Liquid Leaf and PaperClay How to use liquid leaf on a variety of materials and Paperclay seashells

Gold Leaf FeathersB@H Make gold tipped feathers

Gold Gilded Save the DatesWouldn’t It Be Lovely Paper edged in liquid leaf

Gold Leaf Pen

How to gold leaf anything and everything. Tutorial on using all types of leaf on variety of materials
Image via Lauren Conrad

Quick and easy pen that produces a gold paint.  Some pens can be used on ceramics and glass to give a semi-permanent and washable finish.

Entry Table Makeover Calling it Home Using a gold leaf pen to accent a table

DIY Gift Guide: Mother’s Day MugsLauren Conrad Gold leaf been to make washable ceramic mugs

Dress up Plain, Cheap Ballet Flats with This Peacock Feather DIYBabble Updating flats with pen

Edible Gold Leaf

Gold leaf you can eat!  Feel fancy and full.  Comes in spray, sheets, and powders.

How to gold leaf anything and everything. Tutorial on using all types of leaf on variety of materials
Image via Betty Crocker

Gold Leaf Wedding CakeAshlee Marie How to gold leaf an entire cake tier

Golden Birthday CupcakesBetty Crocker Using edible gold luster dust

Gold Covered OreosWe’re Calling Shenanigans Using edible gold spray