Do you have excessive yard waste in the form of tree branches, long grasses, leaves, annuals, and flowers past their prime? We sure do! With the veritable brush jungle behind our home, regular pruning of trees, a relentless landscaping habit, and the endless results of “being a good husband” – aka dead flowers – we’ve built quite the pile of yard waste in our back yard with no real plan of what to do with it. After all, what do you do with a heap of dead, slow to decompose material? Composting fence!
Some time ago, Brianna came across the concept for a “composting fence”; a landscape architecture concept that would modernize your large, long-term compost pile. With her birthday just around the corner, I thought that I would surprise her by taking a day off work and building it for her.

As it turns out… this project isn’t really doable in a single day. But I get a pat on the back for effort, right? Keep reading to find out how to build your own!
Composting Fence Supplies
- 60-in x 50-ft Silver Galvanized Steel Welded Wire
- 4 – 4″ x 4″ x 96″ Treated Lumber
- 1 – 2″ x 4″ x 96″ Treated Lumber
- 1 – 2″ x 4″ x 120″ Treated Lumber
- 12 – 5/4″ x 6″ x 120″ Treated Decking Lumber
- 3 – 50-lb Fast Setting Concrete Mix
- 2-1/2″ Exterior Wood Screws
- Staple Gun & Staples
- Metal Snips (In Some Cases)
- Drill
- Saw
Cut List
- 2 – 4″ x 4″ x 66″
- 2 – 4″ x 4″ x 78″
- 2 – 2″ x 4″ x 48″
- 2 – 2″ x 4″ x 60″
- 2 – 5/4″ x 6″ x 120″
- 4 – 5/4″ x 6″ x 102″
- 4 – 5/4″ x 6″ x 62″
- 4 – 5/4″ x 6″ x 84″
Brianna Here: I’m jumping in on Adam’s post because he has been busy building an under-deck storage area, planter boxes for a shade garden, and a chicken coop extension. Plus he didn’t actually get this done in a day sooo… I was there for a lot of the process. Here is reason #1 you can not do this in a day.
Step 1: Digging It?!
You are going to need to dig post holes. And then pour concrete. If you do not have post hole diggers see if there is someone you can borrow them from. We found a neighbor who let us borrow his for a long time. However, we keep doing projects like espalier of fruit trees and kiwi trellises so we just opted to buy one. Dig around 18″ deep, put in your post and level it. It is helpful if someone can hold it while another person pours in the fast dry concrete. Pour water in with the concrete and then wait. You are going to need these posts to be FULLY set before step 3.

Step 2: Cutting
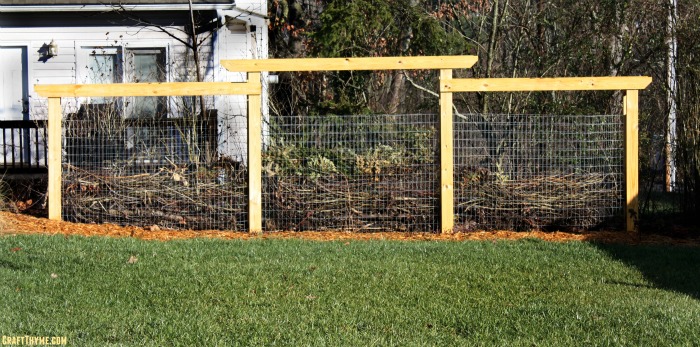
While you wait for the concrete to dry you can go ahead and make all of your cuts for the composting fence. You might be wondering what all this wood is for, however, you are going to use this wood to cover your stapled wire and make an attractive pergola-like top. We had plans to plant grapes at the bottom and use the top as an arbor. Additionally we hung some bird feeders above to attract more wildlife to the yard.
Step 3: Tug, pull, and curse
Unroll your welded wire and get it flat as possible. I personally worked on this while Adam cut lumber. He also added a 2X4 spacer to one side of the post. This gave closer to 6 inches of space between the wire for twigs and yard waste to be placed. When you begin unrolling the wire I suggest gloves as the ends of the rolls are sharp. I can not offer much advice other than rolling the wire face down and manually flattening as you go. It is a PITA, but the flatter you get it the easier the installation goes.
The reason that you want to wait until your posts are FIRMLY set in the ground is that you are going to need to attach the wire and PULLLLLLLL. I picture a ships-master whipping the rowers yelling ‘Pullll Damn Ye’. Anyway, take your wire cloth and line it up near the middle of your 2X4 attached to your post. You want to cover enough wood so that you can get a firm staple, but remember in the end the post will be totally covered so don’t waste a lot of expensive metal by covering your posts. We pulled the metal and figured out the minimum needed to staple it to the next spacer-post then cut the metal. We had to work in sections as our ground was not flat. Also getting more than 6 feet of this stuff straight at one time is a nightmare. I believe if you had a nice level yard you could probably just pull it straight across and skip the cutting, but that was not in our cards.

Here is where the partner comes in really handy. One person can pull on the attached sheet of metal while the other checks to see if they are close to level. Then that same person can staple. Pulling the metal helps get it taunt and reduces the bowing. Note I say reduces! We were not very happy with the wavy look when you peered down the length of the fence at first. However, in the final product this didn’t matter. I’ll explain at the end!
So you will repeat this process 5 more times if you are making 3 sections. As you will need put the metal cloth on both sides of the posts to make a channel that can be filled with your yard waste materials. The hardest part of this was getting everything around the same height and keeping all the metal squares in nice straight verticals. Let’s just say there were some potty words spoken over this particular process. These words may or may not have been used to describe peoples prowess with a level and/or their strength when pulling metal.

Step 4: Adding your decorative ‘Skin’
At this point you are going to add the decorative finish and height to the arbor over the composting fence. Take your long boards and screw them to the front and backs of your posts. We wanted a variable height so the longer ? length went on the fronts and backs of the two middle posts and the ? lengths went on the ends. You are going to be placing the boards over the stapled metal so feel free to really drill those screws in tight. It will act as an additional layer to secure the metal to the post and hide the unsightly seams.
When your now taller posts are in place take your crossbeam of 10 feet in length and attach that to the front and back of each middle upright. Adam, cut each of the ends at an angle for a nice decorative finish. The middle crossbeams will have the angular cuts on both sides. These are the hardest to place as you want to make sure to have the same overhang on both sides. Just measure the difference to insure an equal overhang on both sides. The other two crossbeams will only have a decorative touch on one end. The flat side will be easy to install as the straight cut will go flush to the edge of the middle posts. We installed our outside arbor sections about a foot down from the one in the center. We chose this height as we thought it was the most visually attractive result.

Step 5: Additional Bracing
This step is optional but we added additional bracing between the crossbeams. We did this for two reasons, first to create a place for vines to grow, and secondly provide a place to add hooks to hang bird feeders. I felt like the additional bracing made the entire structure more sound as well. To create the bracing we simply cut some 4X4’s and slotted it in-between the middle of each section and screwed it in place. The cut piece of wood usually fit tight enough between the two boards that no one needed to hold it when screwing, but it might be handy to have a partner to hold when securing it.
The Final Product

Unlike a regular composting bin we are not expecting to pull compost out of the composting fence. The added yard waste is for creating a screen and should slowly feed the soil at the base. So far the various layers of sticks and leaves are miking for a really interesting and attractive backdrop. I can’t wait to see how it looks when I get green vines growing up the arbor!
So now is the time to discuss the bit of waviness to the metal. First, we are not usually looking down the fence line. When you look straight on the fence you do not see it. Secondly, as we added lots of wood it filled out the metal making everything much more taunt. I have been quite happy how everything has held up over the winter. To complete the look we created a bed in front of the fence and planted flowers, cranberries, raspberries, and two grapes. The bird feeders have been a huge hit. I have seen so many more cardinals, jays, and finches flitting about the yard. I am really hoping they will help control the insect population this year in the garden. As birthday presents go this composting fence has been wonderful! It has created a nice windscreen, arbor space, and place to deposit yard waste, all while covering the unattractive brush berm between us and the neighbors. I’d call this project a win for the garden in so many ways.
[…] medium to maintain the soil fertility in your garden. Not sure where to put a compost heap? A composting fence could be the […]
[…] medium to maintain the soil fertility in your garden. Not sure where to put a compost heap? A composting fence could be the […]
Wow I learned something new today I had never heard of the idea of a composite fence I would love to see what it looks like when the vines have grown. Well done
This looks really fantastic, and I bet the plants that you have planted around it will love it too. Especially as it begins to break down and Leach nutrients into the ground. I love that you planted cranberries, raspberries and grapes so cool. You know I’m jealous. The only thing I think I would have done differently than you during the stretching the fencing task, would be to turn to my husband is a honey this was a birthday gift you better call one of your muscled buddies to come help you. It sounds like it was a lot of work. You are a trooper. It really looks great!
Looks great I have a wooden compost bin but this looks like a better solution – thank you for sharing with Pin Worthy Wednesday
This is such a nicer alternative to a composting bin. We’ve been looking for a way to contain our compost area, as right now it’s just sitting in a corner of our yard. This looks like a great way to keep it under control!
It does make for an attractive solution to yard waste.
Liking this idea! and no compost turning! I usually only do spot composting, but this might be added to my “to do” list.
Thanks so much for sharing this with us at the Dishing It & Digging It Link Party. I hope it brings you some good traffic and new friends!
What an interesting idea! Once the vines grow in, it will be a beautiful way to store all that yard waste.
I’m really excited about the way it looks now! Already screens the neighbor’s yard, but the vines will look great too.
I love this idea! I’ve never heard of this before. We just kind of pile things up near our fence but this is a much better idea. It was very thoughtful of your husband to do it for you.
I had been wanting to make one for years. I had even shown him the original article where I had read about the concept. He took that and rolled with it!
Thanks for stopping by and sharing ~have a great weekend!
You too!