Posted on 8 Comments

Star Wars Christmas Ornaments DIY

DIY tutorial that creates a Luke Skywalker Star Wars Ornament

Have you got light sabers, blasters, and the force flying around your house?  We sure do!  With 4 Star Wars obsessed boys and 2 Star Wars obsessed parents it only seemed fitting that we have a Star Wars Christmas tree!  However, to have a Star Wars themed Christmas Tree you have to have a Star Wars Christmas Ornaments and have you seen how much those puppies run?!  Ouch!!!!  I’ll have to admit, Adam, had the idea for how to make DIY Star Wars Christmas ornaments, but the execution is all mine!  By our calculations you can make 40 glass Star Wars Ornaments for $13 or .33 an ornament.

In the supplies below I happened to purchase my ornaments on half off Christmas decoration day at Target.  I happen to have this thing for real glass ornaments so I got the box of 40 for $10 and the package of temporary Star Wars tattoos was $3.  The below links are Amazon Affiliate links.

How to make Star Wars Christmas ornaments from temporary tattoos.

Star Wars Christmas Ornament Supplies

  • Glass Ornaments: Light Colors with matte finishes seem to work the best, but we mixed in silver & clear (for the Light Side) and Red & Black (For the Dark Side).  We bought multipacks that had glitter ornaments we used for color on the tree.  The tattoos do not stick to the glitter!
  • Temporary Tattoos:  Not all tattoos are alike.  We bought one pack at Target and despite the cover having Kylo Ren it had only Light Side characters!  Not a storm trooper to be found.  We ordered a second pack from Amazon and it had a better mix of characters from all of the movies (No Jar Jar Binks!!!).  Also some of the temporary tattoos brands are more opaque than others.  This matters if you are putting them on dark colored glass ornaments as it can change whites to pink etc.
  • Water
  • Wash Cloth

Supplies for DIY Star Wars Ornaments

Step 1: Cut It Out

Cut out your tattoo. Seems simple right? Wrong.  This might be the most important point; Star Wars tattoo selection and trimming.  For your first tattoo start with one you don’t like.  Maybe that 20th storm trooper or some such.  Then cut it out pretty close to the tattoo.  There are two reasons for this.  The first is that on some temporary tattoos they have a lot of clear gel? stuff? surrounding the picture.  You want to remove that as it shows on the ornament and we wants some freaking fantastic Star Wars Christmas Ornaments right?  Secondly, you are taking a flat item and adding it to a curved item.  This is why Greenland looks so damn big on the map.  Flat <> Round (Does not equal for all you non-nerds).  Removing material makes it much easier to mold to the surface.

Pro Tip: Any geometric tattoo is a P.I.T.A. and almost impossible to get perfect on the curved surface.  Do not start with these!

How to create Star Wars ornaments

Step 2: Place Your Face

Before you start this step have a bowl of water and a wash cloth handy.

Okay, not technically your face but potentially Princess Leia’s face needs to line up on the ornament.  Keep the plastic covering attached to the tattoo while you kind of hold it up and see where you want it.  Only when you feel ready to tackle this puppy peal the plastic backing off and lightly place the tattoo on the surface in the middle of the tattoo.  I say lightly for a reason.  If you touch the sticky side to the glass ball much at all it is stuck for good!  Let us just say I was glad there were 10 extra tattoos to mess with.

How to make cheap Star Wars ornaments

Step 3: May the Force Be With You (And with you also)

So we aren’t actually going to “force” the tattoo to adhere.  To get great looking Star Wars Christmas ornaments you need to use care and a deft dabbing hand.  Wring out the wash cloth until it is just slightly damp start smoothing the tattoo from the center outward with dry fingers.  Then lightly dab the paper until it is damp enough to mold easily to the glass.  I learned the hard way that too much water will seep under the tattoo and keep it from adhering to the ornament.  Once you have the entire tattoo stuck you can wet the paper more, but be careful to dab at 90 degrees.  I ruined a few ornaments by sliding the whole thing on the glass.

WAIT THE ENTIRE 30 SECONDS before pealing it back.  I know it is tempting, I know you want to see.  But just let it sit there for a minute.  Glass is much slicker than human skin and you need to give it a moment to settle and adhere correctly. Finally peel off the paper backing and admire your work.

DIY Star Wars Christmas Ornaments

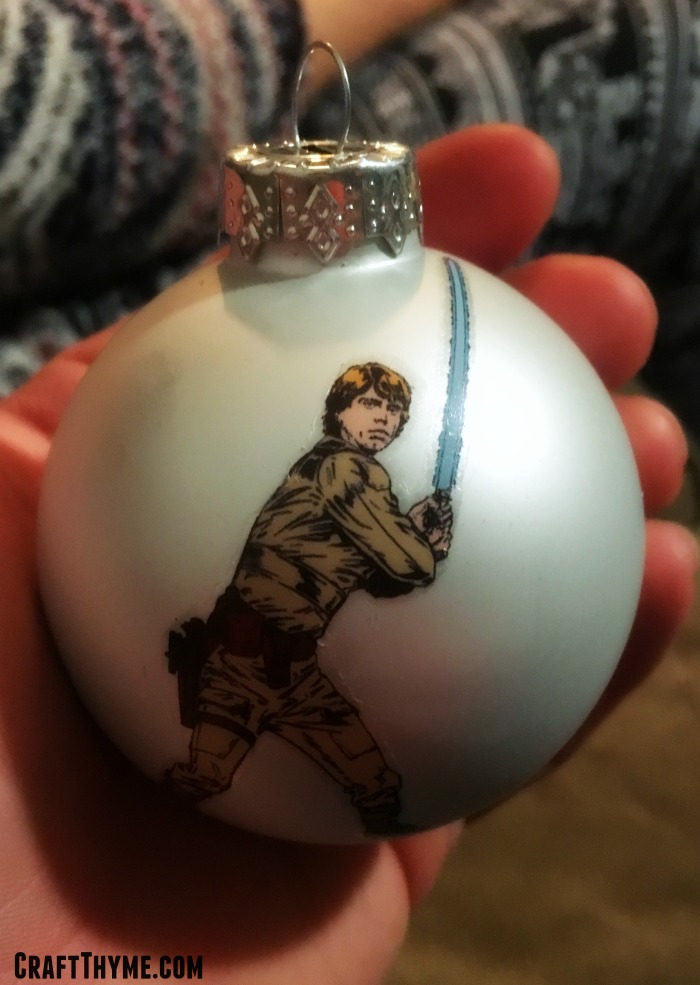
I was careful not to touch anything.  I let it dry fully overnight.  After that just hang and enjoy!

DIY tutorial that creates a Luke Skywalker Star Wars Ornament

To recap:

  • Take the time to cut out extraneous paper
  • Less water is more
  • Dab don’t swipe

Since this is the first year we made them I can’t tell you how they will hold up over time.  But, it would certainly be easy enough to do them again if they happen to peel up.  We have had them on the tree for two weeks and they look really good.  In fact we had the pizza delivery person ask to take pictures!  Can’t ask for a more flattering situation than a random stranger asking to take photos of your Star Wars Christmas ornaments and Star Wars Christmas Tree.

Tutorial to create DIY Star Wars Christmas Ornaments.
Read this tutorial to make cheap Star Wars Christmas Ornaments at home.


Posted on 3 Comments

How to Make Teardrop Garland or Teardrop Swags

How to Make a Teardrop Garland

Evergreens are always in style for Christmas time so why not make your own teardrop garland or swags?  They add Christmas cheer to doors, mailboxes, and below lights.  The following teardrop swag tutorial can be make with artificial or real evergreens.  I use a combo of evergreens in the porch light teardrop garlands.  For specific tips on handling real evergreen garland you can see my evergreen garland video and written tutorials or my evergreen wreath tutorial.  Otherwise read on to learn all about what you will need to make teardrop garland.

The supplies are minimal for making a teardrop garland (affiliate links may follow).  The only item you might not be able to buy is a wire coat hanger.  Trust me, just ask around and I bet you will find someone that has wire coat hangers in spades.  I use them as a base form for the teardrop shape because they are cheap (free) and they already have a built in hook!  How freaking nifty!

Let’s Make a Teardrop Garland

How to Make a Teardrop Garland

Supplies

  • Wire Coat Hanger/ Rustic 18 Gauge Wire: You can use the thick wire to make a form too.  I link to an Amazon reference but you can easily get this cheaper at a craft store.
  • 24 Gauge Floral Wire: My fav because it holds but is easy to work with!
  • Wire Cutters: My husband assures me these are also called dykes…  Yeah…
  • Cheap Rope Garland or live evergreens:  I like to borrow the live stuff from the neighbors.
  • Floral Picks: If you are going the artificial route I love some frosted floral picks.  White pine, cyprus, bittersweet and dried grasses can usually be collected free as you only need a couple of handfuls.

Step 1: Making a Teardrop Swag Form

This is the hardest part of the whole project.  Cutting the dang wire hanger!  The wire is much thicker than it first appears.  I find cursing a bit at it while squeezing the hell out of the wire cutters works well.  You can do some additional work with that potty mouth as you straighten the bends our of the hanger to make two downward v-shaped lengths from the hook.  That will be the basis of your teardrop garland.  I wanted a fuller bottom swag.  You can bend the wire wider at the top and then taper at the bottom if you want a more traditional upside down teardrop shape to the swag.

Use wire coat hangers as a base for teardrop garland
As you can see you don’t exactly have to bend these to perfection.

Step 2: Making the Teardrop Base

Take your cheap garland and cut two pieces to the desired length of your teardrop garland.  Attach the floral wire right below the hook.  You can do some fancy-schmancy knot your you can be like me and just wrap it around a few times till it seems secure.  Lay the chopped up garland on the hanger and lightly wrap the wire around it to attach it.  Do this to both sides and then fluff out the garland.  Don’t worry that it looks a bit hellacious at the moment.  I swear it will get better in the next couple of steps.

Using artificial garland as a base for a teardrop swag
It gets better from here!

Step 3: Fill in the Teardrop Shape

Cut another piece of the cheap garland the same length as the other two and lay it in the middle of the two sections.  Time to bring those elementary craft skills into play.  Remember how to weave? In out. In out. Take the floral wire and kind of weave it in-between all three sections securing the middle.  It may look like it is time to panic when making your teardrop as this is not the prettiest step, but again stick with it!  After you have all three pieces attached the fun begins.

Basis for DIY Teardrop Garlands
Got a good mat of evergreens. It gets even better from here!


Step 4: The Finishing Touches

Now that you have the basis for your teardrop garland you are literally going to stuff other items in.  Cut up more of your cheap evergreen garland and stick the ends to the back of the teardrop.  Stuff in floral picks or real evergreens until the teardrop shape looks full and lush.  I like to hang mine at this point and add in some touches.  You can wire pine cones, add ribbon, or flock the entire teardrop swag with my homemade flocking recipe.

Detail of inserting evegreens into a diy teardrop garland
If you look closely you can see how I am inserting evergreens into the teardrop. Also, that I need a manicure.

Making a Teardrop Garland is this simple!  They look fabulous swagged below lights but you can easily use them instead of a wreath on the door.  Add a decorative bow on top to cover the hook and you are all set!  If you have any questions about this tutorial please leave them in the comments below.

How to Make a Teardrop Swag

Posted on 6 Comments

How to Make Artificial Garland Look Real

Cheap garland can look like the real thing with these tips and tricks

Did you know you can make artificial garland look real?  Did you know you can do this for cheap or even free?  Cheap artificial Christmas garland can look well… cheap or lackluster at best.  While I really love to make real evergreen garland by hand (and happen to have one of the top tutorials on making evergreen garland and wreaths), sometimes, I just don’t have time or the will to churn out yards and yards of the  real stuff.  I am ahem… lazy occasionally. Luckily, some cheap rope garland and a little know how is all it takes to make artificial garland that looks real.  Plus, the faux garland does tend to hold up better to the outdoor elements.

Tutorial on How To Make Artificial Garland Look Real

Tutorial on how to make artificial garland look real

You will need minimal supplies.  (Affiliate links may follow):

Step 1 Hang your Faux Evergreen Garland

Oddly enough, if you want the artificial garland to look real start by having it look like absolute crap.  Hang that crimped piece of faux greenery awfulness as is.  Yep, that is right, don’t fluff, bend, or do anything just put that puppy up.  As you can see here I added some bows at the corner.  You can also see here it looks very much like a dejected Christmas Garland.  Once you have it in place then fluff.  Why wait you ask?  Because anywhere the garland is against a surface or hangs somewhere you will not see the back you are going to want to fluff all the fake greenery forward.  This is also a great time to add lights to your artificial garland if you plan on having it lit.

Cheap garland just looks sad and dejected but you can change that
Start with the sad and dejected cheap garland. I found this for $1.99 for nine feet the day after Thanksgiving.

Step 2 Grab Some Greenery

Here is where you sneak into your neighbors yard ask your neighbor nicely if you can take a few branches off of their evergreens.  White pine, leyland cypress, heck any type of evergreen will do.  Also ivy, magnolia leaves, dried hydrangea, grasses, pine cones, and bittersweet berries make great additions to the garland.  You will not need much of these items.  I used what I could shove in two grocery bags to do the entire porch and add to the artificial tree, tear drop garlands, and wreath.  When you have collected all your items cut the branches into 4-6 inch lengths.  Try to get as many branch tips as possible.  Blunt cut ends will work but need a little more finesse to work in nicely.

If you bought any floral picks or a few branches now is the time to cut them into similar sized items.  All the red and white berries you see where cut from 3 dollar store faux floral Christmas stems.

If you are working with various types of greenery sort everything in piles by type.

Step 3 Making that Faux Garland Fabulous

Now that you are likely covered in pine needles and resin it is time to make the faux, fabulous. Here is when you will finally make artificial garland look real. Start with a single type of evergreen (example your pile of white pine) and start adding them into your greenery at a somewhat even spacing.  To add (complicated steps ahead):

  1. Place a piece of greenery against the artificial garland you can simply twist a free piece of the fake branch around the greenery.

Surprisingly, this will secure the items.  Seriously!  Mine held up in the rain, sun, and wind.  Now you may be wondering why just place one type of evergreen at a time?  Well, too many times I get over zealous and put way too much of one type at the beginning and then run out by the end of the garland.  It may seem to take awhile to make multiple passes to turn your artificial garland into the real thing but the end result looks balanced.  Plus it takes a lot less time than putting greenery up, stepping back, taking it down and moving it, stepping back again, etc… You get the picture!

Blunt ends of cut greenery can be hidden behind the garland or wrapped deep in the greenery.  While, all this seems like “work” I can assure you that it is far less effort than making a real evergreen garland from scratch.

Cheap garland can look like the real thing with these tips and tricks

Step 4 Optional Step

If you really want your artificial garland to pop throw in some more faux items.  No, I’m not joking.  Surprisingly, some faux on faux action pumps your artificial garland up in a way that makes it seem more real.  Adding in more pieces of faux garland, bits of faux berries, or other Christmas florals give it some umph!

Honestly, this is all it takes to make some fabulous garland.  A little borrowed greenery and the ability to twist some wire makes for a beautiful and cheap Christmas decoration.  So take your knowledge and make some artificial garland look real!

Make faux garland fabulous


Posted on 10 Comments

How to Make Evergreen Garland Video Tutorial

How to make Evergreen Garland for Christmas

If you have come here to learn how to DIY evergreen garland for Christmas you have come to the right place!  I have revamped the original tutorial with a video showing the tricks and techniques to make lovely, fresh evergreen garland for your home.  You can watch the video below and scroll down for a list of supplies and detail photos.  Or read the original How to Make Evergreen Garland or Swags post.

Supplies Needed

  1. 24 Gauge Floral Wire*
  2. Rustic Wire 18 Gauge* or Rope
  3. Pruning Shears*
  4. Gloves*: Wear the Gloves!!!!
  5. Evergreen pieces

Details: Starting the Garland

To start the evergreen garland make a loop with the thick wire.  This will be useful for hanging your garland later and give you a base to anchor the floral wire.

How to start making an evergreen garland

Really, put on your gloves after this part.  Otherwise be prepared for scratch, resin covered, hands.

Details: Wrapping the Evergreen

While, I may be awful at rapping, I am very good at wrapping.  This simple step is all you need to repeat to make a beautiful hand tied garland.

How to wrap a DIY evergreen garland.

Tips

  1. Evergreen items are cheap to free.  Walk around your back yard.  Ivy, pine, boxwood all make interesting additions.  Ask you neighbors and make sure to just cut small amounts so it does not even appear that you have been there.
  2. Do not be afraid to decorate your garland.  Additional branches, beads, and lights can make it look fabulous!
  3. Work outdoors if possible.  While the video was taken inside due to the wind, you are going to have a lot of pine needles around your house from the construction.
  4. Gloves. I am bad about wearing them. Which is why my hands are always cut and rough.

Remember if you need a full pictorial tutorial you can get a recap of the video.  Just visit my How to Make Evergreen Garland post.

How to make Evergreen Garland for Christmas

Feel like it is too much to make your own garland?  Well then read my tutorial on how to Make Artificial Garland Look Real for tips to cheat the DIY process and come out with beautiful Evergreen Christmas Garland.

Posted on 6 Comments

Faux Snowballs: Soap Flocking Style

Faux snowball made from ivory soap

I had many comments about using an Ivory Snow Flocking Recipe to cover Styrofoam trees and make various scenes.  It made me think it might be very easy to make faux snowballs using the same technique.  This Christmas craft turned out even better than I expected.  Which, for crafting is amazing…  You should see all the fails I have behind the scenes.

Anyway, on to the faux snowball tutorial:How to make perfect faux snowballs

Supplies

Faux Snowball Ingredients

Step 1 When it Grates it Snows

Make the ivory soap snow.  The only thing that differed from my original recipe was that I found some actual powdered laundry starch (Yippy for the 1950’s supplies hidden at the grocery).  I made a double strength batch to use instead of spray starch.  It worked even better and gave a nice hard surface when dry.

Step 2 Moosh Is Now A Technical Term

Reach down into the faux snow while it is still nice and warm and make sure to get some of the chunky bits out of the bottom of the bowl.  Roll the styrofoam ball in your hands leaving finger prints and an uneven surface.  Basically pretend you are packing up a snowball. Except it is gonna be a lot mooshier and smell a lot like soap.

Cover all your snowballs setting them aside to dry.

Mooshing faux snow on the styrofoam balls
Invest in some hand lotion cause this soap is going to dry your hands out.

Step 3  The Herpes of Crafts: Glitter Time

After covering your dozen snowballs pour some clear glitter in your hand.  Pick up the first snowball and moosh the glitter on the surface.  Kinda like you would if you were baking and covered your hands with flour.  Except it is glitter, and it will be all over you forever.  FOREVER.

The soap-snow will have cooled slightly and started setting up at this point.  It will give you a chance to round out the snowball and remove and sharp peaks that don’t really look anything like snow.

Set them aside to fully dry overnight after completing the same process on all the snowballs.

The next morning they should be perfectly hard and dry.  Ready to use in any of your Christmas decor.

Faux snowball made from ivory soap

Enjoy these articles? Get biweekly updates by joining my mailing list (no spam, no way, no how)

*These are affiliate links.  I only get money from these links if you decide to buy.  I was not compensated to mention this product and spent my own money purchasing, testing, and using similar items in developing these tutorials.

See other great DIY, Decor, and Crafts at these link parties: Twigg Studios, Dream A Little Bigger, Craft-O-Maniac