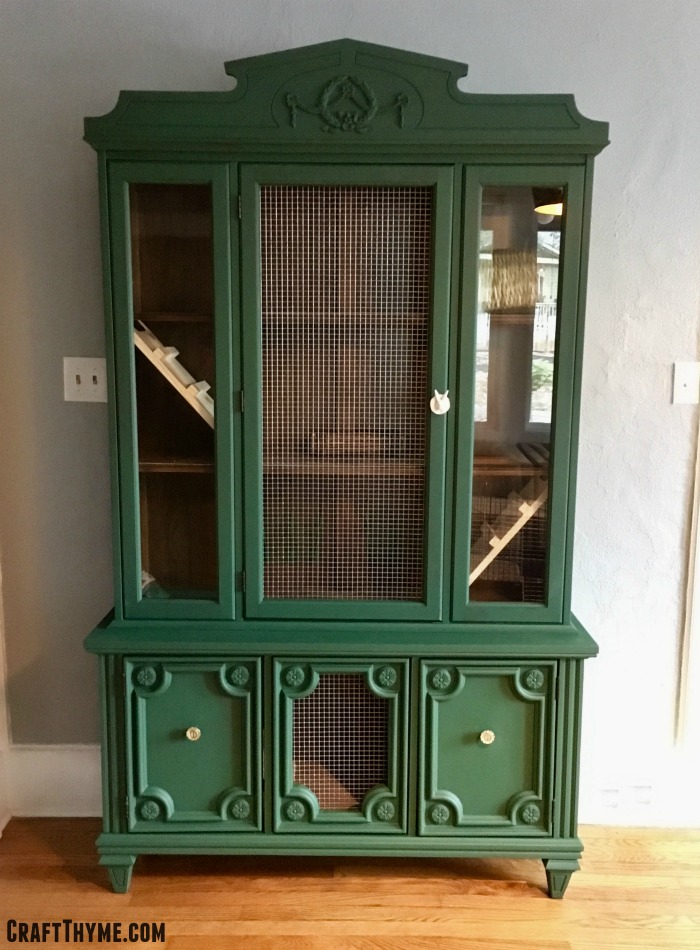
Want a rabbit hutch that looks elegant? Well, we did! We wanted to DIY an indoor rabbit hutch for our new family members Ollie and Biscuit. We got these rabbits from Adam’s work as a co-worker’s friend was trying to rehome her bunnies before embarking on a lot of travel. You might wonder how we decided to get some rabbits and it went something like this:
Forwarded email from Adam: Want to get some rabbits?
Me via Instant message: Ummmm… Sure?
Adam via IM: The boys will love them.
So we have rabbits. All kids need pets, right? These rabbits needed a indoor space… We are talking adorable, cute, pampered, litter trained, indoor rabbits. So we needed an adorable, awesome, and elegant space for the rabbits. Queue the DIY indoor rabbit hutch. We found an old china cabinet on craigslist for $25 that just said: refab me into the most awesome indoor rabbit hutch ever!
Of course, this china cabinet wouldn’t fit in any car we have… Because that would be waaaay to0 easy. So, thanks again Richard, for helping deliver said china cabinet. (No really THANK YOU! I have had rabbits in the middle of my living room for two weeks…)
In comes the china cabinet and before you can even say “DIY indoor rabbit hutch” Adam has already ripped out the middle glass panel. So yeah, no picture of that! From that we did a lot of measuring, talking, internet research, and experience from having the rabbits. Our main goals:
- More space with interesting areas for the rabbits
- Something that looked good in our house
- Reduce how much litter, hay, and rabbit pellets end up all over the floor
- Provided good ventilation for the buns
- EASY TO CLEAN! (Brianna’s major requirement)
- Make it quirky and interesting
We designed the bottom hutch space to hold litter pans and sleeping areas. There are ramps that go up to an eating area. Above that are two more levels with a timothy hay tunnel, chewing twigs, and toys for fun. We created areas for the hay to stay in the hutch and planned how to make this easy to clean!
Once we had the ideas sketched out we just got going! It took minimal supplies. Affiliate links may follow:
DIY Rabbit Hutch Supplies
- 1 – 1 x 8. UNTREATED. We used it to cut the ramps and grips. Make sure it has no chemicals that could harm the bunnies.
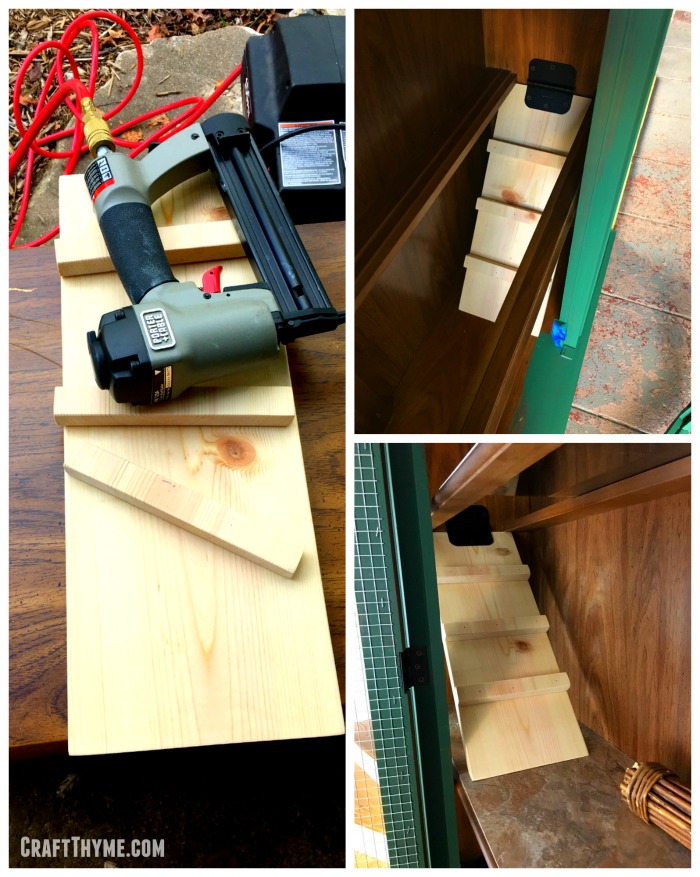
- Hinges: We bought three hinges so that the ramps can be to clean. They simply push up so we can just sweep and litter out from underneath
- Peel and Stick Tile 13 – 12 x 12 We lined all the shelves with peel and stick tile to make it easy to sweep bedding, litter, and bunny poops out of the hutch.
- 1/2″ Hardware Cloth (Chicken wire or other metal wire would work. Indoor rabbit hutches don’t have to protect the rabbits from predators like an outdoor hutch would)
- Screws & Staples
Additional Supplies (Optional)
- Paint (We made our own chalk paint with this awesome recipe we had used before)
- New Knobs: Oh yes, that is a rabbit knob! We happened to find three awesome knobs on sale for $2.50 at Anthropologie (Trust me I am too cheap to buy anything there full price)
Equipment
- Drill
- Saw
Optional Equipment
- Miter Saw
- Jig Saw
- Skil Saw
- Hand Sander
Transformation Steps
For this build we really winged it. Adam used a skil saw to cut out holes for the ramps and a jig saw as a I wanted a fancy opening on the bottom. Yep, that’s me, “Can we cut this center panel out?! It will look hella cool and ventilation… But mostly it would look awesome…And RABBITS!” Once the rough holes were cut, Adam, ran a quick sand on the pretty rough cut holes so the buns wouldn’t get hurt on rough edges. We didn’t worry about beautiful cuts as we were going to cover the floor in tile anyway.
Painting a Indoor Bunny House
As soon as the holes were cut on the DIY indoor rabbit hutch I went to work on the paint. The cheap wood finish was pretty intact in the interior of the cabinet so I focused on a rustic look. The green came from the deepest green of a painting we have in the living room. Those poppies were painted by Adam’s grandmother and one of my favorite paintings. (Poppies are my fav flower… Now if I could just get them to grow!)


Ramps for Rabbits
Adam made simple 45 degree cuts on the end of each ramp. He just measured from holes to floor and took a guess on length. He made small cuts to make the treads and give the rabbits something to grip while climbing. Quick nails to hold everything together and then sanding to make sure none of the rabbits could get hurt. We bought some hinges and connected them to the end to the end of each board and then to the inside of the rabbit hutch.
Other Items
Rabbits need lots of good ventilation (according to the internet :)) and make lots of poop (real life experience). They also need free access to lots of timothy hay and water. To accomplish all of these we did the following:
- We used heavy duty staples to affix the hardware cloth to the open panels.
- We lined all the shelves with peel and stick tile. My hands will never be the same after cutting all that tile to fit the space! BUT poop clean up is as easy as sweeping it out of the shelf an into the trash.
- We drilled small holes to hold hay feeders along the back solid wall (helping to reduce the hay all over my living room)
After that it was simply a case of setting it in the living room and adding some fun toys like willow sticks and timothy hay tunnels!
OH! And before I forgot. The lovely lady who gave us the rabbits also gave us a metal rabbit playpen for them to run around in. We added hooks to the back of the DIY indoor rabbit hutch so that we can simply hook the play space on. We open the bottom door and let them run around. Being litter trained the worst I have had to clean up was a few hard bunny presents from the living room.
In Practice with an Indoor Rabbit Hutch
We LOOOOOVVVVEEEE having something nice in the living room. It allows the kids to interact with the bunnies and keep them as part of the household.
I might be a bit of a neat freak (As some people might have mentioned, Adam) and super sensitive to smells! So I am psyched to be able to just renew litter easily and keep it from floating all over the house. A cage was just allowing them to kick litter everywhere! I just can’t stand a smelly animal space and want something that is super easy to clean and this fits the ticket.

Also, I honestly am over the moon about how cool it looks. The green was perfect and looks great with the painting. The chalk paint gave it a soft matte finish that keeps the color fun but not overwhelming. I, frankly, would be happy with just a china cabinet that looks this good! But it is even better as a nice home for Ollie and Biscuit!


