If you have been following along with our vinyl replacement window saga than you are probably more than ready to see the final product. Here are some shots of what it looks like to have 52 original single hung windows replaced with new vinyl casement windows. If you are interested in the process of having replacement windows installed you can read all about the process in the below pages. Hopefully, all the information provided will allow you to circumvent some of the issues we had with installation of our replacement windows.
Oh and for full disclosure. We paid for all of this work ourselves. I am solely providing this information to help others out. Home renovation is scary and costly at the best of times. I wish I had some of this knowledge before going in on a major renovation like replacement windows for the first time in one unbiased place.
So now that you have heard all about the process of replacement windows it is time to actually see them in action!
Bam! Before & After
Yes, that is two of the 52 replacement windows in all of its finished glory.
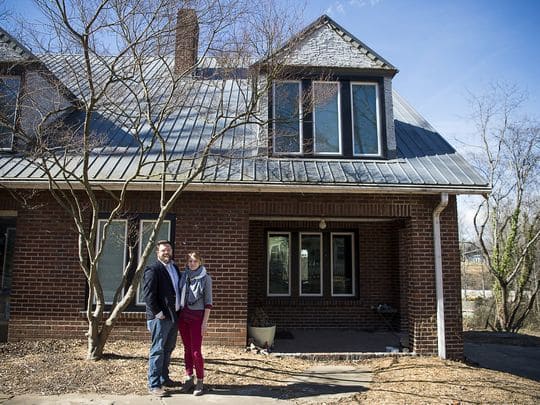
And here is a nice set on the front porch
Oh and it looks good from the interior too!
I think it modernizes the house! Which was great but also increased out tax value :(. This picture is from our local paper by Maddy Jones. You can see the article at the Citizen Times Website. While the increased taxes made us sad the lack of drafts and the crisp modern look was worth all the effort!
As mentioned prior, we opted to have metal window capping, also know as metal window cladding, installed with our vinyl replacement windows. Would metal capping be a good finish for your replacement windows? Well that all depends on the look you are trying to achieve and if you have an older home and want to decrease lead exposure and abatement costs.
In our case we wanted to decrease the potential for lead paint exposure in our 1927 home. We did not bother to test for lead we just went with the assumption that there was a good potential in our almost 90 year old home. The exterior trim was in poor shape and hadn’t been repainted in years; with those two issues metal window capping seemed like a good alternative to scraping, painting, and reinstalling new trim after the replacement window installation. If you want to read about the process from start to finish we have other information about replacement windows here:
Metal capping is usually thin aluminum sheets that have been coated in color. The metal is then bent to cover the trim. I have heard of vinyl capping as well but we only looked at window trim clad in metal. One company offered a very thin aluminum sheeting that would be almost pressed around the current trim to give it a coating of thin sheet metal. The assumption and description from the company is that the tight fit would more mirror the current fluted trim. However, the thin pieces of metal would not be quite as protective. The company we went with used a much more rigid material that could be manipulated to give flutes and bends or kept fairly straight for a modern look and provided a bit more protection. The downside is it could not follow the original trim.
Trust! This trim is clearly not worth trying to save. Metal window capping to the rescue.
Differences in Window Capping
We learned the hard way not all capping is the same. To this day I still am not sure why there was such a mess up with ours but our experience with capping went like this:
First, we got a deck of color options. We went back and forth but settled on a black, with a slight bit of texture. The plan was to have the rest of the trim, garage, and stucco painted in the spring. We figured black would be easy to match and really set off the windows in the brick. As the window company was getting ready to place our order they called to check back about the color selection. The salesman suggested we might like a smooth matte aluminum window cladding instead of the slightly textured one we had chosen. The textured one also had a semi-gloss appearance to the finish. Well hell’s yeah! Smooth matte black sounded perfect to give a modern finish to the house. With no additional cost we were all like “order it up and count us in”!
However, in comes installation day for the first pieces of capping. OMG no! The process of installation scratched the ever-loving hell out of it. Of course the installation crew says, yeah this is common with this flat matte finish. That the original one we picked out is coated to reduce scratching…
Why this wasn’t mentioned at order time I have no idea. I even asked for the differences between the one we chose and the one suggested… All I can assume is that the salesperson did not know the difference. *Sigh* It took a week and a half to get the new (original) choice in, but the window company was more than happy to eat the cost of the one opened box and re-order a better solution. It put the project behind even further on completion (as I write this there are installers banging away at metal sheets outside), but looks so much better than gouges with touch up paint.
So the moral of this story? Not all metal window capping is the same. Some of them have fade, scratch, and weather protection. There are a variety of finishes as well as colors. Additionally the thickness of the metal will provide protection but also dictate some of the final shapes that can be achieved at installation. Make sure to get a UV resistant one if you are going with a dark or bright color. Some fading over time is unavoidable but UV protection will help to manage and minimize the fading due to sun, hopefully, keeping your capping looking fresh far longer than a paint job would.
How Window Cladding is Installed is VERY Important
The installation of the window cladding is super important for two reason:
Look
Protection
First, the look of the capping is important. As discussed above the metal capping can be bent into various shapes. The window company originally tried to mimic our ornate trim. They were more than happy to scale back to a very plain wrap at our request :). Which was good all around because we ended up having some of the “hardest trim to cover” the window company had ever seen. The bends and twists meant that they had to add wooden shims in any place they wanted to nail down the metal to keep from giving it ugly ripples and bends.
During our research we uncovered that one of the downfalls of capping is that if not installed correctly it can lead to damage inside the home. It is very important that they install capping in a way that sheds water. Otherwise you are creating a closed environment that will trap water against the old wood trim. Obviously a recipe for rot and mold! At this point in our installation we were on a first name basis with members of the crew and they were happy to walk us through why they were installing the trim as they were.
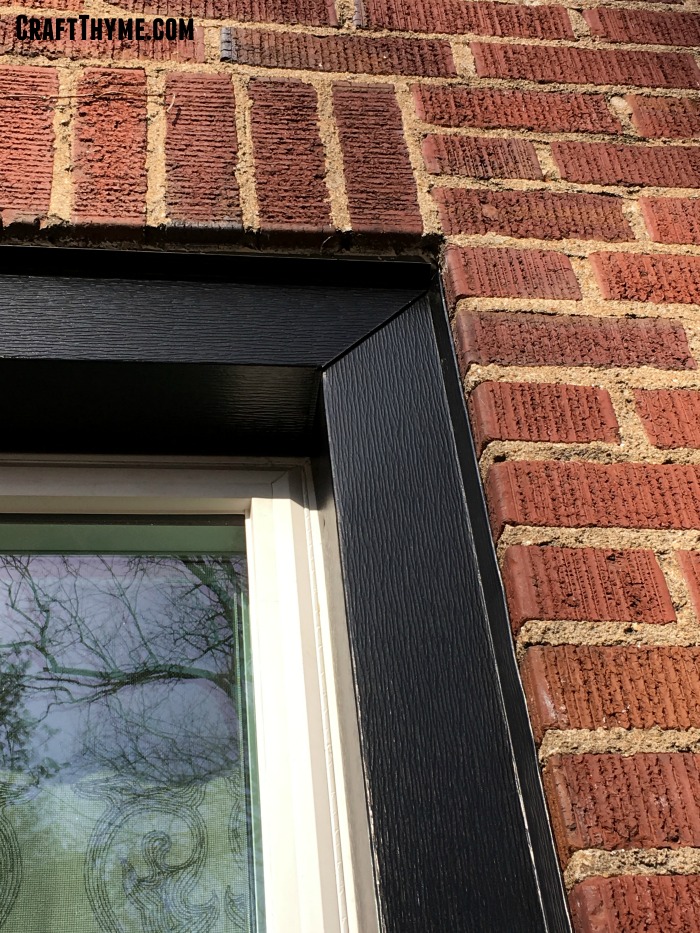
First the bottom sill layer went on. It is done in one long piece with notches cut and folded up. This will keep water off of the trim and sill. The sides and middle layers are then installed straight up. The straight join at the bottom is created to make sure to shed all water off of the windows and out of the sill. A final top piece with mitered edges is installed to cover the top pieces and give a crisp finished look to the top. Any places that gap a bit too much have a black caulk installed at the seams but not fully sealing the area so that it can breath and shed water. If you look closely on the windows you can see there is a tiny channel on each of the replacement windows. This channel holds the edge of the capping firmly along the window leaving no space for water to find its way in.
Just a touch of caulk was added to the bottom seam.
To Recap the Window Capping
Make sure to get a resilient metal material that can be installed in a way that will go with the overall look you are trying to achieve. Secondly, think about long term protective coatings. The cost difference was negligible but one coating was much more likely to withstand wear and tear. Finally, make sure your installation crew has a water plan in place. Poor installation can create more problems with rot and mold than it solves.
I have to admit I was thoroughly impressed with the final result of the metal window capping. It gave a crisper modern edge to the replacement window installation than would have been possible with a scrape and paint of the existing trim. It also allowed us to install a lot more insulation than previously further cutting down on the drafts of an old home.
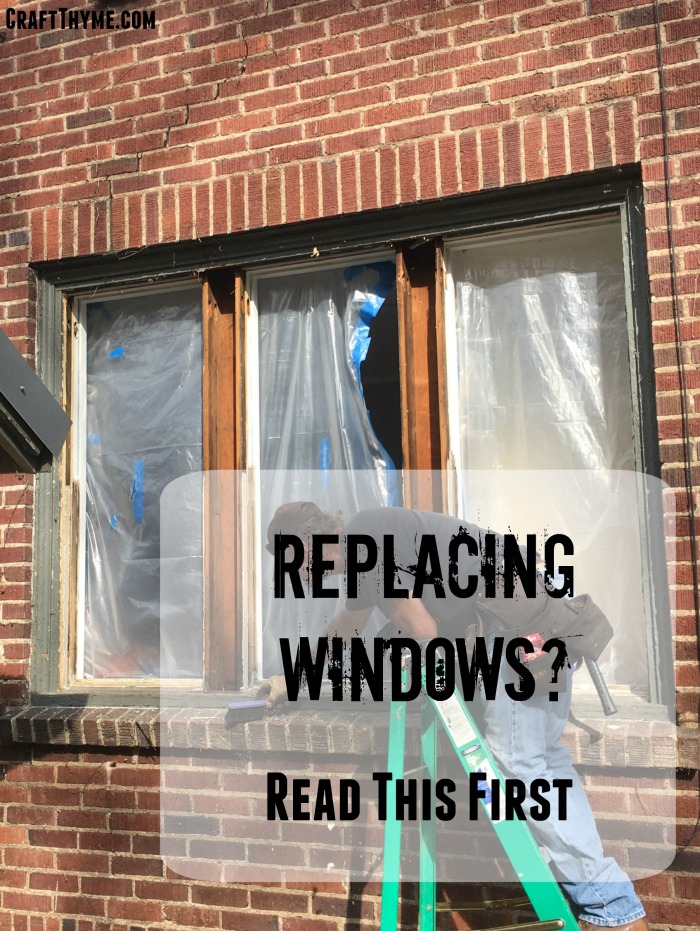
So you want to know what the replacement window installation actually looks like? Well folks it isn’t pretty. The physical process of replacing windows is fairly interesting but not for the faint of construction heart. As mentioned in prior articles we opted for an exterior installation of vinyl casement replacement windows. If you go with a similar installation process the steps below will outline what you can expect to occur when the window company arrives to remove and install the new windows. If you want the full skivvy about replacement windows read our other non-sponsored articles surrounding vinyl replacement windows:
Capping A Metal Alternative to Finishing your Windows: Got Lead? Got Ugly? Capping Can Help
Replacement Windows, The Finished Project Before and After
Prepping for Window removal
Regardless of which method of installation, interior or exterior, there is prep work required of the homeowner. First, you are going to be expected to remove all window coverings and hardware. We had Roman shades in most of our windows so there was a lot of drilling required. We had to take down the shades and the brackets. In a couple cases we were able to leave up our galvanized pipe curtain rods as they were high enough on the frames to not interfere with the process, but we still needed to take down the curtains. Part of this prep is so the window installers have plenty of room to work, however, I would highly recommend it to preserve your window coverings. The process is dirty and there is no way my white blinds and curtains would have remained white!
If you are replacing OOOOOOLLLLLLDDDDD windows like us you may need additional prep. We took a sharp razor and ran it along the interior trim on all. fifty-two. Godforsaken. Windows. Scoring the caulked and painted shut windows minimized the interior frame damage when they started ripping them out. Obviously, you can skip this step if you have “normal” workable windows.
Finally, you will need to move items blocking the windows both inside and outside the home. That meant we spent a week sitting on a couch in the middle of the living room. I also lost a small bush that had gone dormant in the fall by not marking it. They thought it was a dead piece of landscaping and happened to walk all over it. Additionally we had to remove a limb from our Japanese maple after it got broken during window installation.
Timing Replacement Windows and the Seasons
When they begin replacing your windows there will have to be large openings in the side of your home. While this seems like a no-brainer let me repeat this for you. There will be, for most of the day, large gaps in your house. Guess what that means? Hot or cold air is going to pour in or out of your home. We lucked out and 90% of the installation occurred in an unseasonably warm fall. We were able to maintain little additional costs in heating. Each evening before they wrapped up replacement window installation for the day they made sure to close all the holes. BUT that does not mean that foam insulation or caulking had occurred. Our house has been draft city! My suggestion would be for an early fall or late spring install to minimize additional air conditioning or heating costs, though, this would depend on your location.
Installation Methods
First they have to remove the old windows. They can do this one of two ways, interior or exterior. We have a home built in 1927 so we are pretty much guaranteed to have lead paint. We did not bother to have it tested and just opted to have the lead abatement activities performed at the installation. This does add to the installation cost but with four small children we decided it was worth it. In interior installation they remove the interior trim and replace the windows from the inside. This method was used for out 3rd story attic. The cost of scaffolding would have been ridiculous and the attic had newer non-lead based painted trim.
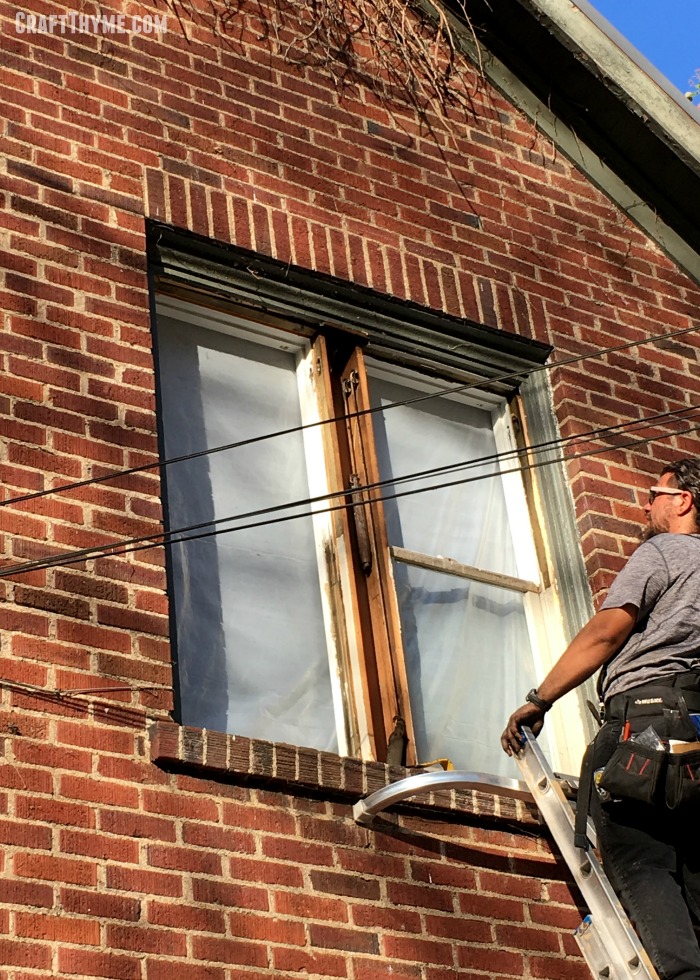
Exterior installation, SURPRISE, happens from the outside! I bet you couldn’t figure that out… They attempted to remove minimal trim from the outside, but ended up having to pull off large chunks to get out our stubborn windows.
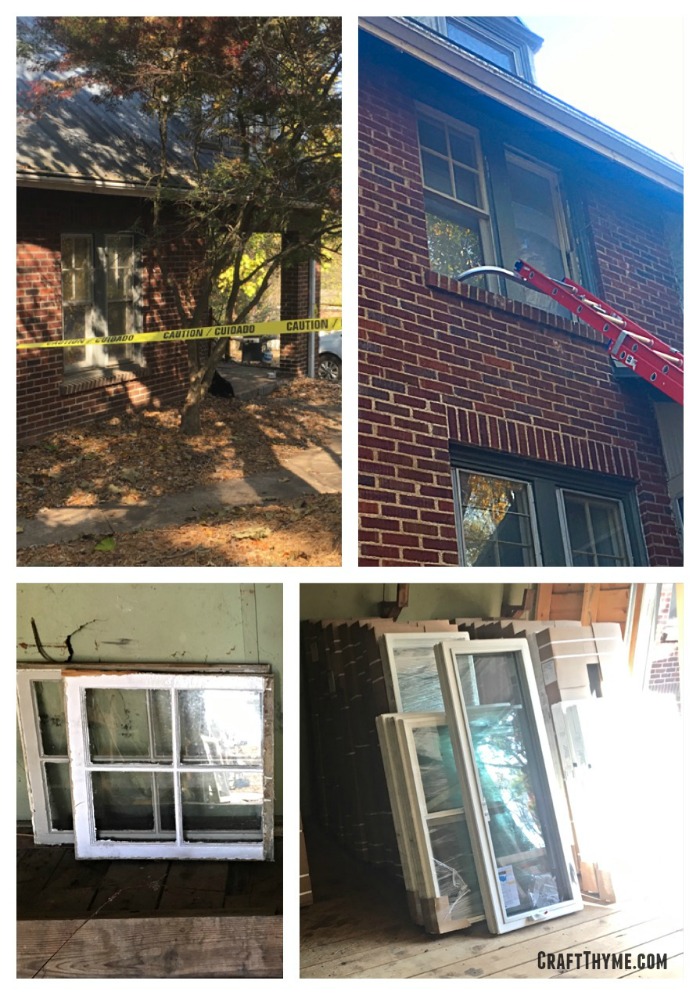
Lead Abatement with Replacement Windows
In the case of our installation the lead abatement required a few things. First, the company we chose did have a special certification to do the specialized lead installation. It was pretty scary looking as we had to have the house surrounded in caution tape with big poison signs (I’m sure the neighbors loved that) and a special permit onsite. They would seal the interior of each bank of windows with plastic, remove the window, HEPA vacuum everything up, remove the plastic and vacuum the interior. All these steps before the ever install the new window. Once installed they vacuumed and wiped the surfaces in the interior of the house. The exterior trim will be capped with metal as opposed to being re-trimmed or repainted in wood. This will contain any exterior paint that may remain with lead rendering it inaccessible and safe.
Actual Replacement Window Installation
If you have made it this far in the post you are going to be sorely disappointed. The meat of the work is in removal of the previous window. The installation requires two guys to push the window into place and get it as close to the interior stops as possible. Trust me, there will be gaps in a 1927 house as the window frames are not perfectly flat or level. And getting it in the opening with a tight fit is not always straight forward. They had to chisel off old paint, squeeze, and sand in places. After pushing the window into place they will level it as much as possible in the frame. Then simply screw in 4 large screws into the frame. Yep, that is it. Screw and bam you have a window.
After the window is screwed in place they should spray insulation foam around the exterior, place the old trim back in place as much as possible, and caulk the interior. I would say the interior caulking is THE finishing touch. Too much and the edges of the windows look goopy; to little and the caulk shrinks into the gaps making the installation look sloppy. To be honest we had a lot of issues with our caulk job. They had a newer member of the team and he, frankly, just did a crappy job. We have had to go behind and re-caulk almost all the windows to minimize shrunken gaps. I personally, have spend a good deal of time peeling excess caulk off the window frame… We finally just asked them to not even caulk the last few windows so we could do it ourselves. The window company owner did offer to come redo the caulk job himself but after 5 weeks into a four day job we just wanted to be done with the project. So it was our choice to finish the interior caulk.
Finally there should be a interior wipe down, removal of tags, cleaning of glass, and screen installation to finish off the interior. Make certain to test each and every window for opening and closing. We had a couple that were inoperable and they needed to make adjustments small adjustments for functionality. To complete the installation they will install new trim or capping. You can read all about the final capping step.
To Recap
The installation is the most disruptive part for your daily life. This portion is loud, dirty, and requires people and furniture be scattered through the interior of your home.
It is also the whole reason they are there: To get the old windows out and the new windows in!
Additionally, expect that the first few windows will go much slower than the process as a whole. There is a ramp up time for each older home as they figure out the best way to remove and install your windows. They moved much faster in the subsequent days with better results. I would suggest asking them to start with some of the less obvious windows as they finished product tends to look better the more they do. We luckily had them work in the back of the house first which led to a pretty nice installation in the front living room windows.
The actual process of installing replacement windows is more invasive than it seems. You can read about the physical installation in detail in the other portions of our guide to replacement windows. However, a quick rundown is that they remove the old, install the new, caulk and replace/add trim to repair what was removed to get the window out. I will remark that our window company did not adequately prepare us for the incidental damage that occurs during installation. Trust me, you would prefer to know up front the hours of work you have ahead of yourself repairing trim, caulk, tile, etc. It came as real shock and started the project off on quite a sour note even though it ended perfectly fine. If you want the whole story you can read about the entire process:
Save Yourself Window Angst: Handling Expectations With Replacement Window Installation
Here is how you can save yourself some angst. First, have a full discussion about expectations around the project. We chose an exterior installation to preserve the original 1927 interior moldings and to mitigate lead exposure for the kids. While we discussed, at length, our wants to preserve the interior moldings we did not realize the fact that our definition of “preserve” and the window company’s definition was not the same thing.
Damage to Your Home is a Thing
Here is a list of perceived acceptable damages to your when installing replacement windows:
Paint ripped from molding: The removal of the windows will cause damage to the stops. For lead and cleanliness they hung plastic covering over each window bank during installation. When removed the plastic can also peel paint from the trim itself
Large nail pops in the molding: They had a hard time removing our windows so they had to hammer and pull in places causing the interior nails to pop out. We had to hammer and fill many small holes
Cracks in the molding itself
This was probably one of the worst examples of cracking we had.
Minimal cracks in the plaster/drywall: Luckily we did not have this issue! But it was discussed as a possibility in older homes after we inquired about all the damage we were witnessing.
Additional Caulking: The major complaint so far from myself and my husband is the caulk job. The guy they had on it was just not very good. We have had to go back and redo it to our standards and fill in shrunken gaps. To the window company’s credit the owner offered to come back and do it again, but frankly I was over it at that pointed and opted to just do it ourselves
Scratches/Gouges to the body of the trim: These were minimal in our case. Mostly superficially in the paint
Complete cracking of exterior trim: In the case of our windows they had to remove large sections of the trim to simply get them out. This was not a big deal for us as we knew they would be capping everything anyway. They went above and beyond to provide extra insulation, so if the capping ends up looking good I find this particular item to be perfectly acceptable. As the homeowner I was excited to have insulation added to the interior of the trim where it was just open air before.
Sill or framing replacement: We had one sill with rot damage that had to be replaced. This will be an extra charge outside of the original agreement
Tile loss: We had a poorly tiled shower that we had eventually planned on tiling. That will now be moved up to the next project on the list. We lost a number of smaller tiles around the frame and a couple of larger ones in the shower. The company did offer to glue them back in place, but we are opting to use an alternate shower and have new tile correctly installed. We had concerns over the water tightness anyway and placing the tiles back in position would only exacerbate that problem.
Installing replacement windows can be damaging but as you can see this blue tile wasn’t any great loss.
General Cleaning: As much as they cleaned it was not nearly enough. For example after the dining room installation on of the kids noticed a grit all over the dining room table. When I took a cleaning cloth to it, it came out black. With the 90 year old dirt the dust was just pervasive. I have spent an incredible amount of time re-cleaning all the construction dirt. Not to mention the dirt of having an entire crew of people in and out of your house. Let us not even discuss the bathroom usage… Ugh. Still to be fair, the crew kept HEPA filtered vacuums and used them during the entire process. Construction just tends to create dust.
DIRT!!!
Handling Expectations is not Just for Customers
Here is the list of additional items that may or may not be issues but should probably be discussed if you want a smooth installation.:
Estimated time for installation. Our estimate was woefully inadequate and I personally am over having crews of people in and out of the house. But, I actually have felt a little bad at how long it has taken them. Our windows were hard to get out, a pain to replace, and the capping is “The hardest trim to cover” the crew has ever seen. We are multiple weeks into this project. Most replacement window installations last a couple of days max, but, most projects, even commercial, have less than 52 windows.
Bathroom usage by the installation crew: We did not mind them using our bathroom, BUT we should have discussed the old plumbing problems. We had to have our drains snaked after everyone’s usage and found paper towels etc in the lines. These items would have been perfectly fine for new plumbing but not our old damaged, root filled lines. I call that one our fault for not informing them of house issues.
Smoking: That was a hard no for us. We had someone smoking outside day 1, but of course that immediately comes in the giant open holes in the house. They immediately addressed that issue when we brought it to their attention. I can’t blame the company on that one since we never discussed it and the took care of that quickly.
Incidentals: Food, water, paper towels? We opted to leave out plastic cups, a bowl of candy, and paper towels instead of fancy hand towels in the bathrooms. We heard that the crew felt bad using nice towels to dry their hands. None of these are required but it is good to lay out which items are for their use so no one feels like you are overstepping bounds.
Access to the property: Do you feel comfortable giving them a key? One day we forgot to leave ours and they just removed a window and let themselves in. No harm done but did make us smile at the ingenuity.
Installation time frames: We went and talked to all the neighbors before the window crew arrived. They knew to expect hammering and noise. That it would be starting after 8 am and done before 7pm. We also made sure that it was okay for them to work on the weekend with a later starting time on Sundays. The crew was very happy with our prep work. They have had to deal with neighborhood complaints at other projects when neighbors were not aware of how short the installation process would be.
In hindsight these incidental damages and cleaning all seem acceptable. BUT on Day 1 I can say we were very unhappy campers when we came home to see all the mess and work it had caused. Managing both the replacement window company’s and our expectations would have started off the project on a much better footing as it was clear they got annoyed with us and assumed we were being overly picky.
Having worked on a variety of home projects personally and previously with an architect and contractors professionally it was very odd to be the “problem homeowner”. If I had it to do over again I would have a much more detailed list of who was responsible for what. And a clear definition of what was an acceptable level of “complete”. We were able to reach a consensus and move forward with the project, but I feel certain it gave everyone a sour taste from the get go.
Luckily it was a longer project and we seemed to all get a working ease together. Additionally, we chose to just let some things go that were probably within our rights to have corrected like the caulk job and tile. In response I felt like the installation was done very well, looks very good on the interior, and the installation team also chose to vote a “problem” member from the team which caused significantly less damage through the rest of the project.
To Recap
To achieve a smoother installation set yourself and the crew up for similar expectations. If everyone is on the same page it is going to be easier to have hard conversations, ultimately decide who is responsible for what, and get a quick professional job. Just as you want the best looking installation of replacement windows, the crew wants a smooth easy-going homeowner. No one wants to feel nitpicked to death and no one wants to feel that they are being taken advantage of. Handling the two way street of renovations and replacement windows makes for a better project all around.
First, this is not a paid review of replacement windows. This is our opinion and description of the process of replacing 52 windows in our 1927 home, which, I think will net you a more realistic view of the replacement window process. I cannot stress enough that this can be a major renovation project. I will admit to not being prepared for what all is involved with replacement windows in an older home, even after doing research. When I wrote this guide our week long replacement window project was still going strong 6 weeks later… While there were issues detailed in each of the subsequent posts I would still highly recommend our window company. McVays America’s Best Choice Windows of Asheville. Here is a link to their facebook page which gives realistic views of their work. Obviously, if you do not live in the Asheville area this vendor won’t work for you but the tips below are the same whenever you are looking for a window contractor.
Hopefully, you can use this as a guide to help you understand the process of replacing windows in your home and not suffer the same shocks as us. Read on or click on a specific topic to learn more about choosing replacement windows, setting expectations, and working with your window contractor. Our tips will help you have a nice smooth install and likely make your replacement window company much happier to work with you!
Oh, and by the way, this is not our wittiest material but probably some of our more informative.
The first step is choosing replacement window is selecting your vendor. You might think this sounds counter intuitive, but most vendors will stock or order all types of windows for installation. Even big box stores, like Lowes, will provide replacement window orders and installation of all types. I truly believe the hardest part of the whole process is finding a reputable company and decent price.
Research shows that there is a large mark up on windows, labor, and installation materials. Making it the holy trifecta for sketchy construction companies to jump on the bandwagon. Read a little online and you’ll hear stories of how it doesn’t take terribly much skill, insane mark ups etc. While I do not agree about the skill part (more on that in the installation portion) the rest holds true. A quick Google search for our area lists 10+ window installation companies and doesn’t even cover the big box stores or the company we actually went with!
How can you protect yourself from bad replacement windows?
Well, I do not have 100% of the answer, but in our case it took a lot of our time. We met with various vendors, got a few quotes, and did a lot of online review reading. We stalked our chosen vendor and went in person to look at some of the projects they had listed on their Facebook page. I hate to break it to you, but no one will be able to do the research but you and no one will look out for you like yourself. What we can do is break down a typical estimate session so you can understand what to expect.
First a person will come to your home. They will talk with you about what you are looking for, bring various brochures, and take measurements. If they do not at least pull out a tape measure run away! In order to get a good estimate they need to know if the sizes are custom or standard. Custom sizes will cost more, shocking I know, but the pricing is generally done in a range calculated by square inches. So they better be measuring if you want a quote that is legitimate. That being said, if you have one vendor that has already measured and you want to supply the same measurements to another company you can speed up the quoting process. The other portions of the quoting process are listed below.
Types of Windows: Can you say Casement?
You will need to know what type of windows you want, or be prepared to spend a lot of time learning about sliders, double hung, picture, and casement windows. Additionally replacement windows come in wood as well as vinyl. I’ll clue you in to here: WOOD = EXPENSIVE. If you need a quick breakdown of window types this is a good link to a fun window infographic I found that succinctly the main types of windows. The salesmen will be happy to go over all of these options with you, but be prepared to spend your precious time and potentially getting up-sale pitches during the process.
In our case I was pretty certain I wanted casements. I had fallen in love with them in a short trip to Italy years ago. I loved the push out or crank features of casements. The screens are on the inside, which makes them easy to remove and keep clean. If you choose to leave out any type of panes then you also get long spans of sleek glass without the break that occurs with double or single hung windows. Of course, my taste = way more money. So you may be able to save yourself that cost by looking at a slider or double hung. Decorative panes can be added to the interior or exterior of each window for an additional cost. They can achieve a look that more closely relates to traditional windows, but we happened to be looking for a mix of modern and classic in our home so we opted for clean, clear panes.
Casement Versus Double Hung
Finishes
Oh me, oh my… What can I say about finishes… This is going to be your first big up-charge if you opted to skip adding panes. We did not realize how significantly it can add to the cost to pick pretty colors. Feel free to get them spec’d (specified) in whatever color your heart desires, but try to remain flexible. We had chosen a white interior, with stainless hardware, and a neutral greige trim that matched the brick mortar in the most perfect way. Am I getting that installed currently? Oh hell noes. Our first quote came back in a manner that made me gasp for air. I quickly learned that there is a dollar value I can assign to perfect color matching and found it not necessary after all. Which leads me to my next point.
Multiple Quotes
I cannot stress enough getting multiple quotes. Multiple quotes from both a single vendor and multiple vendors. We had our replacement windows estimated as high end casements with all the bells and whistles a window can have. We also had the same vendor do a mid price casement (I’m pretty sure a low priced casement doesn’t exist *Le Sigh*) and a mid-priced double hung. We then got similar quotes (nixing the high priced casements) from other vendors for the windows and installation.
You will find that it becomes hard to compare apples to apples. I believe most of this is “sales fooey” created by salespeople to make it harder to cross check quotes. In reality each window has a fenestration (Say that three times fast) rating for comparison. That is the rating for energy efficiency and should be the major metric for deciding if a mid or high price window is “good enough”. The rating is created by testing through a vendor neutral council so those results are perfect for comparison. You can read about the rating system at this link. The other items like warranty, finishes, how it is welded and joined at the corners, etc will factor into the cost, but the big one should be that rating, no matter what the salesperson says.
Is Cost a Major Factor?
If you are looking at replacement windows as a long term cost reduction in heating and energy costs… Well my suggestion is don’t. It is going to take a long time (if ever) for you make up the cost of the windows based on energy savings. That being said we wanted to reduce the drafts, decrease the electric bills, and enjoy the aesthetics. Particularly we wanted to be able to open and close the windows. Many of our counterweights had broken and previous tenants had decided to randomly caulk some shut. Let us not even go into the windows that had cracks taped shut… Since we had decided to tackle this extensive project but knew there wasn’t an immediate cost savings we set a strict budget to spend on this project and had to get creative to make that happen.
One easy way to making replacement windows fit your budget is to be open to the design. As mentioned above the form factor and finishes GREATLY change the price. However, you can go even further by being open to design changes. For example we toyed with the idea of combining the banks of windows into one large window. That was a brief idea, mostly nixed by me, as I wanted to preserve some of the 1920’s feel while still giving it a modern twist. Additionally, you can often get a better price by ordering near the end of the month, when salespeople are trying to meet a quota. Finally, if you happen to be tackling other exterior projects, such as sun rooms, house trim, or repainting, window installation companies will often discount larger projects in an attempt to get your business. Devan, our salesperson was quite creative with options to help match our budget. He did a lot of upfront work and took our budget seriously which I did truly appreciate.
Remember, the window company’s job is to sell you windows. So be prepared for them to ask you to sign on the dotted line that day. A good company will also realize you need time to consider and gently check in with you to see if they can tweak an estimate or potentially earn your business.
To recap:
A little window research goes a long way when buying replacement windows
A lot of window research and estimates go an even longer way
If cost is a factor be open to stylistic changes
Don’t be afraid to negotiate quotes. There is a large markup on windows and installation so construction companies have some wiggle room
Negotiation aside, remember to pay a little extra for a good reputation. A great company needs to make money but will also go the extra mile to make sure you are happy with the final replacement windows.
It is a window company’s goal to make sales and your responsibility to protect yourself. A good company will work to make a good match without putting on deep pressure tactics.
To find out more about replacement windows select from our other articles on the topic.
What to Expect When Installing Replacement Windows (Available 1/11/2017)
Replacement Window Installation: What Really Happens to your Home (Available 1/18/2017)
Capping A Metal Alternative to Finishing your Windows: Got Lead? Got Ugly? Capping Can Help (Available 1/25/2017)
Replacement Windows, The Finished Project Before and After (Available 2/1/2017)
 Yes, that is two of the 52 replacement windows in all of its finished glory.