So you want to know what the replacement window installation actually looks like? Well folks it isn’t pretty. The physical process of replacing windows is fairly interesting but not for the faint of construction heart. As mentioned in prior articles we opted for an exterior installation of vinyl casement replacement windows. If you go with a similar installation process the steps below will outline what you can expect to occur when the window company arrives to remove and install the new windows. If you want the full skivvy about replacement windows read our other non-sponsored articles surrounding vinyl replacement windows:
Everything You Need to Know About Replacement Windows: An Intro Primer
What to Expect When Installing Replacement Windows
Capping A Metal Alternative to Finishing your Windows: Got Lead? Got Ugly? Capping Can Help
Replacement Windows, The Finished Project Before and After

Prepping for Window removal
Regardless of which method of installation, interior or exterior, there is prep work required of the homeowner. First, you are going to be expected to remove all window coverings and hardware. We had Roman shades in most of our windows so there was a lot of drilling required. We had to take down the shades and the brackets. In a couple cases we were able to leave up our galvanized pipe curtain rods as they were high enough on the frames to not interfere with the process, but we still needed to take down the curtains. Part of this prep is so the window installers have plenty of room to work, however, I would highly recommend it to preserve your window coverings. The process is dirty and there is no way my white blinds and curtains would have remained white!
If you are replacing OOOOOOLLLLLLDDDDD windows like us you may need additional prep. We took a sharp razor and ran it along the interior trim on all. fifty-two. Godforsaken. Windows. Scoring the caulked and painted shut windows minimized the interior frame damage when they started ripping them out. Obviously, you can skip this step if you have “normal” workable windows.
Finally, you will need to move items blocking the windows both inside and outside the home. That meant we spent a week sitting on a couch in the middle of the living room. I also lost a small bush that had gone dormant in the fall by not marking it. They thought it was a dead piece of landscaping and happened to walk all over it. Additionally we had to remove a limb from our Japanese maple after it got broken during window installation.
Timing Replacement Windows and the Seasons
When they begin replacing your windows there will have to be large openings in the side of your home. While this seems like a no-brainer let me repeat this for you. There will be, for most of the day, large gaps in your house. Guess what that means? Hot or cold air is going to pour in or out of your home. We lucked out and 90% of the installation occurred in an unseasonably warm fall. We were able to maintain little additional costs in heating. Each evening before they wrapped up replacement window installation for the day they made sure to close all the holes. BUT that does not mean that foam insulation or caulking had occurred. Our house has been draft city! My suggestion would be for an early fall or late spring install to minimize additional air conditioning or heating costs, though, this would depend on your location.
Installation Methods
First they have to remove the old windows. They can do this one of two ways, interior or exterior. We have a home built in 1927 so we are pretty much guaranteed to have lead paint. We did not bother to have it tested and just opted to have the lead abatement activities performed at the installation. This does add to the installation cost but with four small children we decided it was worth it. In interior installation they remove the interior trim and replace the windows from the inside. This method was used for out 3rd story attic. The cost of scaffolding would have been ridiculous and the attic had newer non-lead based painted trim.
Exterior installation, SURPRISE, happens from the outside! I bet you couldn’t figure that out… They attempted to remove minimal trim from the outside, but ended up having to pull off large chunks to get out our stubborn windows.
Lead Abatement with Replacement Windows
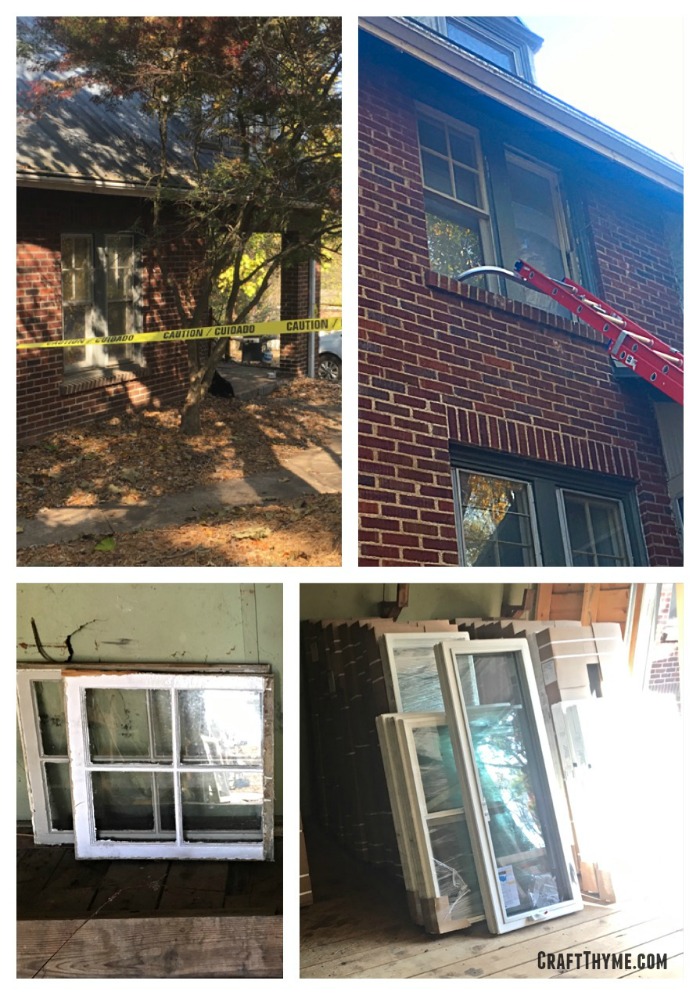
In the case of our installation the lead abatement required a few things. First, the company we chose did have a special certification to do the specialized lead installation. It was pretty scary looking as we had to have the house surrounded in caution tape with big poison signs (I’m sure the neighbors loved that) and a special permit onsite. They would seal the interior of each bank of windows with plastic, remove the window, HEPA vacuum everything up, remove the plastic and vacuum the interior. All these steps before the ever install the new window. Once installed they vacuumed and wiped the surfaces in the interior of the house. The exterior trim will be capped with metal as opposed to being re-trimmed or repainted in wood. This will contain any exterior paint that may remain with lead rendering it inaccessible and safe.
Actual Replacement Window Installation
If you have made it this far in the post you are going to be sorely disappointed. The meat of the work is in removal of the previous window. The installation requires two guys to push the window into place and get it as close to the interior stops as possible. Trust me, there will be gaps in a 1927 house as the window frames are not perfectly flat or level. And getting it in the opening with a tight fit is not always straight forward. They had to chisel off old paint, squeeze, and sand in places. After pushing the window into place they will level it as much as possible in the frame. Then simply screw in 4 large screws into the frame. Yep, that is it. Screw and bam you have a window.
After the window is screwed in place they should spray insulation foam around the exterior, place the old trim back in place as much as possible, and caulk the interior. I would say the interior caulking is THE finishing touch. Too much and the edges of the windows look goopy; to little and the caulk shrinks into the gaps making the installation look sloppy. To be honest we had a lot of issues with our caulk job. They had a newer member of the team and he, frankly, just did a crappy job. We have had to go behind and re-caulk almost all the windows to minimize shrunken gaps. I personally, have spend a good deal of time peeling excess caulk off the window frame… We finally just asked them to not even caulk the last few windows so we could do it ourselves. The window company owner did offer to come redo the caulk job himself but after 5 weeks into a four day job we just wanted to be done with the project. So it was our choice to finish the interior caulk.
Finally there should be a interior wipe down, removal of tags, cleaning of glass, and screen installation to finish off the interior. Make certain to test each and every window for opening and closing. We had a couple that were inoperable and they needed to make adjustments small adjustments for functionality. To complete the installation they will install new trim or capping. You can read all about the final capping step.

To Recap
The installation is the most disruptive part for your daily life. This portion is loud, dirty, and requires people and furniture be scattered through the interior of your home.
It is also the whole reason they are there: To get the old windows out and the new windows in!
Additionally, expect that the first few windows will go much slower than the process as a whole. There is a ramp up time for each older home as they figure out the best way to remove and install your windows. They moved much faster in the subsequent days with better results. I would suggest asking them to start with some of the less obvious windows as they finished product tends to look better the more they do. We luckily had them work in the back of the house first which led to a pretty nice installation in the front living room windows.
Thank you for the post on the process of window replacement installation. I definitely think you need to take into account the seasonal timing of window replacements. Like you mentioned there will be a hole in your wall until the new window is installed. You want to be sure it’s not cold and snowing outside or you’ll have a miserable time during the install.
I like your tip about considering the perfect timing or season when planning a window replacement or installation. Be mindful of the season, for example, if you are planning to have it installed by winter consider the cold breeze that will enter your house, even is the contractor managed to cover the holes your heater might still work harder causing your electrical bill to strike up. We’ve been wondering about getting our windows replaced since winter isn’t here yet it may be a perfect time for it.
We really lucked out with the timing and a surprisingly warm fall!