When Brianna and I first moved into our home, our décor could only be described as “New Construction Chic” – otherwise known as a completely blank slate. While the home was outfit with oil rubbed bronze faucets and a few single-bulb Edison light fixtures, there wasn’t a single other fitting or furnishing in our home. Without window coverings, our living room, bedrooms, and bathrooms (oh my!) were like fish bowls, towel/toilet paper holders were non existent, and without shower curtains things were going to get very smelly very quickly.
We knew that we wanted to extend the oil rubbed bronze and Edison theme further into our home, and given everything stated above, we had to act fast. There are plenty of curtain rods, toilet paper holders, and shower curtain rods out there on the market to choose from that would match the small amount of existing décor, but neither of us was willing to fork over $20-$40 per fixture to make this happen. After all, we had 4 windows that needed immediate covering, needed 3 toilet paper holders, one towel holder, and two shower curtain rods. At best these finishes would have cost us well over $250 (yikes!). Fortunately, we’re DIYers!

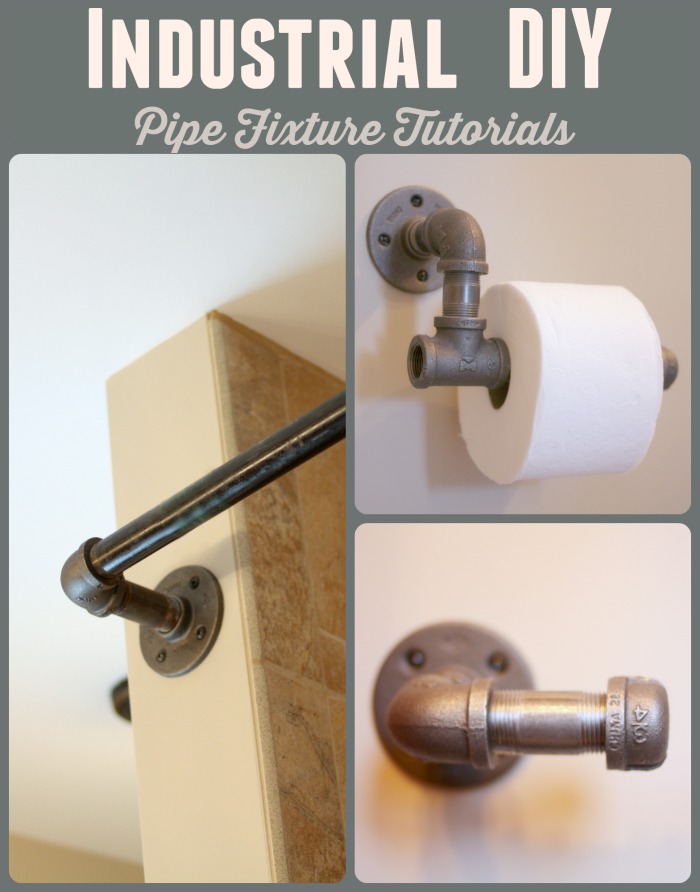
In this first of two posts you’ll learn how we added industrial finishes to our bathrooms by building creative shower curtain rods, toilet paper holders, and hand towel holders through the use of black iron pipe.
Transforming New Construction Bathrooms
We could live with people seeing in the living room for the time being. We could use the bathroom downstairs, set toilet paper on the floor, and close the door for privacy. But we could NOT take a shower without a shower curtain. So let’s begin there….
Master Bathroom: Curved Shower Curtain Rod
Shower rod selection can be a real PITA. Each shower in our home is a shower/tub combo. The one thing neither of us wanted was to take a shower and get surprised when the cold, wet shower curtain decided to sneak up and give you a nice mid-shower hug. The problem is that our master bathroom didn’t lend well to installing a curved shower rod without the need to drill through tile – and neither of us wanted to do that. In addition, the master closet door frame is immediately adjacent to the shower, and we didn’t want to mount a rod there either. We had quite the conundrum on our hands. In the end, we decided to build our own L-shaped shower curtain rod that would avoid the need to drill into the existing tile and fall above the closet door’s frame. Now… for supplies!
Supplies
Zoro.com* is THE source for affordable black iron pipe fittings. Yes, most of your big box home improvement stores will carry a selection of these type fittings, but man are they expensive! Zoro offers a superior selection for less than half the cost.
For the master bathroom shower curtain rod we purchased:
- 2 – 3/4″ Black Iron Floor Flanges*
- 1 – 3/4″ 90-Degree Black Iron Elbow*
- 1 – 2-1/2″ x 3/4″ Welded Steel Nipple*
- 1 – 50″ x 3/4″ Black Iron Pipe (Lowe’s)
When buying black iron pipe from your big box store, they typically carry two different grades of pipe; one for general use, the other for well water use. At a cost of around $13 for a 10-foot pipe, the lower grade pipe is substantially cheaper and perfect for this type of project. And better yet, most retailers offers free pipe cutting and threading as a service, thereby allowing you to complete multiple projects for the price of one length of pipe. I bet you can’t see where we’re going with this one… Determining the appropriate length can be a bit tricky, as you have to take into account the depths and lengths of whatever fittings you use in your project. For this project, you really need to measure the distance between the elbow and the opposite flange to determine how long of a pipe section you need – and then add at least 1/4″ – 1/2″.
Putting it all Together
Assembly of these components is easy and should be completed prior to the installation of any piece of hardware. I cannot stress this point enough. There’s no need to crank your fittings super tight – simply hand tightening them will be sufficient. I got a little overzealous about getting something hung and ready for use and forgot this very important piece of information. I soon found myself taking pieces down and redoing them…. Lesson learned.
To mount, we used bronze/black square head screws to complete the industrial look.


The end result was just what we hoped to achieve. Assembly and installation took all of 5 minutes and the total cost for the master shower curtain rod came to a very reasonable $12.94 – much better than $37.99 for a comparable rod at a big box store!
Guest Bathroom: Straight Shower Curtain Rod
Our guest bathroom has your standard shower stall setup and was therefore much easier to complete. Although we still had the “I don’t want to drill into tile” issue like we did in the master bath, there were no door frames or moldings to contend with. So in order to achieve the extra distance between us and the often huggable shower curtain, we simply crafted a standard shower curtain rod and installed it a few more inches away from the shower/tub threshold.
Supplies
The supply list for the guest bathroom shower curtain rod included:
- 2 – 3/4″ Black Iron Floor Flanges*
- 1 – 47″ x 3/4″ Black Iron Pipe (Lowe’s)
Assembly and Installation
Again, assemble everything prior to installation. My advice on a standard rod like this is to hand-tighten your flanges to your length of pipe, put the rod into place, and then loosen your flanges a bit with the rod in position. This method will ensure a tight fit of your rod prior to finishing your installation with screws (and drywall anchors if necessary).

Again, thrilled with the final product. Total cost: $9.90
Toilet Paper Holders
We’re not the type of people that want to have to constantly perform the reach around (or down) to grab a roll of toilet paper. So in keeping with our theme, we decided to build unique toilet paper holders for each of our 2.5 bathrooms. Crafting these babies can be a lot of fun, as the options and styles are nearly endless. Our designs fit any standard size roll insert and can handle the overall width of the largest rolls on the market (I’m thinking about the roll extenders that Charmin once provided – totally not necessary here!)
In the end, we crafted three different styles of toilet paper holders:

Style 1 Supplies (from Zoro.com*)
- 1 – 3/4″ Black Iron Floor Flanges*
- 1 – 2-1/2″ x 3/4″ Welded Steel Nipple*
- 1 – 3/4″ 90-Degree Black Iron Elbow*
- 1 – 6″ x 3/4″ Welded Steel Nipple*
- 1 – 3/4″ Black Iron Cap*
- Total cost: $5.38
Style 2 & 3 Supplies
- 1 – 3/4″ Black Iron Floor Flanges*
- 2 – 2-1/2″ x 3/4″ Welded Steel Nipple*
- 1 – 3/4″ 90-Degree Black Iron Elbow*
- 1 – 3/4″ Black Iron Tee*
- 1 – 6″ x 3/4″ Welded Steel Nipple*
- 1 – 3/4″ Black Iron Cap*
- Total cost: $6.94 each
Assembly and Installation
As before, assemble everything prior to installation. Give everything a really good hand-tightening! Mount your new fixture at a height and level that works for you. Try to mount to your new creation to a stud if possible, and if not, appropriately sized/weighted drywall anchors will do the trick.
Hand Towel Holders
Perhaps the simplest fixtures to craft, our hand towel holders are simple, functional, and add the perfect additional industrial pop to our bathrooms. We chose to install these in our guest bathrooms (there’s no where to do so in our master), and they always spark conversation after someone lifts a towel and sees what’s lying underneath.
Supplies
- 1 – 3/4″ Black Iron Floor Flanges*
- 1 – 2-1/2″ x 3/4″ Welded Steel Nipple*
- 1 – 3/4″ 90-Degree Black Iron Elbow*
- 1 – 3″ x 3/4″ Welded Steel Nipple*
- 1 – 3/4″ Black Iron Cap*
- Total Cost: $5.01
