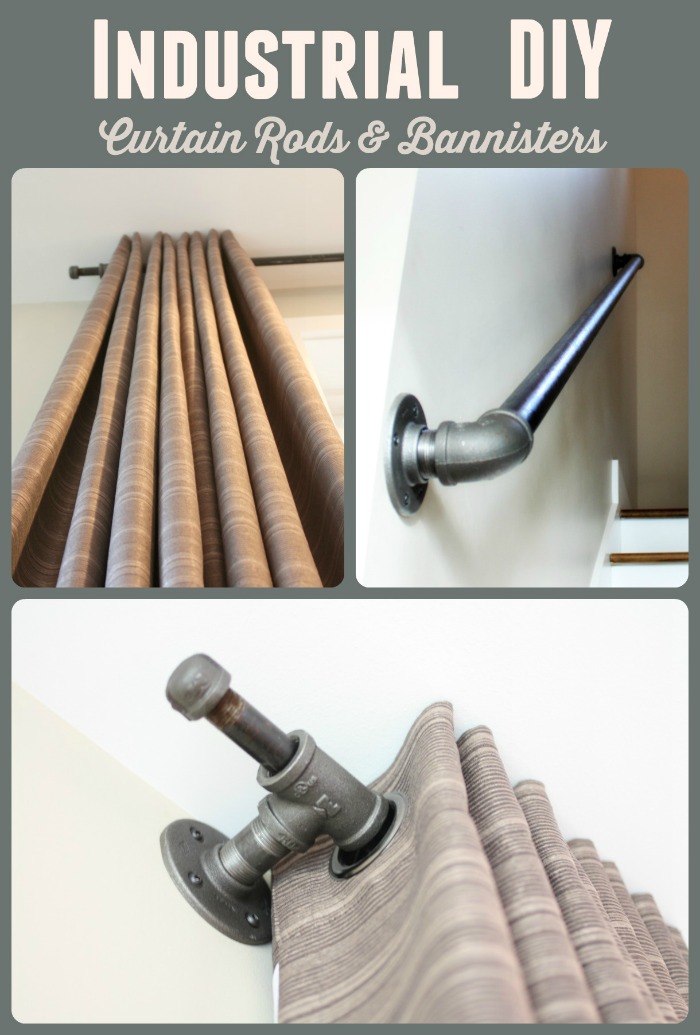
In Part I of this series, you got a glimpse of how Brianna and I transformed our bare bones bathrooms with fixtures constructed out of black iron pipe. Here in Part II we’ll take you further into our home and show you how you can use these same fittings to construct both standard and extra-long curtain rods throughout your/our living room.

Standard Length Curtain Rods
Curtain rods are never hard to find in a big box store. They are typically offered in 10-25 different styles for anywhere from $5 to $50. For most, people can find what they’re looking for in these venues. But not us. No, we can’t be that simple. We wanted something to match what was in our minds, and what we saw on the market just wasn’t doing it for us. And neither were the prices. A minimum of $25 per rod for something “substantial” isn’t cheap, and that wasn’t going to cut it for our limited “we just moved into a new house and have nothing” budget. It was at this point that we decided to pull the theme from upstairs down. Bring on the black iron pipe and fittings!
First we had to construct two standard length curtain rods for the windows on either side of the fireplace. I came up with a simple design and mounting system, got Brianna’s approval (the most important step of any project), then ordered my supplies.
Supplies
- 2 – 3/4″ Black Iron Floor Flanges*
- 2 – 2″ x 3/4″ Welded Steel Nipple*
- 2 – 3/4″ Black Iron Tee*
- 2 – 1/2″ Black Pipe Cap*
- 1 – 28″ x 1/2″ Black Iron Pipe (Note: this length should be determined halfway through installation. Don’t try to do it ahead of time. Trust me.)
Assembly and Installation
Yes, my supply list is right; I am going to use 1/2″ gauge pipe with 3/4″ pipe fittings. How?! Why?! Keep reading….
Step 1: Build and Mount your Brackets
This part is easy. (Actually the whole thing is easy. And cheap.)
- Connect a nipple to a flange.
- Connect a tee to the other side of the nipple.
- Hand-tighten everything
- Mount the bracket you just hand crafted (go you!) to the wall at a level you see fit.
To mount, we used bronze/black square head screws to complete the industrial look. Try to find a stud if you can, or use appropriate drywall anchors to ensure a snug, secure fit. Make sure the tee runs horizontal to the floor; miss this step, and well, you’ll have a great towel holder that’s just out of reach for your guests. If you end up here you should be able to tighten or loosen things just enough to get you back to good.
Step 2: Determine the Length of your Rod
Yes, you could have done this earlier, but trust me, you’ll be much happier with the end result if you wait until now to measure the length of pipe you’ll need to complete your curtain rod. Measure the distance between the outside edges of your tees. To that distance, add an absolute minimum of 3″ so that your pipe can overhang and be capped. For our installations, we added 6″ total giving us 3″ of overhang on each end.
Step 3: Slide your Rod into the Holes
Slide your length of 1/2″ rod into your 3/4″ tee. The 1/2″ rod will fit easily through the tee and allow for easy adjustment back and forth while you to get your curtain(s) in place. Now do you see why we went with 1/2′ pipe?
To install your curtains, insert one side of your rod into an open tee, slide your curtain onto the rod, and then pull the pipe back into place so that it rests in the unoccupied tee. When complete, install the pipe caps on either end, and voila!
Total cost per standard rod: $11.67

Extra-Long Curtain Rods
We’ve always loved the idea of being able to completely transform a room’s feel and appearance as day turned to night. The front wall of our home has two tall windows whose total span (windows and wallspace) covers more than 12′. After some convincing, Brianna sold me on the idea of floor to ceiling curtains that would span the entire wall. Here’s a preview:

During the day we’d let the light shine in. At night, we’d close the curtains and have a wall of fabric. However, to make this happen, we needed to find a 12′-long curtain rod. After a bit of searching, we weren’t coming up with anything for less than $120. Time to build our own!
Supplies
- 3 – 3/4″ Black Iron Floor Flanges*
- 3 – 2″ x 3/4″ Welded Steel Nipple*
- 2 – 3/4″ Black Iron Tee*
- 1 – 1/2″ x 1/2″ x 3/4″ Black Iron Reducing Tee*
- 2 – 1/2″ Black Pipe Cap
- 2 – 68″ x 1/2″ Black Iron Pipe
Assembly and Installation
This project follows the standard rod build instructions for the most part, but has a twist in the middle. Here goes:
Step 1: Build and Mount your Outside Brackets
- Connect a nipple to a flange.
- Connect a 3/4″ tee to the other side of the nipple.
- Hand-tighten everything
- Mount the brackets you just hand crafted to the wall at a level you see fit.
Use the same screws as before, and again, make sure the tee runs horizontal to the floor.
Step 2: Build and Mount your Inside Bracket
- Connect a nipple to a flange.
- Connect the special 3/4″ x 1/2″ x 1/2″ tee to the other side of the nipple.
- Hand-tighten everything
- Mount this bracket centered between the two mounts you’ve already installed. Same height. Still horizontal to the floor.
Step 3: Determine the Length of your Rods
Measure the distance between the outside edges of your tees to the close edge of the center support tee. To that distance, add an absolute minimum of 2″ so that your pipe can overhang and be capped. For our installations, we added 4″ total giving us 3″ of overhang on each end and 1″ to screw into the center tee.
Step 4: Slide your Rods into their Holes
Slide a length of 1/2″ pipe into your 3/4″ tee. Again, the 1/2″ rod will fit easily through the tee and allow for easy adjustment back and forth while you to get your curtain(s) in place. When your curtain on and ready to go, slide the rod back towards the center support and screw the 1/2″ pipe into the 1/2″ tee opening. Repeat for the other side of your new, nearly complete extra-long curtain rod. And oh yeah, cap the ends when complete!
Total cost for the extra-long curtain rod: $25.05

The Completed Whole-Room Look

Coming up in Part III
In Part III we’ll take you upstairs and show you how we’ve continued our theme in our stairwell by swapping out the existing construction-grade banisters and creating our own. This pop of style is both eye catching, functional, and can handle anything our four boys can throw at it!
I made curtain rods also out of pipes like this but I spray painted mine a burnished gold. getting ready to figure out how to use these pipes as bathroom sink faucets. great, strong curtain rods. I used 1″ across our back double patio door. works great. thanks for the article
Sounds very elegant!
I need a curtain rod to cover a 10 foot picture window in a cabin where there is absolutely no spot for a center brace, as I am covering up the bottom half of a triangle – topped window. All that to ask this, would the iron pipe span 10 feet without bowing in the center if I have no way of putting a center support in? I am only using linen shears so there won’t be much weight, but 10 feet is a long run! Any thoughts?
I’d just check the pipe in the store. Get a thickness that is sturdy enough it doesn’t bend when you hold out the 10 ft span.
I was just wondering what you cleaned your pipes off with? The ones I purchased at the hardware store have an oil protectant all over them. I would hate to get that on the walls and curtain material. Thanks!
For the really stuck on goo I have used Goo Gone. Otherwise just a general cleaner. I also made sure to take wax paper and rub it along all the handrails etc. It smooths out the pipe and gives it a nice final coat.
I’m looking to do something similar to your long curtain run to install one long rod above two sliding doors in our basement — talking about a 16′ run. For this I like the look of a thicker pipe so I’m thinking 1″. Will that be up to the task and any watch outs on install / finding parts scaled up to that sizing?
You should have no problem upgrading to 1″, and it should be plenty of support. You should have no problem finding 1″ fittings (though they will certainly be more expensive), and so long as you use heavy duty anchors, you should be just fine!
The 3/4″ x 1/2″ x 1/2″ reducing tee that you link for the middle of the 12′ curtain rod is not correct. The 3/4″ ends up on one of the sides that the 1/2″ rod is suppose to go into and the 1/2″ ends up in the middle and can’t connect to the 3/4″ pipe that goes into the floor flange. Maybe they just sent me the wrong one? What order should the numbers be in to order the correct reducing tee?
I am so sorry you had this problem! When we first wrote the post, the only tee available was the one listed in our post. I had to confirm the design of the tee myself with their customer support before ordering. After checking the supplier’s website, it now appears that they offer different versions of the tee. The one you will need should be G3336401, as tees of this are typically sized as Run-Run-Branch. I’ve updated our post to reflect this change.
Hello Adam, we just moved into a new home with very large windows. Your article is very interesting. Could you tell us what was the length of your drapes from ceiling to floor, what material you used for the drapes, and whether you used lining for the drapes?
They are lined and a polyester blend. We have small kids with sticky fingers so no need to go all silk and have them ruined. I’m not sure the exact final height but the ceilings are 9 ft. We ended up buying them from JcPenney and hemming them to the correct length. We purchased the size up from what we needed. After calculating the cost and time spent it was cheaper to buy and hem than purchase fabric and make totally from scratch.
Did you buy the grommets for the curtains or did the curtains came with them? thanks.
The grommets were a part of the curtains we purchased.
Adam I have a question. Do you think 1″ inch pipe will handle a 10′ run. It needs to be an open run, no support in the middle. The placement of the flanges will depend on the studs because all the pipe is heavy.
A 1″ iron pipe will definitely handle the 10′ run. I’m not entirely convinced that a 3/4″ wouldn’t hold up for you given the way you plan to mount your flanges. Conduit has a ton of flex, but black iron pipe isn’t going to sag at all for you.
The tan chairs in the bottom picture are awesome. Where are they from?
The chairs are the Kendall Velvet Chair in Mushroom from World Market.
Very cool – love how those turned out! Price is right too- I can’t seem to find the pieces that low here. Will have to keep searching because I would love to do this.
Thanks Gina! The key is to buy the 10′ pipe sections and have the big box store cut it down to the size(s) you need. So while you’ve got $10-$12 invested in a 10′ pipe, by the time you cut it down and use it in 3-4 different places, you can really maximize the savings We’ve also got an affiliate link with Zoro that will save you $5 off of your first $25+ order. If you’re interested, let us know!
When you cut the 10′ pipe down, did you then have to thread the cut end? If so, how did you do this? Thank you!
We have ours cut and threaded in the big box store. Some stores are less hassle than others about it. Some charge a small ($.30-.60) per cut and thread. Easiest way to find out is to call ahead and ask them when the best time would be and how much it costs. That can make the whole experience a lot nicer! If you plan to do a ton of these projects you can buy a cutter and threader, but decent equipment is not cheap.