Posted on 23 Comments

How to Build a Hugelkultur Raised Bed and Why You Should

Roma tomatoes that did not crack due to hugelkutlur raised beds

Every fancy gardening website extols the virtues of raised beds. I personally, resisted them for years but a combination of hugelkutlur and raised beds changed my mind! Before, we get into how to build a hugelkutlur raised bed, let’s discuss the why you should build a hugelkultur raised bed.  Also, we can answer the all important question:

What the hell is Hugelkultur and how the hell do you say it?

The easiest definition of Hugelkultur (hoogle – cult – er) is it is a hilled bed where the center of the bed is large trunks of wood and debris covered in dirt.  I added that stab at pronunciation because one time I asked readers how to pronounce diatomaceous… 80+ helpful comments later I decided to edit the article and never ask for help on that score again ;).

But back to hugelkultur; There are a lot of benefits to this traditional style of hugelkultur beds, such as cost, size, soil warmth, etc, but for me the aesthetics just weren’t what I was looking for.

2 year old hugelkultur raised beds full of basil, peppers, kohlrabi, and tomatoes
I just like a nice sharp edge.  Especially when I have neglected my trimming and weeding… This hugelkutlur bed is untidy at the end of the summer but still going strong! No watering needed.

Why Your Raised Beds should be a Hugelkultur Raised Bed

I have always been resistant to raised beds. My vegetable gardens growing up always were in-ground. I can recall the tilling and dirt clod smashing needed to prep a garden from very early years. As a side note, I can’t, to this day, explain why may parents insisted on having a garden growing up. It wasn’t their “thing” and we always spent summers angrily hoeing and yelling at groundhogs. At one point there was an incident where we electrocuted an opossum. Which, while an awesome display of electricity was not exactly the intended result. It did, however, keep the F’ing groundhogs at bay for some time. Till we finally realized the fried opossum had grounded the whole apparatus out. Which resulted in the loss of All. The. Corn.

Also groundhogs can suck it.

However, back to my garden, I was resistant to raised beds due to the added cost of whatever material you use to surround the bed, then the cost of dirt, the labor of construction, and the constant fight to keep the beds from drying out. I know lots of other gardeners who feel the same way.  With all that against raised beds how can building a hugelkultur raised bed change everyone’s minds?

First, there are ways to prep raised beds for less. So much so, we wrote about it right here! Also, let’s be frank: Raised beds look good. As a permaculture enthusiast I shouldn’t give a twit about “looks” and focus on functionality but my artistic background just wants to make beautiful things. Raised beds are easy to edge, weed, fertilize, decorate, etc. But the watering. Oh the watering… Raised beds can be like a terracotta pot and need watering on a daily basis (twice daily?). Ain’t nobody got time for that.

Modified hugelkultur raised beds that need no water but grow herbs, raspberries, and other vegetables
I maaaayyyy have let this hugelkultur raised bed get a little crazy. I have not watered it all summer but it is packed with lemon balm, basil, sage, and fresh fall raspberries.

Hugelkultur raised beds saved me from that fate of standing around with a hose and it can save you too! A lining of spongy wood and chips soaks up the water, then, releases it back to the dirt and plants slowly. Added bonus of a hugelkultur raised bed is the fungal cultures they bring. I attended a soil scientist’s (what a cool job title) class this spring at Organic Growers School and learned so much about how microorganisms and fungus assist the health of your plants. BUT that is a topic that needs its own series of posts. What was most important is that, outside of seedlings and a month of drought I haven’t watered my raised beds. During the drought I didn’t water the established perennials in these beds AT. ALL. I feel like an infomercial but damn… It is kind of amazing.

Have I sold you on having a hugelkultur raised bed? I bet we have! Now what? You got to build those puppies!

How to Build a Hugelkultur Raised Bed

We have detailed articles on building regular raised beds and fancy ones (Linked for your convenience). We even talk about how to fill and prep those raised beds for less. But if you are lazy, like me, here is a quickly tutorial on how to make a hugelkultur raised bed.

Step 1: Build some Raised Beds

Not some of those ridiculous 2 inch raised beds either… We are going to need some deep old boxes to make a good hugelkultur raised bed. I suggest building them at least 6 inches deep and actually follow my own advice. Though it doesn’t always look like it. On the below hugelkultur raised beds we had this brilliant idea to level them in the landscape and then spent an entire day digging only to end up with one of the sides being buried about a foot into the ground.  However, they are damn level.

Raised beds leveled in a sloped landscape.
This took a whole lot of digging!!!!

Step 2: Wood is Good

Depending on how deep your bed is, you are going to fill the bottom 1/3 to 1/2 with wood matter.  Deeper beds can take more wood matter and still have room for lots of dirt. In our deeper beds we used old logs we found in a wood pile, then branches (some of them fresh), then tiny sticks the kids picked up in the yard.

Modify hugelkultur to make a water-wise raised bed

Step 3: Chips Aren’t Just for Snacking

Even if you have a low raised bed you can follow this step. Our top layer was simple ground wood chips. These break down fast but hold water well. I even use wood chips in the bottoms of large containers so I do not have to water the containers as often.

That’s really it, just add dirt on top. But I make it seem a lot more complex and fancy in this in-depth tutorial about prepping beds for less.

It all sounds so great, amiright? But I bet you are wondering how these hugelkultur raised beds held up in the long run. Well, I’d be happy to say they have held up fabulously! The pictured beds above are two years old and going strong.

I plan to pressure wash the wood in the fall and stain, to help protect them, but as for fertility, water retention, and general upkeep?! I can not complain. Honestly, they still look good and grow like crazy.  I’ve been neglectful in keeping up with the harvest (and weeds) due to the rate of growth, even in the heat of summer.

But if that isn’t enough for you then let’s take a second to check out these tomatoes… Certainly, these are a variety of heirloom Roma’s which are resistant to cracking, but LOOK, like really LOOK, no cracking! Through days of no water and days of deluge every evening I have managed to get tomatoes that aren’t cracked. I have never, in ground, or regular raised beds, managed to make that happen without a lot of TLC.

Roma tomatoes that did not crack due to hugelkutlur raised beds
See Ma?! No cracking!

Tomatoes crack when water isn’t regulated. Guess what regulates the hell out of some water?! A Hugelkultur Raised Bed, That’s what! Anything that keeps me from having to babysit my plants will earn a place in my gardening secrets list.

So if you want to reap the benefits of good soil culture and water retention all while maintaining aesthetics then I think a hugelkutlur raised bed should be in your near future.  If you try this techniques please let me know in the comments how well it works for you!

How to make hugelkultur raised beds and why you should make them

Posted on 32 Comments

How to Know When Your Chickens Will Start Laying Eggs

When will your chickens start laying eggs?

If you purchased or hatched chicks for the first time this spring you may be wondering when your chickens will start laying. One of the things that will drive any chicken owner crazy is waiting for your first egg. BUT how do you know when your chicken will start laying? The general rule of thumb is that chickens will start laying around 6 months old (22-28 weeks) is the norm, but there are some precocious breeds that start earlier. Even if your chickens start laying in the normal range that still leaves 1-2 months of uncertainty, *le sigh*. While, we can’t predict with perfect accuracy when your chicken will start laying here are some signs that you may get an egg in a week or two, which, for my inpatient heart is a step in the right direction.

Signs Your Chicken Will Start Laying Her First Egg

When will your chickens start laying eggs?

How Much Time Since Hatch?

Remember below are just estimates of when these different breeds of chickens will start laying. However, it does help to know if you have a late or early egg laying breed.

  • Buff Orpington: 24 Weeks
  • Barred Plymouth Rock: 20 Weeks
  • Easter Eggers: 20 Weeks
  • Cochin: 30 Weeks
  • Brahma: 30 Weeks
  • Favorelle: 23 Weeks
  • Silkie: 32 Weeks
  • Polish: 26 Weeks
  • Sussex: 22 Weeks

Your Chicken Should Be Fully Grown

After knowing about when your chicken breed might start laying, the first way to tell that your chicken might be ready to lay an egg is the way your chicken looks! Most chickens need to be fully grown to lay an egg. Seems like a no-brainer, except with my first flock I wasn’t sure what ‘fully grown’ looked like. Pullets may look as though they are grown with large sizes and lots of beautiful feathers. To tell if a hen is fully grown you will need to inspect the comb and wattles. These should be dark red (or blue, or black, or whatever color your chicken breed has). The comb and wattles need to be fully pigmented and swollen to final size. The chickens will have all their adult feathers and finally lost their terrifying teenage look. Unless you were our speckled Sussex. She started laying waaaay before she was done with wattles and feathers… If I hadn’t seen her laying myself I still wouldn’t believe our pullet was capable of laying while looking so teenagery still.

Difference between a pullet and laying hen
Can you see the subtle differences between a pullet and laying hen?

Squatting behavior

When your chicken is ready to lay her first egg she will often do a funny little squat when you come up to her. Before our pullets began to lay even the tame ones would kind of sidle away and dart around when we would approach to pet them. Then suddenly, a few of them would stop and drop when we went to pet them. A quick brush of the hand and they’ll fan their rumps in the air. Not to be chicken graphic, but this is what they would also do for a rooster. If you want to be a little less gross think about how a cat will stick its butt in the air when you pet them at the base of their tale… Same concept.

Being in the Nesting Boxes

Another good way to know when your chickens will start laying is to note who suddenly started showing interest in the nesting boxes. We had a new flock this year and made sure to fill up the nesting boxes around 20 weeks with straw. They hens took a look at the boxes and then promptly ignored them.

Side note: If you have a small coop beware, they can get in the habit of hanging out in the nesting boxes due to lack of room. This makes for gross nesting boxes and problems later.

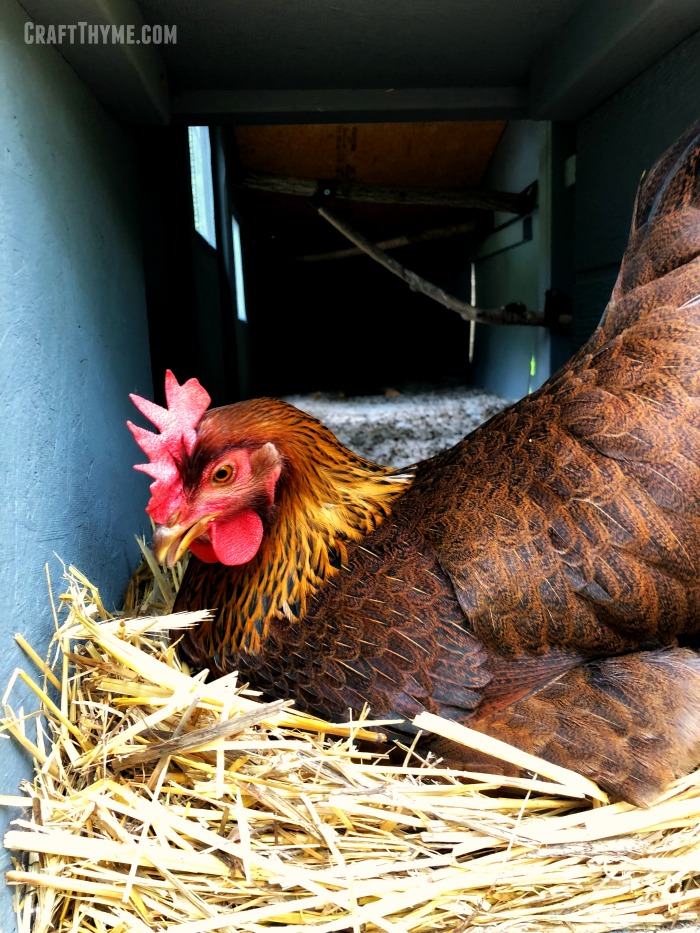
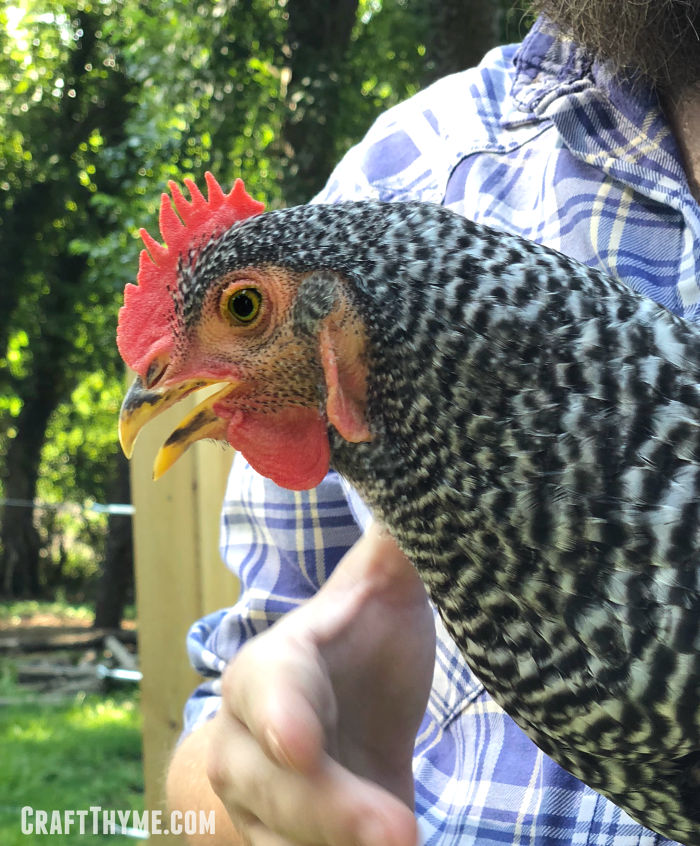
Anyway, a couple of weeks after I filled the nesting boxes with straw, I noticed the Barred Plymouth Rock rooting around in the box. Sure enough, she was the first to lay. Our larger Welsummer was in the coop a lot checking the nesting boxes out recently and I caught her laying this week!

There are a couple other ways that aren’t quite as easy to tell if your chicken is going to start laying. But they still they are generally true for a lot of chickens.

Start Making a Bock-Bock Noise

Don’t you just love my scientific description of chicken noises :)? I’m pretty sure my three year old can do a better impression of a chicken.  That being said, chickens that are about to start laying will often be noisier. They will develop an egg laying bock-bock noise. It is hard to describe for first time chicken owners, but once you get accustomed to the sound you will know when they start practicing that noise. There are some breeds that a quieter than others like our cochins and brahmas but most chickens get pretty verbal around laying time.

Barred Plymouth Rock Pullet
Bock! Bock!

Chickens Become More Tame/Stand Ground

Some chickens are just not going to be squatters as mentioned above, but they all seems to settle down a bit when they are going to start laying eggs.. Generally speaking, chickens will also just lose some of their flightiness around laying time. Unless you are our Polish… That thing is always crazy. Chickens that are about to lay will just start to get more secure in their surroundings. Our layers will hold their ground when I open up the nesting boxes, even when they aren’t actively laying. They will come more when we called and just generally settle down and act like a mature, sensible chicken (again, minus our Polish). I have always assumed it was because they start to cement their adult pecking order and see us as the heads of the flock. Also, think about when you were a teenager (Crazy)… versus when you are an adult (sensible… Okay, less crazy).

All the above are pretty good signs to know when your chicken will start to lay, but also remember each chicken is an individual. We have two Welsummers that hatched at the same time. One had crop issues as a chick (we thought we might lose her at one point) and ended up smaller than the other Welsummer. She still hasn’t started laying and the other has been laying for over a week now.

Crazy polish chicken
Just a crazy, flighty Polish. But isn’t she fantastic?!

Early Laying Breeds

Finally, if you just can’t wait to get some eggs consider raising breeds start young.  Here is a quick list of young egg layers, that also happen to be good egg producing chickens.

  • Plymouth
  • Sussex
  • Easter Eggers
  • Orpingtons (though in our case our Oprington was sloooow to lay)
  • Australorps
  • Leghorns

We would love to hear when your different breeds started egg laying.  If we get enough comments then we can work on honing down our averages!

How to know when your chickens will start laying eggs

Posted on 4 Comments

THE List of Perennial Berries for Your Yard

THE Perennial berry list with over 30+ berries you can grow in temperate climates

It started with a friend pointing out a sale on blueberries. Our response: “Oh we have 13 blueberry bushes”. Their response was, “Oh, they also have raspberries.” Check.

Blackberries?
Check.
Strawberries?
Check.

How many berries do you grow?

Here at Craft Thyme we have 14 types of berries currently growing on our property! Mostly because we love berries. And just for the record I am calling berries anything with small fruits. We aren’t being all scientific and taxonomic up in here.

Yes, it may be shocking but there are well over 14 different types of perennial berries you can grow in temperate zones. Best part perennial berries are pretty much the gardeners best friend. They are easy, fit in even small yards, resist tons of pests, require little care, and show up again and again. Other than potentially fighting off the neighborhood kids or birds your crops are kind of a given. Especially on some of these lesser known varieties, which seem to have better luck with the wildlife.

So what type of perennial berries can you grow in your garden space? Here is a list of perennial berries. Below are the ones I am currently growing and a further list of more uncommon berries worth exploration! All in all I have researched dozens of varieties of berries and listed 29 perennial ones below. I’m also kinda wordy so I had to highlight a few of my favorites with some affiliate links in case you want to buy some for yourself!

Perennial Berries

THE Perennial berry list with over 30+ berries you can grow in temperate climates: BlackberriesBlackberry: (Zones 4-9) I picked up a thornless unnamed variety of blackberry in 2004 and planted it by my back porch. I did literally nothing. It had sun and whatever rain fell. I never fertilized it, I sometimes cut out dead limbs in the spring and wove new vines in the stair railing. But that, folks, was that. In three years I had vines running 10 feet up my stairs and so many blackberries I couldn’t eat them all. It smelled like a winery under the bush from the multitude of fermenting blackberries. From that random purchase I was hooked. Every house I have owned is left with a thornless blackberry somewhere. Arapaho and Apache have been some of my easy favorites.

THE Perennial berry list with over 30+ berries you can grow in temperate climates in your own backyard: Fruiting RoseFruiting Rose aka Rosa Rugosa (Zones 3-9) I’m not sure this counts as a berry, but we just planted one of these roses. They are supposedly pretty maintenance free, unlike the typical fancy rose, and make delicious, vitamin C packed rose hips.


THE Perennial berry list with over 30+ berries you can grow in temperate climates: StrawberriesStrawberries (Zones 3-9)


Blue Berry High Bush (Zones 4-7) THE Perennial berry list with over 30+ berries you can grow in temperate climates: Blueberries


THE Perennial berry list with over 30+ berries you can grow in temperate climates: and in your own back yard!: Low Bush BlueberriesBlueberry Low Bush (Zones 2-8) Yes, blueberries as groundcover do exist. Lowbush blueberries range from 6″ to 2′ tall, though you can trim them to keep them very low to the ground. In our local mountains you can find many of these wild low blueberries for natural picking. However, I purchased a named cultivar. What name? Who knows, I have the tag somewhere but I am wAAAAAAAy behind documenting my garden journal for this year. *sigh* Anywho, we are trialing these by the pond next to the cranberries since they like similar conditions.

THE Perennial berry list with over 30+ berries you can grow in temperate climates: Goji BerriesGoji Berries (Zones 3-10) Why? Well they aren’t exactly my taste, but hey everyone else in the world counts them as a superfood, so I have a couple plants knocking about the yard. Small bushes with little upkeep so there they stay.


THE Perennial berry list with over 30+ berries you can grow in temperate climates: HoneyberryHoneyberry (Zones 2-7)


THE Perennial berry list with over 30+ berries you can grow in temperate climates: MulberryMulberry (Zones 4-9) FYI a groundhog will eat each and every leaf off a mulberry tree if you happen to have it in a pot they can knock over… Just saying… Oddly it will survive this defoliation, so there is that.


THE Perennial berry list with over 30+ berries you can grow in temperate climates: ElderberriesElderberry (Zones 3-8) Hey, guess what?! Groundhogs like these too! We got a few berries last year, but added more plants this year. I have them in a shady location to help deal with excess rainwater runoff. Since they aren’t in the sun I don’t ever expect to have scads of these berries, but what I do get I plan to make an extract to use in cocktails. Cause we live in Asheville, and that’s the hispter kind of shit you do.


THE Perennial berry list with over 30+ berries you can grow in temperate climates: RaspberriesRaspberry (Zones 3-9) This might be my husband and mine favorite type of berry. Do you know raspberries quit ripening when you pick them? So yeah, if you want the taste of an amazing, sweet, fragrant raspberry unlike any you have had in the grocery store you are going to need to grow your own. On that note, I’m not a huge fan of proprietary plants. It just irks the shit out of me when you try and slap a trademark on life. That being said, I am also a sucker for clearance plants. A couple of years ago I picked up a trademarked thornless raspberry called Raspberry Shortcake… Yes, I hate myself sometimes too… Anyway I stuck this plant in the dirt and got lots of green leaves. It was a cute, tiny, compact, thornless bush, but it was just a bush. No raspberries to be seen. Only reason I haven’t dug the damn thing up was because I had other things going on in the yard. So it stayed there. Staying compact, looking cute, and doing nothing. Then this year! Holy mother of berries. We get two complete handfuls of the largest, firmest, and juiciest raspberries I have ever seen every. single. day. For almost a month now! It has outperformed my traditional vines but untold amounts and has had virtually zero pests and literally no love from me. I will be seeking these out and adding them all over the place from this point on.

THE Perennial berry list with over 30+ berries you can grow in temperate climates: CranberriesCranberry (Zones 2-7) I was chocked to learn you can grow cranberries without a bog!  So much so I wrote a whole post about how to grow cranberries here.


THE Perennial berry list with over 30+ berries you can grow in temperate climates: Serviceberry or JuneberryServiceberry aka Juneberry (Zones 4-8) Finally tasted these this year and they are amazing!  Sweeter and larger than a blueberry.


THE Perennial berry list with over 30+ berries you can grow in temperate climates: Little known lignonberriesLignonberry (Zones 2-8) It looks like a tiny boxwood. Which is really kind of a selling point in my humble opinion.


THE Perennial berry list with over 30+ berries you can grow in temperate climates: BoysenberryBoysenberry (Zones 6-9) This crossed plant is a new one for us this year. I’m hoping we love it as much as all our other berries. So far growth has been easy peasy.


THE Perennial berry list with over 30+ berries you can grow in temperate climates: Kiwiberries aka Hardy KiwiKiwiberry (Zones 3-9) Not on my easy list. I know I said berries are easy… But really not this one. I have an entire article about kiwi berries, but they take years to produce, are super specific on site needs, and frankly are a challenge for me as an experienced gardener. If I ever reliably crack the kiwiberry nut I’ll let you in on the secret. Until then just be prepared for a challenging plant.


Nanking Cherry (Zones 3-6) Cherry or Berry… You decide cause Adam and I certainly can’t agree. He said this should be in a post about fruits. I said, well not much of anything, I just typed what I wanted anyway. ;)


These are the berries I might plant in the future, but haven’t yet purchased:

  • Seaberry aka Sea Buckthorn (Zones 3-8)
  • Aronia/ Chokeberry (Zones 3-7) Favorite permaculture podcasters just couldn’t like the taste no matter how hard they tried. So, I kinda put these low on my list.
  • Currant (Black, Red, White) (Zones 2-9) Let’s just sum up all the currants, gooseberries, and jostaberries in one fail swoop. I want them. I know from trips to the British Isles that I love the taste. Guess which plants you can’t ship to North Carolina… At one time our state was really into white pine timber and these plants can help spread disease to white pines so we still can’t have them shipped in. I found one local person with red currants for sale but they wanted 25! TWENTY-FIVE! dollars for a teeny-tiny plant. I. Can’t. Even….. So yeah, totally wish I had paid my $25.
  • Gooseberry (Zones 3-8)
  • Jostaberry (Zones 3-8)
  • Jujube (Zones 5-10)
  • Goumi (Zones 5-9)
  • Wintergreen (Zones 3-8) Soooo want to add these to our forest area. Once I have finished my eradication of poison ivy these are going in.
  • Sand Cherry (Zone 3-6)
  • Highbush Cranberry (Zones 3-7)
  • Autumn Olive (Zones 4-8)
  • Chokecherry (Zones 2-7)
  • Wineberry (Zones 4-8) Some consider this Asian native invasive. Berries are often photgraphed as the have a jewel like quality.
  • Salmonberry (Zones 5-9)
  • Huckleberry (Zones 7-9)

I couldn’t resist throwing in a couple non-perennial berries.

  • Groundcherry: Not a perennial but super tasty berry I grow each year. The sweetest ones will be after the husk has fallen to the ground. If you can grow tomatoes then you can grow groundcherries. they are usually smaller and need only light staking. I let them kinda just hang off my raised beds and sprawl.
  • Strawberry Spinach:  I have been tempted to try this one as you can eat the greens and it makes a small semi-sweet red berry.

So what berries have we missed?! I know there are a lot more blackberry/raspberry hybrids like tayberry, but was trying to stick to mostly true types! Please add your favorite perennial berries in the comments below.

THE Perennial berry list with over 30+ berries you can grow in temperate climates

Posted on Leave a comment

The Urban Permaculture Plan

Urban Permaculture design

After a much needed break from DIY, blogging, and basically lots of work we are finally back and ready to hit the ground running.  I won’t go into all the details of why we were so spotty at posting new content in the last year but suffice to say that some major renovations (52 windows ya’ll!), getting the yard basically tamed (bush hogged), and working/raising kids it was just time for a break.  I can’t (always) speak for Adam, but I know that I was just kinda burnt out and trying to get quality posts together in the evenings just wasn’t happening, especially when there are chicken coops to build and plants to get in the ground.

However, now that we took some time off and had a lovely European vacation (Which you can see on our Instagram @craftthyme) and got a few posts up I finally felt ready to jump back into it.  We have made a holistic urban permaculture plan for the whole yard and started clearing land like we were god-damn pioneers and not urbanites.  Let this be a lesson on when not to neglect a yard for years…

SO much brush! Before and after clearing with even more clearing to go.
Just so much brush, even in the after shot!

I’ve always had a pretty good running obsession for organic gardening.  Not that I will snub all chemicals because I.Cant.Even. when it comes to poison ivy.  But I have always figured if I could use less chemicals then that would be good.  No chemicals would be even better!  Adam has been feeding that obsession of mine with a series of permaculture books, a surprise registration to this years Organic Grower’s Conference (squeeeee!), and unending patience as I listen and talk about podcast after podcast from Sow Edible Permaculture.  I/we want to take my gardening to the next level and design a whole yard system that works to create easy food, with no chemicals, for the whole family.

Plus we got chickens!  Who wouldn’t want to write about those lovely ladies?!  You may recall the great bear, fox, and god knows what else attack on the previous flock when we moved into this house.  We have held off raising another flock until we could create a secure environment like we had at our industrial style house and it took quite a bit of time to build the taj ma-coop.

SO many chicken butts! Chickens were integral to our permaculture design
Chicken butts! We now have a few chickens (according to Adam) and a lot of chickens (according to Brianna)

So how does this turn into an urban permaculture plan? (How to create one is a topic for another post)  Well, the long winded intro above was really to illustrate that while we have not been blogging, we have been reading, learning Sketchup, and drawing.  And drawing.  And drawing.  I also took an online intro to permaculture (Adam listened to a lot of the videos).

And even as we started clearing brush, we began more drawing…  We actually ended up moving the coop location from an earlier plan. It was going to be tucked away behind the garage so we could get a clear view out of the back windows and utilize a difficult space. But once we started removing brush we realized it was waaaay too damp for chicken respiratory systems, but potentially perfect for elderberries, blueberries, hazel nuts, or mushroom logs. So my guess is that as we start working from the plan things will have to change further.

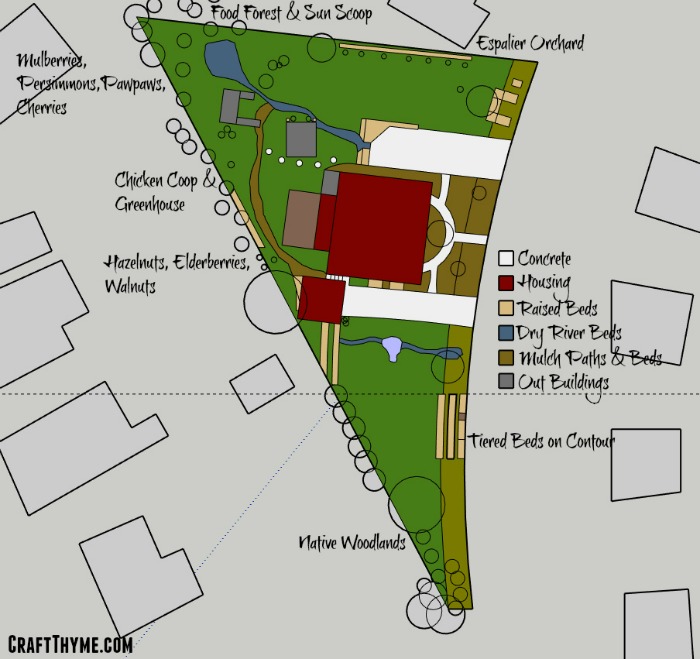
Urban Permaculture Plan Overview

Urban Permaculture design

Currently, we are working on the back corner area behind the garage.  It was the original planned location of the chicken coop but now is going to have elderberries, hazelnuts, and other semi-shade plants.  The chicken coop ended up just a little further down the property line in a drier area.  It is also on the northern side of our property but far enough away from the house that the sun hits the front area.  We accidentally planned a large sun-scoop (because sometimes I plan before I get through all my books, classes, and terminology) that has a chicken coop in the center.  It is kinda nice to finally be in a gardening place where you just know how sun and plants interact enough that you can design something and then have your plan validated by experts.  I’ve always wanted to have this little clearing edged into a mini-urban forest.  The only change is that a central forest lounge area is going to be a chicken coop instead.  This will allow the ladies wind protection, shade from the worst of the heat, but also, some good sunlight in the winter months to keep them warm.

We have cleared back the neglected brush and created a small retaining wall to hold nanking cherries, honey berries, and strawberries
Here we are taking back the forest and making a path to the chicken coop that includes honey berries and nanking cherries.

The plan as it stands is to clear out all the undergrowth, attack the english ivy/poison ivy/honeysuckle, and then replant the under story with a variety of perennial edibles.  Currently, we are eyeballing the removal of some spindly wild cherries and replacement with a couple of pawpaws in the back and nice dwarf plum or persimmon in the front.  Smaller berry bushes and canes, edible ferns, and wintergreen are also part of the foresty feel.  When it is all said and done I think we will add loads of mulch and top with pretty pine straw mulch to speed up the forest vibe.  It will take awhile for the canopy to evolve to fully shade the area.  We had a lot of trees removed in the last year.  My hope is between that and me removing all the invasive vines the grand oak at the end and the locusts, hickories, wild cherries and pears will fill in.  These are great for feeding the wildlife and pollinating the small espalier orchard planned along the side.

Young pawpaw seedlings
And while I say planning, what I mean is I have pawpaws in pots!

Light is probably the hardest part of the entire urban permaculture plan.  We are urban and urban = neighbors trees and buildings blocking the light.  To get enough light to fuel fruit production I really only have a singular location.  I can slot in trees on the other side of the house in a few places but mostly this section is it.  We are slightly down slope from the ridge and the neighbors across the street have some large trees that cut down on available sunlight.  Additionally, I am kinda just attached to the weeping cherry in the front and the 100+ year old cherry on the other side.  So I just have to carefully plan the sun loving crops up front and the shade tolerant items elsewhere. On that note the espalier fruit trees are in front of a wicked new composting fence we just wrapped.  It will also make a nice break between us and the renters next door.

We already added tons of raised beds along the driveways and in front of the cherry tree.  You might note there is this large square thing in the yard.  It is this ridiculously large concrete pad that housed a gazebo and large hot tub.  The gazebo was gone when we moved in and the hot tub had a large crack in it.  We ended up finding someone to take it for parts but we were left with a giant pad…  On that note we saved all the serviceable old windows when we got them replaced last fall in the hopes of building a greenhouse.  We opted to save those and look at making a semi-passive solar greenhouse in that place instead. With the removal of some trees this now looks like a decent place to build a greenhouse.  Maybe not perfection but with the existing structures it is one of the better places.  More over it will act as a wind break for the chicken coop when we do finally get it installed.

The front section will eventually house a number of smaller herbs, flowers, and perennial veggies.  It already has a beautiful Japanese Maple we managed to salvage after being covered with other trees for years.  We also planted two more ornamental trees, a weeping gingko, and a japonicum maple because as much as we love edible plants we also love beautiful plants.  Around these we are going to cut in some new sidewalks to repair the broken ones with pavers.  Adam has already prepped the site for the bricks and I started adding perennials from a local grower, Kenny’s Perrenials.

On the other side we started on the tiered garden beds last year and still plan to finish those.  They won’t get a ton of light due the the trees across the street, but I think the top two tiers could be a great place for blue berries and maybe an asparagus bed.  We moved a play area/patio section over here so that if we ever fully fix the pond and create a waterfall we will be able to enjoy them.  It also keeps us from having negotiate with the neighbors on removing a bunch of white pines.  At the top point of my lot I’ll probably leave that scrub for the next few years, but I can probably manage to fit in a couple more fruit trees or some chestnut hybrids along the road.  It will save the kiddos stepping on the chestnut burrs and allows me to expand what our yard has to offer. Plus I just happen to love chestnuts.

The slope by the garage is kinda useless as-is, but I think that we can quickly get some use out of it by letting squash and pumpkins trail down the hill and planting Jerusalem artichokes at the bottom.  I dug a tiny swale midway down and planted corn below the squash layer.  Long term we could put in more raised tiered beds, but it really only gets great sun at the top.  So maybe frame out a top bed and then plant trailing items that take up a ton of garden space.

The Urban Permaculture Plan as a Whole

We have some issues with the water drainage; in that everything slopes to the back which still leaves the front beds without adequate rainfall at times. While permaculture, in a perfect world, works without a lot of human intervention and irrigation this urban lot may just have to have some rain barrels up front to supplement from time to time.  We are not willing to sacrifice aesthetics and create a berm in the lawn to keep all the water on the lot.  We’re hoping to make the urban permaculture plan as good looking as possible while still being as permaculture as possible.  It might be snubbed by permaculture enthusiasts, but I hope to make something beautiful that might serve as a potential show piece to other people who are interested in dabbling in the urban homesteading/permaculture concepts.  For example, I hope to make a solar powered waterfall for the kids.  It will serve little purpose other than being my garden folly and to attract wildlife!

Another issue with the plan is that most of the nitrogen creation by the chickens is going to be at the back of the lot.  Since we have a small lot (1/3 of an acre) I’m okay with the extra work it will take to move the site made fertilizer (aka composted poop) upwards in the garden.  I’m already moving the rabbit poop downwards ;).  Since we are going to have to move the poop we plan on two different composting areas one behind the chicken coop for cold compost where we add to it slowly.  By the eventual greenhouse we plan on a three bin system that will run hot compost in the fall/winter to try and use the compost as a method to warm the thermal mass of the concrete.

Finally this entire plan is NOT a year in the making.  Here is what we hope to accomplish on major projects.  It leaves out small things like rain barrels, drip irrigation etc.

Year 1

  1. Chicken Coop (Done)
  2. Composting Fence (Done)
  3. Terracing behind the garage (Mushroom Log area/ In-Progress)
  4. Finishing the tiered beds
  5. Small solar pump for the pond
  6. Front Sidewalks (In progress)
  7. Perennial Plantings
    1. Pawpaws
    2. Apples
    3. Pears
    4. Peaches
    5. Plum
    6. Mulberries
    7. Persimmons
    8. Elderberries, hazelnuts, etc

Year 2

  1. Green House
  2. Solar Powered Waterfall/ Stream
  3. Perennial Plantings
    1. Chestnuts
    2. Asparagus
    3. Smaller herbs, veggies, etc
  4. Bee Hives

Year 3

  1. Shade Patio
    1. Cob Pizza oven
    2. Permeable patio
  2. New back deck/Kitchen remodel
  3. Solar Panels?
  4. Hopefully start reaping the rewards and finish projects from year 1 & 2 that didn’t actually get complete

Year 4 & 5 TBD but probably some major indoor kitchen renovations if we haven’t gotten to all of that in year 3!

So we start with a plan and we modify it as we go.  Can’t wait to see how it turns out and we are really hoping you follow along. We use our Instagram and Facebook Stories to show the day to day urban-farm work.  We hope you will follow our progress on the urban permaculture plan and learn to create your own permaculture oasis.

Planning an urban permaculture oasis. Follow along to learn how you can make your own plan and watch ours in action.


Posted on 49 Comments

Egg Laying and Chicken Tracking Spreadsheet How To

Dashboard for free egg production and chicken tracker

Edit: We now have a 2024 Version Available!

Do you have chickens? Do you like spreadsheets? Then I have the Egg Laying Spreadsheet for you! No really, joking pitch aside, I have created this free chicken tracker and egg production spreadsheet for you in 2018 and now use this post to show you how to fill it out. We have updated it over the years and it tracks all your poultry, not just chickens. However, the guide below will still get you started. If you need the newest version see the link at the very top of the page!

Who is this chicken tracker and egg laying spreadsheet for?

Both the home hobbyist, the small farmer, and geek extraordinaire.

Truth time: I made this egg production spreadsheet for myself because I am a geek and wanted to know if my chickens ever broke even, cost-wise, when I sell their excess eggs (Spoiler: I’d keep the chickens anyway). I love tracking all types of things, but I just cannot do it on paper. I like using Google Sheets because they are free and easily accessible from my phone.  Right now I am offering the poultry tracker and egg production spreadsheet only as a Google Sheet. However, if you desperately need this Egg Laying Spreadsheet in an excel format let me know in the comments. If there is enough interest I’ll convert it for you.

We have had a number of enhancements over the year thanks to people like you!  Please keep giving us your feedback about what else you might want to see.

Here is what the Egg Laying Spreadsheet contains:

  • At a glance chart (auto fills)
  • Summary statistics, example: average eggs per hen, eggs per month (autofills)
  • Poultry Log
  • Egg Log
  • Expense Tracking (optional)
  • Income Tracking (optional)

Best Part! You enter you expenses, income, and eggs in each sheet and the statistics and charts automatically update! Booyah!

Egg Laying Spreadsheet Dashboard

My day job is in Business Intelligence so I know people need a variety of ways to digest data. For visual learners the Egg Laying spreadsheet starts with some at-a-glance charts. First you can see how your monthly profit is going and how your running year-to-date profit is headed.  Trust me, the fake data you see below is nothing like my actual profit…  Which is well below zero this year.

My favorite part are the egg spreadsheets. Even if you have no interest in profit and loss you can see your total eggs, egg size, and color all compared!

Dashboard for free egg production and chicken tracker

Poultry Summary Statistics

Need more numbers?  Average eggs per hen? Year-to-date profit on your chickens, quail, ducks?  Then the Summary Statistics page in the Egg Laying Spreadsheet is all for you.  All items automatically populate from the items you enter in the next few sheets and is far expanded beyond the view you see below.

egg size and color tracker for checking the production of your backyard flock

Poultry Log

This is the main portion of the spreadsheet. It started as a place to keep information about all of our new chicks but has evolved to meet a variety of your needs. The whole spreadsheet links from knowing when your chicks start laying, if they died or were sold, and other notes. The key fields that need to be filled in correctly for the Egg Laying Spreadsheet to work:

  • Laying Date
  • Death/Sale date if applicable
  • Type of Animal

Those three items will automatically calculate if you have a laying chicken, duck, or quail hen.  It will stop counting if you have sold or the hen passed away.  Don’t worry you can track your roosters, they just won’t count in your hen totals.

Log of chickens for entering and tracking details of a small flock

Egg Log

This is the fun spreadsheet! I simply pull this sheet up on my phone when I collect eggs and put in the numbers. It is pretty simple, just put how many eggs of each type and color in the appropriate slots. The totals will auto-calculate for you and update the summaries and charts as you go. I have left what exactly goes in sizes and colors up to you.  I tend to put cream eggs with white and tan eggs with brown, etc. but that decision is up to the individual chicken owner. The newest charts include species and egg size tracking. Pro-tip: you can put in total eggs in the EZ total column (not shown), and skip color and sizes but you will lose your size, color, and species charts.

egg tracker for color and size from hens

Expense & Income Tracker

For those chicken owners that want to get a little more into the numbers the expense and income sheets exist. I have some suggested categories for chicken owners, but in reality you can put whatever you want. I am hoping to add more statistics and charts based on the categories in the future. Some examples I am considering: Cost of each egg per amount of feed, Average Carton Price, etc.

If you are a hobbyist and just want to look at how many eggs you have, you can skip these pages or fill out the bare minimum:

  • Date
  • Amount

expense tracking spreadsheet for chicken owners

Categories that must be filled out are marked with an asterisk *.  Filling those columns in is all that is required to use the Chicken Egg Tracking Spreadsheet. I really want feedback from you about what else you might want this spreadsheet to do. Please let me know in the comments and if you found it useful then please share this on social media. 

I spent a lot of time creating something I thought might be of value to you, chicken owners, and would like to have your feedback. Please let me know in the comments what other items you might want to see in the spreadsheet. I’ll see about future enhancements for later this year!

Free chicken tracker and egg laying spreadsheet