Posted on 7 Comments

How to Dye Sand

Tutorial on How to Dye Sand

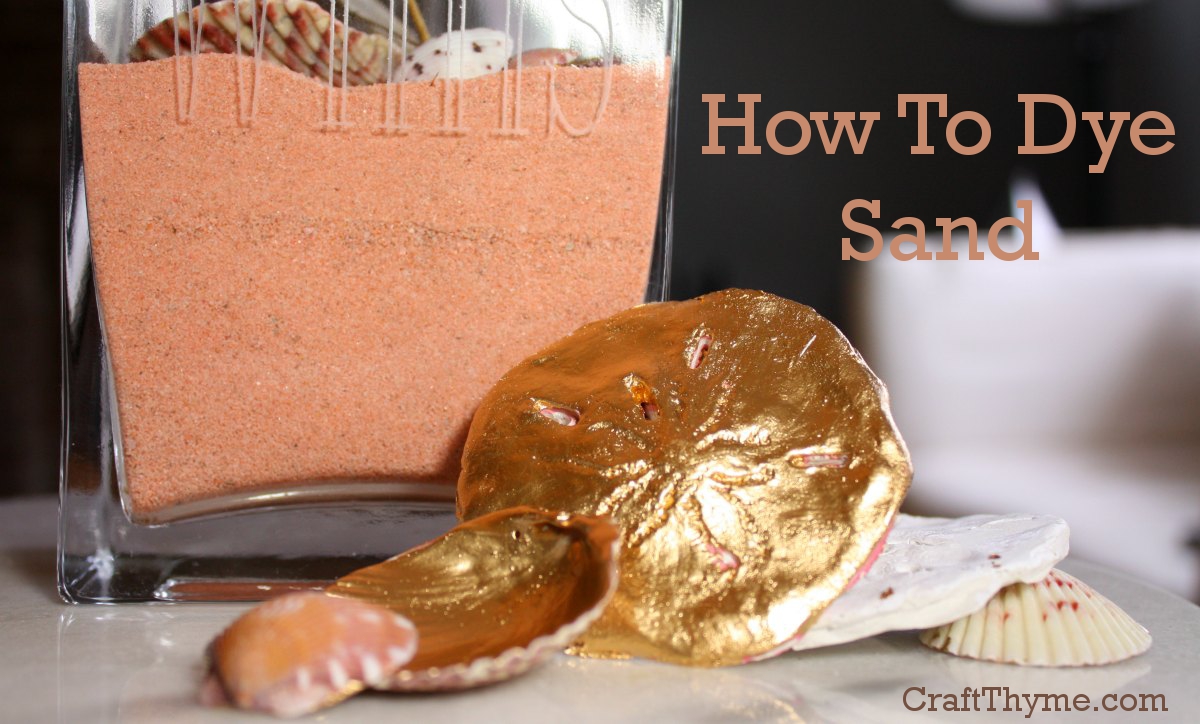
Honestly, one of my absolute favorite things to do is change the color of things.  You would be amazed the number of things you can dye, sand just being one of them.  See how to dye sand so you will never need to go buy the colored stuff for arrangements, crafts, and kid friendly art.  On to the tutorial:

Tutorial on How to Dye Sand
You might guess from this photo there are a bunch more tutorials in the works. (I made that gold sand dollar and will have a tutorial in the next bit)

Supplies:

Supplies needed to dye sand
Please don’t comment on the state of that cookie tray.

Sand: $2.50 (US) will snag you 50 lbs of play sand at the hardware store or you can simply steal some from your kid’s sandbox while they are napping

Rubbing Alcohol: Higher the alcohol content, the faster it dries

STURDY Plastic Bag

Food Coloring: Cheap liquid will do just fine

Cookie Sheet or something on which the sand can dry

Step 1: Pour Everything In a Bag

Adding food coloring to dye sand

I already knew what container my sand was going to go in, so I poured in slightly more than I needed to measure it.  Then I simply poured sand in the STURDY bag.  Shall I repeat sturdy? Start with only a few drops of the color you want to achieve.  I was going for a coral-pink so I put about 5 drops of red and 3 of yellow to begin.  Then throw in some alcohol.  I’m not much for measuring, just give it a splash.

Step 2: Smoosh and Repeat

Matching colors of dyed sand
I hope you don’t need an action shot of smooshing a bag. If you do email me, I’ll send you a picture of my white arms kneading a bag of sand.

What is the technical term we need for this step.  Umm… Squeeze the bag?  Smoosh the sand around?  Knead the color in?  Whatever you do, move the sand around until the color is evenly distributed.  If it is really hard to mix add a splash more rubbing alcohol.

Perhaps you are thinking “whoa that is a little light/dark/fugly” while looking at the color.  Hold up! before you go messing with it.  Make sure it is fully mixed before making assumptions.  If you are trying to match a color (see the ribbon above) then make one special note: It dries much lighter.

I wanted sand a couple shades lighter than the above pink ribbon so I matched it to the exact shade before drying.

Step 3: Remember that gross cookie sheet?

Spreading DIY dyed sand to dry

Once you have the color you want spread the sand out on a cookie sheet. Might I suggest gloves unless you also want to DIY dye your hand?

You can bake the sand at the lowest setting on your oven until dry (always check on the sand to make sure you aren’t about to cause some sort of oven fire, though I am unaware of spontaneous sand combustion) or leave it out overnight to dry.

That is pretty much all there is to dyeing sand.  So go “borrow” some sand from your kids and get crafty.


Posted on Leave a comment

Vintage Fourth of July Wreath

4th of July wreath made with paper medallions and stars

Putting together a vintage inspired wreath was easy.  I had some paper medallions left from the 4th of July mantel and an old grapevine wreath sitting in the basement.  Simply find your glue of choice and go to town! On a side note, this may come across as a lazy post.  But just because I already had the items on hand doesn’t make it lazy… Well it might, but hell, did you see the mess I made already this week?  At least this craft came out lovely.

4th of July wreath made with paper medallions and stars

Here are all the tutorials you need:

How to Make 5 Pointed Stars

How to Make Paper Medallions

Free Printable Paper Rosettes or Medallion Template

Just remember to use a more muted blues, reds, and golds, if you want an old-fashioned or vintage Fourth of July wreath.Details of a Fourth of July wreath made with paper medallions and stars

Happy 4th of July from Craft Thyme

4th of July grapevine wreath made paper stars and rosettes
And one final picture to get the full mood. Or because I had already taken, edited, watermarked, and resized that puppy. I’m using this picture somewhere after that much work.

Enjoy these articles?  Get periodic updates by joining my mailing list (no spam, no way, no how) or subscribing to my RSS feed.

See more great crafts and decor at these link parties: The Creative Girl

Posted on 6 Comments

FAIL: Homemade Paperclay Disaster

I haven’t done any personal blogging here on Craft Thyme and think it will likely be a rare occasion because I want to keep the topics relevant and craft oriented.  However, a little behind the scenes sometimes puts crafting in context and honestly this crafting fail was too good not to share.

While there are a lot of abandoned projects that just don’t make it up to par, usually, when I am building on the tutorials of other sites they turn out alright.  Or hell they at least turn out…  And since I am being personal there are a lot of projects that just require too much time.  I work outside the home and I have two children ages 3 and 1.  Let me repeat that: two boys ages 3 and 1.  Not close to 4 and 2…  We got a barely potty trained and a crawler.  I’m surprised I remember my name and that is often why things don’t reach fruition.

Back to the Point (If there is one to this post):

I should have known something was desperately wrong when the first ingredient was an entire roll of toilet paper.  Have you ever actually seen how much paper is on a roll?

Well you have now.  Thats a whole lotta TP in front of a blender.
Well you have now. That’s a whole lotta TP in front of a blender.  Though I am digging my new photo setup I am working on so I can do tutorials at night. :)

I have probably sealed my fate by allowing the boys to help remove the toilet paper from the roll.  I did at least have sense enough to take the roll away from the bathroom so as not to reinforce removing paper from the regular area.

Pulling copious amounts of toilet paper off the roll.  Every child's dream!
Pulling copious amounts of toilet paper off the roll. Every child’s dream!

It was only downhill from there…

Plaster the Second Issue:

I worked with plaster throughout art school.  I know it has a short set up time, thin consistency, and works best for smoothing and casting.  Why I thought its properties would suddenly transform with the addition of toilet paper and glue, I will never know.  I mean toilet paper is magical…  So it made a little sense at the time.

The Final Fail:

The first time, the plaster set up too fast, the second time it was liquid then the plaster set up too fast.  Sensing a theme?  If there had been a third time I would have been insane.  I am still removing tiny bits of plaster-coated TP from under my nails as I type this.  And let me tell you there is an undesirable ick factor to a bucket of wet toilet paper.  And since this is “nice” blog we won’t discuss what wet toilet paper looks like ground up, and then splattered down your front.  Feel free to discover that gem on your own.

Plus it makes a huge freaking mess.

I adore Twigg Studios and regularly follow their blog, but honestly, in this particular case she must have some kind of plaster voodoo to have achieved this light, smooth, and airy texture.  Possible sanded the shit out of it was Patrick’s (My Husband’s) suggestion.  I found a similar recipe using joint compound, but now having worked with the texture of the mix I think that this might be a DIY that requires a commercial product.

All I can say is my faux barnacles did not equal her sea urchin or barnacle tutorial inspired by Design Sponge.

Take a guess which one I created?  The lump on the left?
Take a guess which one I created? The lump on the left?

Anyway, I’m off to order some real paper clay and take a stab at making these in a different way. That way I can get back to crafting and not craft-failing.

Enjoy these articles?  Get periodic updates by joining my mailing list (no spam, no way, no how) or subscribing to my RSS feed.

See more great crafts and decor at these link parties: Cherished Bliss, Crafty Confessions, The Gunny Sack Uncommon Slice of Suburbia

Posted on 1 Comment

Free Paper Rosette Templates

Free printable template. Flat and pointed paper medallions or rosettes.

Check out my first free printable template!  These two templates will allow you to create a 6 inch paper medallion or paper rosette.  On Monday I showed you how to create your own DIY medallion, but if you are making a lot of them or want an easy template to get started with simply print these on the backside of any 8.5 X 11 inch sheet of paper.

Click here for the tutorial on how to create paper medallions or rosettes.

Free printable template. Flat and pointed paper medallions or rosettes.

The first printable template will make a paper rosette with flat edges like the red one on the left side and the second printable will make a pointed medallion similar, but larger, than the blue one on the right.  I haven’t made one with the scalloped edges…  Why?  Because honestly I wasn’t thrilled with them when they were done.  Reminded me to much of flowers… Instead of fireworks.  But after I cut out, folded, pressed, glued, etc.  I wasn’t about to not use them on my 4th of July Mantel.  I am meticulous; not insane.

Printable Templates are right here in case you skim websites like me:

Download pdf template for flat paper medallion here

Download pdf template for the pointed paper medallion here

Please let me know if you have any questions in the comments or via email.

If you want something fancier and have a Cricut Machine they do have templates too. (Scary Affiliate Link Ahead)

*

Posted on 5 Comments

How to Make Paper Medallions or Rosettes

Pleated paper medallions, also known as paper rosettes, are easy to make.  The following step by step tutorial will show how I created paper medallions for a Fourth of July inspired mantel decoration.  You only need a few tools (namely scissors, paper, and glue) to create these pretty rosettes.

paper-medallion


Supplies

Paper

Scissors

Glue (hot glue recommended)

Ruler

Thing that you can trace and make a circle

Writing implement

Step 1: Math & Preparation

The first step in creating a paper medallion is deciding what diameter you want.  This particular tutorial creates a rosette that is 6 inches across.  In order to get 6 inches each pleated strip of paper needs to be half that size (Just go with me here it will make more sense in a minute).  I used the ruler to mark two 3 in (half of the six inches b/c I want the finished medallion to be 6) strips of my 8.5 X 11 in paper and cut them out.  You can see the faint lines here marked by arrows.  Hold on the that extra 2.5 in piece left over.  We will need that in a minute.

paper-medallion-step1

Step 2: More Math and Decisions

While the previous step only involved dividing by two, the math gets a little more complicated here.  Your next step will be to figure out the pleating.  Perhaps there is a website that offers a golden ratio for making these dang things but let us just say you want it to come out kinda close to even. (Scroll to the “Notes” section at the bottom for a discussion on pleat sizes and paper) In this case 1/2 in pleats look good on 6 inch medallions.  You can mark all your pleats if you are Martha or be like me… Mark the first one and fold it very well then eyeball the rest.

I figure if you start off good that'll do. It's crafting not surgery.
I figure if you start off good that’ll do. It’s crafting not surgery.

Step 3: Folding

Accordion fold both pieces of paper. paper-medallion-step3

Step 4: Oh yeah that other piece

Remember that other piece of left over paper?  Extract it from where ever your cat/3 year old/baby has removed it and grab your “Thing you can trace to make a circle”.  In my case it was this little decorative globe.  Trace a minimum of two circles and cut them out.  You can cut more in various sizes and stack them for a decorative look.

paper-medallion-step4
Someone please remind me to lotion up my hands before I do another tutorial in which they show. Scaly is all that is coming to mind.


Step 5: Yes more steps…  You can do it!

Back to the folded pieces of paper.  Get out your glue.  I suggest hot glue for a few reasons, namely it sticks and it dries fast.  But as long as it glues you are good to go.  First, glue the two strips end to end to make one long strip.  Then circle it around to make a tube.

Kinda looks like a really crappy lampshade when you have glued them correctly.

Step 6: Transformation

This really isn’t a step in itself but mastering the gathering of folds is slippery at best.  You kinda loosely gather the pleats into a cone and begin pushing down.  Try to keep the cussing down to a minimum, as it pops out of shape. Or wait until nap time, and feel free to make a sailor blush.

paper-medallion-step6 Step 7: Pressure Pushing Down On Me

Gently push the cone down.  As the edges fan out the center will begin to flatten.  Now, is why I recommend hot glue.  The medallion will want to pop back up until you set the center.  I use the “Thing I could trace and make a circle” to hold it down while I pop some hot glue on one of the circle centers and then again while it dries (cools? what is the appropriate term for hot glue?).  For added firmness use the second circle and hot glue it on the back.

paper-medallion-step7One Medallion Down!

Notes:

  • Pleats are a beotch and there are a number of things to keep in mind. The bigger (larger diameter) a medallion then the more pleats you will need.
  • More pleats can mean many smaller pleats or greater length of paper (2-3 strips attached).  Though at some point you have to add length.  I have made very small medallions with a single strip, but it needs to be lightweight paper.
  • Stiffer (heavier weight) paper will require more pleats (see above)
  • If you haven’t made enough pleats or added enough length you can always cut into the outside edge.  I like the look enough that I did it on purpose to make a more “firework” looking paper medallion that you can see here.
  • Hot glue is hot.  Paper is thin.  Be careful and don’t blister your finger tips like me.
  • Don’t limit the center to a circle.  The center simply holds the medallion together, consider adding contrasting papers, shapes, and symbols for unique touch.  It also has the added benefit of covering up a multitude of craft sins…  Such as when you might have smooshed the center a little too vigorously.