Posted on 1 Comment

How to Thicken a Sparse Christmas Tree

before and after thickening a sparse Christmas tree using this tutorial.

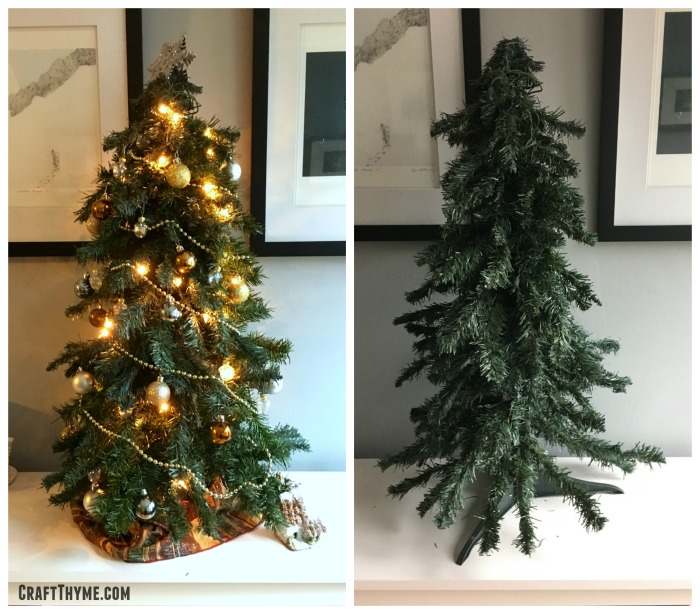
Ever notice how sparse looking an old or cheap artificial Christmas tree can be?  I’m not a huge fan of artificial trees to begin with… So, the last thing I want to do is have a dejected, sparse, Christmas tree.  Fear not!  I have the simplest tutorial that can teach you how to thicken any Christmas tree.  It can take a sad fake tree and make it look fabulous.  With these easy steps you can breath new life into an old artificial tree or add pizazz to a cheap Christmas tree.  You are going to be shocked by how easy it is to thicken a sparse Christmas tree.

No More Sparse Christmas Trees

How to Thicken a Sparse Christmas Tree tutorial.

It only takes two things to make an artificial Christmas Tree look thick and lush. (Affiliate links to follow)

Supplies

  1. Fake Garland
  2. Something to cut wire

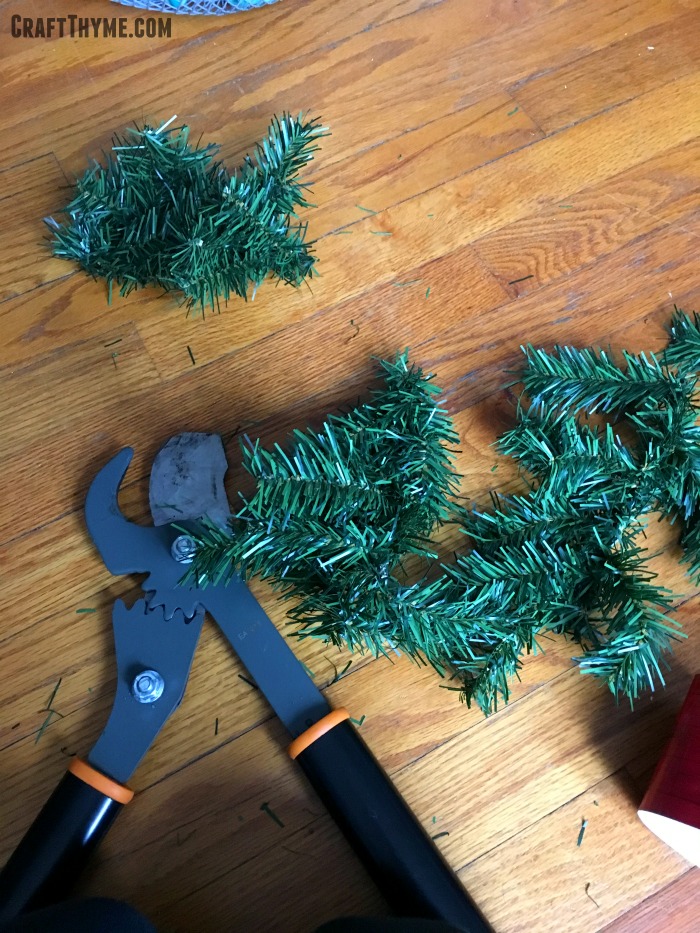
I try to pick up fake garland the day after Thanksgiving.  It is always dirt cheap and can be used as a base to make fabulous evergreen garland, teardrop swags, and thicken a Christmas tree.

Step 1

Put up your sparse Christmas Tree.  Step back and make a face at the lackluster branches.  Look online to see about buying a new, better tree.  Gasp at the prices and proceed to revamp your old artificial tree.

Step 2

Add some lights.  Everything looks better with lights! Fun fact, I had a brief job as a costume designer.  The motto of the theater is “Make it big.  If you can’t make it big make it red.  If you can’t make it red put lights on it.”  Seems legit.

Sparse Christmas tree in need of thickening
Here is a sad sparse Christmas tree. At least it has a little twinkle.

Step 3

Now here is the fun part.  Untie your garland and push in the end until it is near the tree trunk just above the bottom row of branches.  Eye ball where the branches end on the piece of garland and then cut that length.  Cut 4 or 5 more pieces the same length.  Fluff those pieces of garland out and place them right above the bottom row of branches.  You can use a piece of the garland to wrap around another branch or the trunk to secure the piece in place.

Cutting garland to thicken a sparse Christmas Tree.

Step 4

Repeat step three moving up the sparse tree.  You will likely need to fill in 3 or 4 ‘levels’ of tree.  Bonus points if you spend time fluff and twisting, and sprucing it all up.  Personally, I am bad to just shove the branches in and move things around when I decorate if need be.

before and after thickening a sparse Christmas tree using this tutorial.
So Much Better!

Yeah, this really is one of the shortest tutorials I have ever written, but it really is that easy!  Kind of cut, shove, and go!  So, get yourself some cheap garland and make that fake Christmas tree thick and fabulous.

Posted on 7 Comments

Star Wars Christmas Tree

Ornaments for a Star Wars themed Christmas Tree

If you have read anything on our site you might have realized we are a bit nerdy.  So after finding a set of Star Wars stockings for the whole family it only made sense to make our own Star Wars Christmas tree.  However, have you seen how much Star Wars ornaments cost?  Holy night!  We had to turn to our DIY know how to make a full Star Wars Christmas tree complete with BB-8 topper and custom ornaments from all of the movies.  Here is a tour of our Star Wars Christmas tree with a few DIY and money saving tips, in case you want to make your own.

Star Wars stockings hung on a mantel as part of Star Wars Christmas Decorations

I love these stockings and you can still order them when I published this article (Affiliate links to follow).

Star Wars Christmas Tree

Here is the tree in all of it’s glory.  We stuck with colors of the light and dark side.  Blue, silver, red, and black.  With a touch of gold here and there for shimmer and C-3PO.  It is Christmas after all!  You can see here that the BB-8 tree topper is lit.  We created the topper from paper party lanterns.  I cut the excess metal from the frames and glued the lantern’s together.  Then I stuffed a small pack of battery lit LED lights.  They are on a timer and come on each evening.  They also stay cool to the touch making sure the paper lantern is nice a safe.  We got the lantern from the party section of Target but you can also order them off Amazon.

DIY advice and tutorial links on how to make your own Star Wars Christmas Tree

Star Wars Christmas Lights

If you look carefully you can see we sprung for a couple strands of Star Wars lights.  Yoda is donning a festive Santa hat and BB-8 is glowing.  We stumbled across these at CVS while waiting for flu shots.  They were way cheaper than Amazon and we got a 20% off coupon for getting flu shots in store.  You can opt to order them from Amazon. We also got some R2-D2 lights on sale recently, but we had already decorated the tree so we will save them till next year.

Details of a Star Wars Christmas Tree

DIY Star Wars Ornaments

Most of the rest of the Star Wars Ornaments were made by us.  You can read all about how to make your own DIY Star Wars Christmas Ornaments on our detailed tutorial.  They came out for less than .50 an ornament and we got to have most of the main characters from all of the films.  Though we might have opted to skip Jar Jar Binks… Some of my favorites were Yoda and just the general Star Wars logo on a nice matte red Christmas ball.  You can see those details on the tutorial mentioned above.

Ornaments for a Star Wars themed Christmas Tree

While, we didn’t exactly DIY we did reuse lots and lots of Star Wars ships.  Our kids have quite a collection of ships and they chose to keep a few to play with and let us use the rest for the tree.  The gold millennium falcon made a nice touch near the top.  I would have loved to add Boba Fett’s Slave that we have in gold, but alas, I couldn’t get Conlan to part with it for the tree.

Millennium Falcon ornament decorating a Star Wars Christmas Tree

Finishing out the Star Wars Christmas Tree

To finish it off we opted to use some large paper cutouts of Tie Fighters and X-wings that we had left over from McClain’s birthday party.  They had been ceiling decorations that we cut apart and used as large focal points on the tree.  The most perfect coincidence happened when we had just finished decorating the tree.  Granny  & Papaw came by with the yearly gift of Christmas ornaments for the boys and what should appear? Darth Vader (Conlan), Yoda (McClain), BB-8 (Cooper) and Olaf (Keaton’s went on another tree). These ended up being the perfect complement to the tree.

If you are looking to purchase ornaments here are some options:

I grabbed some black flannel fabric on sale and wrapped it around the base for a tree skirt.  We made sure to find wrapping paper with lots of silver, black, red, and blue.  We even found some silver with geometric shapes that looked “Droid” like and blue “Galaxy” paper.  All in all the Star Wars Christmas Tree and presents ended up being the perfect compliment to the Star Wars stockings we had found.  I am really happy with how our Star Wars themed Christmas room turned out.  Especially since it didn’t end up costing a fortune!

Galaxy wrapping paper in a Star Wars themed Christmas room

Make your own Star Wars Christmas Tree with these easy tips

Posted on 8 Comments

Star Wars Christmas Ornaments DIY

DIY tutorial that creates a Luke Skywalker Star Wars Ornament

Have you got light sabers, blasters, and the force flying around your house?  We sure do!  With 4 Star Wars obsessed boys and 2 Star Wars obsessed parents it only seemed fitting that we have a Star Wars Christmas tree!  However, to have a Star Wars themed Christmas Tree you have to have a Star Wars Christmas Ornaments and have you seen how much those puppies run?!  Ouch!!!!  I’ll have to admit, Adam, had the idea for how to make DIY Star Wars Christmas ornaments, but the execution is all mine!  By our calculations you can make 40 glass Star Wars Ornaments for $13 or .33 an ornament.

In the supplies below I happened to purchase my ornaments on half off Christmas decoration day at Target.  I happen to have this thing for real glass ornaments so I got the box of 40 for $10 and the package of temporary Star Wars tattoos was $3.  The below links are Amazon Affiliate links.

How to make Star Wars Christmas ornaments from temporary tattoos.

Star Wars Christmas Ornament Supplies

  • Glass Ornaments: Light Colors with matte finishes seem to work the best, but we mixed in silver & clear (for the Light Side) and Red & Black (For the Dark Side).  We bought multipacks that had glitter ornaments we used for color on the tree.  The tattoos do not stick to the glitter!
  • Temporary Tattoos:  Not all tattoos are alike.  We bought one pack at Target and despite the cover having Kylo Ren it had only Light Side characters!  Not a storm trooper to be found.  We ordered a second pack from Amazon and it had a better mix of characters from all of the movies (No Jar Jar Binks!!!).  Also some of the temporary tattoos brands are more opaque than others.  This matters if you are putting them on dark colored glass ornaments as it can change whites to pink etc.
  • Water
  • Wash Cloth

Supplies for DIY Star Wars Ornaments

Step 1: Cut It Out

Cut out your tattoo. Seems simple right? Wrong.  This might be the most important point; Star Wars tattoo selection and trimming.  For your first tattoo start with one you don’t like.  Maybe that 20th storm trooper or some such.  Then cut it out pretty close to the tattoo.  There are two reasons for this.  The first is that on some temporary tattoos they have a lot of clear gel? stuff? surrounding the picture.  You want to remove that as it shows on the ornament and we wants some freaking fantastic Star Wars Christmas Ornaments right?  Secondly, you are taking a flat item and adding it to a curved item.  This is why Greenland looks so damn big on the map.  Flat <> Round (Does not equal for all you non-nerds).  Removing material makes it much easier to mold to the surface.

Pro Tip: Any geometric tattoo is a P.I.T.A. and almost impossible to get perfect on the curved surface.  Do not start with these!

How to create Star Wars ornaments

Step 2: Place Your Face

Before you start this step have a bowl of water and a wash cloth handy.

Okay, not technically your face but potentially Princess Leia’s face needs to line up on the ornament.  Keep the plastic covering attached to the tattoo while you kind of hold it up and see where you want it.  Only when you feel ready to tackle this puppy peal the plastic backing off and lightly place the tattoo on the surface in the middle of the tattoo.  I say lightly for a reason.  If you touch the sticky side to the glass ball much at all it is stuck for good!  Let us just say I was glad there were 10 extra tattoos to mess with.

How to make cheap Star Wars ornaments

Step 3: May the Force Be With You (And with you also)

So we aren’t actually going to “force” the tattoo to adhere.  To get great looking Star Wars Christmas ornaments you need to use care and a deft dabbing hand.  Wring out the wash cloth until it is just slightly damp start smoothing the tattoo from the center outward with dry fingers.  Then lightly dab the paper until it is damp enough to mold easily to the glass.  I learned the hard way that too much water will seep under the tattoo and keep it from adhering to the ornament.  Once you have the entire tattoo stuck you can wet the paper more, but be careful to dab at 90 degrees.  I ruined a few ornaments by sliding the whole thing on the glass.

WAIT THE ENTIRE 30 SECONDS before pealing it back.  I know it is tempting, I know you want to see.  But just let it sit there for a minute.  Glass is much slicker than human skin and you need to give it a moment to settle and adhere correctly. Finally peel off the paper backing and admire your work.

DIY Star Wars Christmas Ornaments

I was careful not to touch anything.  I let it dry fully overnight.  After that just hang and enjoy!

DIY tutorial that creates a Luke Skywalker Star Wars Ornament

To recap:

  • Take the time to cut out extraneous paper
  • Less water is more
  • Dab don’t swipe

Since this is the first year we made them I can’t tell you how they will hold up over time.  But, it would certainly be easy enough to do them again if they happen to peel up.  We have had them on the tree for two weeks and they look really good.  In fact we had the pizza delivery person ask to take pictures!  Can’t ask for a more flattering situation than a random stranger asking to take photos of your Star Wars Christmas ornaments and Star Wars Christmas Tree.

Tutorial to create DIY Star Wars Christmas Ornaments.
Read this tutorial to make cheap Star Wars Christmas Ornaments at home.


Posted on 3 Comments

How to Make Teardrop Garland or Teardrop Swags

How to Make a Teardrop Garland

Evergreens are always in style for Christmas time so why not make your own teardrop garland or swags?  They add Christmas cheer to doors, mailboxes, and below lights.  The following teardrop swag tutorial can be make with artificial or real evergreens.  I use a combo of evergreens in the porch light teardrop garlands.  For specific tips on handling real evergreen garland you can see my evergreen garland video and written tutorials or my evergreen wreath tutorial.  Otherwise read on to learn all about what you will need to make teardrop garland.

The supplies are minimal for making a teardrop garland (affiliate links may follow).  The only item you might not be able to buy is a wire coat hanger.  Trust me, just ask around and I bet you will find someone that has wire coat hangers in spades.  I use them as a base form for the teardrop shape because they are cheap (free) and they already have a built in hook!  How freaking nifty!

Let’s Make a Teardrop Garland

How to Make a Teardrop Garland

Supplies

  • Wire Coat Hanger/ Rustic 18 Gauge Wire: You can use the thick wire to make a form too.  I link to an Amazon reference but you can easily get this cheaper at a craft store.
  • 24 Gauge Floral Wire: My fav because it holds but is easy to work with!
  • Wire Cutters: My husband assures me these are also called dykes…  Yeah…
  • Cheap Rope Garland or live evergreens:  I like to borrow the live stuff from the neighbors.
  • Floral Picks: If you are going the artificial route I love some frosted floral picks.  White pine, cyprus, bittersweet and dried grasses can usually be collected free as you only need a couple of handfuls.

Step 1: Making a Teardrop Swag Form

This is the hardest part of the whole project.  Cutting the dang wire hanger!  The wire is much thicker than it first appears.  I find cursing a bit at it while squeezing the hell out of the wire cutters works well.  You can do some additional work with that potty mouth as you straighten the bends our of the hanger to make two downward v-shaped lengths from the hook.  That will be the basis of your teardrop garland.  I wanted a fuller bottom swag.  You can bend the wire wider at the top and then taper at the bottom if you want a more traditional upside down teardrop shape to the swag.

Use wire coat hangers as a base for teardrop garland
As you can see you don’t exactly have to bend these to perfection.

Step 2: Making the Teardrop Base

Take your cheap garland and cut two pieces to the desired length of your teardrop garland.  Attach the floral wire right below the hook.  You can do some fancy-schmancy knot your you can be like me and just wrap it around a few times till it seems secure.  Lay the chopped up garland on the hanger and lightly wrap the wire around it to attach it.  Do this to both sides and then fluff out the garland.  Don’t worry that it looks a bit hellacious at the moment.  I swear it will get better in the next couple of steps.

Using artificial garland as a base for a teardrop swag
It gets better from here!

Step 3: Fill in the Teardrop Shape

Cut another piece of the cheap garland the same length as the other two and lay it in the middle of the two sections.  Time to bring those elementary craft skills into play.  Remember how to weave? In out. In out. Take the floral wire and kind of weave it in-between all three sections securing the middle.  It may look like it is time to panic when making your teardrop as this is not the prettiest step, but again stick with it!  After you have all three pieces attached the fun begins.

Basis for DIY Teardrop Garlands
Got a good mat of evergreens. It gets even better from here!


Step 4: The Finishing Touches

Now that you have the basis for your teardrop garland you are literally going to stuff other items in.  Cut up more of your cheap evergreen garland and stick the ends to the back of the teardrop.  Stuff in floral picks or real evergreens until the teardrop shape looks full and lush.  I like to hang mine at this point and add in some touches.  You can wire pine cones, add ribbon, or flock the entire teardrop swag with my homemade flocking recipe.

Detail of inserting evegreens into a diy teardrop garland
If you look closely you can see how I am inserting evergreens into the teardrop. Also, that I need a manicure.

Making a Teardrop Garland is this simple!  They look fabulous swagged below lights but you can easily use them instead of a wreath on the door.  Add a decorative bow on top to cover the hook and you are all set!  If you have any questions about this tutorial please leave them in the comments below.

How to Make a Teardrop Swag

Posted on 6 Comments

How to Make Artificial Garland Look Real

Cheap garland can look like the real thing with these tips and tricks

Did you know you can make artificial garland look real?  Did you know you can do this for cheap or even free?  Cheap artificial Christmas garland can look well… cheap or lackluster at best.  While I really love to make real evergreen garland by hand (and happen to have one of the top tutorials on making evergreen garland and wreaths), sometimes, I just don’t have time or the will to churn out yards and yards of the  real stuff.  I am ahem… lazy occasionally. Luckily, some cheap rope garland and a little know how is all it takes to make artificial garland that looks real.  Plus, the faux garland does tend to hold up better to the outdoor elements.

Tutorial on How To Make Artificial Garland Look Real

Tutorial on how to make artificial garland look real

You will need minimal supplies.  (Affiliate links may follow):

Step 1 Hang your Faux Evergreen Garland

Oddly enough, if you want the artificial garland to look real start by having it look like absolute crap.  Hang that crimped piece of faux greenery awfulness as is.  Yep, that is right, don’t fluff, bend, or do anything just put that puppy up.  As you can see here I added some bows at the corner.  You can also see here it looks very much like a dejected Christmas Garland.  Once you have it in place then fluff.  Why wait you ask?  Because anywhere the garland is against a surface or hangs somewhere you will not see the back you are going to want to fluff all the fake greenery forward.  This is also a great time to add lights to your artificial garland if you plan on having it lit.

Cheap garland just looks sad and dejected but you can change that
Start with the sad and dejected cheap garland. I found this for $1.99 for nine feet the day after Thanksgiving.

Step 2 Grab Some Greenery

Here is where you sneak into your neighbors yard ask your neighbor nicely if you can take a few branches off of their evergreens.  White pine, leyland cypress, heck any type of evergreen will do.  Also ivy, magnolia leaves, dried hydrangea, grasses, pine cones, and bittersweet berries make great additions to the garland.  You will not need much of these items.  I used what I could shove in two grocery bags to do the entire porch and add to the artificial tree, tear drop garlands, and wreath.  When you have collected all your items cut the branches into 4-6 inch lengths.  Try to get as many branch tips as possible.  Blunt cut ends will work but need a little more finesse to work in nicely.

If you bought any floral picks or a few branches now is the time to cut them into similar sized items.  All the red and white berries you see where cut from 3 dollar store faux floral Christmas stems.

If you are working with various types of greenery sort everything in piles by type.

Step 3 Making that Faux Garland Fabulous

Now that you are likely covered in pine needles and resin it is time to make the faux, fabulous. Here is when you will finally make artificial garland look real. Start with a single type of evergreen (example your pile of white pine) and start adding them into your greenery at a somewhat even spacing.  To add (complicated steps ahead):

  1. Place a piece of greenery against the artificial garland you can simply twist a free piece of the fake branch around the greenery.

Surprisingly, this will secure the items.  Seriously!  Mine held up in the rain, sun, and wind.  Now you may be wondering why just place one type of evergreen at a time?  Well, too many times I get over zealous and put way too much of one type at the beginning and then run out by the end of the garland.  It may seem to take awhile to make multiple passes to turn your artificial garland into the real thing but the end result looks balanced.  Plus it takes a lot less time than putting greenery up, stepping back, taking it down and moving it, stepping back again, etc… You get the picture!

Blunt ends of cut greenery can be hidden behind the garland or wrapped deep in the greenery.  While, all this seems like “work” I can assure you that it is far less effort than making a real evergreen garland from scratch.

Cheap garland can look like the real thing with these tips and tricks

Step 4 Optional Step

If you really want your artificial garland to pop throw in some more faux items.  No, I’m not joking.  Surprisingly, some faux on faux action pumps your artificial garland up in a way that makes it seem more real.  Adding in more pieces of faux garland, bits of faux berries, or other Christmas florals give it some umph!

Honestly, this is all it takes to make some fabulous garland.  A little borrowed greenery and the ability to twist some wire makes for a beautiful and cheap Christmas decoration.  So take your knowledge and make some artificial garland look real!

Make faux garland fabulous