Posted on 10 Comments

1927 Cottage Style Home: Remodeling Update

Before and after of the craftsman fireplace

We have been awfully quite here on the website mostly due to a incredible amount of work that is taking place on the remodel of our 1927 cottage style combined duplex.  Man, that is a mouthful.  We have heard it described as traditional, craftsman, cottage style, etc.  In reality it is a spacious brick home from the 20’s that really does not fit a typical style of the time.  The design feels traditional and almost classical with the mirrored sides, but has eaves and shingles that give it a cottage craftsman feel.  I guess we will go with unique brick?  We gave you a before tour of the home and highlighted some of the good bones.  However, in reality it is taking a ton of work and has some significant challenges.  Of course anytime you work on remodeling an older home you better plan on significant challenges!

Painting. Oh Lord the Painting..

Let us start with the painting…  We have purchased over 40 gallons of paint.  I’d like to thank Lowe’s rebates for making that possible.  (You can read some of my other ways to save money at Lowe’s here).  Each piece of trim is taking not one, not two, but three coats of paint to cover the chipped and yellowed paint.  Of course that is after Adam has gone to the trouble to clean it, nail any loose pieces, caulk and putty all the gaps.  Then there is the ceiling, doors, and walls to paint; the list goes on and on.  I would estimate we are about halfway through.  I would think we were further but I have one room that will require a lot of plaster work so that is going to slow the entire process.

Before and after of the cottage style kitchen
What a coat of paint, and a couple hours of de-greasing, will do for a kitchen.

Some of the hardest parts of the painting have been prep work.  You can’t tell from this next photo but this craftsman style mantel and surround was pulled a good inch away from the wall, had about 20 (not hyperbole) nails, and tons of holes and scratches to sand and fill.  Turned out lovely in the end!

Before and after of the craftsman fireplace
As you can see the paint isn’t even dry in this photo!

We have ripped out a bathroom vanity (two more to go), updated closet storage, hung fans, lights, and blinds.  Blinds were a biggy!  Because guess how many windows this house has?  54…  54 windows…  That’s a lot of curtains and blinds.  Speaking of windows?!  We just placed an order for 52 brand new ones (the missing two windows are in the kitchen that we plan on gutting in the next couple of years).  The replacement window process is worthy of a few posts itself.  As much as we are avid DIYers we have windows on 4 stories and did I mentioned there are FIFTY-TWO of these godforsaken things to replace?  We are contracting out the whole process; which is daunting too.  I think the big lesson here is that when remodeling an older home you have to know when to bring in professionals.

Before and after of the cottage style closet
As soon as the paint was dry we hung new shelving and racks. It was absolutely fabulous to not live out of a box anymore!

Oh and in the meantime we took out 7 trees, hired a wonderful landscaper to basically come bush-hog the whole yard, discovered a hidden gazing pond in the process, and placed 104 bags of mulch already.  Did I mention we have done all that in the span of about three and a half months?  With working full time, teaching in the evenings (Adam), getting promoted (Brianna), starting a new preschool, first grade beginning, and trying to rock out the whole parenting thing, I’d say we have been done in!

We found a pond underneath all of the overgrowth and brush
Yeah… There was a pond under there…

Craft Thyme (and sleep) have suffered BUT I think it has already proven to be worth it.  Peppered through this post are some before and afters of the the progress we have already made.  Plus we have some awesome posts forthcoming, in case you ever want to learn how to remove virginia creeper vines from a house, work with galvanized pipe to make awesome curtain rods (very different than the previous black iron pipe fixtures), purchase replacement windows, eradicate english ivy, properly paint an old door, or plant about 100 bulbs then stay tuned because we’ve got your back!

Junked up garage is now all clean
I don’t think I even mentioned the garage… At least there were some cool tools in there.


Posted on 5 Comments

CitriStrip vs SoyGel

CitriStrip vs SoyGel on removing the paint from this brass hardware

In a post from a long time ago and far, far away I chose to use SoyGel paint stripper by Franmar over CitriStrip paint remover. I had taken a notion to remove 6 layers of paint from brick and I pitted CitriStrip vs SoyGel and Soygel won.  It was a notion that turned out fabulously, but took forever.  SoyGel was cost effective and had a great workability that was perfect for a vertical brick wall.  Fast forward a few years and I find myself drawn to, yet, another old house.  And what do old houses have in common?  Layers of paint.  Lots and lots of layers of paint.

This time around I find myself wanted to recover some beautiful brass hardware from thick layers of old yellowed paint.  We decided to paint our closet door black, and yucky yellowed hinges were just not going to cut it.  I immediately said to Adam that we need SoyGel ‘like stat’.  To which he calmly replied, have you seen how much this stuff is on Amazon?

CitriStrip vs SoyGel on removing the paint from this brass hardware

It appears, in the intervening years from my 20’s to 30’s SoyGel has increased in price and CitriStrip has gone down.  Better yet, CitriStrip was available at the big box store right down the road.  I’m impatient at the best of times, so generally the item I can grab today is more likely to be bought.  PLUS it gave me a chance to make the comparison of CitriStrip versus SoyGel when it comes to removing paint.

If you want to read all about working with SoyGel you can go get the deets here.  Otherwise I’ll highlight the differences below.

CitriStrip vs Soygel

CitriStrip has a great smell!  In fact it is a little disconcerting to feel like you should be eating something that is clearly meant to remove paint.  So for scent alone it is a winner, though SoyGel doesn’t smell bad like chemical stripper.  The consistency was thinner than SoyGel which made painting it on the hardware a little easier.  The thick gel texture of SoyGel (Methinks that perhaps they got the name from this observation) was perfect for glopping on brick, but would likely be a pain to cover small intricate detail.  So I’ll give the CitriStrip bonus points for this application.

BUT there is a big but here: CitriStrip just didn’t pack as powerful a punch.  It looked like it was working, paint bubbling up in a pleasant, wipe me off kind of way, BUT (see I told you I would deliver) when I actually went to remove it the CitriStrip had removed one layer.  ONE.  Well okay, maybe I didn’t leave it on long enough or use the right tools.  So I put another layer of CitriStrip on and set the timer for another 30 minutes.

Using CitriStrip to remove paint

I spent the time cutting in the walls of the second living room while Adam focused on the corners.  I heard my alarm sound on the phone, turned it off and continued merrily painting.  This gave the CitriStrip plenty of time to work it’s magic.  But once bitten, twice shy; I wasn’t going to take chances this time and brought out the big guns: Steel Wool.  BUT…  Another single layer of paint removed…  Oh boy only two more to go!  I thought I had potentially coated the paint with removed paint thereby causing a paint seal or paintception.  So I washed the entire thing off and started again.  With similar results.

I actually went back and reread my previous post on SoyGel.  I remember the mantel being a breeze to remove but I couldn’t recall how long I had let the SoyGel set.  Trying to make this a fair comparison I took the CitriStrip and coated the hardware in one more thick coat and plopped it in a plastic bag to sit overnight. Well, that worked!  I was able to just rub off the paint and wash everything with soap and water.  I took a little more steal wool to shine up some of the brass.

removing paint from brass hardware.
Just note, this is the interim step in removing paint from brass hardware. I call it the goo stage.

So the final consensus for CitriStrip versus SoyGel?  Well it really depends on your money, time frame, and patience.  I personally think that SoyGel was much more powerful up front, but for a small job CitriStrip certainly did it.  My final consensus on which is better?  It depends on the application.  If you want something quick, cheap, and effective but you’ll need to really scrape and let it sit overnight?  Well CitriStrip works fine.  But SoyGel would still be my go-to if I decide to bring to strip all the paint off a large item like a fireplace or door.

Before and after removing paint from brass hardwareCitriStrip vs SoyGel


Posted on 20 Comments

Edison Bulb Chandelier: A DIY Overview

A flattened edison bulb makes a unique touch to a light fixture

Our DIY Edison bulb chandelier occasions the most comments both on and off the website. It is the second highest source of interest in our home besides the gardens. Adam designed and created this industrial light fixture with 15 Edison light bulbs shortly after we moved into the house at Burk. The original light was pretty, but small and certainly not anything to get excited over. It did feature a single Edison light bulb that kind of kick started our creativity. That bulb was what lead to our industrial and pipe theme throughout the house. Unlike many of our tutorials we do not have the step by step photos of how to build an Edison bulb chandelier, however, we can give you a rundown, tutorial links, and supplies so that you can likely make an Edison light fixture of your own.

Designing an Edison Bulb Chandelier

As I mentioned above our main fascination started with Edison light bulbs and we have been meaning to blog about this Edison Bulb Chandelier forever.  Now that we are working on the new house we thought it would be good idea to catch up on some of the old projects that never made it to the blog.

A flattened edison bulb makes a unique touch to a light fixture

Do you know how many different types of Edison bulbs there are? We didn’t either, but in researching the project we founds tons of different shapes, styles, and prices. OUCH! Edison light bulbs are not exactly cheap… Below I am going to link to some options using my affiliate links. These links make it easy to purchase everything you need but I’ll let you in on a little secret. If you are patient and willing to go the Ebay route you can cut the costs of building and Edison bulb chandelier in half, easily! We sourced all of our material by bidding on lots of Edison bulbs, brass sockets, and cloth covered wire that mostly shipped from China. That means we have a ton of extra bulbs (saving those for when others burn out) and had to wait a couple weeks for items to arrive. If you can’t wait then go the Amazon route. You will pay a bit more but the items arrive much sooner.

In designing ours we knew we wanted to match the bronze fixtures, industrial design, and incorporate modern with traditional. Wait… did I say bronze? Oh yes, I faux finished every socket. The cost savings of buying brass over bronze was enormous! We brought the traditional/vintage feel in with the cloth covered wire and worked gave it a modern feel with the salvaged wood box top. Adam did a lot of research and consultation about power to make sure that we could make a fixture that could safely handle 15 bulbs. We also decided it would be cool to have them where each individual light can turn off and on. It allows us to mix up which bulbs are showcased and when we need a really bright source of light we can turn them all on.

DIY Industrial light fixture tutorial

Edison Bulb Chandelier Supplies

Basics of Edison Light Fixture Assembly

Step 1: Assemble Your Supplies and Make Your Boxes

As mentioned above we spent a good deal of time getting our supplies hunted down through Ebay. Once they arrived we did the following:

  1. Created a Box: You can use this headboard tutorial to get an idea of how to stain the salvaged wood. Attach the wooden slats to a basic frame like we made in with our potato boxes
  2. Faux Paint Sockets: If you aren’t happy with the original color you can faux finish them to a cast iron or bronze color
  3. Decide on Lengths of Cloth Covered Wire: We chose varied height so we needed to cut a variety of wire lengths
  4. Decide on Light Placement: Since we went with varied height of wire we decided to keep the placement in three simple rows. We drilled holes that were sized to just allow the cloth wire through without have a huge gap that needed covering.

How to make an edison bulb chandelier

Step 2: Start Wiring

Working with wires is not my thing… I know the basics but usually Adam handles this step. We did not have pictures and suggest googling wiring tutorials. Please be extra careful when wiring anything!  The basics go:

  1. You will need to attach the wire to each socket.
  2. Then each socket will need to be wired into the boxes.
  3. Boxes will need to be chained together

Step 3: Hanging the Fixture

We attached two heavy duty hooks to ceiling joists. The wood on this fixture makes it heavy! We used two loops of chain on either end. They are attached on the interior near each corner with smaller hooks and the loop of chain is simply hung over the hook. We used the loops, chain, and hooks for two reasons. First, so because they are heavy duty enough to hold the fixture. Secondly, the chain allowed us to hang the fixture lower than intended at first. This is important as you will need to hang the fixture and then wire it into your home’s power. PLEASE REMEMBER TO TURN OFF THE POWER BEFORE WIRING. I highly suggest turning off the main breaker while doing any wiring. It is just not as safe to turn off the breaker in the room you are in. It is waaay to easy to mistakenly turn off the wrong breaker and go to wire live wires.

Anyway, back to why we chose chain for mounting: It was way too heavy for someone to hold the entire Edison bulb chandelier while someone else wired it in. Plus you needed the space from the ceiling to the top of the industrial light fixture to actually do the wiring. Once it was all wired up, I used my small hands to reach in and hook each corner higher on the chain till we just had a tiny gap from the ceiling. It covers the hooks so that it appears to be a floating mount. It was way easier to hoist it link by link than try to tie off rope or wire in a new position.

Mae a custom edison light fixture

Step 4: Testing and Finalizing Your Design

Step 4 should probably go before the hoisting mentioned in step 3. No sense getting the fixture in the final position without making sure it all works. We tested each light to make sure all connections were secure with a single light bulb. That way you do not have to wonder if the bulb is broken if a socket does not appear to work. takes out all the process of elimination. Once we were sure all the wiring was in correct working order we hoisted it to the final position and then had a blast trying out different bulbs. We fiddled with all the types we purchased and played with placement and which ones looked good on and off. It took way longer than anticipated to find a good balance with the variable lengths and sizes of Edison bulbs, but it was fun to do. The final result still changes from time to time as we turn them on and off. In two years we have only had one bulb burn out and need replacement.

Since we do not have all the step by step pictures of how to assemble the Edison bulb chandelier please let us know if you have any questions in the comments. We are always happy to help and would love to see what you create!

Check out this tutorial on how to create your own DIY Edison Light Fixture. It is easy to make a great looking industrial light fixture for your home!

Posted on 20 Comments

Home Tour: Industrial Decor & Edible Landscaping

We have been meaning to do a home tour for-eveh! You know when the perfect time is to complete a home tour? When we are leaving…  Yes, we have decided to sell our house and move down the street.  We adore the location and the house!  Personally, I LOVE this home, but we woefully under estimated how quickly we would need to expand the space when blending our families.  Great news is we have located a larger family home less than two miles away.  Once we get in, we’ll go over the new house in more detail. Until then let’s go over all the DIY goodness we have in our current home.  Our focus with this house was to try to have a livable modern industrial decor with an attractive edible landscape.  When we bought the house they had some great conduit railings and interesting bronze accents.  We used those as our jumping off point to make a lot of pipe and Edison bulb fixtures.  Honestly, we never even posted about all of our DIY projects.  I have a ton of pictures and may try to go into more detail later.

Edible-Landscape

Orange Front Door and a Blasted Landscape

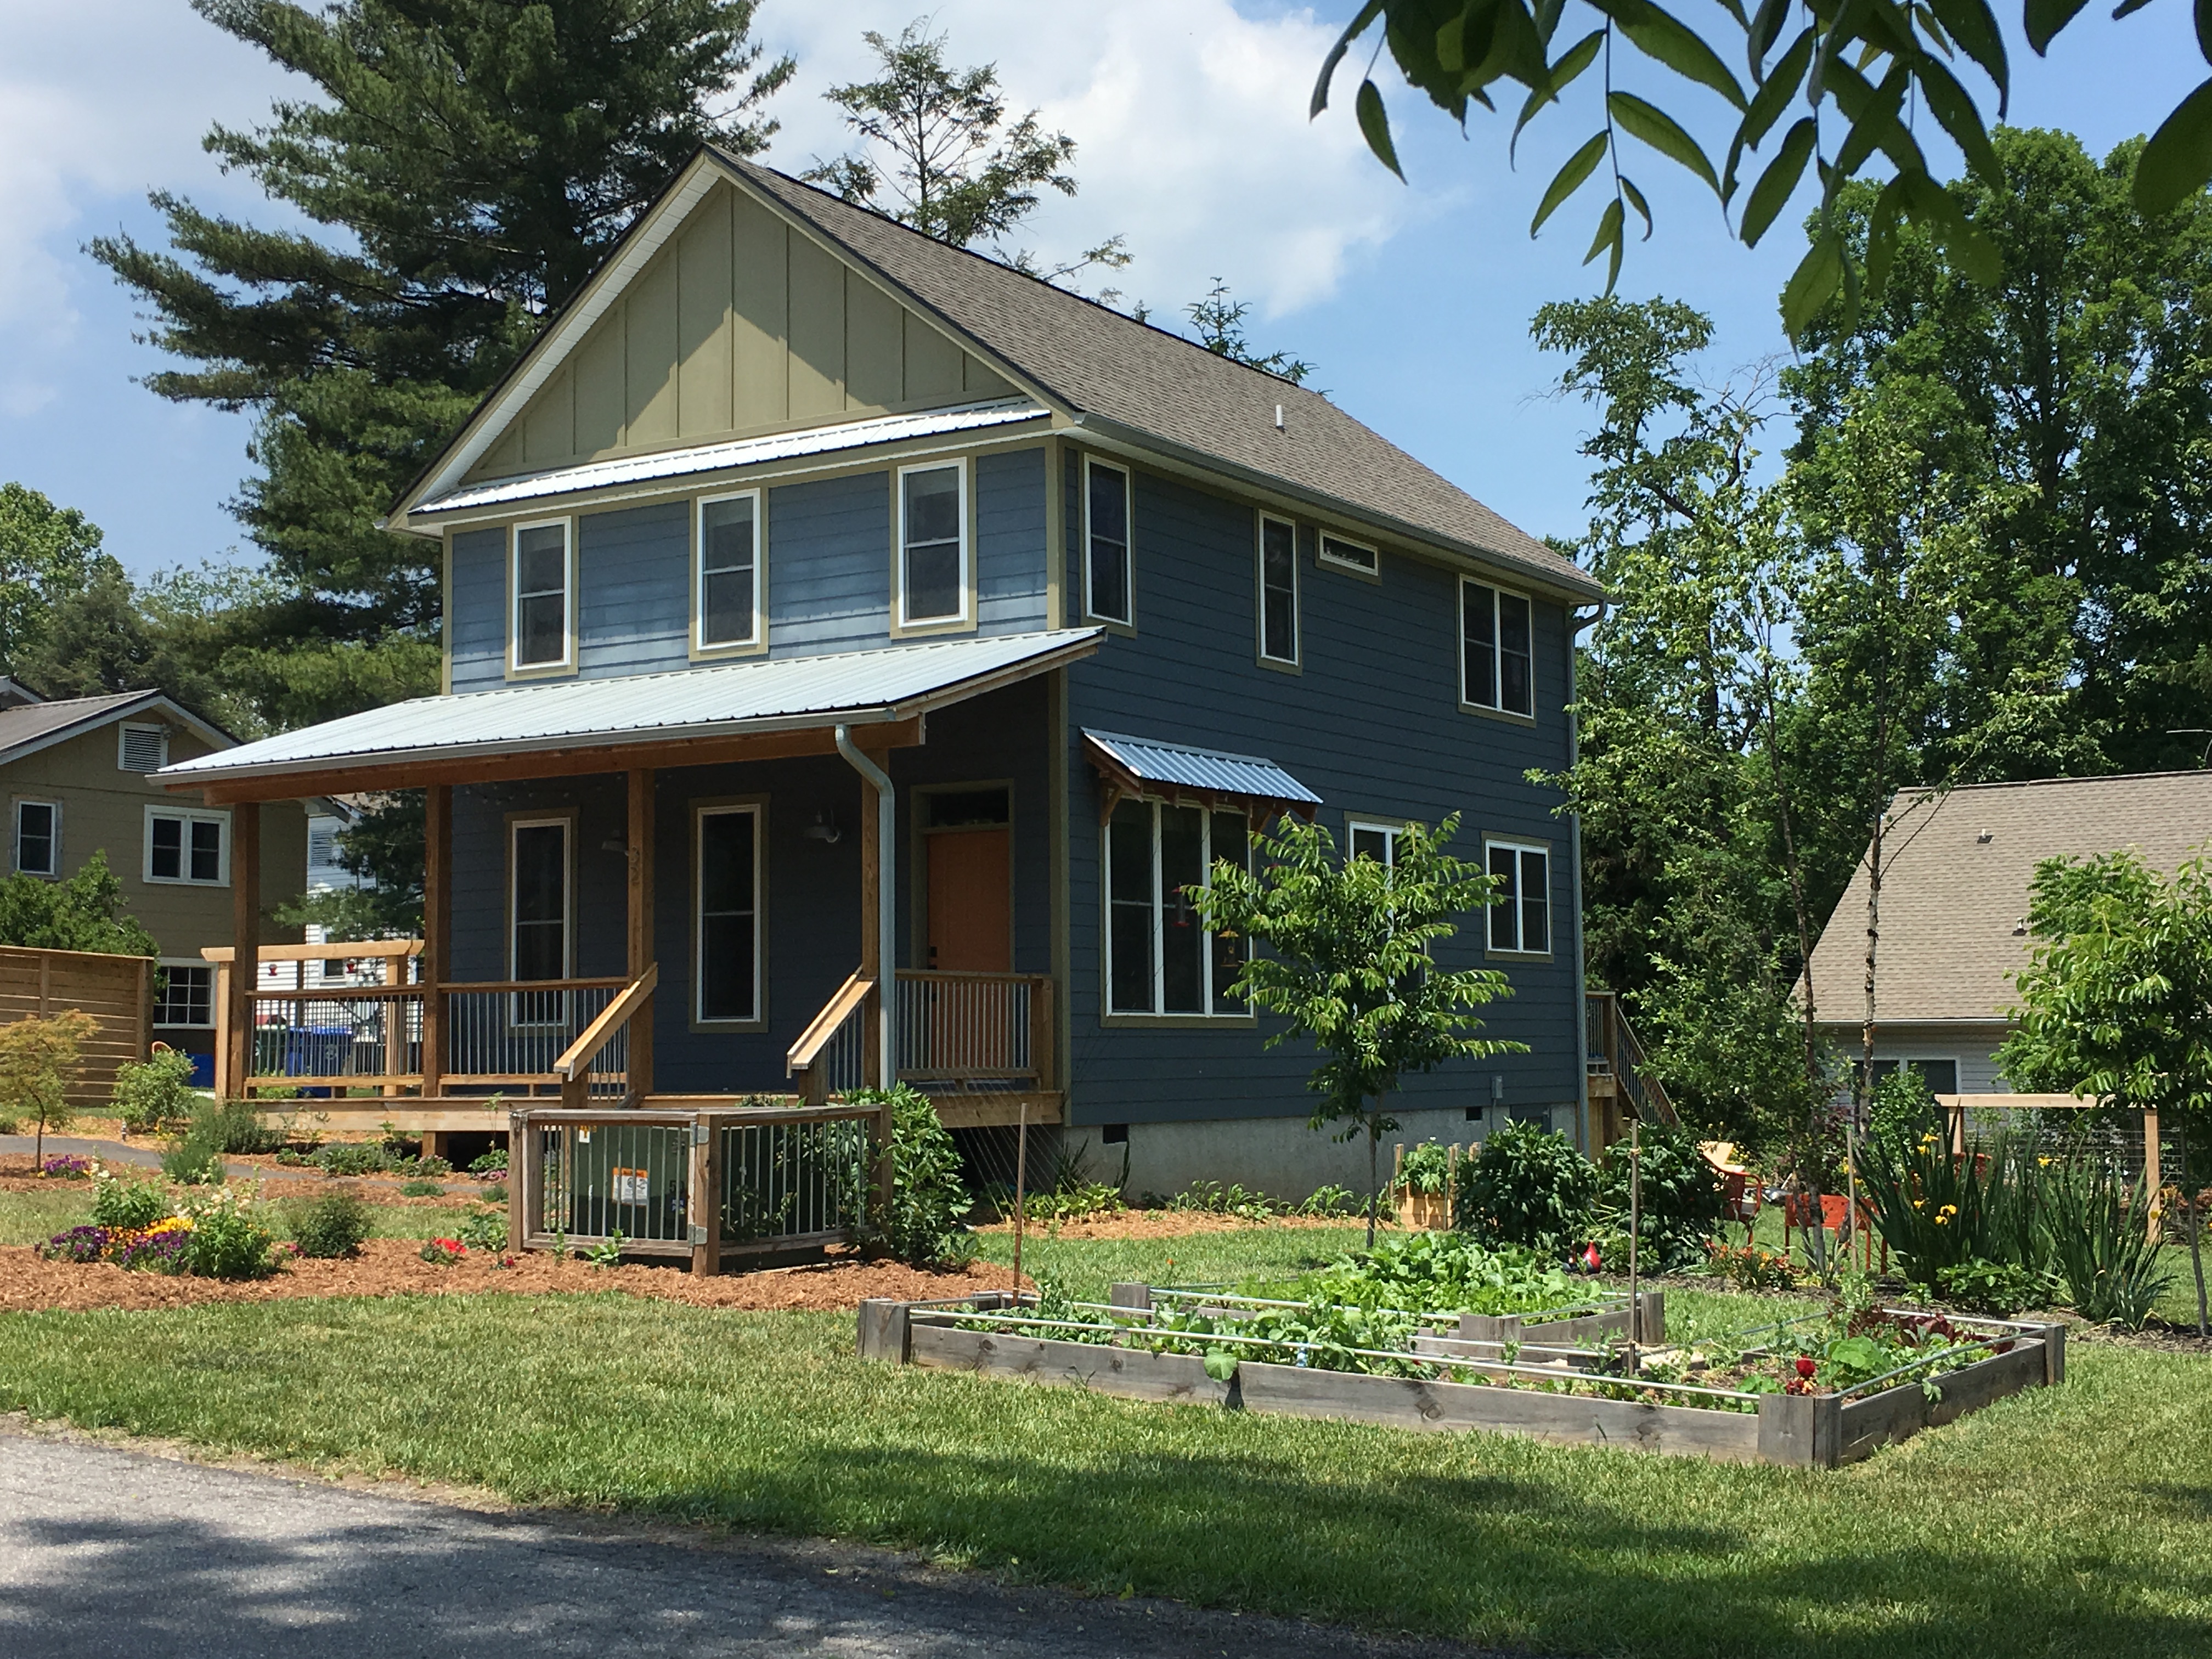
While the house was attractive when we first bought it the landscape was a disaster.  These first couple of photos show the labor of love and the final yard.  We started by marking off and designing beds, bringing in birch, cherry, and Japanese maple trees.  We built trellises to match the porch and boxed in the less attractive transformer, put in a mailbox with galvanized numbers, and built matching raised beds.  The mulch alone was truck loads!  Luckily we had a dear friend help us haul, dig, and haul some more.  The front landscape wouldn’t look a tenth as good with out his help.galvanized-mailbox

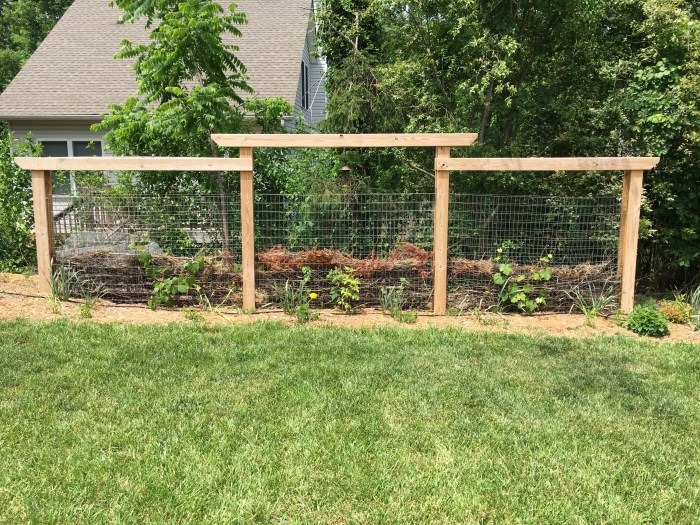
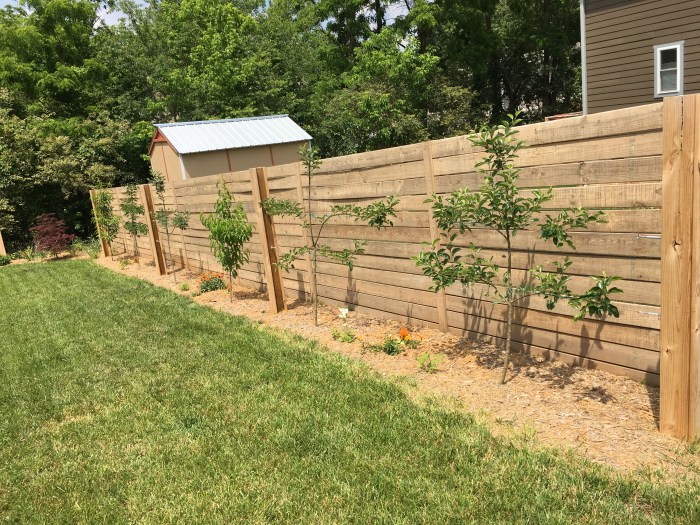
Our yard should have a sign that says created by Lowes clearance (in fact we wrote a post about how to save money at Lowes), but by scoring a lot of plants a low cost and nursing them back to health we were able to build up lots of edible perennials.  What you don’t see in the details of the photos is tons of blackberries, raspberries, goji berries, strawberries, figs, and herbs of all kinds.  Corn, beans, squashes, and more flowers are tucked in all types of beds.  We even added decorative potato towers, a composting fence that holds yard waste and serves as an arbor for grapes with cranberries below, espalier orchard with apples, peaches, and pears and we built a large kiwi trellis (Kiwis are a discussion for next week).

composting-fence

espalier-orchardI’ve never been great with flowers so we worked to added lots of bulbs, daisies, lavender, coreopsis, echinecia, and tons of annuals painstakingly brought back to life.  I have learned a ton about bringing in color and in turn, pulling in pollinators.  The landscaping continues around the back of the house with vertical shade planters and beds of herbs around the chicken coop.  The chicken coop or chicken mansion as it has ended up getting named in the neighborhood is a feat of building all on it’s own.  I’ll be sad to leave it behind, but the new owners are excited about the prospect of being chicken owners eventually.  If nothing else it matches the house perfectly.

raised-garden-beds

Speaking of the chicken coop!  This coop is built on pre-existing concrete pad.  Our guess was there was an old outbuilding or shed at some point.  It certainly pre-dates our occupancy and we did not even realize it was there till we installed the chicken coop.  We chose that location because the grass was not growing there very well; who knew…  When we created the extension we made sure to line it with hardware cloth to keep anything from digging in.  It was costly upfront, but so far we have yet to lose a chicken.  Seems worth it to me.  We painted the entire coop to match and it even has orange panels to close the windows off in the winter time.  You may ask why we have orange windows well…

chicken-mansion

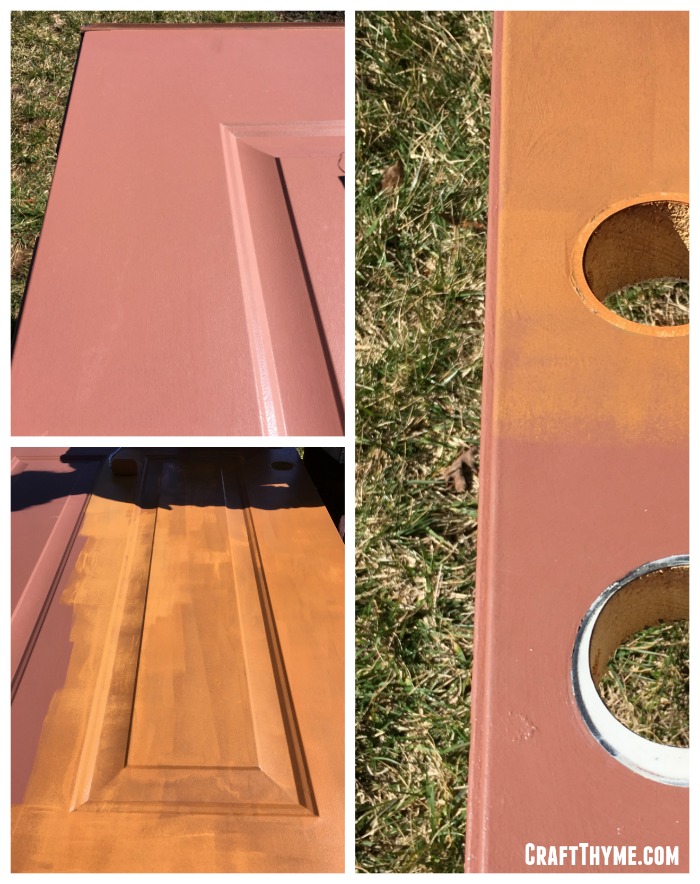
One of our final touches was to change the front door from a bland mauve to a nice pop of orange.  I’m still really happy with the way it sets off the front of the house and felt like the chicken coop needed to have that matching touch.  Only wish we had done it earlier!  I always hated the prior mauve.

Industrial Decor and an Open Living Space

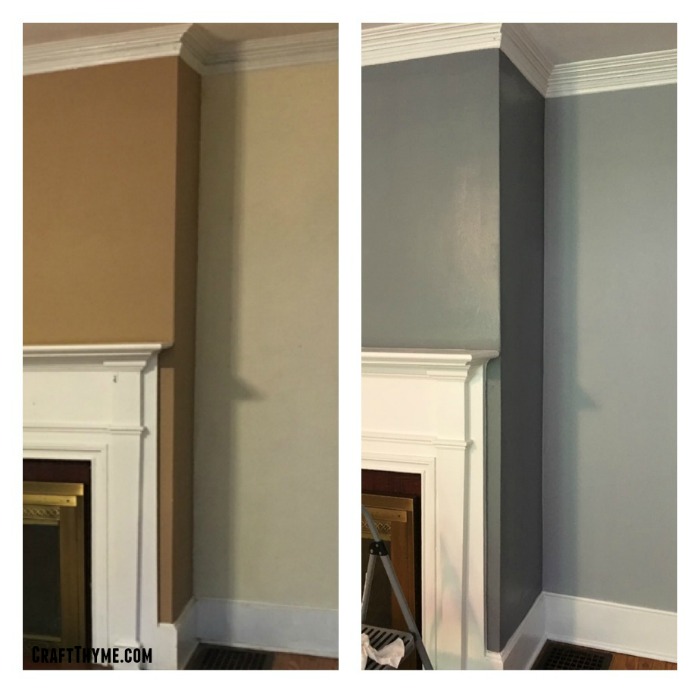
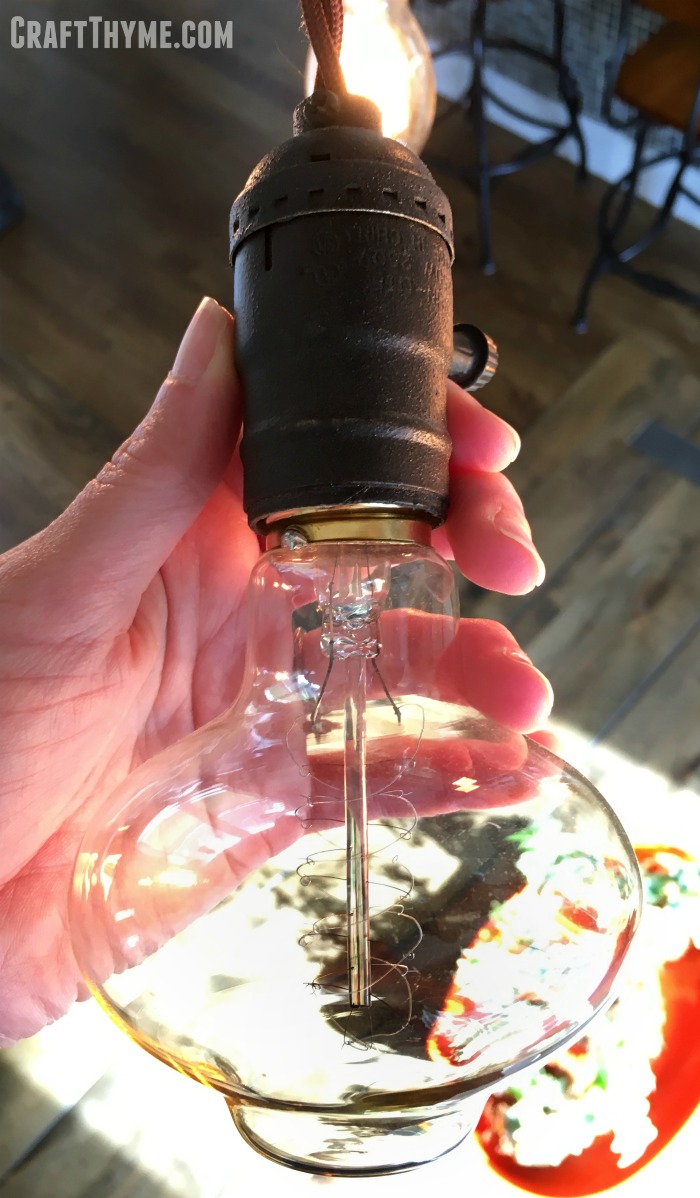
The bottom floor of the house is mostly an open living space.  We transformed the mantel, built pipe curtain rods, jazzed up the bookcase, all the while adding pops of deep orange and navy blue. Adam, built an amazing show piece in our Edison light fixture.  Everyone loves the multi-hued cloth covered cords and unique light bulbs.  I faux painted the sockets to resemble cast iron with a bronze hue, and we made sure that every single light can be turned off and on.  We added more pops of color by painting the powder room with an orange accent wall, making some custom art, and giving the pantry door a boost.  We recently changed out the lights in the kitchen for some clean solid shades.

beam-mantel

If you look closely you can see lots of our touches from gold leafed lamp shades to hand made coffee and side tables.  We had started to play with different styles than just pipe as you can see from the tiny mail table in the entry.  We had plans to make a custom bench for the entry as well. Obviously we were never stop the ideas!

edison-light-ficture

Everyone always remarks on the dining room table.  It is so fun to have the attached swivel seats.  I’m not exactly sure how we are going to move this monstrous piece of iron and wood, but somehow this puppy is heading to the new house.  The boys would be so sad to lose it!  We did, sadly, agree to leave the light fixture.  It really is an awesome show piece so I have no idea how we will match it in the new place, but we are already bouncing around ideas.orange-kitchen

Industrial Shelves and Decals

One of the first things we did was replace a rickety contractor banister with a solid pipe one.  It is substantial nad affixed with heavy duty mounts!  The banisters move the industrial theme upstairs where we continue the pipe with a small built in office area with creatively constructed pipe shelves, and custom pipe desk, and a variety of hand made light fixtures in the Master.  Adam, made the headboard as a surprise out of salvaged wood from various construction sites.  The bed we made ourselves with bolts and thick boards.  The platform is sturdy and great support!custom-wood-shelves

salvaged-wood-headboard

The bathrooms already had great tile so we just continued the pipe through to the shower curtain rods and toilet paper holders.  While we changed out the shower curtain in the boys rooms for showing the house, they had a great monster themed bathroom.  Complete with a monster that eats/holds their toothbrushes.porthole-mirror-bathroom

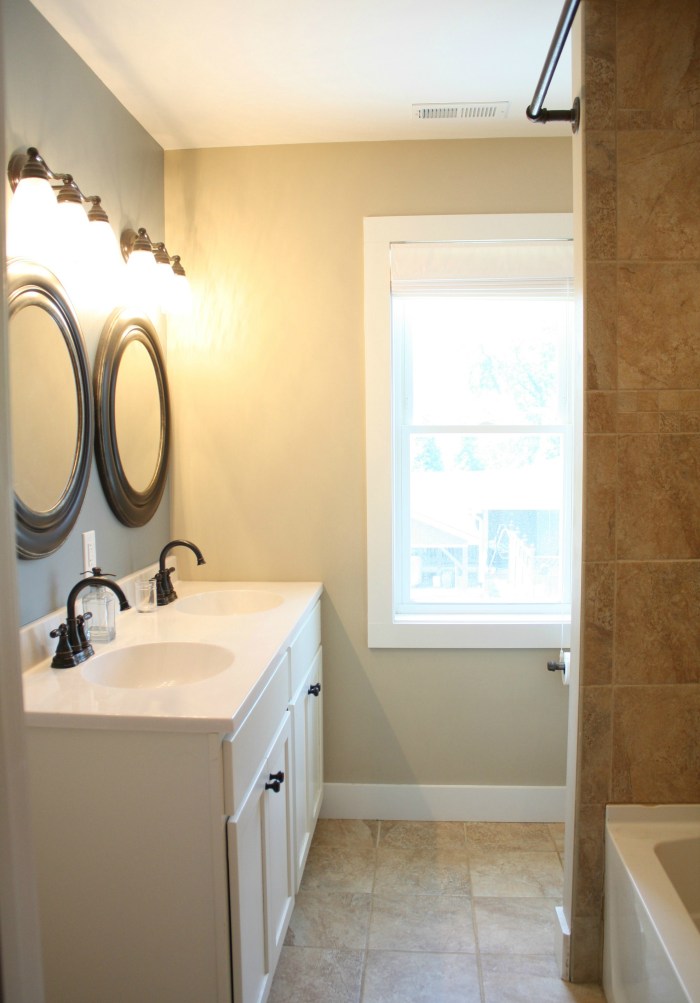
Currently the boys share rooms and while they look very plain in the photos we actually had a space theme in one and a map theme in the other.  For the purposes of showing we had to remove full wall murals of the solar system and world maps.  Oh boy…  Those no-stick decals…  I am pretty sure my finger tips were bleeding after peeling off tons of tiny stars.  I think we will just hand paint murals or find another creative way to decorate walls in the future. I made the map duvets and space themed quilt for both rooms.  Thanks to the ridiculous bunk bed (That took waaaaayyyy to many hours to assemble) we have always had plenty of space to hide the toys.  The boys are good about helping clean up at the end of the day.  We make it easy by keeping drawers and bins where toys can just be dumped.  Bookcases are hidden in the back corner and smaller interactive books are out in the open shelves.  Everyone likes to sit and read so we are probably raising a herd of bookworms.  Which I will consider a triumph!

shared-kids-bedroom

Boys-bunk-bed

We touched almost every single room, even if it was just painting accent walls (we removed a country yellow theme they had going on when we bought the place).  It was an amazing two years worth of work that we truly enjoyed doing.  I’m sure the next homeowners will want to put their stamp on the space, but hopefully we have given them a good start.

Posted on 5 Comments

Orange or Red Front Door?

How to paint an orange front door.

I have always loved a good solid red front door.  I love the pop of color, my mother has a beautiful red door, and red front doors are even supposed to be good luck.  BUT, what happens when you have green tinted trim?  Well I can decidedly say that mauve is not the answer.  Whomever decided that a mauve front door surrounded by green-grey trim and dusty dark blue was a good combo should probably be transported back to the 80’s where they belong.

So fine, the mauve had to go (I hated it from day one) but what color to replace the front door?  I wanted it to pop but I didn’t want to be known as the Christmas house.  So a red front door had to be out.  So, what looks good with blue and green? An analogous color would blend and give the necessary contrast plus orange is my current favorite color.  Adam picked up lots of dark/muted orange swatches on his way home from work.  The rest of the house looks like the blue and green had been muted with grey.  We wanted a pop of color not a freaking eye sore.  So this is how we choose front door colors.  Actually, this is how we choose all colors.:

  1. Whoever did NOT pick them out does an initial sort.  We assume the first person only picked colors they thought might work for the color situation.
  2.  Walk to the place we plan on painting.
  3. Hold up swatches and go: No, No, Maybe, No, Oooohhhh  I like that one, No, Maybe etc.  I particularly like where we toss the No’s around with abandon.  This process should not take more than 3-5 minutes.  Just a gut choice of possible or no.
  4. Repeat step 3 with the maybe’s.
  5. Hold up the final 2 or three, possibly tape them in place (only if it is a major tie), step back and make a decision.
  6. Pick up all of those no’s or ask one of the kids to take them to the trash.

I’m pretty sure we have never spent more than 15 min choosing a paint color, and so far, have never been unhappy.  More time <> better color.

Orange Front Door Color Chosen!

Paint decided, drive to the closest hardware store and holy-mother-of-$20+ for a quart of the chosen color.  Oh hell no, I have to paint one side of one door…  We can’t use samples as they are only interior base and you really need the more elastic exterior paint for a front door; even a porch protected one like ours.  We end up consulting with the paint counter specialists.  They point us to a much cheaper brand.  You may have to put on an extra coat but the end result is just as durable and color rich.  They end up color matching our chosen swatch and away we go!

Time to Paint the Orange Door

The same person who chose the horrific mauve also hired the laziest painters in the world.  Our house was new construction and for some unknown reason the painted the door, in place, with the hardware on.  Drips, brush marks, and paint splattered hardware abound.  The only way to truly fix all those issues was to sand it away.  Frankly, I have a life so we opted to smooth out their mistakes by removing the door hardware, taking the door down, painting it on sawhorses, and using a smooth foam roller.  That way I could get a smooth even coat with a thickness to hide some of the worst brush strokes.  Oh and did I mention this is a wood door clad in metal. Yeah I have no idea what is going on with that either.  What I do know is how a wood door is made, so, I painted all the sections as if they were assembled and had a wood grain.

Deciding on a red front door versus orange front door.
Check out the mauve situation we had going on.

First Coat

ROOKIE mistake.  I have been painting a long time.  What should you never do? Paint in the direct sun. Especially a god-forsaken door.  Painting a door is already a race to try to get all the panels painted with vertical strokes and the top, middle, and bottom in horizontal center pieces. ALL with smooth brush strokes. I thought I could get away with it since it was on the cooler side.  Nope.  Big cup of nope.  If this happens to you then do what I did and just rolled on a THIN patchy first coat let it dry in the .5 seconds it will take and move your painting location.  I moved to the backyard in a nice shady spot to roll on a nice thick coat.  Seriously, move to the shade.  Joking aside, it allows for a nice wet edge.  That is great when you want to make sure all the roll marks match on the panels.

Rolling Away

As the mauve paint disappeared and the orange darken I was certain we had made the right choice.  A nice pop, toned to mesh well with the existing house colors.  We liked it so much we even made ‘Orange Front Doors’ for the chicken coop.  They have winter panels we have to make them warmer when it is cold.

How to paint an orange front door
Adam said we needed an action shot. Here is my attempt to make rolling paint interesting.

Even if you can not do a red door think about a fun door.  Orange, yellow, a deep emerald green; so many choices beyond a basic white front door.  THOUGH, white is going to be a vast improvement over mauve.  What colors do you have for your front door? I would love to hear in the comments or email me a picture!

How to paint an orange front door.
I need to make a pretty vanity shot! We installed new hardware too.