Posted on 18 Comments

It Is Not Too Late to Start Seeds

Start Seeds with this template

Guess what? If you live Zone 7 and above March and even into April is not too late to start seeds indoors and you have the WHOLE outdoor seed planting season ahead. (Get those peas and spinach out today!) If you have no idea of the timing of seed planting both indoors and outside I will walk you through the process and offer free Seed Planting Guides for vegetables at the end of this post.  These free seed starting templates are meant to be used for whatever zone you live in! I have even had someone from the Southern Hemisphere say they work for them.

Start Seeds with this template


So What Can You Plant?

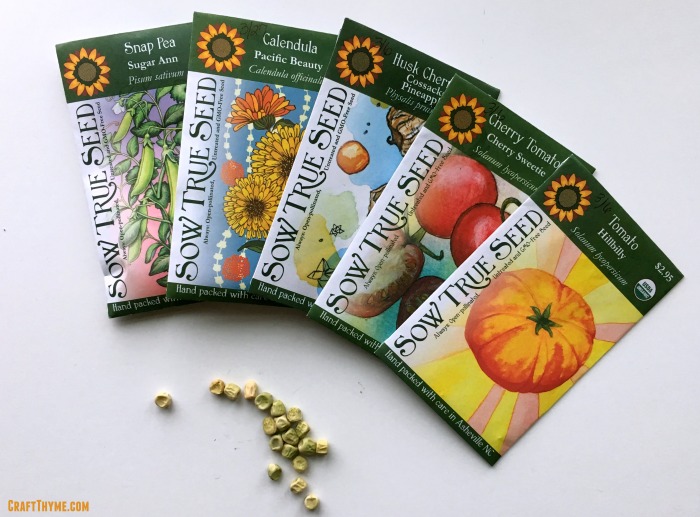
Joking aside the peas and spinach need to go outside ASAP. They should have been out the first couple of weeks of March, but depending on how hot spring is you should be able to get a good crop of snap peas and spinach in before they wane and bolt. So now that, that is out of the way here are some things you can start indoors today to plant out in early may.  Affiliate links to my favorite local seed vendor to follow!  In case you want to order some of these beautiful seed packets for yourself.

Summer Squash: Zucchini, Patty pan, Yellow, etc
Winter Squash: Butternut, Acorn, etc
Melons: Watermelons, Cantaloupe
Eggplant
Nasturtium
Zinnia
Marigold

Obviously, most of these plants grow well planted straight outside, but if you have a shorter season (as I do in mountainous Western North Carolina) getting an extra month can be really useful to get larger, riper, fruit. Plus who doesn’t love flowers?Seed Starting Guide


How to Know When Can you Plant

When to plant your seeds indoors and outdoors all depends on the frost! You can find your average frost free day by Googling. Also the Farmers Almanac has a great list by major cities. So once you have this all important date you’ll need to know how many days before or after that date your seeds can be planted. Such as 7 days before, will tolerate light frost, -1 week, etc. Then you will also need to know how many days the transplants need to actually grow. Additionally you can factor in how long germination takes and WHOA! Are you overwhelmed yet? Trust me it is not too late to plant yet AND I am going to break this down so it is super easy! And if the breakdown still doesn’t make sense then I am going to offer you a free spreadsheet or google doc that you can just plug in numbers and get your dates! How much more simple is that?

The Magic Formula

To Plant Indoors: Frost Date + (Weeks Before Or After Frost – Weeks Needed to Grow Indoors)
To Plant Outdoors Seeds or Transplants: Frost Date + (Weeks before Or After Frost)

Let’s run through an example:

Cabbage can be transplanted. It needs about 42 days (6 weeks) of indoor growth and can tolerate frost. So we can plant it about -21 (3 weeks) days prior to the last frost free day. My average frost free date is 4/24/2016.

Indoors: 4/24/16 + (-3 – 6 weeks) = 2/21/2016
Outdoors: 4/24/16 + -3 weeks = 4/3/2016

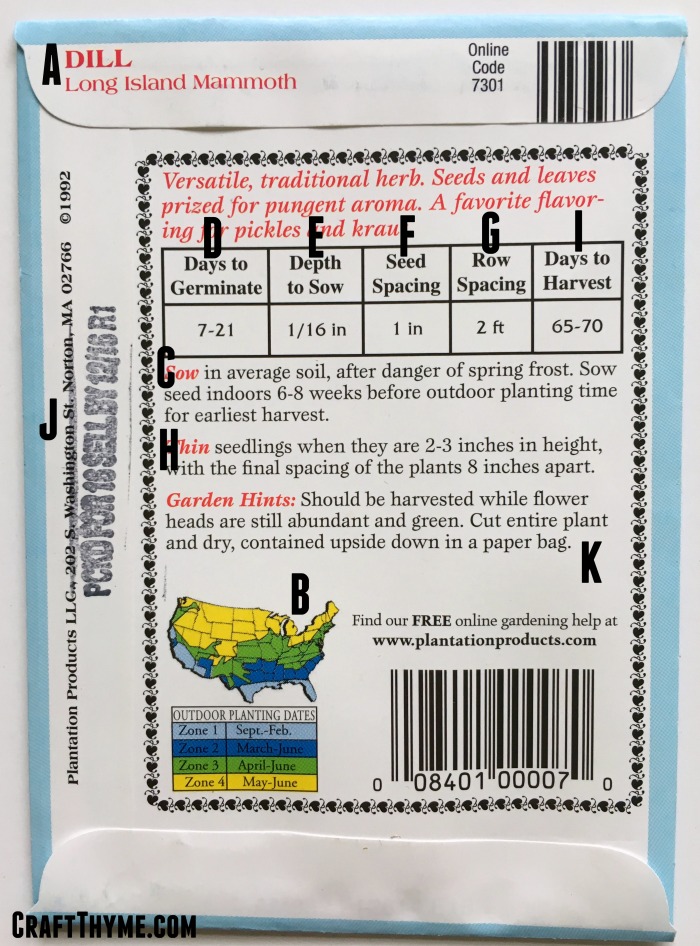
So, are you saying?! “Ugh, math? And where do I find all this information anyway?” Well I have the answer for you. For the old school I have a printable pdf Seed Planting Guide for vegetables, flowers, and herbs so you can calculate when to start seeds for yourself. It has additional information about depth, spacing, thinning, and seed saving. You will still have to do the math and look at a calendar. Though you can use this handy website to plug in weeks and get a date.

For the New school I am offering a free spreadsheet where all you need to do is plug in your frost free date and when to start seeds, both indoors and out, just populates throughout the sheet. I also have a pared down version of the Seed Planning Guide in a Google Doc you can copy and use for yourself. I know not everyone has excel just hanging out on their computer or phone.

Free seed starting planning

Excel Seed Starting Template

PDF Seed Starting Template

Google Seed Starting Template

Free Seed Starting Templates

Posted on 6 Comments

How to Read a Seed Packet

How to read a seed packet
The back of a seed packet can seem intimidating.  It seems silly but if no one has every taught you how to read a seed packet then you could be missing a lot of good information.  A lot of people prefer to buy transplants because seed starting seems difficult. But the truth of the matter is seed starting is easy, offers a cheap way to get lots of plants, and has more variety.  The best part?  The seed packet has all the essential information you need to get going!  Below I outline all the seed packet lingo you will need to interpret to grow your own healthy plants.  As a general note the cheaper seed you purchase at big box stores will have more information, while, specialty seed packets will often include less as it is expected you will know quite a bit about gardening.  In eaither case learning how to read a seed packet will make the whole seed starting process go smoother.

Seed Packet 101


How to read a seed packet or Seed Packet 101

A. Name/ Variety– Usually a common name of the plant and sometimes the Latin version is included. Seems straightforward no? But in reality the variety can be essential to make certain your plant sprouts and thrives.  For example: Oriental Poppies are perennial but California Poppies are annuals.  You would be very disappointed when your California poppies did not show back up the next year if you did not know the variety.

B. Zone Planting – When to plant your seeds.  Ugh, this is the one thing I would always say ignore on your package.  You really have to know your area!  Or google what your actual zone is, as the maps on seed packets are just too vague to know when you should plant.

C. How to Plant –  Most importantly you will need to discern if these seeds can these be planted inside (make your own transplants) or if it needs to be planted directly outside.  Not all vegetables like to be moved so while the packet may not explicitly say you can start them inside it will most often clearly define if it needs to be planted on site.

D. Germination – When your plant should sprout. If you don’t see your seeds coming up fairly soon after the last day of the range you may have an issue.  Make sure you have read the whole seed packet on how to start them (some need soaking overnight etc).  If you think the seeds are just duds you can try googling a germination test.  Most reputable/expensive seed companies will refund or replace bum seed.  Just note, in all my years of growing I have only had the really cheap seeds not germinate and only one incident of the wrong seeds in a packet.

E. Depth to Sow– How deep to plant your seeds. If you aren’t getting germination it may be because you put your seeds to deep or not deep enough.  Some seeds need a little light, some need to be deeply buried.  This measurement does not have to be perfect but aim for a similar depth as suggested

F. Seed Spacing – How far apart to space your seed in a row.  This is NOT the final spacing for the plants that grow from seed.  This number is usually optimized to give you a good germination rate over a row of crops that will be thinned.  Honestly, I use this as a vague guide so I don’t have to thin very much.  I rarely plant in straight rows anyway…  If I have cheap seed I might sow them more thickly.  If I am starting them inside I might ignore this guide completely and just put 2-3 per pot

Diagram on how to read a seed packetHow to Read a Seed Packet: Details

G. Row Spacing –  How far apart to place rows of seeds. If you are planting in rows then this is how far apart the rows should be from each other.  I’m not going to go into why I believe row planting is probably one of the least useful ways to plant a home garden but you can read about the best way to space plants here.  If you are just starting out rows can be great and this gives you the information you need so the plants are not to crowded.

H. Thinning – How many tiny seedlings to cut or pull out.  Seed packets want you to plant extra seed and remove tiny sprouts later.  This is a really good idea for a novice gardener and the seed company!  I’d rather have 5 seeds sprout than none at all.  Once you get familiar with seeds you can cut down the thinning and use less seed. Remember that thinned plants from lettuce, radishes, and beets can be eaten as microgreens if you do not want all those seedlings to go to waste.
I. Days to Harvest –  The most awesome number on the packet!  This is when you can expect to get fruit, vegetables, or flowers.  If your growing conditions aren’t optimal (drought, overly wet, bad soil) expect this to be longer than listed
J. Sell By Date –  Whoa what?  Yep, seeds expire!  Many seeds can be kept for a few years but you want to check the packet and make sure you have fresh seed if you are recently purchasing.  I have seen old seed packets accidentally moved in with new stock.  I always check to make sure they are the freshest I can find.

K.  Extra Info – Details, tips and tricks.  Somewhere you are going to see some tips and tricks about the plant.  It may give you further tips to creating happy and healthy plants or information about harvest and saving seeds.

I personally prefer the more expensive seed (with less info on the packet) because I generally have better germination and healthier seed.  If you want really primo seed and still a good amount of information on the packet here is my affiliate link to my favorite seed store: Sow True Seed.  I also can always find special varieties more suited to my garden and have had wonderful germination rates with these seeds. Plus they will go over how to read their seed packets with you if you are lucky enough to be able to go to their store in Asheville, NC.  However, I started with the packets you can pick up at any big box store.  Nothing wrong with them and great for beginners.  Just make sure to read the whole seed packet and you will have enough information to come out with some good plants.
 Seed Packet 101
Posted on 11 Comments

How to Squirrel Proof a Bird Feeder

How to hang a squirrel proof bird feeder

In my youth, we had bird feeders, and I have found there are two types of families: Those that allow whatever to come and feed and those that fight the squirrels. Adam’s family has perfected the art of how to squirrel proof a bird feeder.  While mine comes from the live and let live bird feeder camp. Adam wanted to hang bird feeders, I thought it was unfair since we have out door cats.  Lazy outdoor cats but small furry predators none-the-less.  Oddly enough Adam’s family squirrel fighting secret also makes the feeders cat proof.  Here are the tips he taught me!

How to Hang Squirrel Proof Bird Feeders

How to hang a squirrel proof bird feeder

Supplies/tools

Bird Feeders*: Bonus points if you pick colorful feeders.  They will add some color in the winter months when all the flowers are gone.

Pulleys*

Nylon Rope*

Hooks*

Lighter

Ladder

Step 1 Gather Everything & Repeat

Get all your supplies and tools, take your ladder and set it under the eave you want to hang the bird feeder from.  Realize your ladder is about 5 feet to short.  Call a friend and have them bring a taller ladder over.  Joking aside, one of the first steps in keeping animals out of the bird feeders is to find a location that is relatively high.  We selected one that allowed us an eye level view from inside but was a good 10-12 feet off the ground outside. Also, thanks to Richard, for the ladder! (And you thought we were joking)

How to hang a squirrel proof bird feeder
A nice boring eave just waiting for a squirrel proof bird feeder

Step 2 and The Secret

The secret is a set of pulleys.  This allows you to hang your bird feeders high, while, allowing for you to easily lower them for refill.  Take your hooks and push them into the wood.  Then hang a pulley from the hook.  You can see the pulleys below.

Step 3 The Tricky Part

The next step is not hard but certainly annoying.  You’ll have to run your line through the pulley, tie it to your bird feeder (leave it empty!!!), and then figure out the height you need to be able to lower it to a level where it is low enough to fill but keep your rope from being so long it drags all over the yard.  In our case we wanted three hung, so we had the added bonus of trying to get them the correct matching heights.  I’m pretty sure we never resorted to yelling, but there was at least one huff had in the process.  “Up an inch. No too high.  Down a little.  No that’s too low.” That is a lot to deal with, while 4 kids run about like crazy fiends and someone else stands outside, on a 12 foot ladder, in 20 degree weather trying to gauge height.

How to hang a squirrel proof bird feeder

Step 4 Hook, Line, and Sinker

You will need another hook to loop the ropes over at the bottom.  We chose one hook because we liked the way the lines looked pulled to one side and they double as perches for the birds.  You could easily add a hook under each feeder and take the line straight down if you wanted the rope to be less noticeable.

Step 5 Tying the Knot

Once all heights have been decided you will want to firmly tie a loop in two places on the rope.  One for where it will hang everyday and one at the end of the rope.  The one at the bottom of the rope will allow a single person to lower the bird feeders and fill them without needing to take them off the pulleys.  When we were completely satisfied with the two heights (which necessitated a second trip to Lowes for more rope) we took a lighter and lightly singed the ends of the rope and knots.  This will keep them from unravelling and coming untied.  BE VERY CAREFUL.  Fire and melty nylon is no fun.  Getting sued because a reader melted a rope to their finger is even less fun.  You have been warned.  You can skip this step and everything will be just fine.

How to hang a squirrel proof bird feeder
I love the added pops of color the feeders add in the winter.

Why This Works

First, for everyone who can not see the obvious, birds fly; cats and squirrels do not.  The high level keeps the birds safe from the cats.  If a squirrel decides to try to run up the ropes they are too heavy for the bird feeder and end up moving it around on the pulley.  The instability makes the squirrel jump off.  So far it has worked like a charm.  The kids love seeing the birds from inside the house.  I have to grudgingly admit I am also impressed.

How to hang a squirrel proof bird feeder

Posted on 6 Comments

DIY Chicken Water Heater

How to make a DIY water heater for your chickens

Disclaimer: This includes heat, electricity, and water.  Build at your own risk.

If you own chickens and you live anywhere that it gets below 32 F (0 C) then you will have experienced the fun of hauling chicken water. Well, no more for me! Adam craftily created a DIY chicken water heater. The water heater only required a few simple materials and the best part?! NO electrical knowledge necessary, short of being able to plug a cord in an outlet.

If you want to make your own chicken water heater we saw the idea somewhere online (This is why we should bookmark regularly) but ended up needing to modify it to suit our needs.

Chicken Water Heater

How to make a DIY water heater for your chickens

Supplies and Tools

Concrete Block
Concrete Paver
Extension Cord*: One with a flat socket area works best
Pluggable Light Socket*
Light Bulb(Start with 40 Watt): And yes it has to be one of the old school, electrical hogging, hot masterpieces of bulb work. The new fangled LED, while great for energy savings, does not get warm enough to do squat
Hammer
Flat Head Screwdriver or a Masonry Chisel*(If you are fancy)
Duck (duct?) Tape: Probably the best choice, we couldn’t find our roll so I think we used some packing tape
Metal Chicken Waterer*
4 Kids (optional): To “help” with the shopping

How to make a DIY water heater for your chickens

Step 1 Get Chiseled

Alright, I completely missed this step. I may have been wrangling one of the kids, cleaning out the laundry room, or making some sort of food. In this family of 6 it feels like someone is always eating. Luckily Adam takes care of dinner, but I tend to handle the snack portions of the day. Anywho, I asked for him to explain this step. Here is how he notched out a section of block so the extension cord can poke through:

I used a masonry chisel (because we have one), but a large flathead screwdriver will do the same thing. Just take patience when doing it. It’s not the kind of thing where you hammer a few times and you’re done. Spend about five minutes slowly making the shape, and you’ll ensure you don’t break the cinderblock as a whole.

Who knew we had a masonry chisel?!

How to make a DIY water heater for your chickens

Step 2 Make a Mix Tape

Dry fit the block over the extension cord and onto the paver. Note where the extension cord sits then do this very, very technical maneuver. Tape that sucker onto the paver.

I know that seems a little rigged, but this is for chickens…

Step 3 Plug and Play

Now plug in your extension cord and set the paver in a nice level place inside your coop. What’s that you say? Your extension cord is too short?! Roll that back up and make another trip to Lowes for the correct length. Now that your paver is in the coop and your cord is plugged in, place the cement block over the cord. If you chiseled enough space the block-paver combo should sit nice, flush, and fairly level.

All you have to do now is put a bulb in the socket and plug it into the cord. If the light comes on you are mostly there!

We have a metal waterer that covered the entire hole making sure no water could accidently pour into the hole holding the electric components. However, I am a nervous nelly with electricity so I made sure to check the fit, how hot the chicken waterer was getting, how hot it was inside the block, etc. I think you really should monitor it too! I personally want my chicken fried by KFC and not by accident.

How to make a DIY water heater for your chickens

Tips

We had to play with the bulb size and placement to get it warm enough to keep liquid water when temps dropped to 15 F (-9 C)

The very edge of the water still seems to freeze from time to time, but the heater keeps the water warm enough that the chickens are able to peck through it with no problem.

Surprisingly, even the little bantams were able to reach the waterer. The redneck chickens seem to have giraffe necks.

Posted on 15 Comments

Re-homing An Unwanted Rooster

10 tips for dealing with an unwanted rooster. How we rehomed our cockerel. #chickens #rooster

Despite our best efforts and attempts at denial we had to admit that we had a rooster among our hens.  We had wondered about the growing comb on his head and larger tail, but the crowing that began right around 11 weeks of age was the final straw.  We had to re-home the unwanted rooster pronto or find out if we really were capable of culling the flock.  If you are trying to deal with an unwanted rooster you can scroll to the bottom for 10 tips on how to deal with your unexpected cockerel.

Being responsible people we tried the absolute best we could to not have a rooster.  We knew it was illegal to have a rooster in town so we bought from a company that guaranteed 98% accuracy on sexing of small batches of chickens…  Clearly we should have bought lotto tickets the day we ordered our chicks since we fell in that lovely 2%.  We were obviously concerned that we would be unable to find a home for Ginsburg (yes we had a rooster named after Ruth Ginsburg, the irony…).  After asking around our facebook friends and getting no where we put a post up on our local freecycle boards.   With in an hour we had a bite and we were sooooo lucky.

10 tips for dealing with an unwanted rooster.  How we rehomed our cockerel. #chickens #rooster
Around 8 weeks we started to get nervous… See the tail feathers? None of the other hens had those.

A gentleman with a 15 free range hens wrote that he had been considering a rooster; could meet us after work that very day and take the rooster off our hands.  Personally, I did not care if he came in a van marked “Chicken Meat for Sale”. We needed rid of the unwanted rooster before we became the neighborhood pariah.  He had already been crowing all weekend long.  When our rooster savior and his family appeared we spent a bit chatting and I really thought our rooster was going to go to a good family.  His name was Adam too so that alone seemed like good luck.  They were so thrilled to have him and told us all about their flock.

10 tips for dealing with an unwanted rooster.  How we rehomed our cockerel. #chickens #rooster
Oh yeah. That is clearly a rooster. No doubt about it.

Little did we know that Ginsburg was going to the proverbial motherland of hens with awesome chicken owners. Chicken-Adam has been excellent.  It has been like the open adoption of roosters.  He has awesomely let us know how he fared his first night, how he was learning to integrate with the flock, asked us some questions about his breed, and sent us some amazing photos!  If I had to end up with a rooster I couldn’t be happier with how it turned out.

10 tips for dealing with an unwanted rooster.  How we rehomed our cockerel. #chickens #rooster
Now this is a happy rooster. You can see his flock and free range home in the background. So lucky to have found such a great owner for him.  Thanks Adam for keeping us up to date!

If you do not end up as lucky as us here are some ideas on how to take care of your unwanted rooster!

10 Tips on Re-Homing Your Unexpected Rooster

  1. Craigslist – You might be able to get $5-$15 for an unwanted rooster, but your best bet for quick placement is FREE.  Make sure to hit the free section and the farm + garden.
  2. Freecycle – Obviously you will need to offer the rooster for free on this site.  It is not quite as ubiquitious as Craigslist, but our Asheville, NC group seems pretty active
  3. Facebook groups – We have a local and very active group (+16K members) who buy, sell, trade and generally chat.  They help rehome all types of animals on the West Asheville Exchange.  If you search the name of your town or a close city you can usually find a number of groups to join.
  4. Local Feed Stores – They probably will not take your rooster BUT they know every poultry keeper in the surrounding area.  Ask them if they know anyone looking for a rooster.  If you are willing to let the bird be culled they will often know a farm or two that take free roosters for the eating
  5. Do the Deed – Oh yes, the traditional way to get rid of unwanted roosters!  Frankly, as a chicken owner I feel like you may need to know this technique even if you never plan on killing your chickens.  If one of them gets incredibly hurt or sick you may need to complete a mercy killing.  I thought this video was not terribly graphic but gave a good idea of how to complete the deed.
  6. Call your local animal control – They may take the bird (which will likely end with its death) or know local organizations that will help.
  7. Contact local 4-H groups –  Please do not do this is you have an aggressive rooster, but if you have a nice one then their may be kids looking for a rooster for their flock.
  8. Photos – With any of the above posting places you need photos.  Let me repeat add a photo.  People want to see what they might be getting.  A nice, healthy, plump rooster is much more appealing than a text ad.
  9. Words – Although I think a photo is a key ingredient in re-homing a rooster,  the text you type is also really important.  You also need to tailor it for your audience.  The local facebook group will band together if you have a good reason to need help.  I would have made certain to discuss how gentle he was, how good with the hens, the attempts we had gone to to NOT have a rooster etc.  Craigslist I would have made sure to discuss statistics like size, breed, feed, general health.  Make sure to give the information each platform needs and wants
  10. Bundle your rooster – If you can stand to lose a hen, or feed, or a cage etc it can make the offer that much more attractive.  Especially if the rooster is a fancy breed.  You can sell a breeding pair or just require that if someone wants to buy a hen they have to take the rooster too.

Bonus tip:

American Poultry Association – I am adding this as a bonus option.  They deal with clubs all over the US, but they are really only going to be helpful if you have a very nice purebred rooster on your hands.  You can look through a list of contacts by state to contact.

10 tips for dealing with an unwanted rooster. How we rehomed our cockerel. #chickens #rooster