Posted on 17 Comments

Why Good Dirt Is Crucial For Your Garden

Why good dirt and soil is crucial for your garden

Let’s get the dirt on dirt. Preparing your garden dirt or garden soil is key to a successful growing season. It may sound silly but your soil is the basis by which everything happens. Good dirt is necessary to support, feed, and grow beautiful vegetables and flowers. Frankly, if I am going to go to the trouble to start seeds, plant starts, weed, fertilize, and water I am damn well going to want to have spectacular vegetables. Without a good base for the plants all those mentioned activities will still result in sad looking plants.

Why good dirt and soil is crucial for your garden

If we can all agree the soil is the basis for growing good specimens then we should all agree on the best way to prep the soil. Except that would be wrong, wrong, wrong! If you get in-depth with gardening you will find that every gardener has their own special technique, blend, and plan for their garden soil. Do not question them and do not try to change their mind. People can be terrifically rabid about this process so I just nod my head and agree that cracking 15 eggs and stirring them in the soil in February while singing positive songs of growth is absolutely essential to getting perfect tomatoes. I have my own rabid opinions on my garden, but what I am sharing with you about soil prep is the absolute essentials for a first time gardener.

Key Components of Good Garden Soil

  1. Mineral
  2. Organic Matter
  3. Moisture
  4. Air
  5. Living Organisms

Mineral Balance in Good Dirt

Minerals are just the rock like particles you think of as dirt. If they are large then you end up with soil that seems sandy, if the particles are small you get the hard fired clay like baseball field that is my yard. (ask me how I really feel about my soil). I’m not going to go into all the different soil types, but what you hope you have is nice mix that is neither sand nor clay. Loam, as it is known will help maintain the delicate balance between having too much and too little moisture retention. it also allows for air to more easily be retained in the soil.

Organics Are Not Just For Groceries

Organic Matter is one of the key components of feeding your plants and living organisms but it also really impacts your moisture retention. The organic matter is decayed leaves, bugs, roots, etc that is mixed in the soil. Compost is a good example of a large heaping helping of organic matter. Plants will further break down organic matter and use the nutrients to feed themselves and the organic matter will absorb water trapping it in the soil and allowing plants to get moisture. High organic matter in your soil can really cut down how much you have to water as well as fertilize.

As I Live and Breathe

Air? Say what? Yep, air needs to be part of your soil. Roots need space to grow and actually need CO2 and oxygen in the soil to survive. Compacted and hard soil will cause roots to be small and stunted. In many cases this can cause the plant to die or at a minimum not thrive.

Icky Bugs Need Love Too

Living organisms. Yes, unfortunately all those creepy crawlies in your soil serve a purpose. Except spiders, spiders can burn in hell. Yeah, yeah, they actually serve a purpose too. Worms, borrowing insects, and a slew of microscopic organisms are important to your plants. They serve to aerate the soil, break down organic matter, and aid plants in absorbing nutrients. Did you know that with the proper bacteria nitrogen fixing plants like peas can actually add to your soil?!

Pretty dirt! Loose rich garden soil looks like this. Dark with lots of organic matter and small clumps.
Now this is some good dirt. Dark, rich, with small clumps of organic matter!

So How Do We Make Good Dirt

So how do you get such good dirt? Mix in a bunch of crap and go? Well not exactly. Let me get all hippy on you and say good soil is a “process man”.

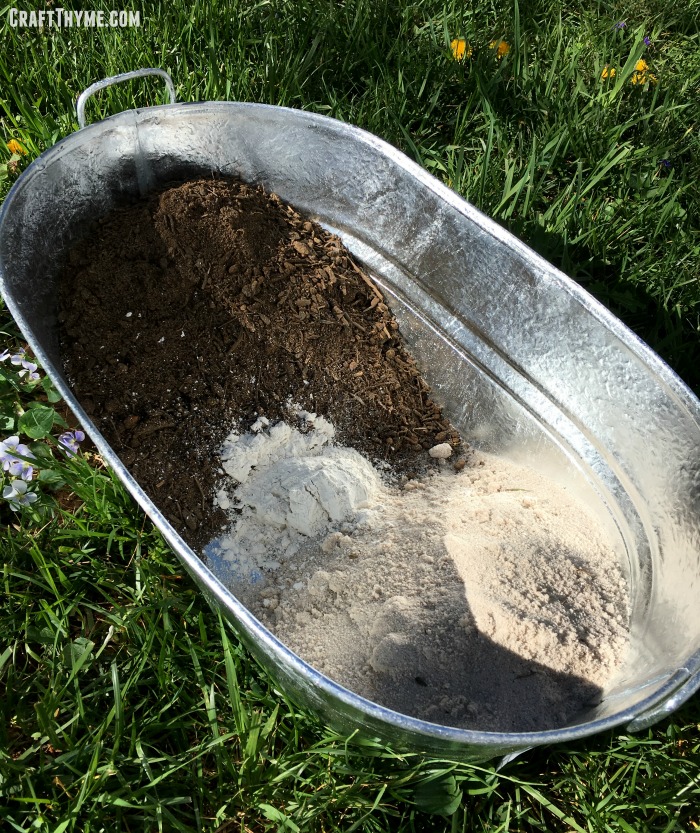
We’re generally a no-till/digging kind of family BUT if this is the first year you are establishing a bed and you aren’t buying garden soil then you may have to avail yourself of some digging. You can till your garden or double dig. I prefer double digging, but it is an incredible amount of work. I think it sets up your garden soil for better long term usage but again, if the difference is between someone gardening or not because it is too much work then borrow a mechanical tiller from the neighbors and go to town. The key here is you are going to do this ONE TIME ONLY. So when you dig add in tons of organic material, ground up leaves, soil conditioner (ground up bark), and compost are my go-to amendments. DO NOT, I repeat DO NOT add sand to clay soil. Logically you would think that would help, but nope. Big old cup of nope. It will make some godawful concrete like substance when mixed directly with clay.

Sometimes you just have to dig. With a mattock. And a shovel. And a rake.

Digging and adding amendments are going to add the air and organic matter to your soil. The organic matter will help add moisture and attract organisms. Those organisms are the reason you are only going to dig this one time. I know fluffing the soil is fun, but to get really good soil you need to let nature take its course. Organisms will build colonies of bacteria and fungus, worms and ants will dig tunnels to bring in air, and all this will work together to give you nice healthy soil over time. The only thing you will need to do to fuel that is continually adding layers of organic matter to the top of the soil throughout the growing season and when you plant. Nature will do the rest.

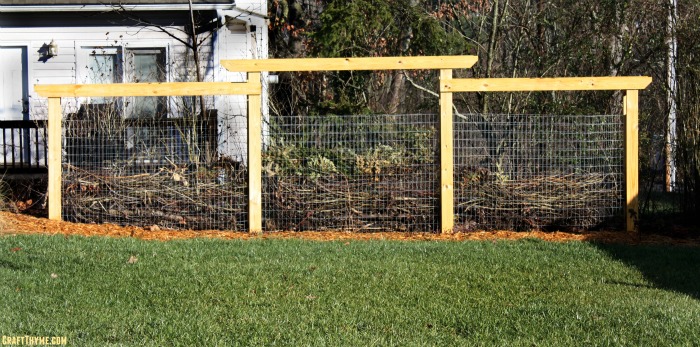
Do note in some cases soil can just be horrifically terrible. You really might consider bringing in some commercial garden soil. I did! You can see we excavated all the grass, dug down some and raked. Call it lazy man’s double digging except that it wasn’t lazy. We had to use a mattock just to get the gravel and grass excavated. As you can see here we added about 4 inches of new soil. I really hate the pre-fertilized kind but I ended up getting some on such a deal I went with it. The reasons I have for disliking this type of commercial dirt is the fertilization benefits are fleeting. Good garden soil traps nutrients around organic matter, but the nitrogen in this commercial mix will used and washed out before the growing season is even over. However, I have a nice pile of compost and chicken bedding just chilling in the back for use later in the summer. I’ll start adding handfuls when the plants get a bit bigger. These bags of soil are just the base for many years of planting.

Sometimes you just have to bring in better soil to correct a garden
FYI, it takes way more soil than one would think to fill in a bed. Make sure you are using garden and not potting soil. Potting soil will dry out way too fast for your garden.

Protect Your Soil/Work Investment

You will need to protect your carefully dug and amended beds. You can keep nutrients from leaching away by covering non-growing areas with mulch. I tend to mulch after by seeds have turned fully into plants. The mulch will reduce weeding, runoff, and wind exposure. It also works to maintain moisture levels. Though with my heavy clay underbase this is not nearly as much of a concern once the plants get larger. Additionally, making permanent paths will keep you from compacting your planting areas by trouncing all over that painfully dug soil you just created. Remember to step lightly and reduce compaction whenever you can.

Bonus Tips

Once you have a good soil base established you can go crazy and start adding in some fun items. I tend to buy legume inoculates for any bed I have never planted peas or beans in. Legume what you say? Yeah you can actually buy bacteria to put in your soil. Rhizobium leguminosarum (Do not ask me how to pronounce that) works with legume roots to fix nitrogen into the roots. They actually add nutrients to the soil. I make sure to either leave the roots or compost the entire pea/bean plant to get the nitrogen back into my garden. You can buy worms, nematodes, minerals (Calcium is great for tomatoes and squash), and all kinds of fun things for your soil. Experimentation shows some benefits, but really you will be pretty good to go with just your basic soil/organic matter mix! If you do want to experiment here are some of my favorite addons (affiliate links to follow)

Legume Inoculate: 

Worms:

Lady Bugs:

Remember the keys to good soil:

  • Mineral
  • Organic Matter
  • Moisture
  • Air
  • Living Organisms

Dig it the first time and add those organic materials and let nature do the rest.

Posted on 11 Comments

How to Plant Like a Pro

How to plant like a pro and maximize your harvest with proper plant spacing

Want to know the trick to maximizing planting space like a pro? Just Say No To Rows and learn how to plant your garden. Yep, I said it. Put the hoe down, the tiller away, and stop with the traditional rows. It is the number one mistake home gardeners make! Why? Because it is labor intensive and more importantly, a waste of useful space that you could be growing food or flowers.  Plant spacing is key to maximizing your harvest.

How to plant like a pro and maximize your harvest with proper plant spacing

There are a number of techniques out there to plant your veggies and flowers in a non-row method. The biggy you will always hear about is ‘Square Foot Gardening’. I have actually checked the book out of the library and read the whole thing. Personally, I think it was a great guide on spacing plants, but I don’t subscribe to his method of soil creation. Peat is just ick to use most of the time. Not to say I haven’t used it from time to time, but I prefer not to do major applications with peat. ANYWHO, I’ll get off my peat soapbox and continue on to the important stuff. How to plant your garden in a meaningful and efficient use of space. This technique works with raised beds or in ground plots!

How to Calculate Plant Spacing

First thing to do is look at the back of your seed packet. You can read in detail about what you are looking for in my other post Seed Packet 101. Find the information about plant spacing. Ignore the row spacing. I saw you looking at the row spacing! Stop that right now :)

Have you found your number? It could range anywhere from 3″-24″ (3-60 cm) or more! You are going to take that number and divide it in half and place it like spokes on a wheel around your plant. So an eggplant that needs 24 inches would get planted with 12 inches on all sides. I tend to visualize a circle around the plant. Then just lay those circles out in a grid form. Yes, it is that easy!

Planting distances based on plant space from seed packet

BUT Wait! There’s More! (Infomercial voice)

There are a couple of things you need to think about before you start planting away. How to weed and how to harvest. Weeds are a fact of gardening life; if you use the above planting method they will be much lighter than traditional rows, but occasionally you are going to need to reach down and pull one out. So guess what that means? Your 6ft X 6ft (2m X 2m) bed? Yeah… You are barely going to be able to reach in the middle. (And yes, I might just have one of those). This is the reason you often see raised beds in 3ft increments. That is the usual distance a human can easily reach from one side. Let us pretend that you ended up with zero weeds, again, you will need to think about being able to reach and harvest your glorious tomatoes and plots of thick spinach. No one likes that smell of rotting squash in the middle of the patch. Yuck! (sometimes I have been known to get lazy on the harvesting)

Perhaps you have a traditional row garden plot. NO WORRIES! You can still use the same space. Divide the area into three foot sections and leave 2-3 ft (1m) pathways between the planting sections. Bonus points if you throw mulch on the pathways to keep yourself from having to weed and hoe the compacted garden paths. BTW, if you noticed I mentioned not tilling at the beginning. Once you have your happy soil you won’t need to be digging these beds and pathways up all the time. I get into more detail on establishing your soil and beds in other posts.

Grid It Out

Let us assume we have a prepared planting soil/space and we know how much space our plants need. The easiest process is to start plunking those puppies in a nice straight grid. Of course this is assuming you have vegetable or flower starts ready to go. Frankly, I plant a lot of veggies and flowers straight from seed into the ground. It gets a little trickier here to get good germination and clear spacing. Frankly, I am willing to waste a bit of seed, especially when it comes to tiny ones like carrots or cabbage. I am just too lazy to carefully plant out 2-3 seeds in each grid space. So I make mini-rows spaced correctly from each other and lightly spread seed down them. Then I just go back and thin the rows by cutting off the un-needed seedlings when they get 2-3 inches high. So why are we planting like this? We can get so many more vegetables in a smaller space. Let us use an example because we love the maths:

We have a 3 ft by 6ft bed (1m X 2m). We want to plant beets (I am the only one in my house but I freaking LOOOOOVVVVEEE beets) The package says row spacing 12 inches and plant spacing 3 inches.

Standard Row Planting: 72 beets (3 rows of 24 beets)  Why beets?  Because I freaking love beets!  This (affiliate links to follow) Rainbow Blend from Sow True Seed is my absolute favorite.  Do yourself a favor and order them today!  You can plant them throughout the summer.  Plus beet greens!  Anyway enough about beets…
Grid Planting: 288 beets (plant 12 across and 24 down. Isn’t that number beet-uiful?!)

planting-grid
Straight grid versus offset planting. Both are superior to row planting to get the most in a small space.

The thing about numbers is they don’t usually lie. I used to say numbers never lie and then I worked in Business Intelligence and saw how people massage numbers… But for gardening 288 beets sounds a lot better than 72, well, if you like beets. Additional bonus from planting in this grid method? Whenever the vegetables get bigger their leaves shade the soil cutting off many weeds and maintaining soil quality from erosion. Less weeds = less weeding!

I learned a technique to completely maximize this planting structure. I have used it before but gotten lazy in the last bit and pretty much default to the grid. I often have too many vegetables to use and end up giving loads away so I no longer plant in an offset method. This technique is part of a full biointensive method of planting that is a lot more complicated and involves things like root depth etc. I’m not going there, it is hella fun to plan out and do, but it takes a lot of calculation and work. BUT this small portion is easy to adopt: instead of gridding off your plants you can use those circles to offset each plant squeezing just a few more inches into each bed. Additionally you can tuck in plantings to really cram those plants in there. That means if you have plants that need a lot of space like tomatoes, you can tuck in basil along the edges of the plantings. Personally I love to shove a few flowers, especially marigolds, in any extra room I have. It just makes the vegetable patches that much more attractive.

So what have we learned today? STOP the rows and plant your vegetables in a efficient layout.

Math is on your side and you can get so many more plants in a small place than you can with traditional row crops. Take a grid or offset method to get lots of veggies, but make sure that you remember to leave room for weeding and harvest.

Posted on 122 Comments

How to Make a Chicken Dust Bath

Why you should make a chicken dust bath for your flock

So would you like to know how to make a chicken dust bath? Or even why you should provide a chicken dust bath? While, we aren’t chicken newbies anymore we still have a lot to learn about chickens. One of the things we completely missed the boat on was that chickens need to bathe. But they need to do so in dirt! I saw a picture on Pinterest of chickens laying in tires full of dirt. It was kind of an ah-ha moment as I have often observed our chickens digging holes in the run, flinging wood chips all over their selves, and then laying in the sun. Honestly, I just kind of thought my chickens were weird (and a bit lazy) and didn’t realize chickens take dust baths until I started researching it.

Why Do You Need a Chicken Dust Bath

As with everything in life, I had to over research the hows and whys of chicken dust bathing. But hey, Dear Reader, this works out for you. Chickens naturally take dirt and dig loose holes in dry soil. These soil divots are then used to fling the dry dirt all over their bodies. If you watch they will roll, flap their wings, dig, and fling dirt everywhere. Our coop is built on a concrete pad, so while there are lots of wood chips we do not have a lot of soil. I think many chicken owners who build runs with the deep litter method are in the same boat with chickens kicking up a lot of wood chips on a regular basis.How to make a chicken dust bath for your flock

But the dirt is key. A dust bath supplies chickens with a way to clean excess oil from their feathers and remove pests like mites from their feathers and skin. The chicken dust bath consists of them kicking up dirt, rolling, and flapping their wings in an attempt to coat dust all the way down throughout their feathers. The dirt soaks up oil (Picture one of those lovely mud masks ladies wear on their faces) and the grit knocks pests loose. Additionally, dust bathing is a social activity with hens. They do the activity together, often preening and napping as a flock afterward.

How to Make Chicken Dust Bath

Great! You now know why you need a dust bath but what does that look like? Well I can tell you from painful practice that if you do not provide one, the chickens will supply one for themselves. Ours are constantly digging up their run, toppling water, and generally making a huge mess! As a stop gap we are making a small dust bath out of a galvanized tub. Once we are finished with the chicken coop extension we bought an even larger tub so that multiple chickens can use it together. It is quite simple to make one you just need two items:

A Box & Dirt!

But you can make better and more attractive dust baths with a few more options. We found some attractive galvanized containers and worked to make a dust mix. All items we purchased ourselves but the links below may be affiliate in nature.Why you should make a chicken dust bath for your flock

Chicken Dust Bath Supplies

Galvanized Tub
Organic Garden Soil
Sand
Diatomaceous Earth (FOOD GRADE ONLY)
For a 5.5 gallon tub I add about 4-5 inches of depth in material. It is almost a 50/50 mix of sand and soil with a cup full of diatomaceous earth. Research shows that many people substitute sand or soil with wood ash. Also the use of diatomaceous earth can be conversational. Often used as an organic pesticide, the product is made of mining deposits of small fossilized sea creatures. It is microscopically sharp and causes insects to die by slicing them up. To humans and chickens it feels like soft talc powder. It can even be eaten (though I am not exactly sold on this idea) and is safe for kids and pets.

Some people worry that it can cause respiratory distress in chickens. I personally weighed the benefits of pest control and decided to add a bit to the bath. I live in a city limits and have to keep the ladies in a run most of the time. Closed up chickens are more likely to contract mites and pests. I try to give my girls lots of space and keep a clean coop to minimize this but I opted for a little additional aid in their bath. If you go with the diatomaceous earth feel free to tell me how we are supposed to be pronouncing it!

edit: Thank you kind readers.  I can now pronounce diatomaceous in the finest of company.

I went ahead and ordered the big bag with the thought that the cost was so much cheaper per pound and I could use this to combat slugs and the godforsaken sugar ants. Let us not get off topic about the ants! Unless I decide I really do want to start eating it or making tons of facial scrub products (yep it is good for that too) I probably have enough for years of dust baths! So the investment will be minimal.

Our New Dust Bath and Future Plans

Why you should make a chicken dust bath for your flock

The new dust bath was a hit with the ladies. Well after they decided the galvanized tub did not signal their impending chicken doom! The pros of putting it in a container is that I can make sure their is a nice clean mix that doesn’t fill the run with mud. Additionally I think it is attractive. The con is that it takes the social aspect of dust bathing away from the chickens as it only fits one or two chickens at a time. Our plan is to add this 15 gallon tub in the extension. We already purchased this bigger version and will add it to the coop when we have the space.

In the future (like next house/farm future) I would love to have free range chickens with fancy dust bathing areas like the versions you see on Pinterest. However, making one in a container is so easy I can’t believe we didn’t do it sooner. Of course it would have helped to know they existed :), but now that I know how useful and healthy a chicken dust bath is for my flock I plan to keep them well supplied.

How to make a chicken dust bath for your flock

Posted on 14 Comments

Building a Composting Fence

Finally an alternative to compost bin plans! Detailed instructions on how to make your own composting fence.

Do you have excessive yard waste in the form of tree branches, long grasses, leaves, annuals, and flowers past their prime?  We sure do!  With the veritable brush jungle behind our home, regular pruning of trees, a relentless landscaping habit, and the endless results of “being a good husband” – aka dead flowers – we’ve built quite the pile of yard waste in our back yard with no real plan of what to do with it.  After all, what do you do with a heap of dead, slow to decompose material? Composting fence!

Some time ago, Brianna came across the concept for a “composting fence”; a landscape architecture concept that would modernize your large, long-term compost pile.  With her birthday just around the corner, I thought that I would surprise her by taking a day off work and building it for her.

Plans for our composting fence.

As it turns out… this project isn’t really doable in a single day. But I get a pat on the back for effort, right? Keep reading to find out how to build your own!

Composting Fence Supplies

  • 60-in x 50-ft Silver Galvanized Steel Welded Wire
  • 4 – 4″ x 4″ x 96″ Treated Lumber
  • 1 – 2″ x 4″ x 96″ Treated Lumber
  • 1 – 2″ x 4″ x 120″ Treated Lumber
  • 12 – 5/4″ x 6″ x 120″ Treated Decking Lumber
  • 3 – 50-lb Fast Setting Concrete Mix
  • 2-1/2″ Exterior Wood Screws
  • Staple Gun & Staples
  • Metal Snips (In Some Cases)
  • Drill
  • Saw

Cut List

  • 2 – 4″ x 4″ x 66″
  • 2 – 4″ x 4″ x 78″
  • 2 – 2″ x 4″ x 48″
  • 2 – 2″ x 4″ x 60″
  • 2 – 5/4″ x 6″ x 120″
  • 4 – 5/4″ x 6″ x 102″
  • 4 – 5/4″ x 6″ x 62″
  • 4 – 5/4″ x 6″ x 84″

Brianna Here: I’m jumping in on Adam’s post because he has been busy building an under-deck storage area, planter boxes for a shade garden, and a chicken coop extension. Plus he didn’t actually get this done in a day sooo… I was there for a lot of the process. Here is reason #1 you can not do this in a day.

Step 1: Digging It?!

You are going to need to dig post holes. And then pour concrete. If you do not have post hole diggers see if there is someone you can borrow them from. We found a neighbor who let us borrow his for a long time. However, we keep doing projects like espalier of fruit trees and kiwi trellises so we just opted to buy one. Dig around 18″ deep, put in your post and level it. It is helpful if someone can hold it while another person pours in the fast dry concrete. Pour water in with the concrete and then wait. You are going to need these posts to be FULLY set before step 3.

Learn to make your own compost and bin detailed directions on making a compost fence.
We are leveling these posts after a few steps because we realized we needed concrete. Follow the directions and learn from our mistakes!

Step 2: Cutting

While you wait for the concrete to dry you can go ahead and make all of your cuts for the composting fence. You might be wondering what all this wood is for, however, you are going to use this wood to cover your stapled wire and make an attractive pergola-like top. We had plans to plant grapes at the bottom and use the top as an arbor. Additionally we hung some bird feeders above to attract more wildlife to the yard.

Step 3: Tug, pull, and curse

Unroll your welded wire and get it flat as possible. I personally worked on this while Adam cut lumber. He also added a 2X4 spacer to one side of the post. This gave closer to 6 inches of space between the wire for twigs and yard waste to be placed. When you begin unrolling the wire I suggest gloves as the ends of the rolls are sharp. I can not offer much advice other than rolling the wire face down and manually flattening as you go. It is a PITA, but the flatter you get it the easier the installation goes.

The reason that you want to wait until your posts are FIRMLY set in the ground is that you are going to need to attach the wire and PULLLLLLLL. I picture a ships-master whipping the rowers yelling ‘Pullll Damn Ye’. Anyway, take your wire cloth and line it up near the middle of your 2X4 attached to your post. You want to cover enough wood so that you can get a firm staple, but remember in the end the post will be totally covered so don’t waste a lot of expensive metal by covering your posts. We pulled the metal and figured out the minimum needed to staple it to the next spacer-post then cut the metal. We had to work in sections as our ground was not flat. Also getting more than 6 feet of this stuff straight at one time is a nightmare. I believe if you had a nice level yard you could probably just pull it straight across and skip the cutting, but that was not in our cards.

Learn to make your own compost and bin detailed directions on making a compost fence.
Note the red level on the wire! It comes in handy.

Here is where the partner comes in really handy. One person can pull on the attached sheet of metal while the other checks to see if they are close to level. Then that same person can staple. Pulling the metal helps get it taunt and reduces the bowing. Note I say reduces! We were not very happy with the wavy look when you peered down the length of the fence at first. However, in the final product this didn’t matter. I’ll explain at the end!

So you will repeat this process 5 more times if you are making 3 sections. As you will need put the metal cloth on both sides of the posts to make a channel that can be filled with your yard waste materials. The hardest part of this was getting everything around the same height and keeping all the metal squares in nice straight verticals. Let’s just say there were some potty words spoken over this particular process. These words may or may not have been used to describe peoples prowess with a level and/or their strength when pulling metal.

Finally an alternative to compost bin plans! Detailed instructions on how to make your own composting fence.

Step 4: Adding your decorative ‘Skin’

At this point you are going to add the decorative finish and height to the arbor over the composting fence. Take your long boards and screw them to the front and backs of your posts. We wanted a variable height so the longer ? length went on the fronts and backs of the two middle posts and the ? lengths went on the ends. You are going to be placing the boards over the stapled metal so feel free to really drill those screws in tight. It will act as an additional layer to secure the metal to the post and hide the unsightly seams.


When your now taller posts are in place take your crossbeam of 10 feet in length and attach that to the front and back of each middle upright. Adam, cut each of the ends at an angle for a nice decorative finish. The middle crossbeams will have the angular cuts on both sides. These are the hardest to place as you want to make sure to have the same overhang on both sides. Just measure the difference to insure an equal overhang on both sides. The other two crossbeams will only have a decorative touch on one end. The flat side will be easy to install as the straight cut will go flush to the edge of the middle posts. We installed our outside arbor sections about a foot down from the one in the center. We chose this height as we thought it was the most visually attractive result.

Learn to make your own compost and bin detailed directions on making a compost fence.

Step 5: Additional Bracing

This step is optional but we added additional bracing between the crossbeams. We did this for two reasons, first to create a place for vines to grow, and secondly provide a place to add hooks to hang bird feeders. I felt like the additional bracing made the entire structure more sound as well. To create the bracing we simply cut some 4X4’s and slotted it in-between the middle of each section and screwed it in place. The cut piece of wood usually fit tight enough between the two boards that no one needed to hold it when screwing, but it might be handy to have a partner to hold when securing it.

The Final Product

Finally an alternative to compost bin plans! Detailed instructions on how to make your own composting fence.

Unlike a regular composting bin we are not expecting to pull compost out of the composting fence. The added yard waste is for creating a screen and should slowly feed the soil at the base. So far the various layers of sticks and leaves are miking for a really interesting and attractive backdrop. I can’t wait to see how it looks when I get green vines growing up the arbor!

So now is the time to discuss the bit of waviness to the metal. First, we are not usually looking down the fence line. When you look straight on the fence you do not see it. Secondly, as we added lots of wood it filled out the metal making everything much more taunt. I have been quite happy how everything has held up over the winter. To complete the look we created a bed in front of the fence and planted flowers, cranberries, raspberries, and two grapes. The bird feeders have been a huge hit. I have seen so many more cardinals, jays, and finches flitting about the yard. I am really hoping they will help control the insect population this year in the garden. As birthday presents go this composting fence has been wonderful! It has created a nice windscreen, arbor space, and place to deposit yard waste, all while covering the unattractive brush berm between us and the neighbors. I’d call this project a win for the garden in so many ways.

Learn to make your own compost and bin detailed directions on making a compost fence.

Posted on 12 Comments

Hardy Grape Kiwi: Plant Porn

Did you know there was such a thing as a grape kiwi (aka baby kiwi, kiwi berry, or hardy kiwi)?! Is it possible to get almost fan-girl squeely over a plant? Did you know that this kiwi not only comes in green and red, it grows in temperate zones? Oh yes folks! I can grow a kiwi in zone 6. A teeny tiny kiwi that you do not even have to peel! There are actually larger hardy kiwi’s, but this post isn’t about them. This is about the adorable grape kiwis.

Grape kiwi size comparison, Image by Hiperpinguino, CC License
Image by Hiperpinguino, CC License.  Check out the tiny kiwis in front for comparison

The Low Down on Grape Kiwi’s

Grape Kiwis are a hardy kiwi type (Actinidia arguta). Say ak-ti-NID-e-a ar-GU-ta three times fast. The tiny kiwi’s grow in groupings that look much like grape bunches. They have thin edible skins and come in the traditional green kiwi color and also a red shade. Descriptions of the fruit are sweeter kiwi flavor with hints of pineapple. Yum!

These vines likely originated in Japan, China, or Russia which means they can survive temperatures of -34. Yippy for zones 5-9! Many of the cultivated vines you can buy have been bred in Russia, which, seems kind of cool. Maybe even give me some garden cred: “Check out my special Russian Kiwi!” I always picture scenarios where I am showing my lawn off to other gardeners… When in reality I am pretty sure I drive everyone around me nuts with my love of plants.

Annanasnaja kiwi from Raintree Nursery
Image from Raintree Nursery. I am thinking of buying these Annanasnaja kiwi

The deciduous vine grows glossy green leaves with scented white flowers. In perfect conditions you can have a 20 foot vine in a growing season so careful trellising can give you an ornamental attractive vine. Sitting in the shade of softly scented vine sounds like a summer pleasure to me. Bonus, the flowers and scent should be attractive to butterflies. Fruit should be ripe in the fall for fresh eating.

Edit: I just ended up buying these three kiwis!  I can’t wait to see how they do*:


How to Grow

Alright, there is a downside to the grape kiwi or maybe an upside depending on your space. You need to have at least 2 vines. Male and female (romantic lover vines ;)) are a must if you want to produce the fruit. Luckily one male is up to the challenge of pollinating anywhere between 6-8 female vines. That means you can have a red grape kiwi and a green grape kiwi and one male will work for both of them.

I have read conflicting information on how far to place the male and female plants away from each other. Most information points to one male being able to pollinate 8 female plants. You’ll need to space these suckers out because if they have the right conditions a single vine can grow 20 feet in a year. WOW! Sounds like a great way to make a vining screen, just remember they are deciduous so all the leaves will disappear in the winter. The recommended spacing is 10 feet apart. I personally am going to plant mine much closer, but I am into backyard orcharding so I plan to prune, prune, prune to keep these babies in shape and in size. WHICH! Is highly recommended. Do not forget this is a vigorous plant that grows for years. Have a sturdy trellis! We built one with 4×4 posts in concrete. Additional bracing to match our composting fence and 14 gauge wire with tightners (turnbuckles). This puppy is going no where.

Planting itself seems a bit finicky. Like every plant under the sun it needs organic, well draining soil. BUT unlike most plants this one NEEDS it. Apparently, they originally grew in forest type settings and are used to having a lot of organic matter and trees to climb. Additionally, heavy wet soils contribute to crown rot. On top of that site selection is muy importante to this plant if you want to get fruit. Sure they are hardy, but their spring growth is very frost sensitive. So you are going to need to find a location that keeps it cool as long as possible so it doesn’t come out of dormancy till the last minute and still gets full sun. Sounds like fun right? So here is my plan to place this plant in a zone 6b-7a. The mountains of Western North Carolina where I am assured to have 80 degree weather followed by a snowstorm in spring and I somehow managed to have a house built on a clay shelf so I have to deal with basically everything that will make this a PITA to get going.

  1. Dig a much deeper hole and put lots of soil amendment (tiny bark shavings) at the bottom. Layer in dirt and compost and plant the kiwi plants slightly above the ground line. Hilling them up will help with the drainage but I am going to have to remember to mulch the hell out of them in fall to protect the first year roots…
  2. The trellis site is on the southwest side of my house set slightly back. That means that it gets shaded in the mornings and some even in the afternoons but gets some amazing direct light during the day.
  3. We are going to use the male to train on our porch to the west side. First, he doesn’t have to be quite as protected. Secondly, you can prune the heck out of him. He just needs enough growth to set flowers. Finally, we will get the added benefit of some shade in the afternoons where our porch mostly bakes. In the winter we will still get the warm sun since the vine will lose its leaves.

I’m game to try these grape kiwis though from the planting info they seem like they may need a little extra care than a beginning gardener might want to try. Just being honest, I’m a tiny bit nervous about this purchase, but almost everyone agrees that if you can get them off to a decent start they are easy after the first year.


Image from Hiperpinguino, CC license

Kiwi Berry Care

Assuming that everything grows off without a hitch (Get it? har, har, har) the care is not that big of a deal once you get them established. Pruning the growth if you have a small space becomes incredibly important. You will want to train a central vine and then let it umbrella shape from there. Once it gets to the top of your trellis cut it off and focus on keeping it that height. The first year or two prune for shape and prune regularly throughout the growing season. Tie the main branches to the trellis to keep them from getting wound around. Small branches can twine without worry of causing bad growth later on. After the first couple of years you can read in depth articles about the best way to develop fruiting wood. Lots of opinions out there, but by that time you’ll be a seasoned kiwi grower able to experiment with different choices. Sources disagree on how long each variety takes to set fruit. I have read anything from year 2 to year 5! So I’ll update this with my own experiences later. Remember that it likes a lot of organic matter so side dress with compost regularly throughout the growing season and in the fall and spring like other fruit trees and bushes.

Once you get past the initial hard phase of growing hardy kiwis the vine is supposed to last for years and years. Just prune, fertilize and repeat. Flowers will set fruit that ripens September through October depending on variety.

So, I’m set to try my hand at growing a grape kiwi. This hardy plant should be good to go if I can get it established. Wish me luck on my tiny, hardy kiwi experience.