Creating your own paper bag book covers is as simple as this 4 step how to. Of course, I am way past my school years and my kids aren’t quite to the ‘back to school’ point, but the back to school fever got me thinking I needed a decorating refresh before I start putting up Halloween items. I used the basic paper bag book cover and then embellished it. The tape based embellishments work perfectly to reinforce the covers for students and decorate the covers for me.

Supplies (Not Shown, because I think we all know what a ruler looks like)
Paper (paper bags can be split at the seams and laid flat, thick craft paper works just as well)
Ruler
Scissors
Pen or Pencil
Decorative Tape (for embellishing)
Step 1: Can you trace?
Lay out the book on your paper. If the paper is decorative make sure the ugly side is up so you can mark on it. Open the book in the middle so the spin is wide open. Trace around the edges.

Step 2: Add Allowance
Place the book off to the side and grab the ruler. Add about 1.5 inches along the top sides of the tracing and 4 inches along the sides. No one is going to come mark you down if you fudge the measurements a bit.

Step 3: Cut and Fold
Cut along the allowance you just drew. Fold the top and bottom inward along the original book line you traced.

Step 4: Putting the book into the grooves, fold, slots, pocket… Whatever you want to call the paper thing you just folded.
Take the book and open it back up to one of the covers. Align that cover with one of the sides you traced. Take the edge of the paper and start feeding the cover into the folds you made. Feed enough in until you are close the the original tracing line. Then close the cover, flip the book over and repeat on the other side. You will get the sharpest crease if you pull the jacket over the closed book and kind of crease it along the edge before feeding the cover into the slots. (see the last image)
Voila you are done!
Embellish
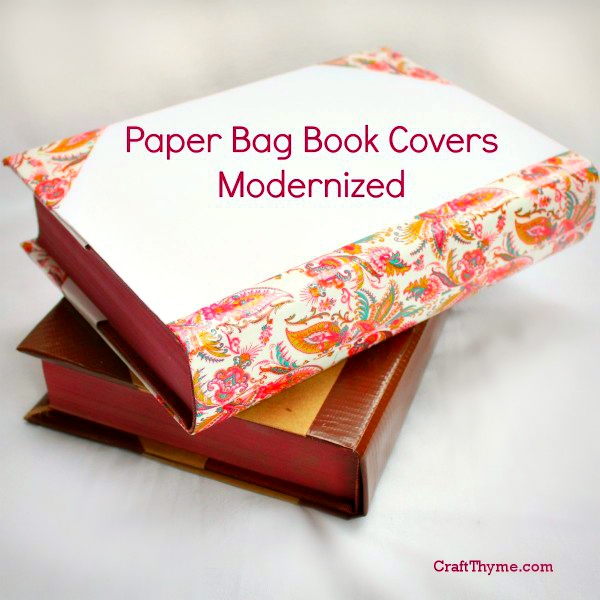
I always remember how my book jackets would tear at the corners and bottom of the spine as a kid. To solve this and add some pep to the cover I took decorative tape and covered the spine and sealed the corners.
The ‘classic’ bag paper book is edged in faux leather aka brown duck tape and the ‘modern’ white book got trimmed in paisley duck tape.
Enjoy these articles? Get periodic updates by joining my mailing list (no spam, no way, no how) or subscribing to my RSS feed.
See more great crafts and decor at these link parties: Craftberry Bush, Young and Crafty, Craftionary, Pin Junkie, The Jenny Evolution, The Stitchin Mommy, DIY Vintage Chic, By Stephanie Lynn
these are so fun! I am going to try them out this weekend! thank you!
Hope they turn out well!
Thanks for linking up my Friday Flash Blog on The Jenny Evolution. I’m back from vacation in central Colorado and ready for a great party this week. See you there!
Jennifer
thejennyevolution.com
Lovely! Great tutorial too! :)
Thanks for stopping by!
Great idea! The paper bag looks is sooo out. ;) Stop by my Friday’s Five Features and link up this post (and others)! http://diy-vintage-chic.blogspot.com/2013/08/fridays-five-features-no-4.html
I mean totally? Kids these days need some pizzazz. Thanks for the invitation.
Thanks for stopping by DIY Vintage Chic’s Friday’s Five Features and Fun Festivities. Don’t forget to stop back by this Friday!
This is plain COOL! I have a bunch of kraft paper that I want to put to use. I know now ;)
Visiting from the linky party at Happy Go Lucky!
Cheers,
That is just a plain awesome comment. Made my day! Thanks.
I used to make book covers in Jr.High to cover up old text books. These are so pretty. Great idea to reinforce the corners with decorative tape. Great photo tutorial.
I am so glad you enjoyed! Thanks for stopping by.