Hi folks! Today we are going to learn more about a method of easy seed starting. Why? Because for years I have offered lots of utilities to help you start seeds. Guides to find the perfect time to start seeds, guides to get the most from your seed packet, guides to manage your seed inventory. What have We never offered you? A practical method to actually start seeds and grow them into healthy plants!
In this post you will learn why you WANT to start plants from seeds, how to get them going quickly, and how to avoid all the pitfalls you will want to most definitely, well, avoid.
If you aren’t looking to start seeds this year, no problem! We often use starts (plants already started) so we won’t judge! No snobby gardening here; plus we have lots of other gardening, DIY, and DOING advice. Follow along on our Instagram for our latest projects.
Now Let’s make Seed Starting Easy: Prep Time
You do want to save money, plant hard to find and unusual varieties, and have the healthiest plants? Then seed starting is for you. Starting your own seeds means you can order amazing varieties you would never see in the grocery store! Did you know pink striped celery is thing? How about white tomatoes? There are so many amazing fruits and veggies you can order from catalogs that you would rarely find as starts. Even more exciting, when you start your own plants you control the conditions so that you get healthy, disease free, starts to place in your garden. Sold? Great lets get started:
Materials Needed:
- Seed Tray
- Peat Pods
- Seeds
- Towel
- Paper & Pen
Optional materials:
- Heat mat
- Fluorescent or LED lights
Easy Seed Starting: Get green by being clean
The first step to seed starting is being clean! I like to reuse my trays from year to year and you can too! It saves money and keeps the plastic trays out of the trash. Just start by killing any left over fungus or pathogens. Kill. All. The. Things. (Which is odd because I am generally all for being around bacteria). However, in this case, even if I am buying new trays I may clean them if they have been sitting around a lot of other gardening supplies. You have a few options for cleaning the trays but they all start with good old fashioned:
- Soap and Water (don’t knock it till you try it)
After that it is up to you how much of a nuclear approach you want to take. If you had any issues with fungus or other problems the prior year you will want to do one of the three in order of severity of your problem:
- Vinegar: Splash on all the surfaces and let dry
- Peroxide: Splash on all the surfaces, rinse, and let dry
- Bleach & water: Dilute bleach if you are going with this option and make sure to thoroughly rinse the trays before drying

Medium Matters
While your trays are drying it is time to prep your seed starting medium, also know as soil. Except it isn’t really soil… There are as many opinions about seed starting mix as there are recipes for the perfect hamburger. However, there are a few rules everyone tends to agree on.
- Made of fine particles
- Neutral Ph
- Free of pathogens (otherwise all that cleaning is wasted)
- Not full of nutrients
I know number 4 seems odd. Why wouldn’t we want seeds to start in a nice fertile environment? Seeds include all the nutrients the plant needs to get established. Additional nutrients in the soil only serve to attract baddies like fungus that will compete with your seeds! Once they are up and established as plants with true leaves you can bring on the good, nutrient rich, stuff.
Since this is EASY seed starting I am going to give you my tip. Just use the peat pellets (shame, shame, shame). You have plenty more years as a gardener to angst over the environmental impact of peat, to research perfect balance of sanitized soil and coir, and discover seed blocks.
For now: Soak those peat pods in a large bowl of warm water.
Pre-soak the peat pods to make seed starting easy. This way you are sure that all of the pods are evenly moist, without being water logged. I have been lazy and soaked them in the tray and it makes a big mess, half don’t get inflated, and the other half are dripping wet. Yes, you have to clean one bowl afterward, but come on! You can do it!

Time to Plant Those Seeds
Gather all the seeds you plan to put in the tray. Make sure one tray is going to hold mostly plants that will go out in the garden at the same time. You will want to do this for a couple of reasons:
- It is easier to keep track of when you started the seeds and when they need to go outside when the entire tray is pretty closely related. For example all of my cabbage, broccoli, and cauliflower will all be started together. Their outside plant days are similar. (Pro tip: If you need help know when to start and when to plant outside we have the automatic calculator just for you)
- The plants tend to have similar growth rates. If you start a lot of unrelated plants together in close quarters you really have to make sure your summer squash don’t overrun your pepper starts. True story, the cucumbers will overrun everything, every time. They are the dicks of the vegetable start world.
Now that you have your clean tray, selected seeds, and pods make sure to keep that towel and paper/pen handy. You will be labeling the tray as you go. I know you are totally going to remember exactly where you put each seed, right? Wrong. Unless you have some amazing photographic memory you are going to be trying to puzzle out if that is cabbage or kale when they first start growing. Remember we want this to be easy seed starting.
Planting Seeds in 4 Easy Steps
Step 1: Lay out a row of pods
Generally I plant 6, 3, or 12 pods depending on what I am starting and how much my family will eat. When I am laying out the tray I always put 6 or 12 pods out. Want the real reason? My tray is set in blocks of 6 and I got tired of doing maths and figured if I really wanted 4 then I could either take 3 or plant 6. I’m lazy calm like that and you can be too! Just figure out small increments and lay out the pods you need for one to two types of plants. Do them in small increments so that you can:
1. Document what you planted
2. Keep from cross contaminating pods with other seeds. You don’t want poppies in your tomatoes.
Step 2: Dry your fingers
Step 2 seems like a no-brainer, but it is worth mentioning. You are about to pour some seeds into your hands. I guarantee that most of the time you will pour too many seeds out. If the seeds are nice and dry then they can safely go back into the packet when you are done. If your hands are damp you can ruin the entire packet of seeds. How do I know this? Because I have done it. Dampness = sprouting = lost packet of seeds.

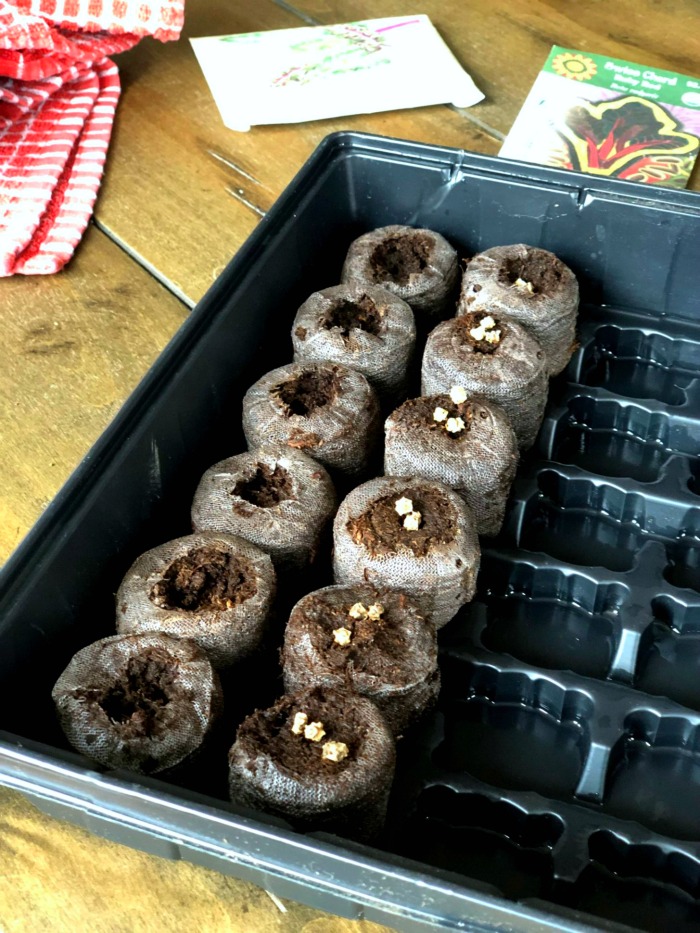
Step 3: Plant some freaking seeds!
Yes you are finally there!!! It is time to put the seeds in the peat pots. Start by laying the seeds on the surface of the pot. Put a few extra to insure every pod germinates. How many depends on the size of the seed. Large seeds like nasturtium might get 2 to a pod, while small seeds like cabbage might get 4 to 6. You want to insure germination but leave enough seed to replant when the groundhogs invariably eat all of my starts.
After all the seeds of a row are placed on the soil put the extras back in the pack. Then I use my fingers to bury the seeds into the peat to level indicated on the seed package. (Pro Tip: Need help interpreting your seed package? We have instructions for you)

Step 4: Document
I know I already said it, but use that paper and pen to write down what you just planted. Just draw rectangles for each row or half row you plant. Why do I stress this so much? Because I have totally and completely messed this step up soooo many times. I have a lot of experience with plants so I can figure out which type is which when I forget to write them down but ask me to tell you which one is the large tomato versus the cherry tomato. Then you just gotta sit there and wait till it makes fruit. *le sigh* I am saving you from you!

Now What?! Heat, light, and water
Turn up the Heat
Heat? What? Yeah, this was a trick I learned waaaay later in my seed starting life. Guess what? Seeds such as peppers and tomatoes really need warm soil (75-80 F) to get the best germination (i.e. when the seed pops above the soil). I can’t tell you the number of times I would start my peppers and tomatoes on a certain date but then they would take forever to germinate and throw off all my timing. So if you keep a cool house then allow plenty of extra time for those seeds to germinate OR get a seed mat. A seed mat will keep your seeds the perfect temperature. BUT remember some crops like cool soil too! Here is a handy chart by the University of California that gives you optimal temperatures.
Light It Up
Now that we have the seeds all tucked nicely in their perfect temperature, soil beds they are going to need light. And lots of it! You can make do with a super sunny window sill or a small plastic cold frame/greenhouse, but make sure to constantly turn the trays, watch for signs of legginess, and monitor temperatures. I am telling you right now getting a light is sooooooo much easier. You can get fancy led grow lights or a simple full spectrum fluorescent. I went cheap on the fluorescent but often think of upgrading to those grow lights… Anywho, enough dreaming. Put the trays super close to the the lights and move them back as the plants get bigger.

Water is Key
Finally, you need to keep the seeds evenly damp. Not soaking wet, but certainly don’t let them dry out! Even moisture will help them get started but keeping them water logged can choke roots and lead to fungus issues.
See how easy was it to get the seeds started?!
Additional Resources
Here are some additional resources to keep your garden growing:
Seed Starting Calculator and Guide
