Posted on 2 Comments

Best Places to Order Heirloom and Organic Seeds

Ordering seeds for your garden is one of the most exciting ways to find new varieties of plants you wouldn’t be able to simply get as starts nearby. But ordering seeds, especially heirloom seeds, can be overwhelming. Below we will go over the differences in heirloom, organic, open pollinated, and other seed types. As well as what factors you should consider when picking a seed company to place orders with. We have marked our top eight companies for ordering heirloom seeds so you can figure out the best place to order seeds for you and tips for making those seeds last. Finally, we have a comprehensive list of the best places throughout the United States to order heirloom, organic, and open pollinated seed. Spoiler: We are NOT affiliated with any of these companies except one. We have just spent years ordering and trialing seeds.

What Is The Difference Between Heirloom, Organic, and other seed types?

When you begin looking through seed catalogs and ordering seeds you may see a lot of different terms. It is going to be hard to select your particular best place to order seeds unless you know what type of seed you want to order. Let’s go over a few of these and explain that when ordering heirloom seeds not all definitions are the same.

  • Open Pollinated Seed: Open pollinated seeds are sees that when you grow a plant you can then save the same seeds off that plant and have it come out like its mother plant. For example, if you grow an “Amish Paste” variety of tomato and save seed from those tomatoes than you should come out with an “Amish Paste” tomato the next year. Please Note: There is a lot more that has to occur to save true seed, but being open pollinated versus hybrid seed is the start.
  • Heirloom Seed: All heirloom seeds are open pollinated and non-GMO by their very nature. There is no exact definition of what makes something an heirloom, but generally it means the seed is open pollinated, and saved seed varieties that originated BEFORE World War II. However, I will often see heirloom added to any open pollinated seed regardless of how long the variety has been in existence.
  • Non-GMO Seed: Labelling a seed non-gmo means that it has not been genetically modified in a lab. Most varieties of seed have been genetically modified by careful selection in a garden over many years, so non-GMO speaks specifically to not have genes altered or added directly through gene modification techniques. FUN FACT you should NOT be able to order GMO seed for non-commercial operations. That being said, there is a real problem with GMO drift. Corn is one of the worst culprits for accidently having GMO genes passed on. If this is an important issue to you as a garden you will want to buy seed that is non-GMO Certified. They will have tested a certain sample of the seed to make sure it didn’t accidently end up with GMO traits.
  • Hybrid Seed: Hybrid seeds sometimes get bad rap because they aren’t “pure”. Hybrid seeds come from crossing two very specific and different parent varieties to create a plant that has different characteristics than the parent plants. The drawbacks are if you save seed from hybrid plants you probably won’t get the same plant you started with. But I don’t hate on hybrids. Hybrids can offer a lot of cool properties like disease resistance or high yield that you might not be able to get out of an open pollinated type. Also, many folks aren’t equipped to both grow in a small garden and meet the necessary rules for pure seed saving (like distance). So if you aren’t set on saving a particular seed, then give hybrids a look. They can be particularly good for new gardeners as many hybrids are grown to be a bit tougher than their open pollinated cousins.
  • Organic Seed: Organic seeds can be hybrid or open pollinated seed types BUT heirloom and open pollinated seeds do NOT have to be organic. The organic label means the parent plants of the seeds had to be grown in organic certified conditions. I’ll save my rather negative opinion of the organic certification process for another post :). It is ONE method to insure you start with seed that hasn’t been around non-organic pesticide. But I personally think finding a reputable seed supplier who follows your ethics is probably a better indication.
  • Pelleted Seed: This is seed that has been coated in… something. The purpose is to make smaller seed larger and more uniform in size for easier sowing (via hand or seeder). Depending on the seed type they may use clay or some other ‘seed safe’ coating. Pelleted seed is great for carrots but it is often hard to find for heirloom varieties.
Don’t forget to find the key for each seed retailer. They will often have their own terminology when marking their seeds

What To Look For When Ordering Heirloom Seeds?

Spoiler: There isn’t going to one BEST place to order heirloom and organic seeds. But there is going to be one or two best places for you specifically to order seeds. To figure that out you need to understand what seed type you want to order (above) and some other factors.

  • Cost: Unless you are Richey McRichison cost is going to be a factor. Specialty seeds aren’t cheap. Organic designation can add to the cost. Some companies like to work with farmers or resellers and give good discounts to bulk orders. Which leads to our next consideration–>
  • Scale: Are you going to be a small hobby gardener or scale to market? Maybe even full time agriculture. Seed sellers generally cater to large or small scale. However, there are a few vendors that sell to both.
  • Location, Location, Location: One of the joys of buying heirloom seed is that it has been saved over many years. Which means varieties can often acclimate to a particular region. Finding a seed source near your area can often mean less work as a gardener. The varieties will be used to your weather and pests with natural defenses for both.
  • Variety: One of the joys of buying heirloom seed is getting something not found in every store! I like to find seed sellers with enough variety of choice to satisfy my “oooh and awwwweee” factor. But buyer beware, sometimes a more targeted seed seller is going to fully understand the exact varieties they are selling. Their advice and commitment to those varieties can get your garden really going. They have picked things they know are reliable and tasty.
  • Seed Health: Let us say it again: GERMINATION RATE. All those fancy peppers I was trialing last year…. 1 whole packet never even germinated. Also open pollinated seeds have to be kept in special conditions in order to make sure the seed you get will grow up like the parent plant. One year all my tomatoes were not what was on the packet. :(. The company refunded all my money when I sent them pictures, but what a waste of a growing season when you end up with some tasteless paste tomato when you really wanted a rich slicing variety
  • Mission and Values: A number of heirloom varieties disappeared over the years when hybrid and “easier” vegetables came on the market. There are companies DEVOTED to preserving these varieties. Other companies work with local communities or other charitable activities. I always think it is nice to work with a company doing good things when I can.

Our Top 3 Locations to Order Heirloom Seeds

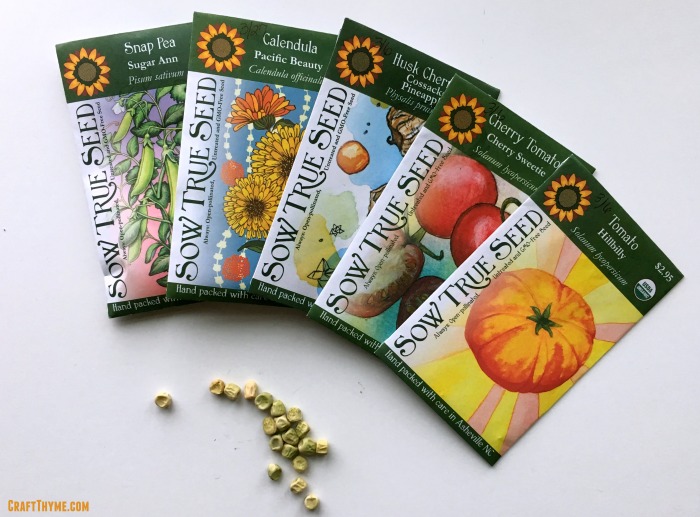
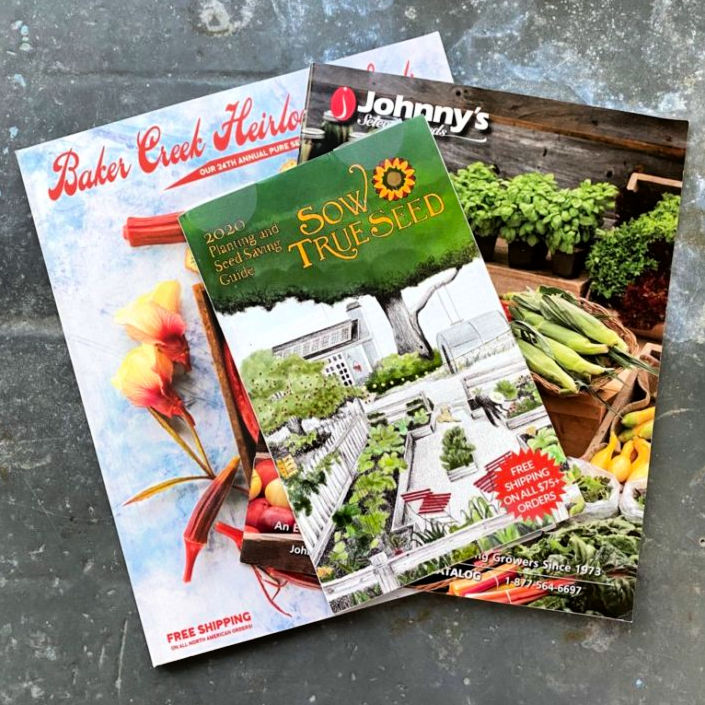
#1: Sow True Seed: Asheville, NC

  • Price: Most packs ~$3.00
  • Shipping: Based on exact cost of weight and zip. via USPS.
    • Often free order +$49
    • Free in-store pickup
    • Unknown: International Shipping
  • Why we love them: There are sooooo many reasons to love Sow True Seed. My top reason is that they trial the seeds they sell. You know you are going to buy seeds that work well in the Southeastern United States. I have, personally, great germination rates that result in tasty vegetables. They are small, give tons of seeds away for school and community gardens, and are just generally nice people. Over the years their website has evolved to make it easy to order heirloom seeds as well as open pollinated varieties. They also have signed the safe seed pledge so you know they do their utmost to keep clean, non-gmo seed.
  • Things to consider: They ship all over the US but their physical location in Asheville, NC is where their focus is involved.

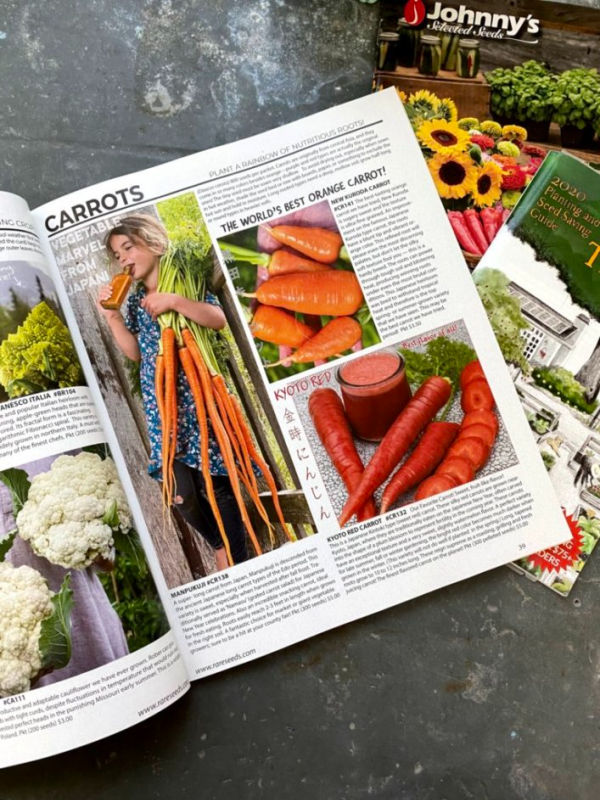
#2: Baker Creek Heirloom Seeds: Mansfield, Missouri

  • Price: Most packs ~$3.50-$4.50
  • Shipping: North America (Canada, US, Mexico) Free
    • They do ship internationally for additional fees.
  • Why we love them: Do you need a cucumber that looks like a dragon egg? What about a bean that grows over 4ft long? Cause they will have it. If you want to find unusual varieties from around the world this is the place to go. Added bonus, the yearly catalog might as well be plant porn.
  • Things to consider: The seed packets can be really small. Like barely have enough pepper seeds to double plant a small tray (12 peppers?!). The germination can be dubious at best. They do try to mark seed packets with low germination and add more seeds, but that is only after you receive your order. Finally, they are getting varieties from all over the world. It makes them really, really cool but it also means I’ll be trying to grow a blue butterfly pea plant for the 3rd year in a row (Yeah, I don’t give up easily) because it just doesn’t like something about Western North Carolina. Honestly, I would hesitate to base my entire garden on their seeds but I use them as an add-on every single year.

#3: Amazon/Etsy: Who knows?!

  • Price: ~$2.00-$5.00
  • Shipping: Just depends. We order Prime if we can for free and many Etsy sellers offer free shipping.
  • Why we love them: We combined these two as the same because of the key reason we like them. FYI, We are Amazon Affiliates (link above is an affiliate link), but that isn’t the reason we suggest Amazon. Amazon\Etsy can have things you just can’t find anywhere else. Both locations can connect with you with small independent sellers who carry items that you just cannot find other places. I have found that costs can be higher than expected as items get padded in shipping costs
  • Things to consider: Amazon and to a lesser extent Etsy are large corporations that are platforms for other sellers. This can be great in giving a small seller a larger online presence, but it can also mean they take a lot of money out of the small seller’s profit. Call it a love-hate relationship with this type of big corporation. Additionally, you rarely know what type of seed you are getting. These aren’t the common seed markets so reviews are limited in some cases, and you are just taking a chance at the quality. I will say though, I have an awesome banana tree I ordered as a teeny tiny plant from Amazon. I also had to throw out a bag of Jerusalem artichokes when I was trying to source bulbs a few years back because they were rotten (Sow True carries these now). I have had some success with seeds, but also have gotten packets of dubious nature when ordering heirloom seeds. Its a buyer beware area.
Look at this seed porn! I mean who doesn’t need three foot long carrots FFS?

5 Other Really Awesome Places to Order Heirloom Seeds

Johnny’s Selected Seed: Especially great if you are looking at bulk orders for farming. Their focus is more commercial in nature but they are open for home gardeners ordering heirloom and organic seeds.

Botanical Interests: We picked up a few packs from them on sale at Ace hardware a few years ago and they did wonderfully. Their packets are meant to help new gardeners and are beautiful and informative. Their website has specific areas for organic and heirloom types seeds.

Seed Savers Exchange: I have NOT personally used their seed, but I am familiar with their mission. They are one of the big groups to help preserve heirloom seeds for future use. They also help facilitate seed exchange among seed savers. They are on m to-try list if I ever get past the first five I have listed.

High Mowing Seeds: They are another company I am familiar with but don’t use regularly. The nice thing is being out of Vermont they offer a lot of good varieties for the East Coast of the US. They have also been in the organic seed business a LOOOONNNGGGG time. You know you will be getting real organic seed when you order from them.

Burpee: You may be appalled by our last choice since Burpee is more synonymous with big box gardening than organic and heirlooms, but I stand by them. I like to meet gardeners where they are and not everyone is ready to go hunt down esoteric packs of strange and delightful white tomatoes. (Trust me, you will get there if you get hooked in gardening). Burpee has entire lines of organic and heirloom seeds. Often you can find some of these lines at Lowes, Home Depot, and other big box stores. They focus on lines of seeds that give good consistent results and provide seed that is accessible to a lot more folks. I will often fill my vegetable needs from Burpee seeds and they grow great plants.

Need Even More Options?! See the list at the bottom of the post for even more specialty locations to order heirloom seeds, as well as organic and open pollinated seeds. Please add your favorite seed places in the comments and I will update the list.

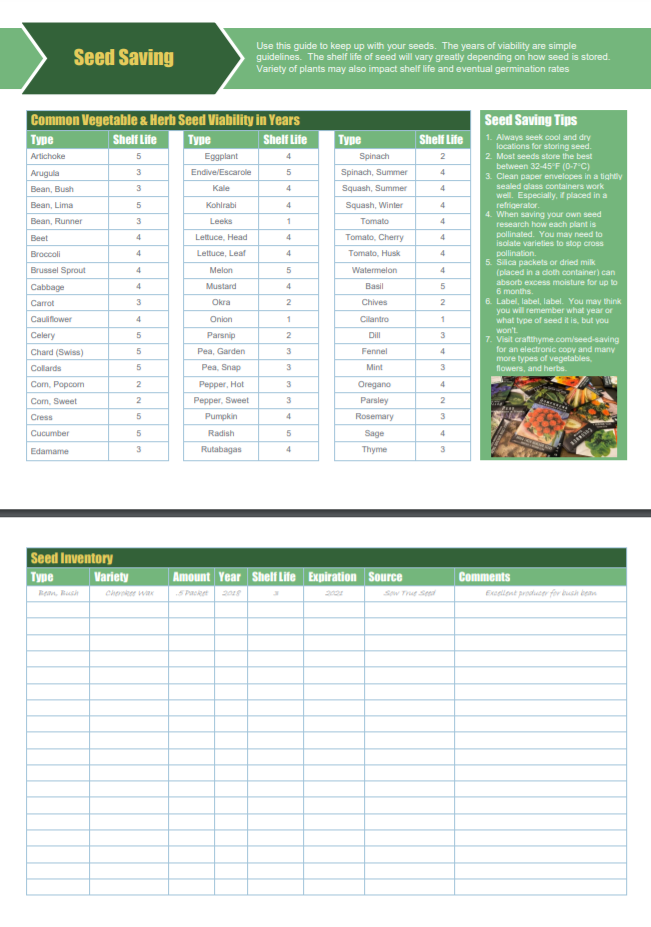
How to Keep Your Seeds Organized

Now that you have figured out how to locate the best places to order heirloom seeds don’t forget to keep them organized and safe! People often do not realize you do not need to order $100’s of seeds each year. For a small family a single packet of tomato seeds can generate enough plants for 3-4 growing seasons. There are really three things to keep in mind:

  1. Keep up with what you order
  2. Keep them dry, cool, and safe
  3. Keep up with what you order (It is worth saying twice)

I always THINK I am going to remember what I ordered, what I liked the previous year, etc. I don’t unless I literally MAKE myself. Now, I keep a nice online inventory. I make notes at the end of the year and before I allow myself to order anything new. Added bonus, it is easy to simply hit “share” and let my gardening friends see what extras I have on hand. Here is a handy link to our seed inventory and printable seed saving guide. This can help you keep your heirloom seeds organized and determine when seeds are going out of date so you can plant them accordingly.

Finally, remember to just have fun and enjoy ordering/planting these unusual heirloom seeds. You may not get every seed to become a beautiful plan but it is one of the best ways you can help preserve and taste history!

THE List of Places to Order Heirloom, Organic, and Open Pollinated Seeds

Southeastern US

Northeastern US:

Midwestern US

Southwest

Northwest 

Find out all you need to know and where to go to order the best heirloom seed, organic seed, or open pollinated seed for your garden.
Posted on 1 Comment

Seed Saving Chart & Seed Inventory

Whether you save your own seeds or buy them in packets it is important to know what seeds you have on hand and how long the seeds are good for in storage. Like most things here at the Reaganskopp Homestead we have a a Google Sheet for seed saving and seed inventories. I know you all are shocked (#sarcasm). As and added bonus we even made a handy dandy printable seed saving chart too! (gasp… paper?!)

But First: Why a Seed Saving Chart?

So what do we mean by “How long are seeds good?”. Well, seeds are only viable for certain lengths of time. Meaning if seeds are properly stored and then properly planted you are likely to get a certain percentage of healthy seedlings after a certain length of time.

I repeat: Properly stored and properly planted

For example, if I take my saved tomato seeds and keep them dry and cool, I can likely still have good germination after three to four years. That means that if you have half a packet of seeds from last year, that you loved, there would be no reason to throw them out and spend more money this year.

But Why a Seed Inventory?

To get the most bang for your seed buck I combined a seed saving chart with a seed inventory. Why? Because you can think you will know what seeds you have, and how many you have, and how long they are good for, and you will be wrong. Then you will see a deal on seeds and end up with about 50 varieties of cherry tomatoes and space to plant out three. Which is even more exciting because out of six family members only you actually eat cherry tomatoes… Or maybe you won’t because you have control when it comes to plants… In either case, it is good to know what you have and when it expires. It makes garden planning a cinch and if you opt for the online version you can reference it when out shopping for seeds.

But wait there is more!

So why do we also have a printable seed saving chart when we usually focus on non-paper solutions? The Reaganskopp Homestead is hosting their first community seed swap and garden planning session. We partnered with a local gardening/homesteading store (Fifth Season Gardening – Asheville) to host the event. Since we are having an in-person seed swap I wanted to have print outs of guidelines for the seed swappers. We made a printable seed saving guide and inventory to take with us.

Spoiler: It is pretty too!

How do you use the Seed Saving Chart & Seed Inventory?

Both the electronic and paper versions are pretty easy. Log your varieties of plants, how much seed you have on hand, and the year you purchased the seed. The electronic version will calculate the expiration date automatically once you put in the year. The paper version will require some addition. I update my sheet once I have everything planted out, so that next spring I’ll have a complete list of what seeds I have left.

How Do I Get a Copy?

Click the link below and you will be prompted to make a copy to your Google Drive. Make the copy and then run with it. Please note, I only give copy access to the Seed Saving Chart and Seed Inventory. This avoids someone accidentally messing the entire sheet up. There is a tab that has examples of use.

Seed Saving Chart & Seed Inventory (Electronic Copy Only)

You can also get the printable version by clicking below

Printable Seed Saving Chart & Seed Inventory (Printable pdf)

What Do We Ask For In Return?

If you like/use the Seed Saving Chart & Seed Inventory we simply ask that you spread the word about it to others and send in suggestions via comments. Each year we try to incorporate what readers want to see. You are free to use it for personal or business use. Just don’t try to sell it as your product because that makes you a meanie, not nice person.

Posted on Leave a comment

Easy Seed Starting

How to place your seeds to make seed starting easy.

Hi folks! Today we are going to learn more about a method of easy seed starting. Why? Because for years I have offered lots of utilities to help you start seeds. Guides to find the perfect time to start seeds, guides to get the most from your seed packet, guides to manage your seed inventory. What have We never offered you? A practical method to actually start seeds and grow them into healthy plants!

In this post you will learn why you WANT to start plants from seeds, how to get them going quickly, and how to avoid all the pitfalls you will want to most definitely, well, avoid.

If you aren’t looking to start seeds this year, no problem! We often use starts (plants already started) so we won’t judge! No snobby gardening here; plus we have lots of other gardening, DIY, and DOING advice. Follow along on our Instagram for our latest projects.

Now Let’s make Seed Starting Easy: Prep Time

You do want to save money, plant hard to find and unusual varieties, and have the healthiest plants? Then seed starting is for you. Starting your own seeds means you can order amazing varieties you would never see in the grocery store! Did you know pink striped celery is thing? How about white tomatoes? There are so many amazing fruits and veggies you can order from catalogs that you would rarely find as starts. Even more exciting, when you start your own plants you control the conditions so that you get healthy, disease free, starts to place in your garden. Sold? Great lets get started:

Materials Needed:

  • Seed Tray
  • Peat Pods
  • Seeds
  • Towel
  • Paper & Pen

Optional materials:

  • Heat mat
  • Fluorescent or LED lights

Easy Seed Starting: Get green by being clean

The first step to seed starting is being clean! I like to reuse my trays from year to year and you can too! It saves money and keeps the plastic trays out of the trash. Just start by killing any left over fungus or pathogens. Kill. All. The. Things. (Which is odd because I am generally all for being around bacteria). However, in this case, even if I am buying new trays I may clean them if they have been sitting around a lot of other gardening supplies. You have a few options for cleaning the trays but they all start with good old fashioned:

  • Soap and Water (don’t knock it till you try it)

After that it is up to you how much of a nuclear approach you want to take. If you had any issues with fungus or other problems the prior year you will want to do one of the three in order of severity of your problem:

  • Vinegar: Splash on all the surfaces and let dry
  • Peroxide: Splash on all the surfaces, rinse, and let dry
  • Bleach & water: Dilute bleach if you are going with this option and make sure to thoroughly rinse the trays before drying
Make sure the thoroughly sanitize any seed trays before use.
Squeaky clean tray! Like kids with organized toys, you are about to mess this tray up.

Medium Matters

While your trays are drying it is time to prep your seed starting medium, also know as soil. Except it isn’t really soil… There are as many opinions about seed starting mix as there are recipes for the perfect hamburger. However, there are a few rules everyone tends to agree on.

  1. Made of fine particles
  2. Neutral Ph
  3. Free of pathogens (otherwise all that cleaning is wasted)
  4. Not full of nutrients

I know number 4 seems odd. Why wouldn’t we want seeds to start in a nice fertile environment? Seeds include all the nutrients the plant needs to get established. Additional nutrients in the soil only serve to attract baddies like fungus that will compete with your seeds! Once they are up and established as plants with true leaves you can bring on the good, nutrient rich, stuff.

Since this is EASY seed starting I am going to give you my tip. Just use the peat pellets (shame, shame, shame). You have plenty more years as a gardener to angst over the environmental impact of peat, to research perfect balance of sanitized soil and coir, and discover seed blocks.

For now: Soak those peat pods in a large bowl of warm water.

Pre-soak the peat pods to make seed starting easy. This way you are sure that all of the pods are evenly moist, without being water logged. I have been lazy and soaked them in the tray and it makes a big mess, half don’t get inflated, and the other half are dripping wet. Yes, you have to clean one bowl afterward, but come on! You can do it!

Easy seed starting tutorial. Here are the supplies you need.
So many pretty seed packets! I could collect even more if space would allow!

Time to Plant Those Seeds

Gather all the seeds you plan to put in the tray. Make sure one tray is going to hold mostly plants that will go out in the garden at the same time. You will want to do this for a couple of reasons:

  1. It is easier to keep track of when you started the seeds and when they need to go outside when the entire tray is pretty closely related. For example all of my cabbage, broccoli, and cauliflower will all be started together. Their outside plant days are similar. (Pro tip: If you need help know when to start and when to plant outside we have the automatic calculator just for you)
  2. The plants tend to have similar growth rates. If you start a lot of unrelated plants together in close quarters you really have to make sure your summer squash don’t overrun your pepper starts. True story, the cucumbers will overrun everything, every time. They are the dicks of the vegetable start world.

Now that you have your clean tray, selected seeds, and pods make sure to keep that towel and paper/pen handy. You will be labeling the tray as you go. I know you are totally going to remember exactly where you put each seed, right? Wrong. Unless you have some amazing photographic memory you are going to be trying to puzzle out if that is cabbage or kale when they first start growing. Remember we want this to be easy seed starting.

Planting Seeds in 4 Easy Steps

Step 1: Lay out a row of pods

Generally I plant 6, 3, or 12 pods depending on what I am starting and how much my family will eat. When I am laying out the tray I always put 6 or 12 pods out. Want the real reason? My tray is set in blocks of 6 and I got tired of doing maths and figured if I really wanted 4 then I could either take 3 or plant 6. I’m lazy calm like that and you can be too! Just figure out small increments and lay out the pods you need for one to two types of plants. Do them in small increments so that you can:

1. Document what you planted

2. Keep from cross contaminating pods with other seeds. You don’t want poppies in your tomatoes.

Step 2: Dry your fingers

Step 2 seems like a no-brainer, but it is worth mentioning. You are about to pour some seeds into your hands. I guarantee that most of the time you will pour too many seeds out. If the seeds are nice and dry then they can safely go back into the packet when you are done. If your hands are damp you can ruin the entire packet of seeds. How do I know this? Because I have done it. Dampness = sprouting = lost packet of seeds.

Dry your finger tips in between each row of seed starting
Dry your fingers, and in my case, put on some lotion.

Step 3: Plant some freaking seeds!

Yes you are finally there!!! It is time to put the seeds in the peat pots. Start by laying the seeds on the surface of the pot. Put a few extra to insure every pod germinates. How many depends on the size of the seed. Large seeds like nasturtium might get 2 to a pod, while small seeds like cabbage might get 4 to 6. You want to insure germination but leave enough seed to replant when the groundhogs invariably eat all of my starts.

After all the seeds of a row are placed on the soil put the extras back in the pack. Then I use my fingers to bury the seeds into the peat to level indicated on the seed package. (Pro Tip: Need help interpreting your seed package? We have instructions for you)

How to place your seeds to make seed starting easy.

Step 4: Document

I know I already said it, but use that paper and pen to write down what you just planted. Just draw rectangles for each row or half row you plant. Why do I stress this so much? Because I have totally and completely messed this step up soooo many times. I have a lot of experience with plants so I can figure out which type is which when I forget to write them down but ask me to tell you which one is the large tomato versus the cherry tomato. Then you just gotta sit there and wait till it makes fruit. *le sigh* I am saving you from you!

Remember to always document what seeds you plant where. You will not remember!
I’ll remember what I planted where… No, no I won’t.

Now What?! Heat, light, and water

Turn up the Heat

Heat? What? Yeah, this was a trick I learned waaaay later in my seed starting life. Guess what? Seeds such as peppers and tomatoes really need warm soil (75-80 F) to get the best germination (i.e. when the seed pops above the soil). I can’t tell you the number of times I would start my peppers and tomatoes on a certain date but then they would take forever to germinate and throw off all my timing. So if you keep a cool house then allow plenty of extra time for those seeds to germinate OR get a seed mat. A seed mat will keep your seeds the perfect temperature. BUT remember some crops like cool soil too! Here is a handy chart by the University of California that gives you optimal temperatures.

Light It Up

Now that we have the seeds all tucked nicely in their perfect temperature, soil beds they are going to need light. And lots of it! You can make do with a super sunny window sill or a small plastic cold frame/greenhouse, but make sure to constantly turn the trays, watch for signs of legginess, and monitor temperatures. I am telling you right now getting a light is sooooooo much easier. You can get fancy led grow lights or a simple full spectrum fluorescent. I went cheap on the fluorescent but often think of upgrading to those grow lights… Anywho, enough dreaming. Put the trays super close to the the lights and move them back as the plants get bigger.

Good lighting is important to make sure you seed starts are healthy.
Ignore the dirt. The tinfoil underneath helps reflect additional light when they get bigger. Also, I am using super fancy cups to lift the trays closer to the lights. My lights are on chains to be adjustable, but my chains were only so long. So instead of buying more chain I just lift the seeds. Problem solved!

Water is Key

Finally, you need to keep the seeds evenly damp. Not soaking wet, but certainly don’t let them dry out! Even moisture will help them get started but keeping them water logged can choke roots and lead to fungus issues.

See how easy was it to get the seeds started?!

Additional Resources

Here are some additional resources to keep your garden growing:

Seed Starting Calculator and Guide

How to Read a Seed Packet

Plant Like a Pro

How to start seeds the easy way. Learn tips that will get you healthy starts, that save you money, and give you a garden full of rare veggies, flowers, and fruit!
Posted on 11 Comments

How to Plant Like a Pro

How to plant like a pro and maximize your harvest with proper plant spacing

Want to know the trick to maximizing planting space like a pro? Just Say No To Rows and learn how to plant your garden. Yep, I said it. Put the hoe down, the tiller away, and stop with the traditional rows. It is the number one mistake home gardeners make! Why? Because it is labor intensive and more importantly, a waste of useful space that you could be growing food or flowers.  Plant spacing is key to maximizing your harvest.

How to plant like a pro and maximize your harvest with proper plant spacing

There are a number of techniques out there to plant your veggies and flowers in a non-row method. The biggy you will always hear about is ‘Square Foot Gardening’. I have actually checked the book out of the library and read the whole thing. Personally, I think it was a great guide on spacing plants, but I don’t subscribe to his method of soil creation. Peat is just ick to use most of the time. Not to say I haven’t used it from time to time, but I prefer not to do major applications with peat. ANYWHO, I’ll get off my peat soapbox and continue on to the important stuff. How to plant your garden in a meaningful and efficient use of space. This technique works with raised beds or in ground plots!

How to Calculate Plant Spacing

First thing to do is look at the back of your seed packet. You can read in detail about what you are looking for in my other post Seed Packet 101. Find the information about plant spacing. Ignore the row spacing. I saw you looking at the row spacing! Stop that right now :)

Have you found your number? It could range anywhere from 3″-24″ (3-60 cm) or more! You are going to take that number and divide it in half and place it like spokes on a wheel around your plant. So an eggplant that needs 24 inches would get planted with 12 inches on all sides. I tend to visualize a circle around the plant. Then just lay those circles out in a grid form. Yes, it is that easy!

Planting distances based on plant space from seed packet

BUT Wait! There’s More! (Infomercial voice)

There are a couple of things you need to think about before you start planting away. How to weed and how to harvest. Weeds are a fact of gardening life; if you use the above planting method they will be much lighter than traditional rows, but occasionally you are going to need to reach down and pull one out. So guess what that means? Your 6ft X 6ft (2m X 2m) bed? Yeah… You are barely going to be able to reach in the middle. (And yes, I might just have one of those). This is the reason you often see raised beds in 3ft increments. That is the usual distance a human can easily reach from one side. Let us pretend that you ended up with zero weeds, again, you will need to think about being able to reach and harvest your glorious tomatoes and plots of thick spinach. No one likes that smell of rotting squash in the middle of the patch. Yuck! (sometimes I have been known to get lazy on the harvesting)

Perhaps you have a traditional row garden plot. NO WORRIES! You can still use the same space. Divide the area into three foot sections and leave 2-3 ft (1m) pathways between the planting sections. Bonus points if you throw mulch on the pathways to keep yourself from having to weed and hoe the compacted garden paths. BTW, if you noticed I mentioned not tilling at the beginning. Once you have your happy soil you won’t need to be digging these beds and pathways up all the time. I get into more detail on establishing your soil and beds in other posts.

Grid It Out

Let us assume we have a prepared planting soil/space and we know how much space our plants need. The easiest process is to start plunking those puppies in a nice straight grid. Of course this is assuming you have vegetable or flower starts ready to go. Frankly, I plant a lot of veggies and flowers straight from seed into the ground. It gets a little trickier here to get good germination and clear spacing. Frankly, I am willing to waste a bit of seed, especially when it comes to tiny ones like carrots or cabbage. I am just too lazy to carefully plant out 2-3 seeds in each grid space. So I make mini-rows spaced correctly from each other and lightly spread seed down them. Then I just go back and thin the rows by cutting off the un-needed seedlings when they get 2-3 inches high. So why are we planting like this? We can get so many more vegetables in a smaller space. Let us use an example because we love the maths:

We have a 3 ft by 6ft bed (1m X 2m). We want to plant beets (I am the only one in my house but I freaking LOOOOOVVVVEEE beets) The package says row spacing 12 inches and plant spacing 3 inches.

Standard Row Planting: 72 beets (3 rows of 24 beets)  Why beets?  Because I freaking love beets!  This (affiliate links to follow) Rainbow Blend from Sow True Seed is my absolute favorite.  Do yourself a favor and order them today!  You can plant them throughout the summer.  Plus beet greens!  Anyway enough about beets…
Grid Planting: 288 beets (plant 12 across and 24 down. Isn’t that number beet-uiful?!)

planting-grid
Straight grid versus offset planting. Both are superior to row planting to get the most in a small space.

The thing about numbers is they don’t usually lie. I used to say numbers never lie and then I worked in Business Intelligence and saw how people massage numbers… But for gardening 288 beets sounds a lot better than 72, well, if you like beets. Additional bonus from planting in this grid method? Whenever the vegetables get bigger their leaves shade the soil cutting off many weeds and maintaining soil quality from erosion. Less weeds = less weeding!

I learned a technique to completely maximize this planting structure. I have used it before but gotten lazy in the last bit and pretty much default to the grid. I often have too many vegetables to use and end up giving loads away so I no longer plant in an offset method. This technique is part of a full biointensive method of planting that is a lot more complicated and involves things like root depth etc. I’m not going there, it is hella fun to plan out and do, but it takes a lot of calculation and work. BUT this small portion is easy to adopt: instead of gridding off your plants you can use those circles to offset each plant squeezing just a few more inches into each bed. Additionally you can tuck in plantings to really cram those plants in there. That means if you have plants that need a lot of space like tomatoes, you can tuck in basil along the edges of the plantings. Personally I love to shove a few flowers, especially marigolds, in any extra room I have. It just makes the vegetable patches that much more attractive.

So what have we learned today? STOP the rows and plant your vegetables in a efficient layout.

Math is on your side and you can get so many more plants in a small place than you can with traditional row crops. Take a grid or offset method to get lots of veggies, but make sure that you remember to leave room for weeding and harvest.

Posted on 18 Comments

It Is Not Too Late to Start Seeds

Start Seeds with this template

Guess what? If you live Zone 7 and above March and even into April is not too late to start seeds indoors and you have the WHOLE outdoor seed planting season ahead. (Get those peas and spinach out today!) If you have no idea of the timing of seed planting both indoors and outside I will walk you through the process and offer free Seed Planting Guides for vegetables at the end of this post.  These free seed starting templates are meant to be used for whatever zone you live in! I have even had someone from the Southern Hemisphere say they work for them.

Start Seeds with this template


So What Can You Plant?

Joking aside the peas and spinach need to go outside ASAP. They should have been out the first couple of weeks of March, but depending on how hot spring is you should be able to get a good crop of snap peas and spinach in before they wane and bolt. So now that, that is out of the way here are some things you can start indoors today to plant out in early may.  Affiliate links to my favorite local seed vendor to follow!  In case you want to order some of these beautiful seed packets for yourself.

Summer Squash: Zucchini, Patty pan, Yellow, etc
Winter Squash: Butternut, Acorn, etc
Melons: Watermelons, Cantaloupe
Eggplant
Nasturtium
Zinnia
Marigold

Obviously, most of these plants grow well planted straight outside, but if you have a shorter season (as I do in mountainous Western North Carolina) getting an extra month can be really useful to get larger, riper, fruit. Plus who doesn’t love flowers?Seed Starting Guide


How to Know When Can you Plant

When to plant your seeds indoors and outdoors all depends on the frost! You can find your average frost free day by Googling. Also the Farmers Almanac has a great list by major cities. So once you have this all important date you’ll need to know how many days before or after that date your seeds can be planted. Such as 7 days before, will tolerate light frost, -1 week, etc. Then you will also need to know how many days the transplants need to actually grow. Additionally you can factor in how long germination takes and WHOA! Are you overwhelmed yet? Trust me it is not too late to plant yet AND I am going to break this down so it is super easy! And if the breakdown still doesn’t make sense then I am going to offer you a free spreadsheet or google doc that you can just plug in numbers and get your dates! How much more simple is that?

The Magic Formula

To Plant Indoors: Frost Date + (Weeks Before Or After Frost – Weeks Needed to Grow Indoors)
To Plant Outdoors Seeds or Transplants: Frost Date + (Weeks before Or After Frost)

Let’s run through an example:

Cabbage can be transplanted. It needs about 42 days (6 weeks) of indoor growth and can tolerate frost. So we can plant it about -21 (3 weeks) days prior to the last frost free day. My average frost free date is 4/24/2016.

Indoors: 4/24/16 + (-3 – 6 weeks) = 2/21/2016
Outdoors: 4/24/16 + -3 weeks = 4/3/2016

So, are you saying?! “Ugh, math? And where do I find all this information anyway?” Well I have the answer for you. For the old school I have a printable pdf Seed Planting Guide for vegetables, flowers, and herbs so you can calculate when to start seeds for yourself. It has additional information about depth, spacing, thinning, and seed saving. You will still have to do the math and look at a calendar. Though you can use this handy website to plug in weeks and get a date.

For the New school I am offering a free spreadsheet where all you need to do is plug in your frost free date and when to start seeds, both indoors and out, just populates throughout the sheet. I also have a pared down version of the Seed Planning Guide in a Google Doc you can copy and use for yourself. I know not everyone has excel just hanging out on their computer or phone.

Free seed starting planning

Excel Seed Starting Template

PDF Seed Starting Template

Google Seed Starting Template

Free Seed Starting Templates