Posted on 6 Comments

Color Mixing for Kids: St. Patrick’s Day Activity

Color mixing with food coloring is a fun activity for kids and adults

Do you have kids at the age to learn colors and color mixing? Do you need a rainbow activity for St. Patrick’s Day? Do YOU need an activity, using household ingredients, that will teach both colors, color mixing for kids, scientific theory, and potentially cause 4 boys six years and under to pause for more than 10 seconds? You don’t? Good for you for making that life choice that shrinks the human population. For the rest of us breeders read on!

Color Mixing Activity for Children

Mixing color activity for children
Let’s not ask why we have so many pint glasses from so many breweries…

Supplies

Coffee (optional)
Husband (Can I say optional? This post certainly wouldn’t have happened without him)
Kids (Needed unless you just love color)
Way too many pint glasses for adults to own (regular glasses will do)
Liquid Food Coloring*(Yellow, Red, Blue)
Water
Paper Towels*
Post-it Notes* or Scratch Paper

Step 1 The Set-up

Groggily slug down coffee while the kids tuck in breakfast and vaguely note that husband is exclaiming that today we will “Science”. Watch as Adam starts setting out 7 glasses, fills 4 with water, and raise eyebrow as he hands you paper towels.

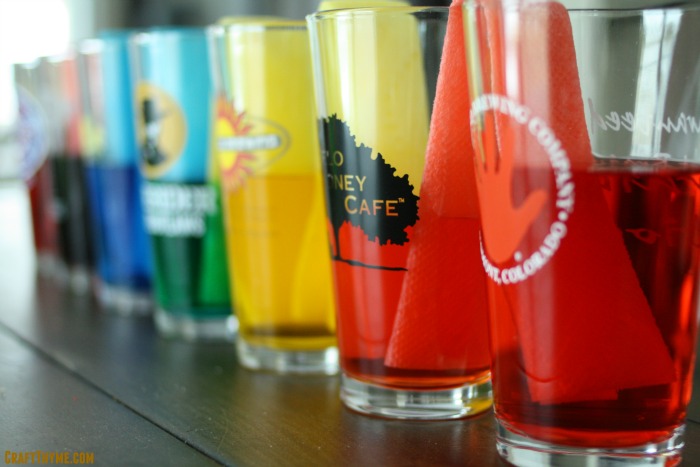
Joking aside, line up the seven glasses and fill every other one 80%-90% full with water. Since we aren’t doing rocket-surgery (yes, you read that correctly) I think we can combine all the set-up in one step. Fold 6 paper towels lengthwise twice. Set out your droppers of food coloring and call over the kids.

Step one in a color mixing activity for kids
Picture just in case anyone needs help folding paper towels. See optional coffee above if this step is hard to complete.

Step 2 Paint the Town Red

I’m not sure there is anyone in the world who doesn’t like to watch food color mix into water. The kids will love to come watch. In the glasses of water drop 6 drops of red in the first glass, 8 drops of yellow in the next water, 6 drops of blue in the following, and 6 drops of red in the final water glass. Your line up will be: R0Y0B0R

Step 3 Patience and Hypothesis

You are going to take your wicking paper towels and place them from glass to glass as seen in the next photo. Adam could weigh in on why the paper towel needs to be a certain length, as I never read the original info on this activity. Suffice to say it is better if it touches near the bottom of both glasses.

Our small children immediately got ants in their pants because the process takes a bit for the colors to start moving. This is the perfect time to grab some post-it notes and teach kids about having a hypothesis. First, we discussed what they thought might happen. I may have mentioned the words water and cohesion and then realized that was a little nerdy even for my kids. So we decided that maybe the colored water would magically move. IF that happened we took guesses on what color each glass would turn. I stuck the sticky notes down in front of the empty glasses and wrote everyone’s guesses. Found out that no one knew what colors mix to make secondary colors… I have failed my art degree yet again!

Color wicking and mixing in a child friendly activity

Step 4 Free Play

Let the kids go play, use their imaginations, etc. Not very moment needs to be structured with activities! About the time someone is getting annoyed that someone else is smacking them with a lightsaber, ‘borrowing’ their toy car, or knocking down their carefully crafted block tower it will be time to look at the results. Even though they were in plain sight the whole time, the kids were so excited to see that the water had moved and mixed colors. They simply had forgotten to look!


Color activity for children
These are not photoshopped! I was so surprised this color mixing activity worked so well.

Side Notes

I found it incredibly interesting that each of them had thought they guessed all the colors correctly. I had to show them their initial guesses on paper… I sense that I may not be the only person who will have to be right in this household.Color mixing with food coloring is a fun activity for kids and adults

Color mixing activities for kids

Posted on 4 Comments

Autumn Sun Catchers

Tutorial on creating wax paper sun catchers in leaf shape.

Last week I had the pleasure of doing my first first ever craft guest post at The Experimental Home.  I wanted to keep it kid friendly and Autumn themed to blend with both of our website missions.  Laura graciously invited me to share these fall leaf sun catchers while making an awesome Spider Tutorial for Craft Thyme:

Tutorial on creating wax paper sun catchers in leaf shape.

My guest post and can be found at The Experimental Home in it’s entirety, but I have now added the instructions here as well.

First, I wanted to touch on one awesome thing I learned! I can craft with my kids and collaboratively we can come up with something pretty awesome.  So often I regulate ‘kid crafts’ to the refrigerator, but when we work together we can come up with decorations I would be proud to showcase at an adult dinner party.

So thanks to McClain & Conlan!  You made these autumn sun catchers awesome!

McClain getting ready to help make wax paper leaf suncatchers
Conlan is not shown. He was pitching a hissy that his brother had 4 colors and he only had 2. Oh sibling love.

Now on to the instructions!

Supplies Needed:

Crayons(broken works too; I hate feeling wasteful)
Grater
Wax Paper 
Iron 
Old Towels (optional if you are neat and tidy)

Step 1: The Great Grate

Did I mention the kiddos are 1 & 3? Yeah so… I grated the crayon. We had little paper plates left over from a party which made it easier for them to pass the colors back and forth. To get an ‘Autumn’ feel I limited them to orange, red, yellow, and light green. Luckily they didn’t even notice Mama was limiting their creativity in the name of aesthetics.

Step 2: Sprinkles and Fights

Pull off a nice large sheet of wax paper. You’ll note it is laying on a pile of old towels. We will get to that in a minute. Let the kids sprinkle crayon shavings all over the paper. Watch the kids get in a squabble over the green, then over the red, then separate the colors and consistently repeat ‘share’ over and over. Give up and hand them each a set of shavings. Relax and sip coffee.

How to make autumn suncatchers from crayons and wax paper.

Step 3: Strike While The Iron Is Hot

When the kids are done spreading the crayon gratings about, lay another piece of wax paper on top, scoot them back, and gently iron (Parents only). The boys thought the way the color melted and instantly spread was magical. Please Note: If you are doing this craft yourself a little crayon goes a long way.

Because the crayon does have a tendency to spread I always iron on old towels so if any leaks out of the wax paper I don’t have to worry about stains.

How to make autumn suncatchers from crayons and wax paper.

Step 4: Mama Craft Completion

The boys were done crafting, but I finished up by tracing the leaves. Just an FYI: permanent marker works great on wax paper. While, the ran around like crazy kids outside I cut out and hung the leaves from fishing line along the dining room window to create a nice collaborative fall display.

wax paper leaves hung from fishing line across the window


Posted on Leave a comment

Spooky Spider From Gloves

Stuffed Halloween spider made from gloves

Hello and Happy October Craft Thyme readers!

My name is Laura, and I blog at The Experimental Home, where I share my everyday creative experiments. I “met” Brianna back in August, when she was my package pal. We hit it off, and decided to pull the ol’ switcharoo on you today, I hope you don’t mind.

Now that it is actually October, I am getting excited for Halloween. It is such a fun holiday, and it is so much fun to
make silly and spooky decorations. Yeah, for me, silly and spooky go together. I am the kind of girl that laughs at horror
films (to the point that my husband won’t go to a scary movie with me). Speaking of silly and spooky, check out this spider I am going to show you how to make today… can you believe I made it out of a pair of gloves?

pair of gloves spider

I picked up a pair of basic black stretchy gloves in the dollar section of my local Michaels. Clearly I didn’t go to the
craft store to find gloves, but I can’t resist browsing the deals in the dollar section. I looked at the 8 fingers and immediately thought spider… I know, I am weird like that. I took them home and experimented until I came up with the perfect pair of gloves spider.

black gloves

The first thing to do to transform these gloves into a spider is to give them a little structure. I used pipe cleaners so
the spider’s legs would be bendable and shapeable. I folded a pipe cleaner in half and bent down the tips to keep them from poking through the fingertips of the gloves.

pipe cleaner for spider

I stuck the two ends of the pipe cleaner in two adjacent fingers. Since there are eight fingers, I needed a total of four
pipecleaners, plus one for the thumbs. For the thumbs, I just bent down the tips and stuck it in one thumb for the time being.

gloves and pipe cleaners

Time to stuff. Get out a bag of fiberfill and stuff those gloves. I found it was easier to stuff each finger individually
before stuffing the palm. Stuff all the fingers first, then the palm and thumb of the glove with the pipe cleaner hanging
out – get it good and stuffed. Don’t stuff the palm or thumb of the other glove yet.

stuffed gloves

Finally, stick the loose pipe cleaner end in the other thumb, and fill the thumb with stuffing. Now you are all set to transform your gloves into a spider. Put the stuffed glove inside the empty one folding the cuff of the empty one under as you go.

Look, you have a spider!

pair of gloves spider

Spend a little time (or way to long if you want) bending and sculpting the legs to make your little spider look just right.
Then seal up the “seam”. I just squirted in a little fabric glue, but you could also use white or hot glue, or simply stitch
him shut. For a little extra fun, I glued on eight googly eyes. I actually took a minute to search  spider eyes on google images to learn about spider-eye arrangements… yikes, that’s a creepy bunch of images. Happy Halloween!

Good thing my pair of gloves spider is just as silly as he is spooky.

pair of gloves spider

Here is a fun spider factoid, the pincher things in front of spider’s mouth (made by the thumbs of my gloves) are called chelicerae. The final segment of the chelicerae are the spider’s fangs. Google image that if you dare.

So, if you have a few minutes and a pair of gloves, make your self a little spider and show off your new spider knowledge.
Better yet, help a kid in your life make a pair of gloves spider and learn all about spiders together.

A big thank you to Brianna for swapping blogs with me today. I can’t wait to see all the fun Halloween projects she has
in store for us!

Don’t forget to stop by The Experimental Home to say hi and check out all my everyday experiments.

sigcd

Enjoy these articles? Get biweekly updates by joining my mailing list (no spam, no way, no how)