The back of a seed packet can seem intimidating. It seems silly but if no one has every taught you how to read a seed packet then you could be missing a lot of good information. A lot of people prefer to buy transplants because seed starting seems difficult. But the truth of the matter is seed starting is easy, offers a cheap way to get lots of plants, and has more variety. The best part? The seed packet has all the essential information you need to get going! Below I outline all the seed packet lingo you will need to interpret to grow your own healthy plants. As a general note the cheaper seed you purchase at big box stores will have more information, while, specialty seed packets will often include less as it is expected you will know quite a bit about gardening. In eaither case learning how to read a seed packet will make the whole seed starting process go smoother.
Seed Packet 101
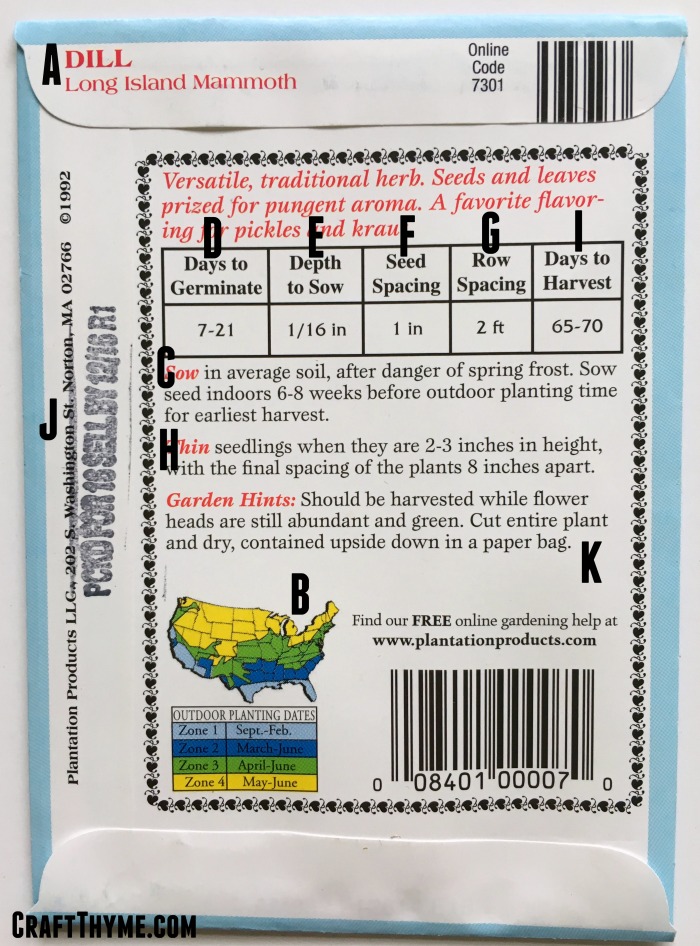
A. Name/ Variety– Usually a common name of the plant and sometimes the Latin version is included. Seems straightforward no? But in reality the variety can be essential to make certain your plant sprouts and thrives. For example: Oriental Poppies are perennial but California Poppies are annuals. You would be very disappointed when your California poppies did not show back up the next year if you did not know the variety.
B. Zone Planting – When to plant your seeds. Ugh, this is the one thing I would always say ignore on your package. You really have to know your area! Or google what your actual zone is, as the maps on seed packets are just too vague to know when you should plant.
C. How to Plant – Most importantly you will need to discern if these seeds can these be planted inside (make your own transplants) or if it needs to be planted directly outside. Not all vegetables like to be moved so while the packet may not explicitly say you can start them inside it will most often clearly define if it needs to be planted on site.
D. Germination – When your plant should sprout. If you don’t see your seeds coming up fairly soon after the last day of the range you may have an issue. Make sure you have read the whole seed packet on how to start them (some need soaking overnight etc). If you think the seeds are just duds you can try googling a germination test. Most reputable/expensive seed companies will refund or replace bum seed. Just note, in all my years of growing I have only had the really cheap seeds not germinate and only one incident of the wrong seeds in a packet.
E. Depth to Sow– How deep to plant your seeds. If you aren’t getting germination it may be because you put your seeds to deep or not deep enough. Some seeds need a little light, some need to be deeply buried. This measurement does not have to be perfect but aim for a similar depth as suggested
F. Seed Spacing – How far apart to space your seed in a row. This is NOT the final spacing for the plants that grow from seed. This number is usually optimized to give you a good germination rate over a row of crops that will be thinned. Honestly, I use this as a vague guide so I don’t have to thin very much. I rarely plant in straight rows anyway… If I have cheap seed I might sow them more thickly. If I am starting them inside I might ignore this guide completely and just put 2-3 per pot
 How to Read a Seed Packet: Details
G. Row Spacing – How far apart to place rows of seeds. If you are planting in rows then this is how far apart the rows should be from each other. I’m not going to go into why I believe row planting is probably one of the least useful ways to plant a home garden but you can read about the best way to space plants here. If you are just starting out rows can be great and this gives you the information you need so the plants are not to crowded.
H. Thinning – How many tiny seedlings to cut or pull out. Seed packets want you to plant extra seed and remove tiny sprouts later. This is a really good idea for a novice gardener and the seed company! I’d rather have 5 seeds sprout than none at all. Once you get familiar with seeds you can cut down the thinning and use less seed. Remember that thinned plants from lettuce, radishes, and beets can be eaten as microgreens if you do not want all those seedlings to go to waste.
I. Days to Harvest – The most awesome number on the packet! This is when you can expect to get fruit, vegetables, or flowers. If your growing conditions aren’t optimal (drought, overly wet, bad soil) expect this to be longer than listed
J. Sell By Date – Whoa what? Yep, seeds expire! Many seeds can be kept for a few years but you want to check the packet and make sure you have fresh seed if you are recently purchasing. I have seen old seed packets accidentally moved in with new stock. I always check to make sure they are the freshest I can find.
K. Extra Info – Details, tips and tricks. Somewhere you are going to see some tips and tricks about the plant. It may give you further tips to creating happy and healthy plants or information about harvest and saving seeds.
I personally prefer the more expensive seed (with less info on the packet) because I generally have better germination and healthier seed. If you want really primo seed and still a good amount of information on the packet here is my affiliate link to my favorite seed store:
Sow True Seed. I also can always find special varieties more suited to my garden and have had wonderful germination rates with these seeds. Plus they will go over how to read their seed packets with you if you are lucky enough to be able to go to their store in Asheville, NC. However, I started with the packets you can pick up at any big box store. Nothing wrong with them and great for beginners. Just make sure to read the whole seed packet and you will have enough information to come out with some good plants.

 How to Read a Seed Packet: Details
