Posted on 6 Comments

How to Make Artificial Garland Look Real

Cheap garland can look like the real thing with these tips and tricks

Did you know you can make artificial garland look real?  Did you know you can do this for cheap or even free?  Cheap artificial Christmas garland can look well… cheap or lackluster at best.  While I really love to make real evergreen garland by hand (and happen to have one of the top tutorials on making evergreen garland and wreaths), sometimes, I just don’t have time or the will to churn out yards and yards of the  real stuff.  I am ahem… lazy occasionally. Luckily, some cheap rope garland and a little know how is all it takes to make artificial garland that looks real.  Plus, the faux garland does tend to hold up better to the outdoor elements.

Tutorial on How To Make Artificial Garland Look Real

Tutorial on how to make artificial garland look real

You will need minimal supplies.  (Affiliate links may follow):

Step 1 Hang your Faux Evergreen Garland

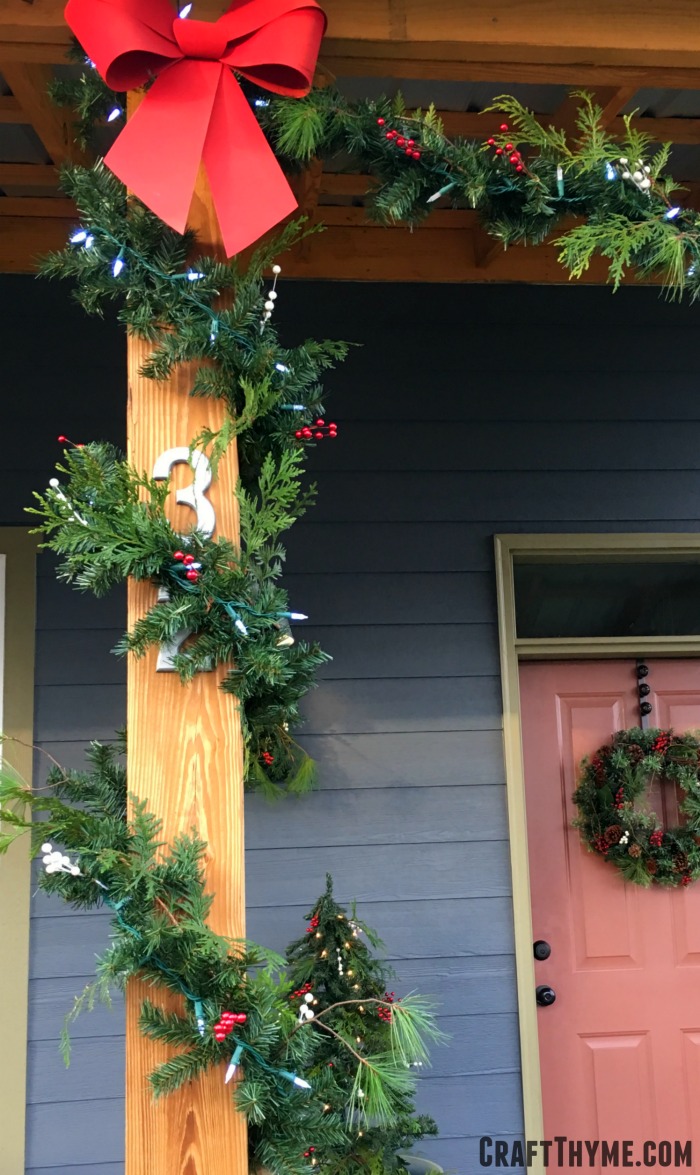
Oddly enough, if you want the artificial garland to look real start by having it look like absolute crap.  Hang that crimped piece of faux greenery awfulness as is.  Yep, that is right, don’t fluff, bend, or do anything just put that puppy up.  As you can see here I added some bows at the corner.  You can also see here it looks very much like a dejected Christmas Garland.  Once you have it in place then fluff.  Why wait you ask?  Because anywhere the garland is against a surface or hangs somewhere you will not see the back you are going to want to fluff all the fake greenery forward.  This is also a great time to add lights to your artificial garland if you plan on having it lit.

Cheap garland just looks sad and dejected but you can change that
Start with the sad and dejected cheap garland. I found this for $1.99 for nine feet the day after Thanksgiving.

Step 2 Grab Some Greenery

Here is where you sneak into your neighbors yard ask your neighbor nicely if you can take a few branches off of their evergreens.  White pine, leyland cypress, heck any type of evergreen will do.  Also ivy, magnolia leaves, dried hydrangea, grasses, pine cones, and bittersweet berries make great additions to the garland.  You will not need much of these items.  I used what I could shove in two grocery bags to do the entire porch and add to the artificial tree, tear drop garlands, and wreath.  When you have collected all your items cut the branches into 4-6 inch lengths.  Try to get as many branch tips as possible.  Blunt cut ends will work but need a little more finesse to work in nicely.

If you bought any floral picks or a few branches now is the time to cut them into similar sized items.  All the red and white berries you see where cut from 3 dollar store faux floral Christmas stems.

If you are working with various types of greenery sort everything in piles by type.

Step 3 Making that Faux Garland Fabulous

Now that you are likely covered in pine needles and resin it is time to make the faux, fabulous. Here is when you will finally make artificial garland look real. Start with a single type of evergreen (example your pile of white pine) and start adding them into your greenery at a somewhat even spacing.  To add (complicated steps ahead):

  1. Place a piece of greenery against the artificial garland you can simply twist a free piece of the fake branch around the greenery.

Surprisingly, this will secure the items.  Seriously!  Mine held up in the rain, sun, and wind.  Now you may be wondering why just place one type of evergreen at a time?  Well, too many times I get over zealous and put way too much of one type at the beginning and then run out by the end of the garland.  It may seem to take awhile to make multiple passes to turn your artificial garland into the real thing but the end result looks balanced.  Plus it takes a lot less time than putting greenery up, stepping back, taking it down and moving it, stepping back again, etc… You get the picture!

Blunt ends of cut greenery can be hidden behind the garland or wrapped deep in the greenery.  While, all this seems like “work” I can assure you that it is far less effort than making a real evergreen garland from scratch.

Cheap garland can look like the real thing with these tips and tricks

Step 4 Optional Step

If you really want your artificial garland to pop throw in some more faux items.  No, I’m not joking.  Surprisingly, some faux on faux action pumps your artificial garland up in a way that makes it seem more real.  Adding in more pieces of faux garland, bits of faux berries, or other Christmas florals give it some umph!

Honestly, this is all it takes to make some fabulous garland.  A little borrowed greenery and the ability to twist some wire makes for a beautiful and cheap Christmas decoration.  So take your knowledge and make some artificial garland look real!

Make faux garland fabulous


Posted on 10 Comments

1927 Cottage Style Home: Remodeling Update

Before and after of the craftsman fireplace

We have been awfully quite here on the website mostly due to a incredible amount of work that is taking place on the remodel of our 1927 cottage style combined duplex.  Man, that is a mouthful.  We have heard it described as traditional, craftsman, cottage style, etc.  In reality it is a spacious brick home from the 20’s that really does not fit a typical style of the time.  The design feels traditional and almost classical with the mirrored sides, but has eaves and shingles that give it a cottage craftsman feel.  I guess we will go with unique brick?  We gave you a before tour of the home and highlighted some of the good bones.  However, in reality it is taking a ton of work and has some significant challenges.  Of course anytime you work on remodeling an older home you better plan on significant challenges!

Painting. Oh Lord the Painting..

Let us start with the painting…  We have purchased over 40 gallons of paint.  I’d like to thank Lowe’s rebates for making that possible.  (You can read some of my other ways to save money at Lowe’s here).  Each piece of trim is taking not one, not two, but three coats of paint to cover the chipped and yellowed paint.  Of course that is after Adam has gone to the trouble to clean it, nail any loose pieces, caulk and putty all the gaps.  Then there is the ceiling, doors, and walls to paint; the list goes on and on.  I would estimate we are about halfway through.  I would think we were further but I have one room that will require a lot of plaster work so that is going to slow the entire process.

Before and after of the cottage style kitchen
What a coat of paint, and a couple hours of de-greasing, will do for a kitchen.

Some of the hardest parts of the painting have been prep work.  You can’t tell from this next photo but this craftsman style mantel and surround was pulled a good inch away from the wall, had about 20 (not hyperbole) nails, and tons of holes and scratches to sand and fill.  Turned out lovely in the end!

Before and after of the craftsman fireplace
As you can see the paint isn’t even dry in this photo!

We have ripped out a bathroom vanity (two more to go), updated closet storage, hung fans, lights, and blinds.  Blinds were a biggy!  Because guess how many windows this house has?  54…  54 windows…  That’s a lot of curtains and blinds.  Speaking of windows?!  We just placed an order for 52 brand new ones (the missing two windows are in the kitchen that we plan on gutting in the next couple of years).  The replacement window process is worthy of a few posts itself.  As much as we are avid DIYers we have windows on 4 stories and did I mentioned there are FIFTY-TWO of these godforsaken things to replace?  We are contracting out the whole process; which is daunting too.  I think the big lesson here is that when remodeling an older home you have to know when to bring in professionals.

Before and after of the cottage style closet
As soon as the paint was dry we hung new shelving and racks. It was absolutely fabulous to not live out of a box anymore!

Oh and in the meantime we took out 7 trees, hired a wonderful landscaper to basically come bush-hog the whole yard, discovered a hidden gazing pond in the process, and placed 104 bags of mulch already.  Did I mention we have done all that in the span of about three and a half months?  With working full time, teaching in the evenings (Adam), getting promoted (Brianna), starting a new preschool, first grade beginning, and trying to rock out the whole parenting thing, I’d say we have been done in!

We found a pond underneath all of the overgrowth and brush
Yeah… There was a pond under there…

Craft Thyme (and sleep) have suffered BUT I think it has already proven to be worth it.  Peppered through this post are some before and afters of the the progress we have already made.  Plus we have some awesome posts forthcoming, in case you ever want to learn how to remove virginia creeper vines from a house, work with galvanized pipe to make awesome curtain rods (very different than the previous black iron pipe fixtures), purchase replacement windows, eradicate english ivy, properly paint an old door, or plant about 100 bulbs then stay tuned because we’ve got your back!

Junked up garage is now all clean
I don’t think I even mentioned the garage… At least there were some cool tools in there.


Posted on 5 Comments

CitriStrip vs SoyGel

CitriStrip vs SoyGel on removing the paint from this brass hardware

In a post from a long time ago and far, far away I chose to use SoyGel paint stripper by Franmar over CitriStrip paint remover. I had taken a notion to remove 6 layers of paint from brick and I pitted CitriStrip vs SoyGel and Soygel won.  It was a notion that turned out fabulously, but took forever.  SoyGel was cost effective and had a great workability that was perfect for a vertical brick wall.  Fast forward a few years and I find myself drawn to, yet, another old house.  And what do old houses have in common?  Layers of paint.  Lots and lots of layers of paint.

This time around I find myself wanted to recover some beautiful brass hardware from thick layers of old yellowed paint.  We decided to paint our closet door black, and yucky yellowed hinges were just not going to cut it.  I immediately said to Adam that we need SoyGel ‘like stat’.  To which he calmly replied, have you seen how much this stuff is on Amazon?

CitriStrip vs SoyGel on removing the paint from this brass hardware

It appears, in the intervening years from my 20’s to 30’s SoyGel has increased in price and CitriStrip has gone down.  Better yet, CitriStrip was available at the big box store right down the road.  I’m impatient at the best of times, so generally the item I can grab today is more likely to be bought.  PLUS it gave me a chance to make the comparison of CitriStrip versus SoyGel when it comes to removing paint.

If you want to read all about working with SoyGel you can go get the deets here.  Otherwise I’ll highlight the differences below.

CitriStrip vs Soygel

CitriStrip has a great smell!  In fact it is a little disconcerting to feel like you should be eating something that is clearly meant to remove paint.  So for scent alone it is a winner, though SoyGel doesn’t smell bad like chemical stripper.  The consistency was thinner than SoyGel which made painting it on the hardware a little easier.  The thick gel texture of SoyGel (Methinks that perhaps they got the name from this observation) was perfect for glopping on brick, but would likely be a pain to cover small intricate detail.  So I’ll give the CitriStrip bonus points for this application.

BUT there is a big but here: CitriStrip just didn’t pack as powerful a punch.  It looked like it was working, paint bubbling up in a pleasant, wipe me off kind of way, BUT (see I told you I would deliver) when I actually went to remove it the CitriStrip had removed one layer.  ONE.  Well okay, maybe I didn’t leave it on long enough or use the right tools.  So I put another layer of CitriStrip on and set the timer for another 30 minutes.

Using CitriStrip to remove paint

I spent the time cutting in the walls of the second living room while Adam focused on the corners.  I heard my alarm sound on the phone, turned it off and continued merrily painting.  This gave the CitriStrip plenty of time to work it’s magic.  But once bitten, twice shy; I wasn’t going to take chances this time and brought out the big guns: Steel Wool.  BUT…  Another single layer of paint removed…  Oh boy only two more to go!  I thought I had potentially coated the paint with removed paint thereby causing a paint seal or paintception.  So I washed the entire thing off and started again.  With similar results.

I actually went back and reread my previous post on SoyGel.  I remember the mantel being a breeze to remove but I couldn’t recall how long I had let the SoyGel set.  Trying to make this a fair comparison I took the CitriStrip and coated the hardware in one more thick coat and plopped it in a plastic bag to sit overnight. Well, that worked!  I was able to just rub off the paint and wash everything with soap and water.  I took a little more steal wool to shine up some of the brass.

removing paint from brass hardware.
Just note, this is the interim step in removing paint from brass hardware. I call it the goo stage.

So the final consensus for CitriStrip versus SoyGel?  Well it really depends on your money, time frame, and patience.  I personally think that SoyGel was much more powerful up front, but for a small job CitriStrip certainly did it.  My final consensus on which is better?  It depends on the application.  If you want something quick, cheap, and effective but you’ll need to really scrape and let it sit overnight?  Well CitriStrip works fine.  But SoyGel would still be my go-to if I decide to bring to strip all the paint off a large item like a fireplace or door.

Before and after removing paint from brass hardwareCitriStrip vs SoyGel


Posted on 20 Comments

Edison Bulb Chandelier: A DIY Overview

A flattened edison bulb makes a unique touch to a light fixture

Our DIY Edison bulb chandelier occasions the most comments both on and off the website. It is the second highest source of interest in our home besides the gardens. Adam designed and created this industrial light fixture with 15 Edison light bulbs shortly after we moved into the house at Burk. The original light was pretty, but small and certainly not anything to get excited over. It did feature a single Edison light bulb that kind of kick started our creativity. That bulb was what lead to our industrial and pipe theme throughout the house. Unlike many of our tutorials we do not have the step by step photos of how to build an Edison bulb chandelier, however, we can give you a rundown, tutorial links, and supplies so that you can likely make an Edison light fixture of your own.

Designing an Edison Bulb Chandelier

As I mentioned above our main fascination started with Edison light bulbs and we have been meaning to blog about this Edison Bulb Chandelier forever.  Now that we are working on the new house we thought it would be good idea to catch up on some of the old projects that never made it to the blog.

A flattened edison bulb makes a unique touch to a light fixture

Do you know how many different types of Edison bulbs there are? We didn’t either, but in researching the project we founds tons of different shapes, styles, and prices. OUCH! Edison light bulbs are not exactly cheap… Below I am going to link to some options using my affiliate links. These links make it easy to purchase everything you need but I’ll let you in on a little secret. If you are patient and willing to go the Ebay route you can cut the costs of building and Edison bulb chandelier in half, easily! We sourced all of our material by bidding on lots of Edison bulbs, brass sockets, and cloth covered wire that mostly shipped from China. That means we have a ton of extra bulbs (saving those for when others burn out) and had to wait a couple weeks for items to arrive. If you can’t wait then go the Amazon route. You will pay a bit more but the items arrive much sooner.

In designing ours we knew we wanted to match the bronze fixtures, industrial design, and incorporate modern with traditional. Wait… did I say bronze? Oh yes, I faux finished every socket. The cost savings of buying brass over bronze was enormous! We brought the traditional/vintage feel in with the cloth covered wire and worked gave it a modern feel with the salvaged wood box top. Adam did a lot of research and consultation about power to make sure that we could make a fixture that could safely handle 15 bulbs. We also decided it would be cool to have them where each individual light can turn off and on. It allows us to mix up which bulbs are showcased and when we need a really bright source of light we can turn them all on.

DIY Industrial light fixture tutorial

Edison Bulb Chandelier Supplies

Basics of Edison Light Fixture Assembly

Step 1: Assemble Your Supplies and Make Your Boxes

As mentioned above we spent a good deal of time getting our supplies hunted down through Ebay. Once they arrived we did the following:

  1. Created a Box: You can use this headboard tutorial to get an idea of how to stain the salvaged wood. Attach the wooden slats to a basic frame like we made in with our potato boxes
  2. Faux Paint Sockets: If you aren’t happy with the original color you can faux finish them to a cast iron or bronze color
  3. Decide on Lengths of Cloth Covered Wire: We chose varied height so we needed to cut a variety of wire lengths
  4. Decide on Light Placement: Since we went with varied height of wire we decided to keep the placement in three simple rows. We drilled holes that were sized to just allow the cloth wire through without have a huge gap that needed covering.

How to make an edison bulb chandelier

Step 2: Start Wiring

Working with wires is not my thing… I know the basics but usually Adam handles this step. We did not have pictures and suggest googling wiring tutorials. Please be extra careful when wiring anything!  The basics go:

  1. You will need to attach the wire to each socket.
  2. Then each socket will need to be wired into the boxes.
  3. Boxes will need to be chained together

Step 3: Hanging the Fixture

We attached two heavy duty hooks to ceiling joists. The wood on this fixture makes it heavy! We used two loops of chain on either end. They are attached on the interior near each corner with smaller hooks and the loop of chain is simply hung over the hook. We used the loops, chain, and hooks for two reasons. First, so because they are heavy duty enough to hold the fixture. Secondly, the chain allowed us to hang the fixture lower than intended at first. This is important as you will need to hang the fixture and then wire it into your home’s power. PLEASE REMEMBER TO TURN OFF THE POWER BEFORE WIRING. I highly suggest turning off the main breaker while doing any wiring. It is just not as safe to turn off the breaker in the room you are in. It is waaay to easy to mistakenly turn off the wrong breaker and go to wire live wires.

Anyway, back to why we chose chain for mounting: It was way too heavy for someone to hold the entire Edison bulb chandelier while someone else wired it in. Plus you needed the space from the ceiling to the top of the industrial light fixture to actually do the wiring. Once it was all wired up, I used my small hands to reach in and hook each corner higher on the chain till we just had a tiny gap from the ceiling. It covers the hooks so that it appears to be a floating mount. It was way easier to hoist it link by link than try to tie off rope or wire in a new position.

Mae a custom edison light fixture

Step 4: Testing and Finalizing Your Design

Step 4 should probably go before the hoisting mentioned in step 3. No sense getting the fixture in the final position without making sure it all works. We tested each light to make sure all connections were secure with a single light bulb. That way you do not have to wonder if the bulb is broken if a socket does not appear to work. takes out all the process of elimination. Once we were sure all the wiring was in correct working order we hoisted it to the final position and then had a blast trying out different bulbs. We fiddled with all the types we purchased and played with placement and which ones looked good on and off. It took way longer than anticipated to find a good balance with the variable lengths and sizes of Edison bulbs, but it was fun to do. The final result still changes from time to time as we turn them on and off. In two years we have only had one bulb burn out and need replacement.

Since we do not have all the step by step pictures of how to assemble the Edison bulb chandelier please let us know if you have any questions in the comments. We are always happy to help and would love to see what you create!

Check out this tutorial on how to create your own DIY Edison Light Fixture. It is easy to make a great looking industrial light fixture for your home!

Posted on 6 Comments

New Reaganskopp Homestead: A No Filter Home Tour

You might have noticed that it has been a little quiet around here but we are going to change that with a new home tour.  Well it all started with the decision to do a little yard sale shopping which ended up with us shopping for a yard.  Yep!  We have moved! A whole 1.8 miles down the road from our previous locale.  We have been known for our impulsiveness from time to time, but I am pretty sure this move takes the cake.  Our process in a nutshell: see a house you are interested in, go put your house on the market, and boom under contract in 19 hours.  The whole shebang set in motion in less than a week, which certainly did cause some scrambling since we hadn’t even put in an offer on another property.  As luck would have it we were able to work everything out so that life and Craft Thyme can continue on.

BUT the houses are oh so different this time.  We have gone from new and modern to old and well…old?  Oh yes, we have decided to plunge into the land of old home ownership with the purchase of a 1927 brick combined duplex.  Fun fact, when I (Brianna) was a kid I spent a lot of time in this house.  I loved all the pass throughs, strange staircases, fireplaces, nooks, crannies, and built ins. Seeing as this house is double the heated space and three times the yard size with an attic, two basements, and a garage?  What’s not to love?

But every fairy tale has to have the heroes triumph over adversity.  Our adversity? Tenants.  This home has had tenants for a long time and they have been well… tenants…  You really need someone who loves an older home to keep it up in style!  And guess what?  We are going to love this older home to renovation death.  The bones are amazing with hardwood floors, huge rooms, and built ins galore. But being us means we have huge plans.  Of course the huge plans have to happen after some basic changes.  We are currently in those first stages.  The ones where you get moved in, clean, clean, clean, paint, hang blinds, paint some more, try not to kill each other, and paint some more and clean again.  We will provide you with lots of before and afters but for right now we are going to do the tour AS IS.  Oh yes!  You get to see the new homestead in complete un-retouched glory.  #nofilter!

Let the Home Tour Begin:

The First Floor

The first floor contains an entryway that serves to combine the two sides, two living rooms, two dining rooms, a three quarter bath, and combined galley kitchen.  We are just going with pictures from here on out for the first floor of the home tour.  BUT take special note of those awesome fireplaces, built-ins, and staircases.  They are the bones of what will be AWESOME.

Home Tour Dining Room: We re-homed the piano. Best story from the previous tenants: No one knew where the piano came from. It just appeared one day.
We re-homed the piano. Best story from the previous tenants: No one knew where the piano came from. It just appeared one day.
Home Tour Living Room:You can't help but fall in love with these fireplaces and staircases! One for each side!
You can’t help but fall in love with these fireplaces and staircases! One for each side!
Just don't ask Adam his opinion of the kitchen.
Just don’t ask Adam his opinion of the kitchen.
The entry and sun-porch is pretty inviting.
Tiniest sink ever.
Tiniest sink ever.

The Second Floor

There are two ways to reach the second floor.  Matching winding staircases flank the fireplaces in both living rooms.  Both sides are mirrored making for two modest bedrooms, two gargantuan bedrooms with sitting areas, and two extremely modest (read that as tiny) bathrooms by today’s standards.  There is a pass through in the hallways that leads across to either side and up to the attic (Not pictured in the home tour).

Home Tour Bedroom:There are two of these smaller, yet still generous sized bedrooms. Needs new plaster and paint in both cases.
There are two of these smaller, yet still generous sized bedrooms. Needs new plaster and paint in both cases.
Tile. Lots of colorful tile.
Questionable stains... :P
Questionable stains… :P
Both master and shared boy bedrooms have neat bumpouts and a large reading nook. One bedroom contains stains the other eggplant paint. A real toss up on what to tackle first.

The Third Floor

What?!  There is a third floor?  You bet your sweet aspercreme there is!  Head up an oddly shaped and unfinished wood staircase to a large wooden floored attic.  Currently, it is not heated or plumbed but the kids adore running around up there and we have very awesome, secret plans for 5+ years in the future.  Right now I have lots of winter clothes and fine china stashed up there till I straighten out the closet situation and paint the beautiful builtins.

Color, color everywhere!

The Ground Floor

WTH? There is more!  Oh yes, there are two concrete basements down below.  The access to the basement is solely outside, which, is going to be fun in the winter.  Because guess what?!  That’s where the laundry is located.  We have more of those secret plans to handle that, but we will get to that later.  I really don’t have any pictures of dark, concrete areas to share.  You should thank me for saving you from that.

The Yard

Well what can I say about the yard…  It is extremely large, especially, for a city lot, but the tenants were N.O.T. into gardening.  Underneath the over growth there are tons of interesting plants, jack in the pulpits, day lilies in spades, and a host of other plants (including a run in with poison ivy twice now).  We won’t be doing much in the gardening area till next spring, but there is so much potential there it is exciting and a little overwhelming.  Kind of welcome to the jungle meets English cottage garden.

There is a pond out there... Somewhere....
There is a pond out there… Somewhere….
Under the tree cover we put a new mailbox.
We found a buried dog lot that housed the chickens for a short stint.


And that concludes our before tour.  We will be posting additional room details as we work to renovate our new home.  Expect to see a new style as we go for a more laid back bohemian mix of modern and classic.  Should be entertaining for both you and us!