Posted on 5 Comments

CitriStrip vs SoyGel

CitriStrip vs SoyGel on removing the paint from this brass hardware

In a post from a long time ago and far, far away I chose to use SoyGel paint stripper by Franmar over CitriStrip paint remover. I had taken a notion to remove 6 layers of paint from brick and I pitted CitriStrip vs SoyGel and Soygel won.  It was a notion that turned out fabulously, but took forever.  SoyGel was cost effective and had a great workability that was perfect for a vertical brick wall.  Fast forward a few years and I find myself drawn to, yet, another old house.  And what do old houses have in common?  Layers of paint.  Lots and lots of layers of paint.

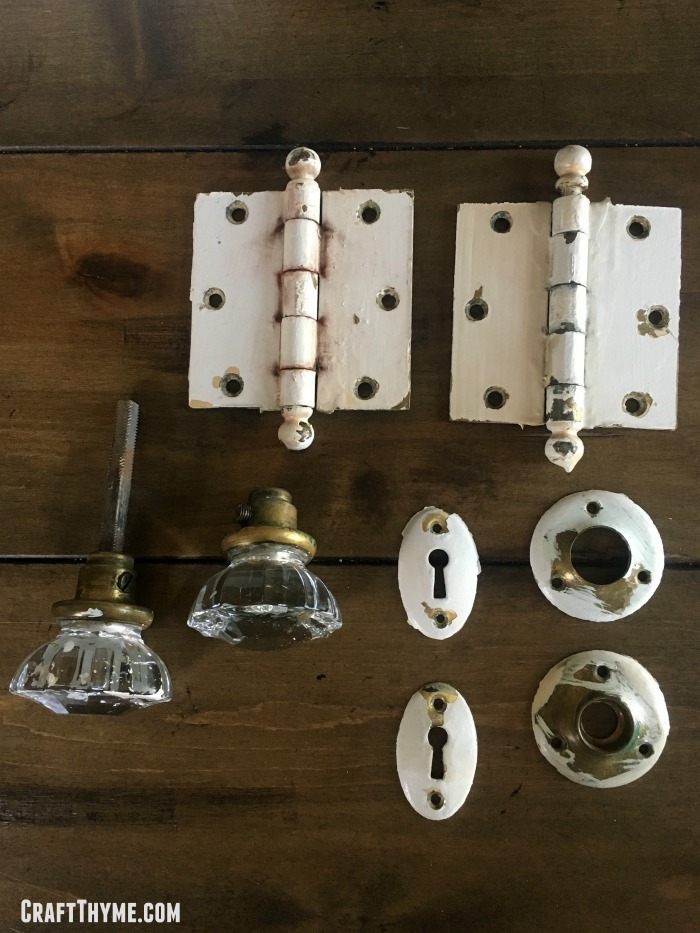
This time around I find myself wanted to recover some beautiful brass hardware from thick layers of old yellowed paint.  We decided to paint our closet door black, and yucky yellowed hinges were just not going to cut it.  I immediately said to Adam that we need SoyGel ‘like stat’.  To which he calmly replied, have you seen how much this stuff is on Amazon?

CitriStrip vs SoyGel on removing the paint from this brass hardware

It appears, in the intervening years from my 20’s to 30’s SoyGel has increased in price and CitriStrip has gone down.  Better yet, CitriStrip was available at the big box store right down the road.  I’m impatient at the best of times, so generally the item I can grab today is more likely to be bought.  PLUS it gave me a chance to make the comparison of CitriStrip versus SoyGel when it comes to removing paint.

If you want to read all about working with SoyGel you can go get the deets here.  Otherwise I’ll highlight the differences below.

CitriStrip vs Soygel

CitriStrip has a great smell!  In fact it is a little disconcerting to feel like you should be eating something that is clearly meant to remove paint.  So for scent alone it is a winner, though SoyGel doesn’t smell bad like chemical stripper.  The consistency was thinner than SoyGel which made painting it on the hardware a little easier.  The thick gel texture of SoyGel (Methinks that perhaps they got the name from this observation) was perfect for glopping on brick, but would likely be a pain to cover small intricate detail.  So I’ll give the CitriStrip bonus points for this application.

BUT there is a big but here: CitriStrip just didn’t pack as powerful a punch.  It looked like it was working, paint bubbling up in a pleasant, wipe me off kind of way, BUT (see I told you I would deliver) when I actually went to remove it the CitriStrip had removed one layer.  ONE.  Well okay, maybe I didn’t leave it on long enough or use the right tools.  So I put another layer of CitriStrip on and set the timer for another 30 minutes.

Using CitriStrip to remove paint

I spent the time cutting in the walls of the second living room while Adam focused on the corners.  I heard my alarm sound on the phone, turned it off and continued merrily painting.  This gave the CitriStrip plenty of time to work it’s magic.  But once bitten, twice shy; I wasn’t going to take chances this time and brought out the big guns: Steel Wool.  BUT…  Another single layer of paint removed…  Oh boy only two more to go!  I thought I had potentially coated the paint with removed paint thereby causing a paint seal or paintception.  So I washed the entire thing off and started again.  With similar results.

I actually went back and reread my previous post on SoyGel.  I remember the mantel being a breeze to remove but I couldn’t recall how long I had let the SoyGel set.  Trying to make this a fair comparison I took the CitriStrip and coated the hardware in one more thick coat and plopped it in a plastic bag to sit overnight. Well, that worked!  I was able to just rub off the paint and wash everything with soap and water.  I took a little more steal wool to shine up some of the brass.

removing paint from brass hardware.
Just note, this is the interim step in removing paint from brass hardware. I call it the goo stage.

So the final consensus for CitriStrip versus SoyGel?  Well it really depends on your money, time frame, and patience.  I personally think that SoyGel was much more powerful up front, but for a small job CitriStrip certainly did it.  My final consensus on which is better?  It depends on the application.  If you want something quick, cheap, and effective but you’ll need to really scrape and let it sit overnight?  Well CitriStrip works fine.  But SoyGel would still be my go-to if I decide to bring to strip all the paint off a large item like a fireplace or door.

Before and after removing paint from brass hardwareCitriStrip vs SoyGel


Posted on 20 Comments

Edison Bulb Chandelier: A DIY Overview

A flattened edison bulb makes a unique touch to a light fixture

Our DIY Edison bulb chandelier occasions the most comments both on and off the website. It is the second highest source of interest in our home besides the gardens. Adam designed and created this industrial light fixture with 15 Edison light bulbs shortly after we moved into the house at Burk. The original light was pretty, but small and certainly not anything to get excited over. It did feature a single Edison light bulb that kind of kick started our creativity. That bulb was what lead to our industrial and pipe theme throughout the house. Unlike many of our tutorials we do not have the step by step photos of how to build an Edison bulb chandelier, however, we can give you a rundown, tutorial links, and supplies so that you can likely make an Edison light fixture of your own.

Designing an Edison Bulb Chandelier

As I mentioned above our main fascination started with Edison light bulbs and we have been meaning to blog about this Edison Bulb Chandelier forever.  Now that we are working on the new house we thought it would be good idea to catch up on some of the old projects that never made it to the blog.

A flattened edison bulb makes a unique touch to a light fixture

Do you know how many different types of Edison bulbs there are? We didn’t either, but in researching the project we founds tons of different shapes, styles, and prices. OUCH! Edison light bulbs are not exactly cheap… Below I am going to link to some options using my affiliate links. These links make it easy to purchase everything you need but I’ll let you in on a little secret. If you are patient and willing to go the Ebay route you can cut the costs of building and Edison bulb chandelier in half, easily! We sourced all of our material by bidding on lots of Edison bulbs, brass sockets, and cloth covered wire that mostly shipped from China. That means we have a ton of extra bulbs (saving those for when others burn out) and had to wait a couple weeks for items to arrive. If you can’t wait then go the Amazon route. You will pay a bit more but the items arrive much sooner.

In designing ours we knew we wanted to match the bronze fixtures, industrial design, and incorporate modern with traditional. Wait… did I say bronze? Oh yes, I faux finished every socket. The cost savings of buying brass over bronze was enormous! We brought the traditional/vintage feel in with the cloth covered wire and worked gave it a modern feel with the salvaged wood box top. Adam did a lot of research and consultation about power to make sure that we could make a fixture that could safely handle 15 bulbs. We also decided it would be cool to have them where each individual light can turn off and on. It allows us to mix up which bulbs are showcased and when we need a really bright source of light we can turn them all on.

DIY Industrial light fixture tutorial

Edison Bulb Chandelier Supplies

Basics of Edison Light Fixture Assembly

Step 1: Assemble Your Supplies and Make Your Boxes

As mentioned above we spent a good deal of time getting our supplies hunted down through Ebay. Once they arrived we did the following:

  1. Created a Box: You can use this headboard tutorial to get an idea of how to stain the salvaged wood. Attach the wooden slats to a basic frame like we made in with our potato boxes
  2. Faux Paint Sockets: If you aren’t happy with the original color you can faux finish them to a cast iron or bronze color
  3. Decide on Lengths of Cloth Covered Wire: We chose varied height so we needed to cut a variety of wire lengths
  4. Decide on Light Placement: Since we went with varied height of wire we decided to keep the placement in three simple rows. We drilled holes that were sized to just allow the cloth wire through without have a huge gap that needed covering.

How to make an edison bulb chandelier

Step 2: Start Wiring

Working with wires is not my thing… I know the basics but usually Adam handles this step. We did not have pictures and suggest googling wiring tutorials. Please be extra careful when wiring anything!  The basics go:

  1. You will need to attach the wire to each socket.
  2. Then each socket will need to be wired into the boxes.
  3. Boxes will need to be chained together

Step 3: Hanging the Fixture

We attached two heavy duty hooks to ceiling joists. The wood on this fixture makes it heavy! We used two loops of chain on either end. They are attached on the interior near each corner with smaller hooks and the loop of chain is simply hung over the hook. We used the loops, chain, and hooks for two reasons. First, so because they are heavy duty enough to hold the fixture. Secondly, the chain allowed us to hang the fixture lower than intended at first. This is important as you will need to hang the fixture and then wire it into your home’s power. PLEASE REMEMBER TO TURN OFF THE POWER BEFORE WIRING. I highly suggest turning off the main breaker while doing any wiring. It is just not as safe to turn off the breaker in the room you are in. It is waaay to easy to mistakenly turn off the wrong breaker and go to wire live wires.

Anyway, back to why we chose chain for mounting: It was way too heavy for someone to hold the entire Edison bulb chandelier while someone else wired it in. Plus you needed the space from the ceiling to the top of the industrial light fixture to actually do the wiring. Once it was all wired up, I used my small hands to reach in and hook each corner higher on the chain till we just had a tiny gap from the ceiling. It covers the hooks so that it appears to be a floating mount. It was way easier to hoist it link by link than try to tie off rope or wire in a new position.

Mae a custom edison light fixture

Step 4: Testing and Finalizing Your Design

Step 4 should probably go before the hoisting mentioned in step 3. No sense getting the fixture in the final position without making sure it all works. We tested each light to make sure all connections were secure with a single light bulb. That way you do not have to wonder if the bulb is broken if a socket does not appear to work. takes out all the process of elimination. Once we were sure all the wiring was in correct working order we hoisted it to the final position and then had a blast trying out different bulbs. We fiddled with all the types we purchased and played with placement and which ones looked good on and off. It took way longer than anticipated to find a good balance with the variable lengths and sizes of Edison bulbs, but it was fun to do. The final result still changes from time to time as we turn them on and off. In two years we have only had one bulb burn out and need replacement.

Since we do not have all the step by step pictures of how to assemble the Edison bulb chandelier please let us know if you have any questions in the comments. We are always happy to help and would love to see what you create!

Check out this tutorial on how to create your own DIY Edison Light Fixture. It is easy to make a great looking industrial light fixture for your home!

Posted on 6 Comments

New Reaganskopp Homestead: A No Filter Home Tour

You might have noticed that it has been a little quiet around here but we are going to change that with a new home tour.  Well it all started with the decision to do a little yard sale shopping which ended up with us shopping for a yard.  Yep!  We have moved! A whole 1.8 miles down the road from our previous locale.  We have been known for our impulsiveness from time to time, but I am pretty sure this move takes the cake.  Our process in a nutshell: see a house you are interested in, go put your house on the market, and boom under contract in 19 hours.  The whole shebang set in motion in less than a week, which certainly did cause some scrambling since we hadn’t even put in an offer on another property.  As luck would have it we were able to work everything out so that life and Craft Thyme can continue on.

BUT the houses are oh so different this time.  We have gone from new and modern to old and well…old?  Oh yes, we have decided to plunge into the land of old home ownership with the purchase of a 1927 brick combined duplex.  Fun fact, when I (Brianna) was a kid I spent a lot of time in this house.  I loved all the pass throughs, strange staircases, fireplaces, nooks, crannies, and built ins. Seeing as this house is double the heated space and three times the yard size with an attic, two basements, and a garage?  What’s not to love?

But every fairy tale has to have the heroes triumph over adversity.  Our adversity? Tenants.  This home has had tenants for a long time and they have been well… tenants…  You really need someone who loves an older home to keep it up in style!  And guess what?  We are going to love this older home to renovation death.  The bones are amazing with hardwood floors, huge rooms, and built ins galore. But being us means we have huge plans.  Of course the huge plans have to happen after some basic changes.  We are currently in those first stages.  The ones where you get moved in, clean, clean, clean, paint, hang blinds, paint some more, try not to kill each other, and paint some more and clean again.  We will provide you with lots of before and afters but for right now we are going to do the tour AS IS.  Oh yes!  You get to see the new homestead in complete un-retouched glory.  #nofilter!

Let the Home Tour Begin:

The First Floor

The first floor contains an entryway that serves to combine the two sides, two living rooms, two dining rooms, a three quarter bath, and combined galley kitchen.  We are just going with pictures from here on out for the first floor of the home tour.  BUT take special note of those awesome fireplaces, built-ins, and staircases.  They are the bones of what will be AWESOME.

Home Tour Dining Room: We re-homed the piano. Best story from the previous tenants: No one knew where the piano came from. It just appeared one day.
We re-homed the piano. Best story from the previous tenants: No one knew where the piano came from. It just appeared one day.
Home Tour Living Room:You can't help but fall in love with these fireplaces and staircases! One for each side!
You can’t help but fall in love with these fireplaces and staircases! One for each side!
Just don't ask Adam his opinion of the kitchen.
Just don’t ask Adam his opinion of the kitchen.
The entry and sun-porch is pretty inviting.
Tiniest sink ever.
Tiniest sink ever.

The Second Floor

There are two ways to reach the second floor.  Matching winding staircases flank the fireplaces in both living rooms.  Both sides are mirrored making for two modest bedrooms, two gargantuan bedrooms with sitting areas, and two extremely modest (read that as tiny) bathrooms by today’s standards.  There is a pass through in the hallways that leads across to either side and up to the attic (Not pictured in the home tour).

Home Tour Bedroom:There are two of these smaller, yet still generous sized bedrooms. Needs new plaster and paint in both cases.
There are two of these smaller, yet still generous sized bedrooms. Needs new plaster and paint in both cases.
Tile. Lots of colorful tile.
Questionable stains... :P
Questionable stains… :P
Both master and shared boy bedrooms have neat bumpouts and a large reading nook. One bedroom contains stains the other eggplant paint. A real toss up on what to tackle first.

The Third Floor

What?!  There is a third floor?  You bet your sweet aspercreme there is!  Head up an oddly shaped and unfinished wood staircase to a large wooden floored attic.  Currently, it is not heated or plumbed but the kids adore running around up there and we have very awesome, secret plans for 5+ years in the future.  Right now I have lots of winter clothes and fine china stashed up there till I straighten out the closet situation and paint the beautiful builtins.

Color, color everywhere!

The Ground Floor

WTH? There is more!  Oh yes, there are two concrete basements down below.  The access to the basement is solely outside, which, is going to be fun in the winter.  Because guess what?!  That’s where the laundry is located.  We have more of those secret plans to handle that, but we will get to that later.  I really don’t have any pictures of dark, concrete areas to share.  You should thank me for saving you from that.

The Yard

Well what can I say about the yard…  It is extremely large, especially, for a city lot, but the tenants were N.O.T. into gardening.  Underneath the over growth there are tons of interesting plants, jack in the pulpits, day lilies in spades, and a host of other plants (including a run in with poison ivy twice now).  We won’t be doing much in the gardening area till next spring, but there is so much potential there it is exciting and a little overwhelming.  Kind of welcome to the jungle meets English cottage garden.

There is a pond out there... Somewhere....
There is a pond out there… Somewhere….
Under the tree cover we put a new mailbox.
We found a buried dog lot that housed the chickens for a short stint.


And that concludes our before tour.  We will be posting additional room details as we work to renovate our new home.  Expect to see a new style as we go for a more laid back bohemian mix of modern and classic.  Should be entertaining for both you and us!


Posted on 2 Comments

Why You Need A Secure Coop for Chickens

Why do some people need to have the fort knox of secure chicken coops?  We certainly had the Taj MaCoop at our previous house.  I personally have never free ranged my chickens since it is not allowed in the city, but I never realized why I needed such a secure coop.  Below are the reasons a secure coop and run is necessary for some flocks of chickens.  If you lack the space to free range and live in an area with wildlife you may need to go the extra mile with hardware cloth and heavy bolts just to keep you flock safe.

That coop withstood multiple dog attacks with zero signs of wear!

It is a sad week here at the Reaganskopp household.  With heavy hearts we had to rehome what was left of our chicken flock.  We moved them to our new home, the new girls started laying and everything was going fabulously… Until it wasn’t.

First, one of the three redneck chickens (bantams) got a case of bumble-foot that could not be cured.  So, I had to put her out of her misery.  Please know as a chicken owner you may end up dealing with things like this.  It is the ‘not fun’ part of owning livestock.  10 of 11 left…

Secondly, we had to leave town in a hurry to help with a family medical issue.  When we got back someone/thing had opened the gate releasing all the chickens for an entire weekend.  Luckily the girls took roost under the porch and made a nice dirt nest by the basement.  However, the silver laced wynadotte was never to be seen again.  Chicken count 9 of 11…

RIP Condi!
RIP Conde!

Oh number 3!  The day the bear came.  Loose fencing and a large bear make for an exciting Saturday morning.  The bear decided to drag our head chicken down the hill.  Condoleezza was my personal favorite so that was a real blow, plus I got the adrenaline rush of a life time when I came within a 2 feet of a large bear in the woods.  And yes, you read that correctly a bear…  I live in a city but that city is located in the mountains so we get exciting things like bears.  I had seen movement in the woods and thought it was our wayward chicken.  Nope it was the bear that had taken our chicken.  Backing slowly away worked well.  We moved closer to the river and have over 3 tenths of a wooded acre now (Huge in the City) so apparently that makes us bear central.  Do not get me started on our trash issues or the new bear safety lessons we have had with the kids… 8/11 (not looking so hot for the flock)

And the final straw after fixing the hole in the fence and bird netting the entire top of the run… Foxes.  Bears and Foxes.  Can. Not. Make. This. Up.  The foxes figured out a way to climb in-between the layers of netting.  They also decided to polish off the last two bantams.  Leaving behind half of one for me to fight a swarm of yellow jackets to clean up the remains.  Let’s just say that is a sight that can not be unseen.  Since we were down to 6 of our original 11 chickens we knew we had to take action fast.  We realize exactly what type of coop will have to be built to survive the wildlife on this side of town and that was not about to occur in a single day.  So we found a nice couple with a large free range area surrounded by an electric fence who were happy to have 6 laying chickens before the sun set and the foxes returned.

So that means we will eat the last of our eggs and have to go back to buying them at the farmers market like everyone else.  It also means that Adam is planning the most fabulous coop build over the winter so we can start fresh in the spring.  Now to save the money for the yards and yards of expensive hardware cloth it will require to make a safe space!

Adam's gorgeous Brahma did make it!  Though you can see her lovely foot feather much worse for wear after tangling with a fox the night before.
Adam’s gorgeous Brahma did make it! Though you can see her lovely foot feather much worse for wear after tangling with a fox the night before.

Moral of this story for anyone thinking of owning chickens.  Depending on the predator load in your area you may be fine with a simple netted run or even an open coop with full free range.  BUT if you have a lot of predators and the chickens only have a small space to roam you must have a secure place for them.  They are simply too easy and tempting to be left alone by any predator that can reach them if there isn’t adequate coverage for them to run and hide.  Our mistake was not realizing the difference a 2 mile move makes and providing a secure enough location up front.  At least we found a good home for the remaining flock and now have a plan in place for next year.

Going to miss all those eggs...
Going to miss all those eggs…
Posted on 7 Comments

Bees and Butterflies on the Rebound

Bumblebee on lavender

This week is pollinator week in in the United States.  National Pollinator week was created to bring awareness to all pollinators which include bees, butterflies, birds, and and bats.  In case you weren’t aware Asheville is a certified Bee City, USA.  There is a week long celebration to bring awareness to pollinators. As gardeners, I tend to think we take mental notes of all the environmental gloom and doom we hear. Global warming, bee colony collapse, droughts, pesticide, and the myriad of other environmental disasters that we both contribute to as humans and feel absolutely overwhelmed to stop. Well guess what, today I have good news! Honeybee and butterfly populations are on the rebound. The general scientific community believes this is in large part to increased interest in bee keeping AND gardeners like you and me.Butterfly on a flower

While it may be too early to tell it certainly looks like everyone had an impact by increasing habitat that was beneficial for pollinators. For example, monarch butterflies at their smallest population level were covering 1 hectare in their Mexican over wintering grounds. This past year they covered 4 hectares; nearly 3 times more than previous years! Some of the butterfly rebound can be attributed to favorable climate this past winter, but also to programs of planting herb and pesticide protected stands of milkweed. The plant necessary for monarch butterfly life cycle. Additionally, the Mexican government worked WITH the US government on this project. The US planted milkweed and Mexico work to crackdown on illegal logging in protect monarch forest land. How is that for some warm fuzzies and feeling like you make an impact?!

Throughout the US, Canada, and Europe the number bee hives have increased between 10-15%. This is due in large part to education about bee colony collapse and a renewed interest in backyard bee keeping. Additionally, increased interest in pollinator gardens have given more urban habitat for these small pollinators. Wonderful news all around!

Unfortunately it is not all Rainbows and Unicorns

Except, there are still issues for both honey bees, butterflies and other pollinators, despite the recent rebound numbers. First, lets tackle the bee situation. The colony increase are mostly due to an influx of beekeepers. These beekeepers are still reporting losses of 40-60% of their hives every year. Imagine if you lost 60% of your garden! or 60% of your craft projects failed! Every year. After Year. Shoo… I doubt most of us would keep at it. So there is a lot of concern that the be rebound is temporary because it is a hot button issue and the general colony collapse problem hasn’t gone away (and this is not the post to discuss those potential causes). It is still devastating any wild honey bee populations! The increase in butterflies is fragile and new. We are looking at basically 10 acres holding almost every monarch butterfly in the world. Logging those acres or remove their milkweed and we will be right back where we were. But do not get discouraged. Human efforts are making an impact in both places.Bumblebee on lavender

What As Gardeners Can We Do For Bees?

Gardeners can make a huge impact by offering plants for pollinators. Even if flowers aren’t your thing adding in a few lavenders or butterfly weed (milkweed) plants offers a respite for traveling bees and butterflies. Extra benefit, both of these plants are perennials so you plant them off to one side and forget about them. They will continue to benefit both your garden with plentiful pollinators for your fruits and veggies and benefit the insects with increased habitat.  Additionally they attract other types of native bees like bumble bees and mason bees.

If you want to get more involved you can work on cultivating a true pollinator garden. Here is just a short list of some plants that pollinators love and are easy to find at the local garden center. Plus not all of them are flowers. Many herbs also attract pollinators as good places for caterpillars and food when they flower.  Here are some of my favorites with affiliate links if you want to purchase.

And if you want to be a gold member of the ‘increase pollinator club’ you can leave a certain amount of ‘wild space’ and attempt to attract native bees as well. Wild space gardening has popped up all over Asheville. I’ll let you read up on their facebook page here. But the general idea is to have a healthy 4 foot by 4 foot space of wild friendly plants.House for Mason Bees

We have opted to do a combo. I am adding a number of pollinator friendly plants PLUS we just hung our first mason bee house to attract mason bees next spring. (Quick PSA: if you are interested in the complimentary butterfly house don’t bother. I researched it and they do not attract butterflies. I was sad, but happy I didn’t waste the money). I’m not opting for a honeybee hive as I really do not have the necessary property to adequately support a nice healthy hive. I went to a few classes and you need a certain number of clear feet just for them to enter and exit the hive. SIGH! Maybe the next house!

Now mason bees I can do. I’ll save all the details about them for a different post, but suffice to say they are tiny, native pollinators. The pictured house does attract them, they are safe non-aggressive bees (the males can’t even sting), and they are native to the entirety of North America. So we are going to try to attract these little green, blue, and tiny honeybee colored bees to our house while also adding more herbs, flowers, and plants to offer shelter to all pollinators. That way we can contribute to the awesome bee and butterfly rebound.

Bee hives in Chicago
Though some bee hives are not in my immediate future I did fine this located right in the middle of Chicago.