Posted on 17 Comments

How to Dye Crepe Paper

How to Dye Crepe Paper

I wanted to dye crepe paper streamers so I could get a whole variety of colors and variations in my decorations.  I love color but the brightly dyed store bought colors just weren’t enough for me.  However, pouring paint etc on the streamers tended to make a soggy-fugly mess.  It took me awhile to figure out a process for dying them that would keep the crepe texture.

How to Dye Crepe Paper
Colors! I love Colors!


Supplies:

  • White or Light Colored Crepe Paper
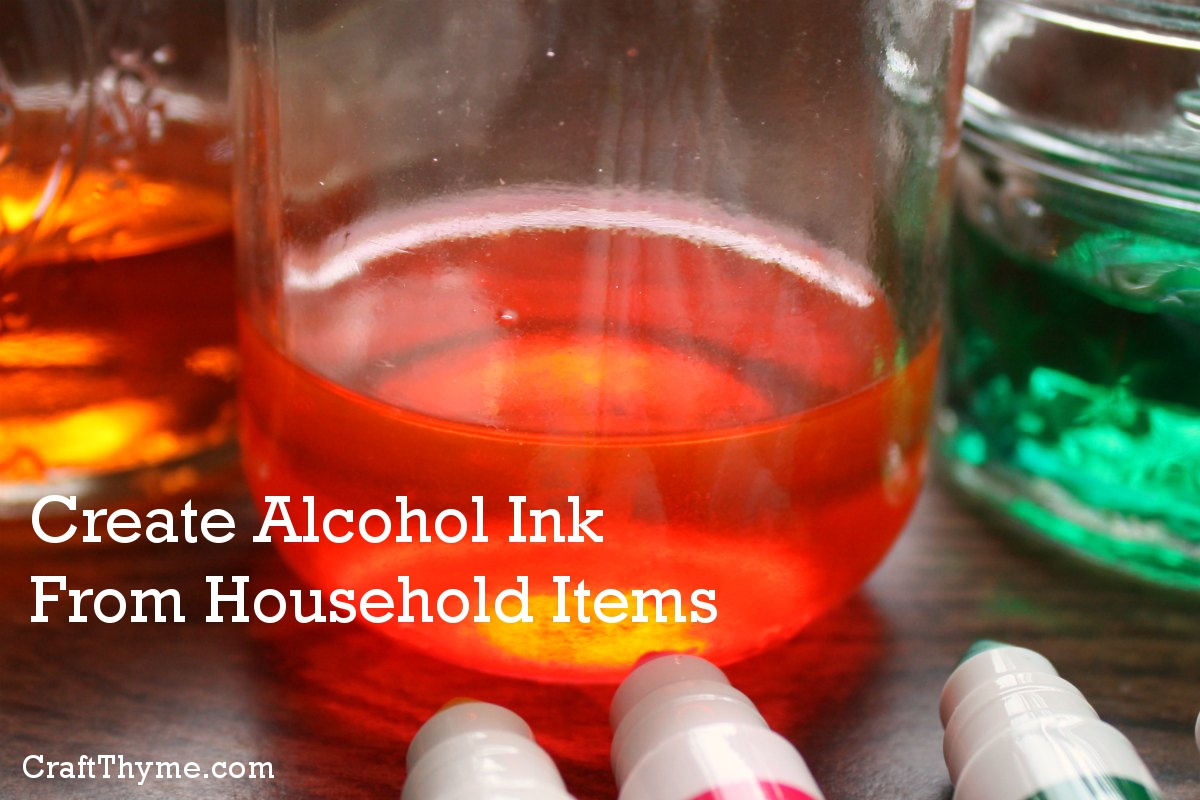
  • Dye– See the recipe here
  • Alcohol: 90% is best (If you want pastel)
  • Um yeah that’s it…  Sometimes crafts don’t require a lot of things.  But don’t mention it.  I’ll take any opportunity to take a trip to the craft store.

Step 1

Make rolls of the colors you want to create.  One large roll of crepe paper is around 150 ft.  I always divide mine into three.  And no it isn’t necessary to be as anal as myself and wrap it so neatly.  That just takes a special kind of crazy.  It will dye if the rolls are fairly tight.

Step 1 assemble rolls
Wow, I can’t believe how anal I am at re-rolling the crepe paper.

Step 2 (For Pastel Colors Only)

Remember this is for pastel colors only!  I repeat pastel only.  Soak each roll in plain alcohol to wet it.  Don’t drench it but go ahead and dampen the whole roll.

Step 2 Wet the Paper
So… you might want to consider covering your work area or putting these on a tray… I have a lovely 70’s counter top that you can see I care for a lot.

Step 3

Now the fun part!  Pour on the dye.  Soak that puppy!  I like to pour it in the middle, then flip it over and do the other side.  Now would be a good time to remember gloves so you don’t stain your hands…  Or just tell your friends it is the newest trend in finger dye.  If you aren’t going for pastel it will take more dye since the rolls aren’t wet to begin with.

Pouring DyeStep 4

This is the hard one!  Wait.  Yeah you have to let it dry.  You can squeeze a a little of the excess out, but gently.  If you squish the roll too much then you risk ruining the crepe texture.  I have been known to stick them on top of heating vents in the winter months…  Usually overnight the alcohol evaporates and you have a nice dry roll.

Final Notes

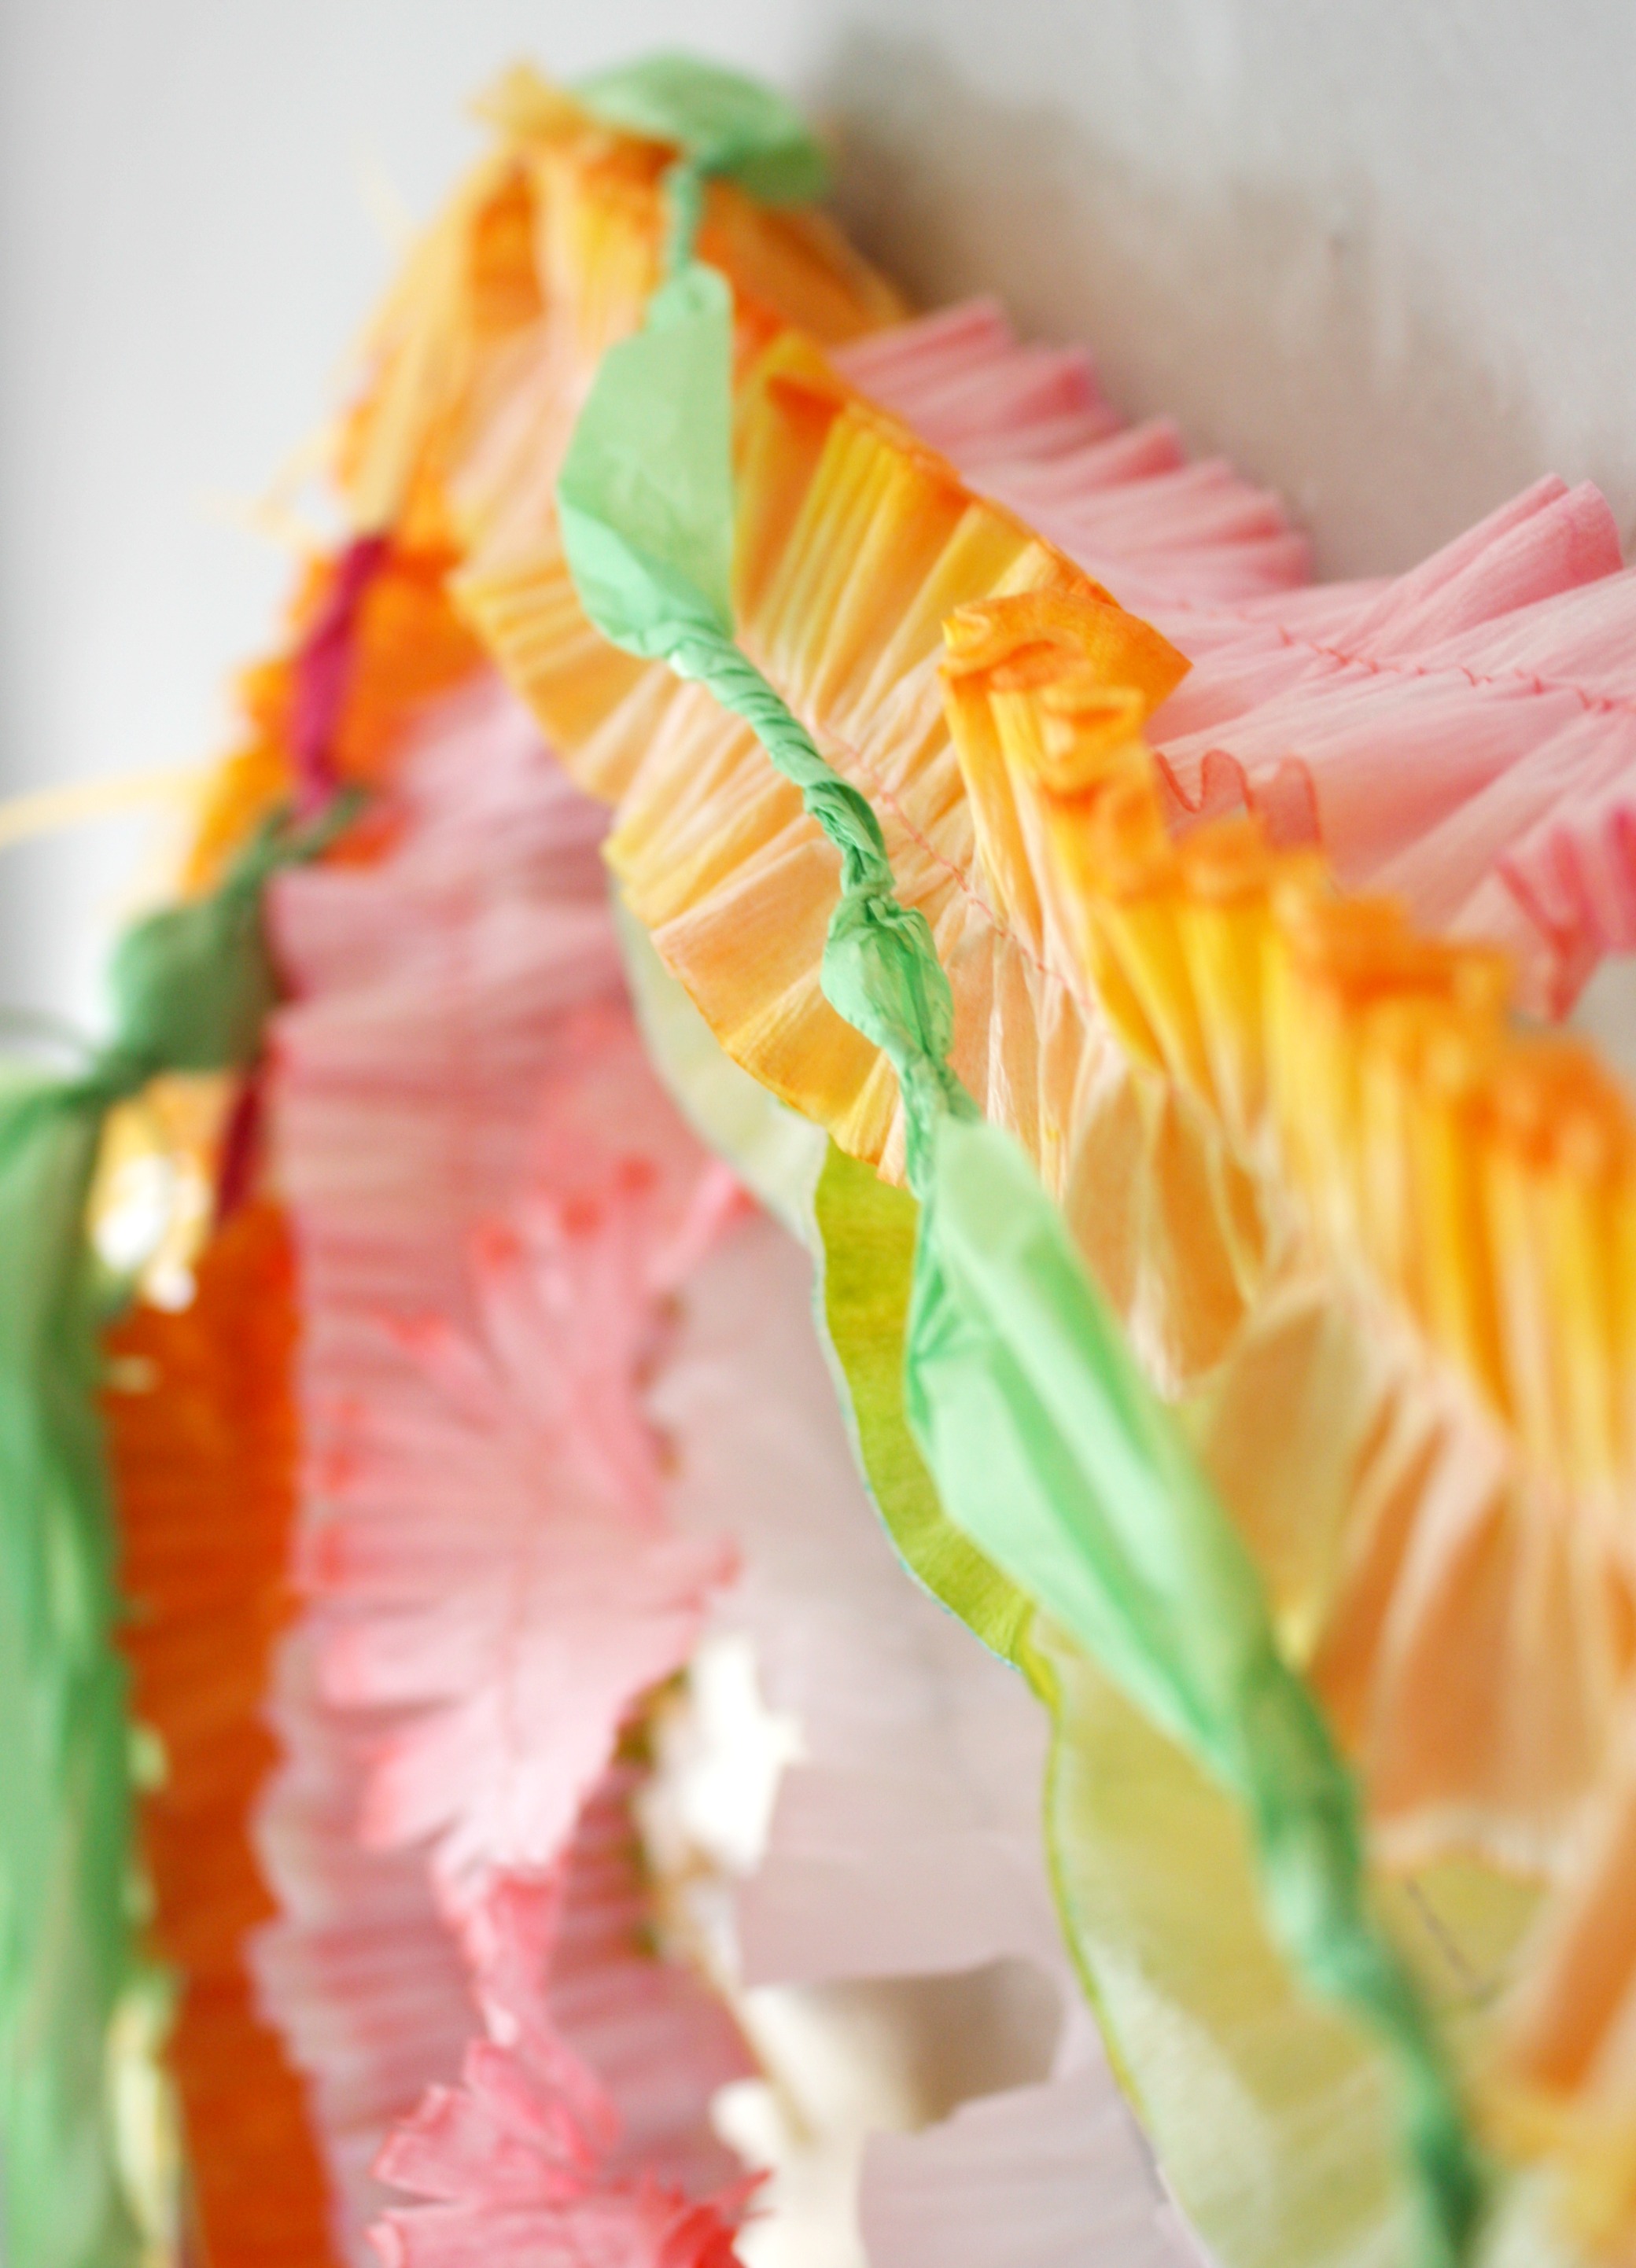
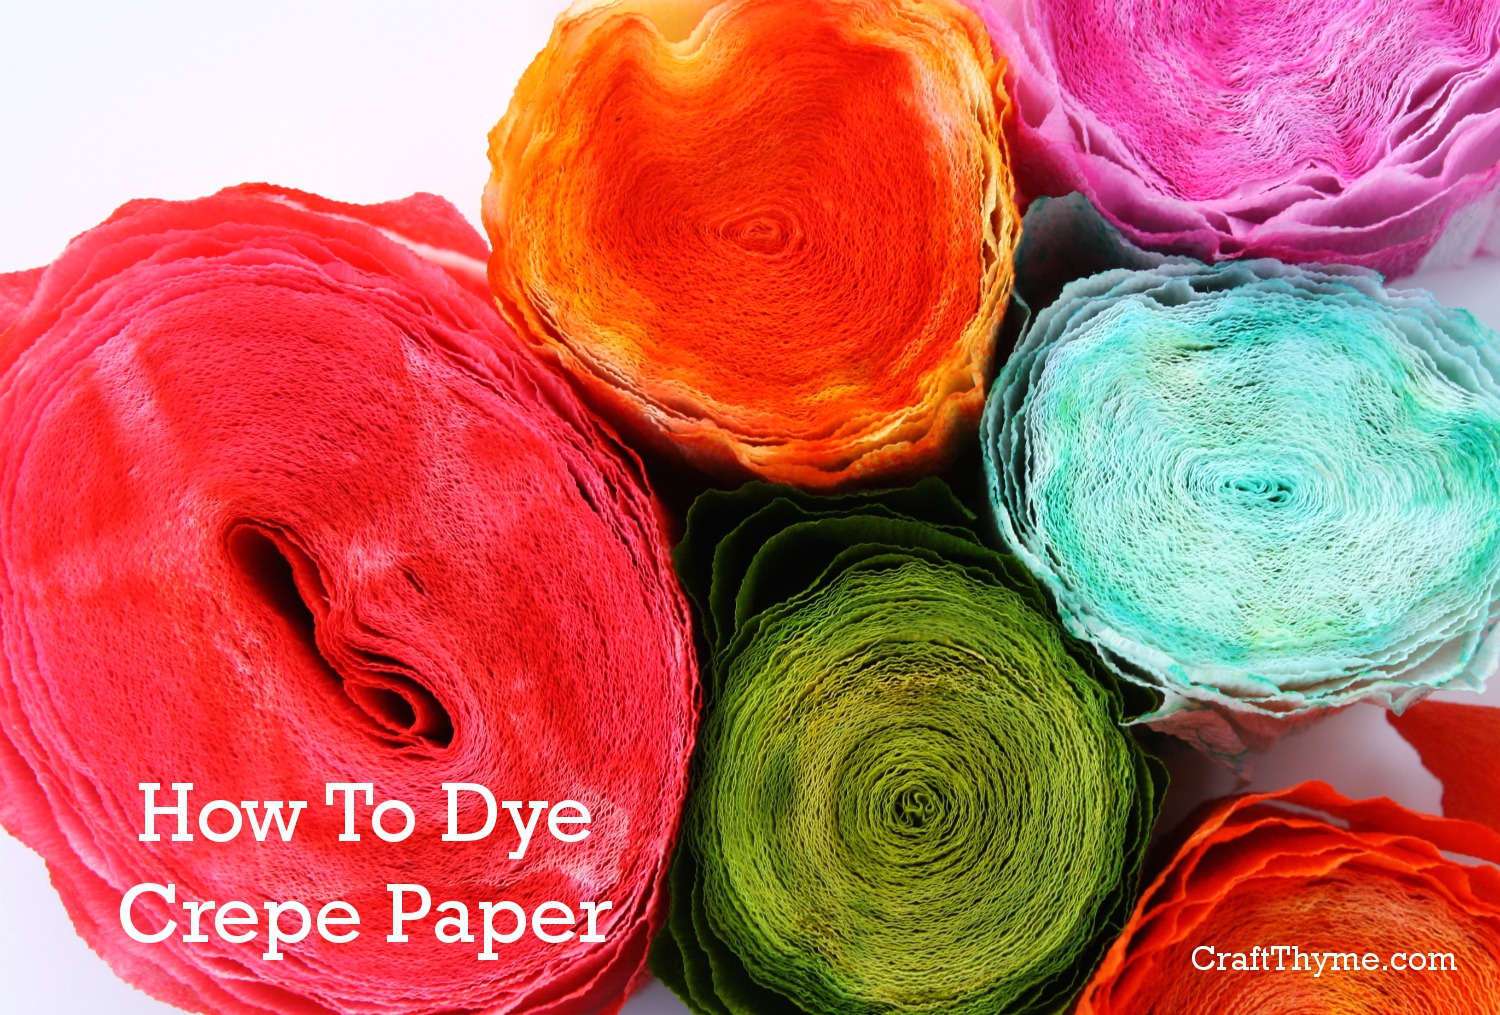
Here you can see the variation between a pre-soaked pastel crepe roll and direct dye crepe roll.  The paper itself will separate out some of the component dyes…  So in less technical terms: Orange is going to leave splotches of red and yellow.  But they are pretty splotches.

Hand Dyed Crepe Paper
So much prettier than store bought.

Want to see what you can do with all this crepe paper?  Check out the inspiration for this tutorial in my Spring Garland Post.

Enjoy these articles?  Get periodic updates by joining my mailing list (no spam, no way, no how) or subscribing to my RSS feed.

This post was submitted to The Crafty Blog StalkerHouse of HepworthsSnippets of Inspiration, Sugar & Dots, Seven Thirty Three, & Craft-O-Maniac. Where you can find more create crafts, DIY, and recipes.


Posted on 119 Comments

How to Make Alcohol Inks

How to make alcohol inks

Making alcohol ink or dye from household items is super easy.  I use the alcohol ink to dye crepe paper for a nice vintage look.  Honestly this is so easy I almost think it is silly to have a how to article.  But since I am whipping these up all the time I thought I’d give you a quick run down.  You can also see my tutorial on how to make Walnut Alcohol Ink.

How to make alcohol inks
As McClain says: this tutorial is “Easy Peasy Lemon Squeezy”

Supplies

  • Alcohol:  I like the high proof stuff myself ;) Joking aside, I use the 91% isopropyl alcohol if I can find it because it dries faster and for dying crepe paper changes the texture the least.
  • Glass jars: Plastic is fine but will tend to stain forever.  FOREVER.
  • Old/Cheap Markers OR Food Coloring:  I have tried a number of different pigments from watercolor to paint but they tend to not dissolve in a way that I found to fit my needs (in other words they made a craptastic mess)alcohol ink supplies

Step 1

Pour some alcohol in jars.  If using markers uncap and stick in alcohol let sit for about 30 minutes.  You can speed the process by stirring the marker around in the alcohol.  If using food coloring start with 1 to 2 drops of your color. If mixing colors you may need to add alcohol if you want a pastel color.

making alcohol ink
Only hard part here is waiting for the color to come out of the markers

Step 2

That’s it.  Color in alcohol = done.  Feel free to celebrate with a drink of ethyl alcohol (as known as spirituous liquor). Edit: apparently some people in the world don’t understand chemistry humor. So let’s clarify: isopropyl alcohol = baddy bad. Ethyl alcohol = tasty. Make sure to use common sense when having a whisky sour, glass of wine, or beer. Never drink & drive and always enjoy in moderation!

Notes

More markers per jar = a brighter dye.  The nice thing about using markers is that if you happen to have the washable type then it will not stain your hands.  However, you could just stop and put on some gloves like someone that has sense.

These alcohol based inks are perfect for dyeing paper products.  You can see these dyes in action on how to dye crepe paper without loosing the crepe texture. 

If you are looking for a way to make alcohol ink for use on plastic, metal, or glass SORRY!  I have tried so many formulas and none of them work quite as well as the commercial variety you can see here (warning an affiliate link ahead).  If I ever come up with it you will be the first to know!!!

*


Posted on 6 Comments

Crepe Paper Tutorials

Crepe and tissue paper decoration detail

I need some Spring color!  Enter: an array of tissue and crepe paper garlands, tassels, and streamers. For a list of crepe paper tutorials on how to make each and every item shown scroll on down!  Instead of making the regular ho-hum mantel display I thought I would give my entryway some Spring umph.  As an added bonus I set up an area to take some pictures of the kids,using the decorations as a photo backdrop.

Crepe and tissue paper decorations
You’ll note that none of the kids are actually sitting nicely enough for pictures. So I used myself.  Yeah I am really that pale.

Crepe and tissue paper is inexpensive and can be turned into garlands, tassels, streamers, puffs.  Basically it is some versatile shiznit if you want some cheap and fancy looking decorations.  I really wanted a mix of textures and colors.  You can see a bit of the variety in this detail shot.  After making them all, I hung them from some lightweight command hooks.  Easiest thing to make a temporary display, plus crepe paper is so lightweight it takes nothing to hang them.

Crepe Paper Tutorials


Since I basically had a love affair with tissue and crepe paper I have a ton of tutorials to offer:

Crepe Paper Tutorials

In the mean time check out some of the details:

Crepe and tissue paper decoration detail

Enjoy these articles?  Get periodic updates by joining my mailing list (no spam, no way, no how) or subscribing to my RSS feed.

Posted on 15 Comments

Couch Crafts: Hand Sewing Doll Clothes From Scraps

As I still seem to be pissing my fetus off and causing it to create a major pain in my back I am forced to continue on my “Imagine the Impossible” challenge of coming up with couch crafts. I have been meaning to make some doll clothes for my son’s favorite bunnies for some time and what better way to use my time than knocking that project off my list.

I did do a tiny bit of prep work off the couch. I grabbed an arm load of fabric scraps, buttons, velcro, thread, scissors, and hand sewing needles. I sat down and very quickly traced the arms and torsos of Hippity and Hoppity and came up with two tiny patterns for a bib and jacket. Then I reclined on the couch cut them out and hand-sewed the clothes.

Pile of Scrap. Of course Cheerios had to be involved.

Sure what took me a few hours laying and sewing would have taken mere minutes on a machine. However, it kept me busy and McClain Ooohhed and Aahhhed while I was fitting them. As a bonus he got to be more a part of the process. Of course when he wanted the thread, needle, and scissors I had to limit the amount of the process he could be.

Hoppity and Hippity in their new finery. The bib closes with velcro so McClain can take it off and on. The jacket just slips on and off but I reinforced the seams so he can’t easily rip it as he learns to dress them.

Anyway, for my first check in on the “Imagine the Impossible” it is still feeling pretty damn impossible to be idle for another 6-8 weeks and find crafts I can do and blog about. At least I found one I and my son enjoyed!

Here is an example of some quick patterns. McCall’s and Vogue eat your heart out.


When you are looking at scraps think about unusual layouts for the patterns. Here I used the selvage of the red fabric to make and interesting back and collar. As a bonus I didn’t have to hem/finish those edges.
Posted on 13 Comments

How To Make A Mounted Spice Rack From Jars

How to make a spice rack from baby food jars

During my organization frenzy of 2012 I am pretty excited to tackle the spice mess in my pantry. I created a mounted spice rack using old baby food jars. Want to learn how? See the following tutorial on creating your own spice rack. Bonus organization: I not only cleaned up the spices but I used these random jars I refused to throw away.

Necessary Materials

Jars with lids (Labels removed… If you want it to be aesthetically pleasing)

Wooden board or Shelf

Wood Screws

Drill

Step 1 Painting the Lids (Not shown because spray paint comes with directions)

Depending on the look you are going for you may or may not want to spray paint the outside rim of your lids. Personally I wasn’t in love with the bright red “baby food” lid so I hit the edges with a little white glossy spray paint. It blended with the current shelf color and should be easy to repaint if when I finally repaint the pantry.

Step 2 Work Out the Spacing

How to make a spice rack from baby food jars
The shelf is stained, but clean. I swear!

This is really going to depend on the size of jars you are using. Mine ended up being about 2 inches apart. Hold up a jar with the lid and make sure you can comfortably turn the jar without getting your hand caught between the wall or another jar. Remember to keep in mind if others will be using the spice rack to leave ample space for different sized hands, i.e. you have danity hands while your husband has meat hooks.

Use a pencil and draw around the lid. Dislike the spacing and draw again. Hold a couple of jars up and try not to drop one on your foot… Decide the spacing is pretty good and move on.

Step 3 Drill, Baby, Drill

How to make a spice rack from baby food jars
Why yes, I did think it was necessary to protect my beauuuutiful 70’s faux-wood counter-tops when drilling. Also note the thin spray paint on top, you won’t be seeing that area so don’t waste your time.

While the metal lids aren’t exactly Kevlar you will thank yourself if you drill a pilot hole for the screw through the middle of each jar. Imagine holding a jar lid, screw, and drill upside down and trying to apply enough pressure to pierce the metal. So, take the extra second to drill a quick hole. The metal is thin enough on most jars you won’t need a special drill bit.

Step 4 We’re All Screwed Now

How to make a spice rack from baby food jars
At some point I really will go back and paint these stained shelves we inherited from the previous owner. Really.

Take a wood screw and tightly hook the lid to the underneath of the shelf or to a board you can mount later. Make sure the wood screw is shorter than the board thickness since you will want to get it as flush as possible with the lid. I didn’t really worry about the make (metal content) of the screw since the spices will not be in contact with it and I want to keep them as dry as possible.

Finally fill the jars and attach to the lids!

How to make a spice rack from baby food jars
Completed Spice Rack! Now I just need to make some pretty labels.

Here’s a detail shot:

How to make a spice rack from baby food jars

Notes:

-This idea isn’t novel and works with canning jars too. My great-grandfather hung all his nails, bolts, and screws from the rafters in the basement using old canning jars. Just make sure to mount the rim over the lid before securing with the screw.

-This makes a great space saver if you have odd height shelves ( me!) or you can always mount these to a board to hang elsewhere.

-Other than waiting for the paint to dry and being picky about the spacing this is a very fast project. I completed it while entertaining a two year old so it must not have required a huge amount of effort on my part :).

If you try this project or have done a similar spice rack please let me know! I love to see pictures.