When we first moved into our 1927 home in Asheville, one of the first things we noticed was the severe lack of electricity. Not that electricity was entirely absent, but by today’s standards, there wasn’t much for us to work with. There were no outlets in any of the bathrooms, bedrooms had two outlets placed in what seemed like after-thought locations, and all rooms (regardless of size) were only wired for a single ceiling or wall light fixture.
Our new master bedroom was easily twice the size of the one we had just moved out of, but the outlet placement and lighting left a little to be desired. The new master contained what we thought of as a reading/sitting area that sat inside of one of the home’s two front dormers. The space was roughly 8′ x 8′, and we thought it would make a perfect reading nook with two chairs and a low bookcase. There was only one problem with the reading nook plan… there was no lighting in the space. There was however an outlet, and that opened up some possibilities! We could have put a lamp in the space, but that would have dictated a layout different that what we had envisioned. Ceiling lighting in that space would have been ideal, but with nothing available, we were forced to get creative. DIY Pulley Light to the rescue.
Bring on Craigslist
Always looking for something to upcycle, we immediately turned to Craigslist to see what was being offered up to the masses. It just so happened that we found someone selling lights from a factory they helped salvage a few months back. At $20 a pop, they seemed like a good deal, so we made the trip across town to check these babies out. Suffice to say, after a coat of satin nickel spray paint, they were a perfect fit for the space.
BUT! We still had to make them work as ceiling lights….
That’s when we had the brilliant idea to use fancy black/white cloth lamp wire, a nautical rope cleat, and galvanized pulleys to 1) hang the light from the ceiling, 2) make a functional DIY pulley light that could be raised or lowered based on lighting preference.
Supplies
Installing a DIY Pulley Light Fixture
The first step to this process is to install your pulleys:
- Mark the location on the ceiling from where you want your light to hang. For us, this was the center of the space. Make a small, tiny, erasable mark – you won’t be covering it up.
- Envisioning what it would be like for your lamp to hang from your pulley, place your pulley to one side of the mark you just made.
- If using the model of pulley we used for this project (see above), mark the four holes that you’ll use to mount your pulley to the ceiling.
- Install your center pulley!
- If mounting into a stud/rafter, go ahead and install your pulley directly.
- If mounting into ceiling drywall, we recommend using heavyweight anchors installed as per the manufacturer’s instructions. (Something like these should do you just fine). After your anchors are in place, go ahead and install your pulley
- Repeat steps 1-4 for Pulley #2, but this time, the pulley should fall near the corner of the ceiling/wall where your outlet lies.
When your pulleys are in place, go ahead and install your boat cleat:
- Mark the location on the wall where you want to be able to access the lamp wire wrapped around the cleat.
- Mark the two holes that you’ll use to mount your boat cleat to the wall.
- Install your boat cleat!
- If mounting into a stud, go ahead and install your cleat directly.
- If mounting into drywall, we recommend using drywall anchors installed as per the manufacturer’s instructions. With your anchors in place, go ahead and install your cleat.
Next, wire/re-wire your light to ensure you have enough length to get you where you need to go:
Our light came with only 3 feet of old, dingy, and yellowed wire still attached. Needless to say, that wasn’t going to do the job or give us an awesome design for our finished product. This is where the 20′ of cloth lamp wire comes into play.
- Disconnect the the old lamp wire from your light. This is often easier said than done, but you should be able to access where the wires actually connects to the light socket. Once removed,
- Attach the new lamp wire.
- Do NOT install the plug at the other end of the lamp wire. We’re not ready for that quite yet.
Finally, run your lamp wire through the pulleys, around the cleat, and prepare for awesomeness:
- Run the open end of the wire through pulley #1, over to and through pulley #2, and down the wall towards your cleat.
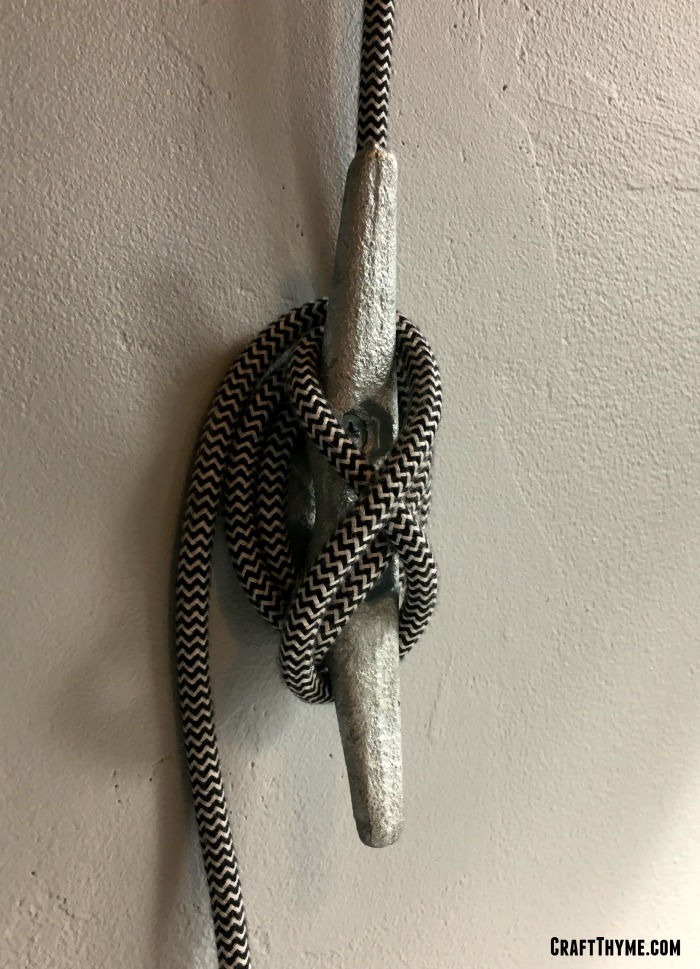
- When your light is at the right height, start wrapping the extra length of your cloth lamp wire around the wall cleat.
- When you feel that you have enough line around the cleat to raise and lower the light (assuming that you want this functionality), measure out enough slack on the bottom end of the cleat so that you can reach your outlet.
- Either cut your lamp wire here or neatly organize the remaining slack.
- Install the plug onto the end of your wire. We find that there is always a wide variety of plugs available at your local big-box home improvement store, and a lot of them have an awesome retro feel!
With the circuit complete, you can now test out your new light creation!


Thank you so much for sharing! This is exactly what I need for over my craft table. Being able to raise and lower an overhead light as needed will be perfect.
So glad t was helpful!