Posted on 11 Comments

How to Plant Like a Pro

How to plant like a pro and maximize your harvest with proper plant spacing

Want to know the trick to maximizing planting space like a pro? Just Say No To Rows and learn how to plant your garden. Yep, I said it. Put the hoe down, the tiller away, and stop with the traditional rows. It is the number one mistake home gardeners make! Why? Because it is labor intensive and more importantly, a waste of useful space that you could be growing food or flowers.  Plant spacing is key to maximizing your harvest.

How to plant like a pro and maximize your harvest with proper plant spacing

There are a number of techniques out there to plant your veggies and flowers in a non-row method. The biggy you will always hear about is ‘Square Foot Gardening’. I have actually checked the book out of the library and read the whole thing. Personally, I think it was a great guide on spacing plants, but I don’t subscribe to his method of soil creation. Peat is just ick to use most of the time. Not to say I haven’t used it from time to time, but I prefer not to do major applications with peat. ANYWHO, I’ll get off my peat soapbox and continue on to the important stuff. How to plant your garden in a meaningful and efficient use of space. This technique works with raised beds or in ground plots!

How to Calculate Plant Spacing

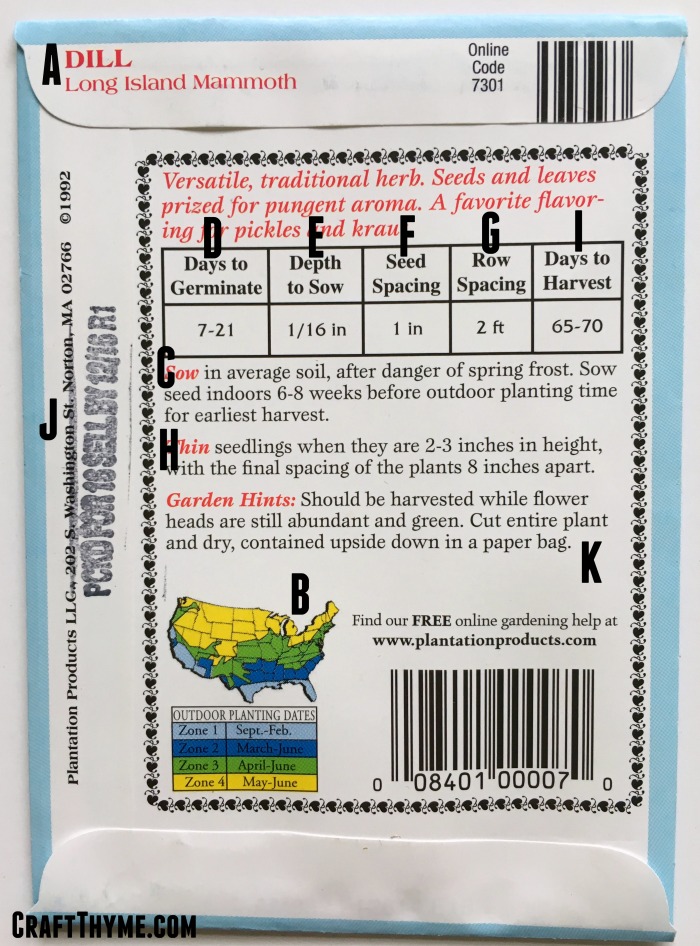
First thing to do is look at the back of your seed packet. You can read in detail about what you are looking for in my other post Seed Packet 101. Find the information about plant spacing. Ignore the row spacing. I saw you looking at the row spacing! Stop that right now :)

Have you found your number? It could range anywhere from 3″-24″ (3-60 cm) or more! You are going to take that number and divide it in half and place it like spokes on a wheel around your plant. So an eggplant that needs 24 inches would get planted with 12 inches on all sides. I tend to visualize a circle around the plant. Then just lay those circles out in a grid form. Yes, it is that easy!

Planting distances based on plant space from seed packet

BUT Wait! There’s More! (Infomercial voice)

There are a couple of things you need to think about before you start planting away. How to weed and how to harvest. Weeds are a fact of gardening life; if you use the above planting method they will be much lighter than traditional rows, but occasionally you are going to need to reach down and pull one out. So guess what that means? Your 6ft X 6ft (2m X 2m) bed? Yeah… You are barely going to be able to reach in the middle. (And yes, I might just have one of those). This is the reason you often see raised beds in 3ft increments. That is the usual distance a human can easily reach from one side. Let us pretend that you ended up with zero weeds, again, you will need to think about being able to reach and harvest your glorious tomatoes and plots of thick spinach. No one likes that smell of rotting squash in the middle of the patch. Yuck! (sometimes I have been known to get lazy on the harvesting)

Perhaps you have a traditional row garden plot. NO WORRIES! You can still use the same space. Divide the area into three foot sections and leave 2-3 ft (1m) pathways between the planting sections. Bonus points if you throw mulch on the pathways to keep yourself from having to weed and hoe the compacted garden paths. BTW, if you noticed I mentioned not tilling at the beginning. Once you have your happy soil you won’t need to be digging these beds and pathways up all the time. I get into more detail on establishing your soil and beds in other posts.

Grid It Out

Let us assume we have a prepared planting soil/space and we know how much space our plants need. The easiest process is to start plunking those puppies in a nice straight grid. Of course this is assuming you have vegetable or flower starts ready to go. Frankly, I plant a lot of veggies and flowers straight from seed into the ground. It gets a little trickier here to get good germination and clear spacing. Frankly, I am willing to waste a bit of seed, especially when it comes to tiny ones like carrots or cabbage. I am just too lazy to carefully plant out 2-3 seeds in each grid space. So I make mini-rows spaced correctly from each other and lightly spread seed down them. Then I just go back and thin the rows by cutting off the un-needed seedlings when they get 2-3 inches high. So why are we planting like this? We can get so many more vegetables in a smaller space. Let us use an example because we love the maths:

We have a 3 ft by 6ft bed (1m X 2m). We want to plant beets (I am the only one in my house but I freaking LOOOOOVVVVEEE beets) The package says row spacing 12 inches and plant spacing 3 inches.

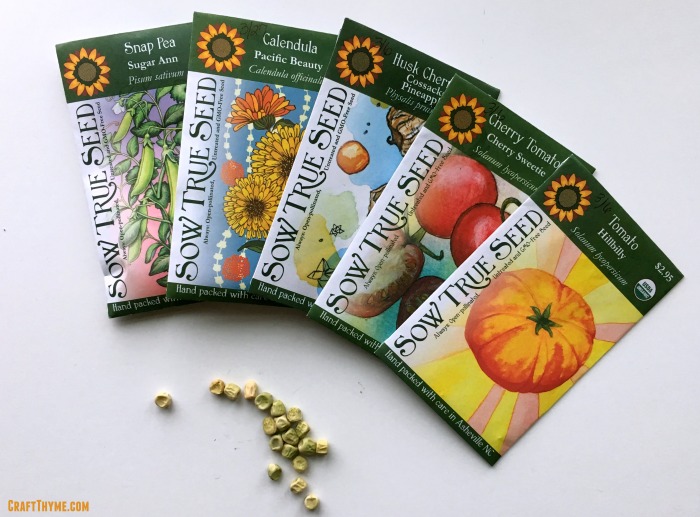
Standard Row Planting: 72 beets (3 rows of 24 beets)  Why beets?  Because I freaking love beets!  This (affiliate links to follow) Rainbow Blend from Sow True Seed is my absolute favorite.  Do yourself a favor and order them today!  You can plant them throughout the summer.  Plus beet greens!  Anyway enough about beets…
Grid Planting: 288 beets (plant 12 across and 24 down. Isn’t that number beet-uiful?!)

planting-grid
Straight grid versus offset planting. Both are superior to row planting to get the most in a small space.

The thing about numbers is they don’t usually lie. I used to say numbers never lie and then I worked in Business Intelligence and saw how people massage numbers… But for gardening 288 beets sounds a lot better than 72, well, if you like beets. Additional bonus from planting in this grid method? Whenever the vegetables get bigger their leaves shade the soil cutting off many weeds and maintaining soil quality from erosion. Less weeds = less weeding!

I learned a technique to completely maximize this planting structure. I have used it before but gotten lazy in the last bit and pretty much default to the grid. I often have too many vegetables to use and end up giving loads away so I no longer plant in an offset method. This technique is part of a full biointensive method of planting that is a lot more complicated and involves things like root depth etc. I’m not going there, it is hella fun to plan out and do, but it takes a lot of calculation and work. BUT this small portion is easy to adopt: instead of gridding off your plants you can use those circles to offset each plant squeezing just a few more inches into each bed. Additionally you can tuck in plantings to really cram those plants in there. That means if you have plants that need a lot of space like tomatoes, you can tuck in basil along the edges of the plantings. Personally I love to shove a few flowers, especially marigolds, in any extra room I have. It just makes the vegetable patches that much more attractive.

So what have we learned today? STOP the rows and plant your vegetables in a efficient layout.

Math is on your side and you can get so many more plants in a small place than you can with traditional row crops. Take a grid or offset method to get lots of veggies, but make sure that you remember to leave room for weeding and harvest.

Posted on 14 Comments

Building a Composting Fence

Finally an alternative to compost bin plans! Detailed instructions on how to make your own composting fence.

Do you have excessive yard waste in the form of tree branches, long grasses, leaves, annuals, and flowers past their prime?  We sure do!  With the veritable brush jungle behind our home, regular pruning of trees, a relentless landscaping habit, and the endless results of “being a good husband” – aka dead flowers – we’ve built quite the pile of yard waste in our back yard with no real plan of what to do with it.  After all, what do you do with a heap of dead, slow to decompose material? Composting fence!

Some time ago, Brianna came across the concept for a “composting fence”; a landscape architecture concept that would modernize your large, long-term compost pile.  With her birthday just around the corner, I thought that I would surprise her by taking a day off work and building it for her.

Plans for our composting fence.

As it turns out… this project isn’t really doable in a single day. But I get a pat on the back for effort, right? Keep reading to find out how to build your own!

Composting Fence Supplies

  • 60-in x 50-ft Silver Galvanized Steel Welded Wire
  • 4 – 4″ x 4″ x 96″ Treated Lumber
  • 1 – 2″ x 4″ x 96″ Treated Lumber
  • 1 – 2″ x 4″ x 120″ Treated Lumber
  • 12 – 5/4″ x 6″ x 120″ Treated Decking Lumber
  • 3 – 50-lb Fast Setting Concrete Mix
  • 2-1/2″ Exterior Wood Screws
  • Staple Gun & Staples
  • Metal Snips (In Some Cases)
  • Drill
  • Saw

Cut List

  • 2 – 4″ x 4″ x 66″
  • 2 – 4″ x 4″ x 78″
  • 2 – 2″ x 4″ x 48″
  • 2 – 2″ x 4″ x 60″
  • 2 – 5/4″ x 6″ x 120″
  • 4 – 5/4″ x 6″ x 102″
  • 4 – 5/4″ x 6″ x 62″
  • 4 – 5/4″ x 6″ x 84″

Brianna Here: I’m jumping in on Adam’s post because he has been busy building an under-deck storage area, planter boxes for a shade garden, and a chicken coop extension. Plus he didn’t actually get this done in a day sooo… I was there for a lot of the process. Here is reason #1 you can not do this in a day.

Step 1: Digging It?!

You are going to need to dig post holes. And then pour concrete. If you do not have post hole diggers see if there is someone you can borrow them from. We found a neighbor who let us borrow his for a long time. However, we keep doing projects like espalier of fruit trees and kiwi trellises so we just opted to buy one. Dig around 18″ deep, put in your post and level it. It is helpful if someone can hold it while another person pours in the fast dry concrete. Pour water in with the concrete and then wait. You are going to need these posts to be FULLY set before step 3.

Learn to make your own compost and bin detailed directions on making a compost fence.
We are leveling these posts after a few steps because we realized we needed concrete. Follow the directions and learn from our mistakes!

Step 2: Cutting

While you wait for the concrete to dry you can go ahead and make all of your cuts for the composting fence. You might be wondering what all this wood is for, however, you are going to use this wood to cover your stapled wire and make an attractive pergola-like top. We had plans to plant grapes at the bottom and use the top as an arbor. Additionally we hung some bird feeders above to attract more wildlife to the yard.

Step 3: Tug, pull, and curse

Unroll your welded wire and get it flat as possible. I personally worked on this while Adam cut lumber. He also added a 2X4 spacer to one side of the post. This gave closer to 6 inches of space between the wire for twigs and yard waste to be placed. When you begin unrolling the wire I suggest gloves as the ends of the rolls are sharp. I can not offer much advice other than rolling the wire face down and manually flattening as you go. It is a PITA, but the flatter you get it the easier the installation goes.

The reason that you want to wait until your posts are FIRMLY set in the ground is that you are going to need to attach the wire and PULLLLLLLL. I picture a ships-master whipping the rowers yelling ‘Pullll Damn Ye’. Anyway, take your wire cloth and line it up near the middle of your 2X4 attached to your post. You want to cover enough wood so that you can get a firm staple, but remember in the end the post will be totally covered so don’t waste a lot of expensive metal by covering your posts. We pulled the metal and figured out the minimum needed to staple it to the next spacer-post then cut the metal. We had to work in sections as our ground was not flat. Also getting more than 6 feet of this stuff straight at one time is a nightmare. I believe if you had a nice level yard you could probably just pull it straight across and skip the cutting, but that was not in our cards.

Learn to make your own compost and bin detailed directions on making a compost fence.
Note the red level on the wire! It comes in handy.

Here is where the partner comes in really handy. One person can pull on the attached sheet of metal while the other checks to see if they are close to level. Then that same person can staple. Pulling the metal helps get it taunt and reduces the bowing. Note I say reduces! We were not very happy with the wavy look when you peered down the length of the fence at first. However, in the final product this didn’t matter. I’ll explain at the end!

So you will repeat this process 5 more times if you are making 3 sections. As you will need put the metal cloth on both sides of the posts to make a channel that can be filled with your yard waste materials. The hardest part of this was getting everything around the same height and keeping all the metal squares in nice straight verticals. Let’s just say there were some potty words spoken over this particular process. These words may or may not have been used to describe peoples prowess with a level and/or their strength when pulling metal.

Finally an alternative to compost bin plans! Detailed instructions on how to make your own composting fence.

Step 4: Adding your decorative ‘Skin’

At this point you are going to add the decorative finish and height to the arbor over the composting fence. Take your long boards and screw them to the front and backs of your posts. We wanted a variable height so the longer ? length went on the fronts and backs of the two middle posts and the ? lengths went on the ends. You are going to be placing the boards over the stapled metal so feel free to really drill those screws in tight. It will act as an additional layer to secure the metal to the post and hide the unsightly seams.


When your now taller posts are in place take your crossbeam of 10 feet in length and attach that to the front and back of each middle upright. Adam, cut each of the ends at an angle for a nice decorative finish. The middle crossbeams will have the angular cuts on both sides. These are the hardest to place as you want to make sure to have the same overhang on both sides. Just measure the difference to insure an equal overhang on both sides. The other two crossbeams will only have a decorative touch on one end. The flat side will be easy to install as the straight cut will go flush to the edge of the middle posts. We installed our outside arbor sections about a foot down from the one in the center. We chose this height as we thought it was the most visually attractive result.

Learn to make your own compost and bin detailed directions on making a compost fence.

Step 5: Additional Bracing

This step is optional but we added additional bracing between the crossbeams. We did this for two reasons, first to create a place for vines to grow, and secondly provide a place to add hooks to hang bird feeders. I felt like the additional bracing made the entire structure more sound as well. To create the bracing we simply cut some 4X4’s and slotted it in-between the middle of each section and screwed it in place. The cut piece of wood usually fit tight enough between the two boards that no one needed to hold it when screwing, but it might be handy to have a partner to hold when securing it.

The Final Product

Finally an alternative to compost bin plans! Detailed instructions on how to make your own composting fence.

Unlike a regular composting bin we are not expecting to pull compost out of the composting fence. The added yard waste is for creating a screen and should slowly feed the soil at the base. So far the various layers of sticks and leaves are miking for a really interesting and attractive backdrop. I can’t wait to see how it looks when I get green vines growing up the arbor!

So now is the time to discuss the bit of waviness to the metal. First, we are not usually looking down the fence line. When you look straight on the fence you do not see it. Secondly, as we added lots of wood it filled out the metal making everything much more taunt. I have been quite happy how everything has held up over the winter. To complete the look we created a bed in front of the fence and planted flowers, cranberries, raspberries, and two grapes. The bird feeders have been a huge hit. I have seen so many more cardinals, jays, and finches flitting about the yard. I am really hoping they will help control the insect population this year in the garden. As birthday presents go this composting fence has been wonderful! It has created a nice windscreen, arbor space, and place to deposit yard waste, all while covering the unattractive brush berm between us and the neighbors. I’d call this project a win for the garden in so many ways.

Learn to make your own compost and bin detailed directions on making a compost fence.

Posted on 12 Comments

Hardy Grape Kiwi: Plant Porn

Did you know there was such a thing as a grape kiwi (aka baby kiwi, kiwi berry, or hardy kiwi)?! Is it possible to get almost fan-girl squeely over a plant? Did you know that this kiwi not only comes in green and red, it grows in temperate zones? Oh yes folks! I can grow a kiwi in zone 6. A teeny tiny kiwi that you do not even have to peel! There are actually larger hardy kiwi’s, but this post isn’t about them. This is about the adorable grape kiwis.

Grape kiwi size comparison, Image by Hiperpinguino, CC License
Image by Hiperpinguino, CC License.  Check out the tiny kiwis in front for comparison

The Low Down on Grape Kiwi’s

Grape Kiwis are a hardy kiwi type (Actinidia arguta). Say ak-ti-NID-e-a ar-GU-ta three times fast. The tiny kiwi’s grow in groupings that look much like grape bunches. They have thin edible skins and come in the traditional green kiwi color and also a red shade. Descriptions of the fruit are sweeter kiwi flavor with hints of pineapple. Yum!

These vines likely originated in Japan, China, or Russia which means they can survive temperatures of -34. Yippy for zones 5-9! Many of the cultivated vines you can buy have been bred in Russia, which, seems kind of cool. Maybe even give me some garden cred: “Check out my special Russian Kiwi!” I always picture scenarios where I am showing my lawn off to other gardeners… When in reality I am pretty sure I drive everyone around me nuts with my love of plants.

Annanasnaja kiwi from Raintree Nursery
Image from Raintree Nursery. I am thinking of buying these Annanasnaja kiwi

The deciduous vine grows glossy green leaves with scented white flowers. In perfect conditions you can have a 20 foot vine in a growing season so careful trellising can give you an ornamental attractive vine. Sitting in the shade of softly scented vine sounds like a summer pleasure to me. Bonus, the flowers and scent should be attractive to butterflies. Fruit should be ripe in the fall for fresh eating.

Edit: I just ended up buying these three kiwis!  I can’t wait to see how they do*:


How to Grow

Alright, there is a downside to the grape kiwi or maybe an upside depending on your space. You need to have at least 2 vines. Male and female (romantic lover vines ;)) are a must if you want to produce the fruit. Luckily one male is up to the challenge of pollinating anywhere between 6-8 female vines. That means you can have a red grape kiwi and a green grape kiwi and one male will work for both of them.

I have read conflicting information on how far to place the male and female plants away from each other. Most information points to one male being able to pollinate 8 female plants. You’ll need to space these suckers out because if they have the right conditions a single vine can grow 20 feet in a year. WOW! Sounds like a great way to make a vining screen, just remember they are deciduous so all the leaves will disappear in the winter. The recommended spacing is 10 feet apart. I personally am going to plant mine much closer, but I am into backyard orcharding so I plan to prune, prune, prune to keep these babies in shape and in size. WHICH! Is highly recommended. Do not forget this is a vigorous plant that grows for years. Have a sturdy trellis! We built one with 4×4 posts in concrete. Additional bracing to match our composting fence and 14 gauge wire with tightners (turnbuckles). This puppy is going no where.

Planting itself seems a bit finicky. Like every plant under the sun it needs organic, well draining soil. BUT unlike most plants this one NEEDS it. Apparently, they originally grew in forest type settings and are used to having a lot of organic matter and trees to climb. Additionally, heavy wet soils contribute to crown rot. On top of that site selection is muy importante to this plant if you want to get fruit. Sure they are hardy, but their spring growth is very frost sensitive. So you are going to need to find a location that keeps it cool as long as possible so it doesn’t come out of dormancy till the last minute and still gets full sun. Sounds like fun right? So here is my plan to place this plant in a zone 6b-7a. The mountains of Western North Carolina where I am assured to have 80 degree weather followed by a snowstorm in spring and I somehow managed to have a house built on a clay shelf so I have to deal with basically everything that will make this a PITA to get going.

  1. Dig a much deeper hole and put lots of soil amendment (tiny bark shavings) at the bottom. Layer in dirt and compost and plant the kiwi plants slightly above the ground line. Hilling them up will help with the drainage but I am going to have to remember to mulch the hell out of them in fall to protect the first year roots…
  2. The trellis site is on the southwest side of my house set slightly back. That means that it gets shaded in the mornings and some even in the afternoons but gets some amazing direct light during the day.
  3. We are going to use the male to train on our porch to the west side. First, he doesn’t have to be quite as protected. Secondly, you can prune the heck out of him. He just needs enough growth to set flowers. Finally, we will get the added benefit of some shade in the afternoons where our porch mostly bakes. In the winter we will still get the warm sun since the vine will lose its leaves.

I’m game to try these grape kiwis though from the planting info they seem like they may need a little extra care than a beginning gardener might want to try. Just being honest, I’m a tiny bit nervous about this purchase, but almost everyone agrees that if you can get them off to a decent start they are easy after the first year.


Image from Hiperpinguino, CC license

Kiwi Berry Care

Assuming that everything grows off without a hitch (Get it? har, har, har) the care is not that big of a deal once you get them established. Pruning the growth if you have a small space becomes incredibly important. You will want to train a central vine and then let it umbrella shape from there. Once it gets to the top of your trellis cut it off and focus on keeping it that height. The first year or two prune for shape and prune regularly throughout the growing season. Tie the main branches to the trellis to keep them from getting wound around. Small branches can twine without worry of causing bad growth later on. After the first couple of years you can read in depth articles about the best way to develop fruiting wood. Lots of opinions out there, but by that time you’ll be a seasoned kiwi grower able to experiment with different choices. Sources disagree on how long each variety takes to set fruit. I have read anything from year 2 to year 5! So I’ll update this with my own experiences later. Remember that it likes a lot of organic matter so side dress with compost regularly throughout the growing season and in the fall and spring like other fruit trees and bushes.

Once you get past the initial hard phase of growing hardy kiwis the vine is supposed to last for years and years. Just prune, fertilize and repeat. Flowers will set fruit that ripens September through October depending on variety.

So, I’m set to try my hand at growing a grape kiwi. This hardy plant should be good to go if I can get it established. Wish me luck on my tiny, hardy kiwi experience.

Posted on 18 Comments

It Is Not Too Late to Start Seeds

Start Seeds with this template

Guess what? If you live Zone 7 and above March and even into April is not too late to start seeds indoors and you have the WHOLE outdoor seed planting season ahead. (Get those peas and spinach out today!) If you have no idea of the timing of seed planting both indoors and outside I will walk you through the process and offer free Seed Planting Guides for vegetables at the end of this post.  These free seed starting templates are meant to be used for whatever zone you live in! I have even had someone from the Southern Hemisphere say they work for them.

Start Seeds with this template


So What Can You Plant?

Joking aside the peas and spinach need to go outside ASAP. They should have been out the first couple of weeks of March, but depending on how hot spring is you should be able to get a good crop of snap peas and spinach in before they wane and bolt. So now that, that is out of the way here are some things you can start indoors today to plant out in early may.  Affiliate links to my favorite local seed vendor to follow!  In case you want to order some of these beautiful seed packets for yourself.

Summer Squash: Zucchini, Patty pan, Yellow, etc
Winter Squash: Butternut, Acorn, etc
Melons: Watermelons, Cantaloupe
Eggplant
Nasturtium
Zinnia
Marigold

Obviously, most of these plants grow well planted straight outside, but if you have a shorter season (as I do in mountainous Western North Carolina) getting an extra month can be really useful to get larger, riper, fruit. Plus who doesn’t love flowers?Seed Starting Guide


How to Know When Can you Plant

When to plant your seeds indoors and outdoors all depends on the frost! You can find your average frost free day by Googling. Also the Farmers Almanac has a great list by major cities. So once you have this all important date you’ll need to know how many days before or after that date your seeds can be planted. Such as 7 days before, will tolerate light frost, -1 week, etc. Then you will also need to know how many days the transplants need to actually grow. Additionally you can factor in how long germination takes and WHOA! Are you overwhelmed yet? Trust me it is not too late to plant yet AND I am going to break this down so it is super easy! And if the breakdown still doesn’t make sense then I am going to offer you a free spreadsheet or google doc that you can just plug in numbers and get your dates! How much more simple is that?

The Magic Formula

To Plant Indoors: Frost Date + (Weeks Before Or After Frost – Weeks Needed to Grow Indoors)
To Plant Outdoors Seeds or Transplants: Frost Date + (Weeks before Or After Frost)

Let’s run through an example:

Cabbage can be transplanted. It needs about 42 days (6 weeks) of indoor growth and can tolerate frost. So we can plant it about -21 (3 weeks) days prior to the last frost free day. My average frost free date is 4/24/2016.

Indoors: 4/24/16 + (-3 – 6 weeks) = 2/21/2016
Outdoors: 4/24/16 + -3 weeks = 4/3/2016

So, are you saying?! “Ugh, math? And where do I find all this information anyway?” Well I have the answer for you. For the old school I have a printable pdf Seed Planting Guide for vegetables, flowers, and herbs so you can calculate when to start seeds for yourself. It has additional information about depth, spacing, thinning, and seed saving. You will still have to do the math and look at a calendar. Though you can use this handy website to plug in weeks and get a date.

For the New school I am offering a free spreadsheet where all you need to do is plug in your frost free date and when to start seeds, both indoors and out, just populates throughout the sheet. I also have a pared down version of the Seed Planning Guide in a Google Doc you can copy and use for yourself. I know not everyone has excel just hanging out on their computer or phone.

Free seed starting planning

Excel Seed Starting Template

PDF Seed Starting Template

Google Seed Starting Template

Free Seed Starting Templates

Posted on 6 Comments

How to Read a Seed Packet

How to read a seed packet
The back of a seed packet can seem intimidating.  It seems silly but if no one has every taught you how to read a seed packet then you could be missing a lot of good information.  A lot of people prefer to buy transplants because seed starting seems difficult. But the truth of the matter is seed starting is easy, offers a cheap way to get lots of plants, and has more variety.  The best part?  The seed packet has all the essential information you need to get going!  Below I outline all the seed packet lingo you will need to interpret to grow your own healthy plants.  As a general note the cheaper seed you purchase at big box stores will have more information, while, specialty seed packets will often include less as it is expected you will know quite a bit about gardening.  In eaither case learning how to read a seed packet will make the whole seed starting process go smoother.

Seed Packet 101


How to read a seed packet or Seed Packet 101

A. Name/ Variety– Usually a common name of the plant and sometimes the Latin version is included. Seems straightforward no? But in reality the variety can be essential to make certain your plant sprouts and thrives.  For example: Oriental Poppies are perennial but California Poppies are annuals.  You would be very disappointed when your California poppies did not show back up the next year if you did not know the variety.

B. Zone Planting – When to plant your seeds.  Ugh, this is the one thing I would always say ignore on your package.  You really have to know your area!  Or google what your actual zone is, as the maps on seed packets are just too vague to know when you should plant.

C. How to Plant –  Most importantly you will need to discern if these seeds can these be planted inside (make your own transplants) or if it needs to be planted directly outside.  Not all vegetables like to be moved so while the packet may not explicitly say you can start them inside it will most often clearly define if it needs to be planted on site.

D. Germination – When your plant should sprout. If you don’t see your seeds coming up fairly soon after the last day of the range you may have an issue.  Make sure you have read the whole seed packet on how to start them (some need soaking overnight etc).  If you think the seeds are just duds you can try googling a germination test.  Most reputable/expensive seed companies will refund or replace bum seed.  Just note, in all my years of growing I have only had the really cheap seeds not germinate and only one incident of the wrong seeds in a packet.

E. Depth to Sow– How deep to plant your seeds. If you aren’t getting germination it may be because you put your seeds to deep or not deep enough.  Some seeds need a little light, some need to be deeply buried.  This measurement does not have to be perfect but aim for a similar depth as suggested

F. Seed Spacing – How far apart to space your seed in a row.  This is NOT the final spacing for the plants that grow from seed.  This number is usually optimized to give you a good germination rate over a row of crops that will be thinned.  Honestly, I use this as a vague guide so I don’t have to thin very much.  I rarely plant in straight rows anyway…  If I have cheap seed I might sow them more thickly.  If I am starting them inside I might ignore this guide completely and just put 2-3 per pot

Diagram on how to read a seed packetHow to Read a Seed Packet: Details

G. Row Spacing –  How far apart to place rows of seeds. If you are planting in rows then this is how far apart the rows should be from each other.  I’m not going to go into why I believe row planting is probably one of the least useful ways to plant a home garden but you can read about the best way to space plants here.  If you are just starting out rows can be great and this gives you the information you need so the plants are not to crowded.

H. Thinning – How many tiny seedlings to cut or pull out.  Seed packets want you to plant extra seed and remove tiny sprouts later.  This is a really good idea for a novice gardener and the seed company!  I’d rather have 5 seeds sprout than none at all.  Once you get familiar with seeds you can cut down the thinning and use less seed. Remember that thinned plants from lettuce, radishes, and beets can be eaten as microgreens if you do not want all those seedlings to go to waste.
I. Days to Harvest –  The most awesome number on the packet!  This is when you can expect to get fruit, vegetables, or flowers.  If your growing conditions aren’t optimal (drought, overly wet, bad soil) expect this to be longer than listed
J. Sell By Date –  Whoa what?  Yep, seeds expire!  Many seeds can be kept for a few years but you want to check the packet and make sure you have fresh seed if you are recently purchasing.  I have seen old seed packets accidentally moved in with new stock.  I always check to make sure they are the freshest I can find.

K.  Extra Info – Details, tips and tricks.  Somewhere you are going to see some tips and tricks about the plant.  It may give you further tips to creating happy and healthy plants or information about harvest and saving seeds.

I personally prefer the more expensive seed (with less info on the packet) because I generally have better germination and healthier seed.  If you want really primo seed and still a good amount of information on the packet here is my affiliate link to my favorite seed store: Sow True Seed.  I also can always find special varieties more suited to my garden and have had wonderful germination rates with these seeds. Plus they will go over how to read their seed packets with you if you are lucky enough to be able to go to their store in Asheville, NC.  However, I started with the packets you can pick up at any big box store.  Nothing wrong with them and great for beginners.  Just make sure to read the whole seed packet and you will have enough information to come out with some good plants.
 Seed Packet 101