Posted on 2 Comments

Halloween Mantel

Halloween Mantel with Dripping Flesh Garland

I have stated before that I usually like the ‘prettier’ halloween.  Glittered skulls, pretty potions, mystical & magical versus ghouls and gore is more up my alley.  However, this year I just wasn’t feeling it.  I even had ravens, black tulle, and lots of green glitter all ready to go.  Instead I opted to make a huge mess with paint and plaster.

Halloween Mantel with Dripping Flesh Garland


I think once you have a giant eye attached to your mantel, you kinda have to continue with the theme.

Zombie Candles and Spider Webs


In comes spider webs and zombie candles.  Lots of spider webs…

Zombie Candles


And lots of zombie candles…

Best part?  My kids and husband didn’t even bat an eyelash at the giant evil eye.  I think they are immune to Mama’s decorating insanity.

Tutorials Used

Rotting Flesh Garland

Zombie Candles

Enjoy these articles? Get biweekly updates by joining my mailing list (no spam, no way, no how)

Posted on 4 Comments

A Garland: Evil Eyes & Rotting Flesh

Evil eye and rotting flesh garland

The title of this post tickles me to no end.  I usually make ‘pretty’ garlands like these, but I just couldn’t help but make some gruesome rotting flesh with an evil eye centerpiece to go along with my Zombie Candles.

Evil eye and rotting flesh garland


I adore pretty Halloween with glittered skulls and fancy cocktails potions, but I was just in a more gruesome mood this year.  I don’t think many people will want to recreate this garland, but I did a quick mashup of the process in case anyone was interested.

It involves plaster, paint, and plastic sheeting.  Here is an interpretation of events from McClain, my 3 year old:

McClain: “Whatcha doing Mama?”

Me: “What does it look like I am doing?” (said nicely b/c I was curious what he thought)

McClain:”You’re making a BIG mess”

But it was a melty, drippy, bloody, gruesome mess.

Process to make a rotting flesh garland


After swirling plaster came a layer of paint (same colors used in the Zombie Candles).  FYI: you don’t have to wait for the plaster to fully dry before painting.  Just wait till it hardens.

Next week you can see the full Undead Mantel (10/16)

Enjoy these articles? Get biweekly updates by joining my mailing list (no spam, no way, no how)

See other spooky decorations, crafts, and recipes at these link parties: 52 Mantels, Shabby Creek Cottage

Posted on Leave a comment

Spooky Spider From Gloves

Stuffed Halloween spider made from gloves

Hello and Happy October Craft Thyme readers!

My name is Laura, and I blog at The Experimental Home, where I share my everyday creative experiments. I “met” Brianna back in August, when she was my package pal. We hit it off, and decided to pull the ol’ switcharoo on you today, I hope you don’t mind.

Now that it is actually October, I am getting excited for Halloween. It is such a fun holiday, and it is so much fun to
make silly and spooky decorations. Yeah, for me, silly and spooky go together. I am the kind of girl that laughs at horror
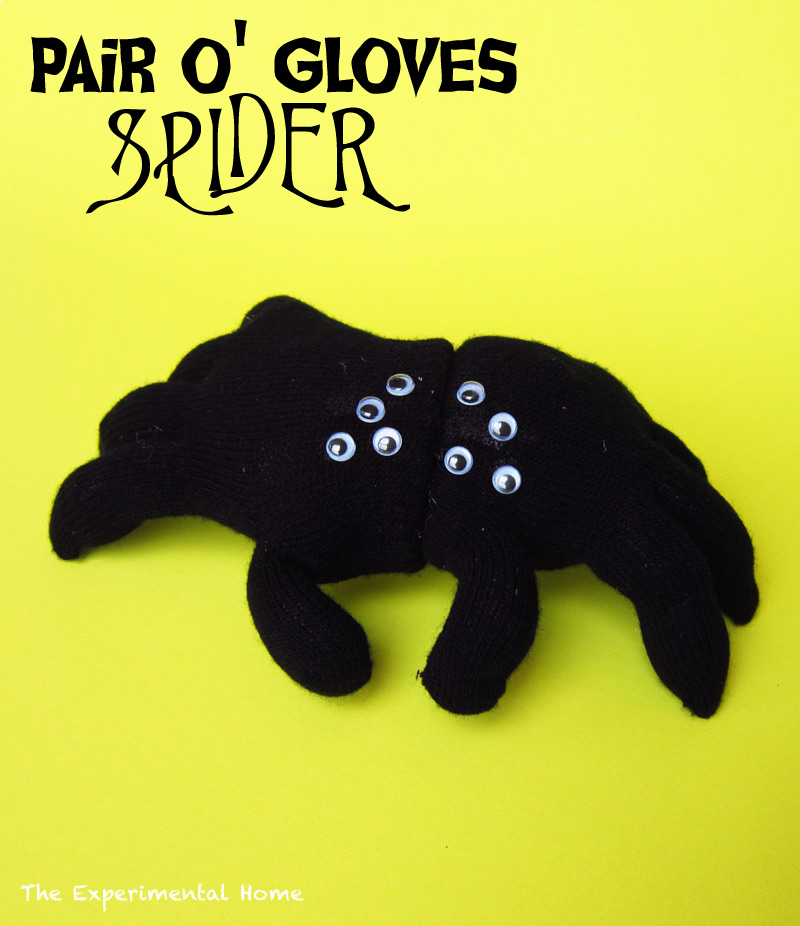
films (to the point that my husband won’t go to a scary movie with me). Speaking of silly and spooky, check out this spider I am going to show you how to make today… can you believe I made it out of a pair of gloves?

pair of gloves spider

I picked up a pair of basic black stretchy gloves in the dollar section of my local Michaels. Clearly I didn’t go to the
craft store to find gloves, but I can’t resist browsing the deals in the dollar section. I looked at the 8 fingers and immediately thought spider… I know, I am weird like that. I took them home and experimented until I came up with the perfect pair of gloves spider.

black gloves

The first thing to do to transform these gloves into a spider is to give them a little structure. I used pipe cleaners so
the spider’s legs would be bendable and shapeable. I folded a pipe cleaner in half and bent down the tips to keep them from poking through the fingertips of the gloves.

pipe cleaner for spider

I stuck the two ends of the pipe cleaner in two adjacent fingers. Since there are eight fingers, I needed a total of four
pipecleaners, plus one for the thumbs. For the thumbs, I just bent down the tips and stuck it in one thumb for the time being.

gloves and pipe cleaners

Time to stuff. Get out a bag of fiberfill and stuff those gloves. I found it was easier to stuff each finger individually
before stuffing the palm. Stuff all the fingers first, then the palm and thumb of the glove with the pipe cleaner hanging
out – get it good and stuffed. Don’t stuff the palm or thumb of the other glove yet.

stuffed gloves

Finally, stick the loose pipe cleaner end in the other thumb, and fill the thumb with stuffing. Now you are all set to transform your gloves into a spider. Put the stuffed glove inside the empty one folding the cuff of the empty one under as you go.

Look, you have a spider!

pair of gloves spider

Spend a little time (or way to long if you want) bending and sculpting the legs to make your little spider look just right.
Then seal up the “seam”. I just squirted in a little fabric glue, but you could also use white or hot glue, or simply stitch
him shut. For a little extra fun, I glued on eight googly eyes. I actually took a minute to search  spider eyes on google images to learn about spider-eye arrangements… yikes, that’s a creepy bunch of images. Happy Halloween!

Good thing my pair of gloves spider is just as silly as he is spooky.

pair of gloves spider

Here is a fun spider factoid, the pincher things in front of spider’s mouth (made by the thumbs of my gloves) are called chelicerae. The final segment of the chelicerae are the spider’s fangs. Google image that if you dare.

So, if you have a few minutes and a pair of gloves, make your self a little spider and show off your new spider knowledge.
Better yet, help a kid in your life make a pair of gloves spider and learn all about spiders together.

A big thank you to Brianna for swapping blogs with me today. I can’t wait to see all the fun Halloween projects she has
in store for us!

Don’t forget to stop by The Experimental Home to say hi and check out all my everyday experiments.

sigcd

Enjoy these articles? Get biweekly updates by joining my mailing list (no spam, no way, no how)

Posted on 23 Comments

Zombie Candles For Halloween

Undead Candles

I happen to be just a tiny bit obsessed with the undead.  I love to watch zombie movies! Needless to say with Halloween rolling around I needed to make something related to zombies.  In comes the idea for inanimate objects turned into zombies and out rolls my tutorial for undead candles:

How to make your very own, undead candlesThe following tutorial involves flame, knives, and paint attached to questionably flammable surfaces.  Basically, do not try this at home and then sue me.  I have no money anyway. 

Supplies for the Zombie Apocalypse:

Candles: White or suitably decaying flesh color

Steak/Serrated Knife

Flame in the form of lighter

Cheap Acrylic Paint: Black, White, Red, Green

Foam Brush

Step 1 Day One/Ground Zero: Distress Their Nervous Systems

Distressing the exterior of the zombie candle


First you need to infect your candles with the zombie virus.  I find the best way to accomplish this is to burn, hack tooth like marks, and roll them in melted pools of wax.  Basically get the exterior all roughed up.  I make sure to saw some nice tooth marks into the surface.  Be very careful when applying flame and using a knife.  You wouldn’t want to infect yourself.

Step 2 Day 5: Rot Sets In

Sponging thin green paint onto the surface of the candles


Once the candles have died and risen as zombies, rot will begin to take over their bodies (especially if you live in the humid southern regions).  To help your zombie candles along, thin some greenish paint with water and sponge it over the candles.  Since the coat of paint is thin it will bead on the surface of the candle.  This is fine!  Just let iit dry.

Step 3 Day 10: Zombie Candles Begin To Moan

Adding a greyish layer of paint to zombie candlesIf your candles begin to shamble and moan don’t worry!  You are almost done with those decaying pieces of decor.  Mix some black, white, with red or green to get a nice thick coat of undead color.  Sponge it on liberally and do NOT thin with water.  Any gashes and tooth marks can be left unpainted.  Let dry and try not to leave your candles near any brains.

Step 4 Day 15: Transformation Complete No One Makes It To Day 28

Adding faux blood to the candles


Your candles are probably shambling about the neighborhood.  Now is the perfect time to corral them and check out any bloody wounds they may have received on the hunt.  Simply apply a thick coat of dark red paint to any bite marks/gashes and let it drip down.  For an added bonus add ‘bloody’ fingerprints.

Once dry you have your own piece of undead decor.

Undead Candles


Since I have no urge to become undead myself I use caution when burning these candles as acrylic paint is not meant to be burnt.  I prefer to use older candles that are burned down in the center so I can insert a battery operate tea light and stay away from the whole flame thing.

Check out my Evil Eye and Rotting Flesh Garland (10/8) and Final Halloween Mantel (10/16)

Posted on 39 Comments

Faux Cast Iron Finish

The final finish has a lot of texture and is matte in nature like real cast iron.

I developed this paint technique to create a cast iron finish on a HID-E-OUS brass lamp we had in our living room.  My husband and I have a lovely cast iron legged side table and a shared like of Restoration Hardware.  Also a shared like of not spending that type of money.  I tried to find a good tutorial to fake a cast iron finish but gave up and started playing with paint.  After multiple attempts, hauling the side table around to compare, and scraping off bad finishes I found a way to paint a faux cast iron finish.

Faux Cast Iron Tutorial


It looks great on furniture but also works to make an ‘urn’ like finish for Halloween.

Supplies

Supplies to create a faux cast iron finish.


For the basic finish you need:

Rustoleum American Accents Stone Finish in Mineral Brown* (long enough title?)

Bronze Spray Paint*

Matte Clear Finishing Spray*

Sand Paper (higher grit is better for smoother finish)

If you want to paint glass:

Add a glass primer or frosting spray*

Step 1 We All Hate It: Priming

Depending on the piece you are covering you’ll need to prime it.  Glass required a coat of frosting spray.  My horrible brass lamp needed a clear coat sanded off.  Google directions for the piece you want to cover.

Step 2 Using the Rustoleum American… Ah to hell with it: The Stone Paint

Faux Cast Iron: Spraying Stone

I’m just going to call it stone spray paint from here on out.  The title in supplies should let you know what I mean.  By the way, I am only suggesting that particular brand for the stone paint because it is the only one I have used.  I tried a variety of bronze paints and they worked fine, but I haven’t had a chance to try a different texture brand.  If you do please leave a note in the comments.

Lightly cover the whole piece with a splattering of the texture.  I moved waaaay back than my usual spray painting technique.  You can see if just splattered a coating.

Step 3: Bronzer instead of Blush

Cast Iron Paint Finish: Adding bronze

You can go ahead and spray a covering coat of bronze spray paint before the stone paint is dry.  Save some time and it doesn’t hurt anything.  However, let the bronze mostly dry.  I say mostly because I am impatient and if it is a bit tacky and peels up you’ll be fine. If you are doing it right it will look shiny and warty and you’ll be thinking “what the hell is this?”

Step 4: More OMG This Looks Awful

After the bronze ‘mostly’ dries take the sand paper and give it a buff.  It will knock off a lot of the texture leaving pits, holes, and scuffs.  Then cover in bronze paint again.  Repeat step 3 & 4 if you don’t feel like it had a lot of varied texture, or you were impatient (like me) and gummed up the paint into a wad.

Step 5: Now It Will Come Together

Finishing the faux cast iron finish
From What? to Wow! all in one coat of paint.

Let everything dry and then cover the whole item with a thick coat of matte spray.  By thick, I mean disregard the manufacturers guidelines and get that puppy about 3-6 inches from the surface.  You want the matte paint to pool in the pits and any decorative carvings.

That is pretty much that!  There aren’t really notes with this process other than more layers of paint give a richer finish.  You can see how I styled these cast iron ‘urn’ vases for a Halloween Vignette.

The final finish has a lot of texture and is matte in nature like real cast iron.

Enjoy these articles? Get biweekly updates by joining my mailing list (no spam, no way, no how)

See more great DIY, Decor, & Crafts at these Link Exchanges: 52 Mantels, Lambert’s Lately, The Crafty Blog Stalker, Craftberry Bush, The Pin Junkie, The Stitchin Mommy, I Should Be Mopping The Floor, Craft-O-Maniac, Dream A Little Bigger, By Stephanie Lynn, Kitchen Table Art