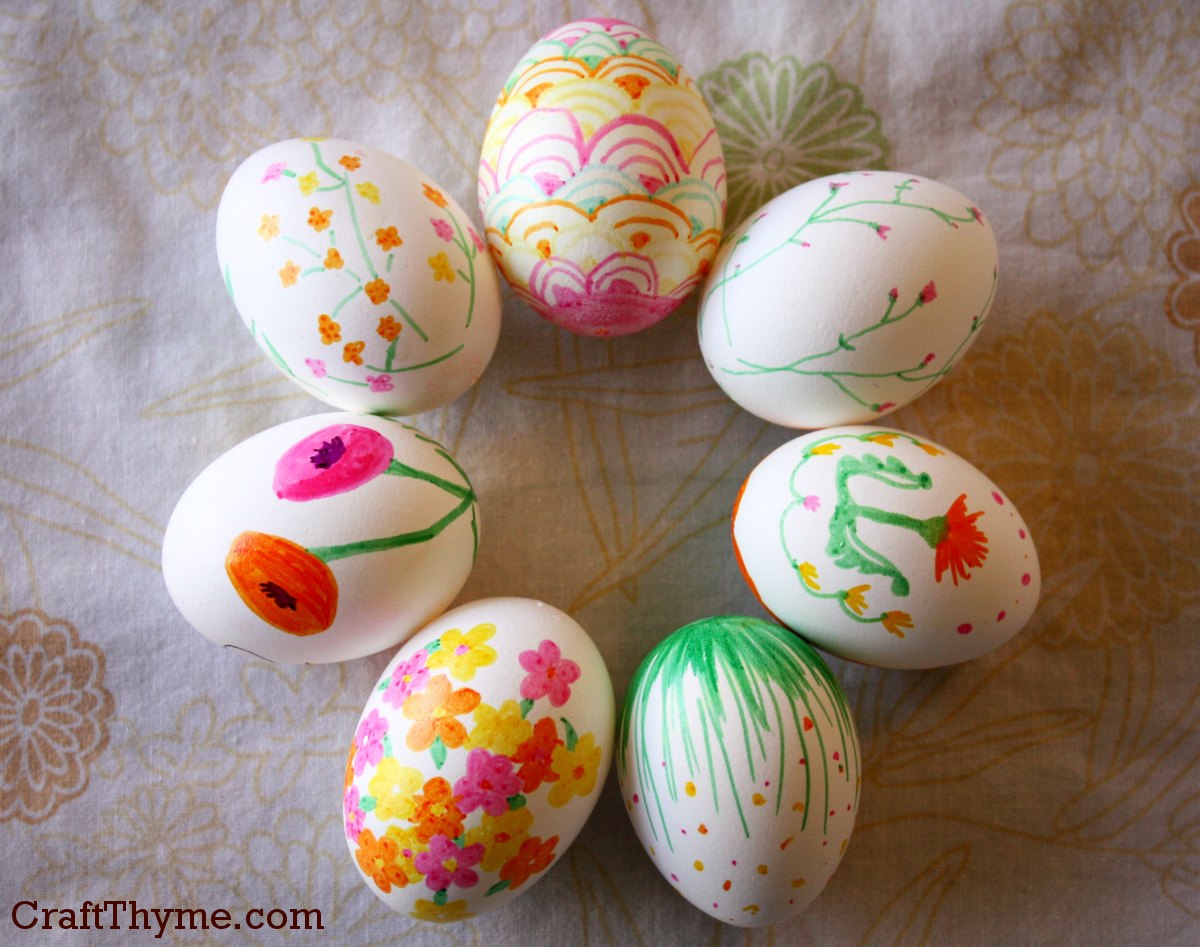
Easter is just around the corner and I wanted to make some pretty floral patterned Easter Eggs. These will be part of my Easter table setting (coming next week). I blew out some eggs a couple of weeks ago and they have just been sitting… Waiting… for divine Eggspiration.
Bring on the Pattern
Got a wild hair and grabbed some permanent markers. Voila! I did these all freehand while trying to throw a ball to McClain and keep Conlan from exercising his new found ability to crawl… off the porch. Imagine if I had a stencil or even a reference pattern!
If using permanent markers I would strongly suggest to NOT eat the egg. I wasn’t using hard boiled eggs, but I can’t imagine eating anything that smells like those markers do. But, the markers make a quick and easy way to make colorful patterns on Easter Eggs.
If you want to see these eggs in their final table setting I’ll post a link here when it goes live next week.
Enjoy these articles? Get periodic updates by joining my mailing list (no spam, no way, no how) or subscribing to my RSS feed.
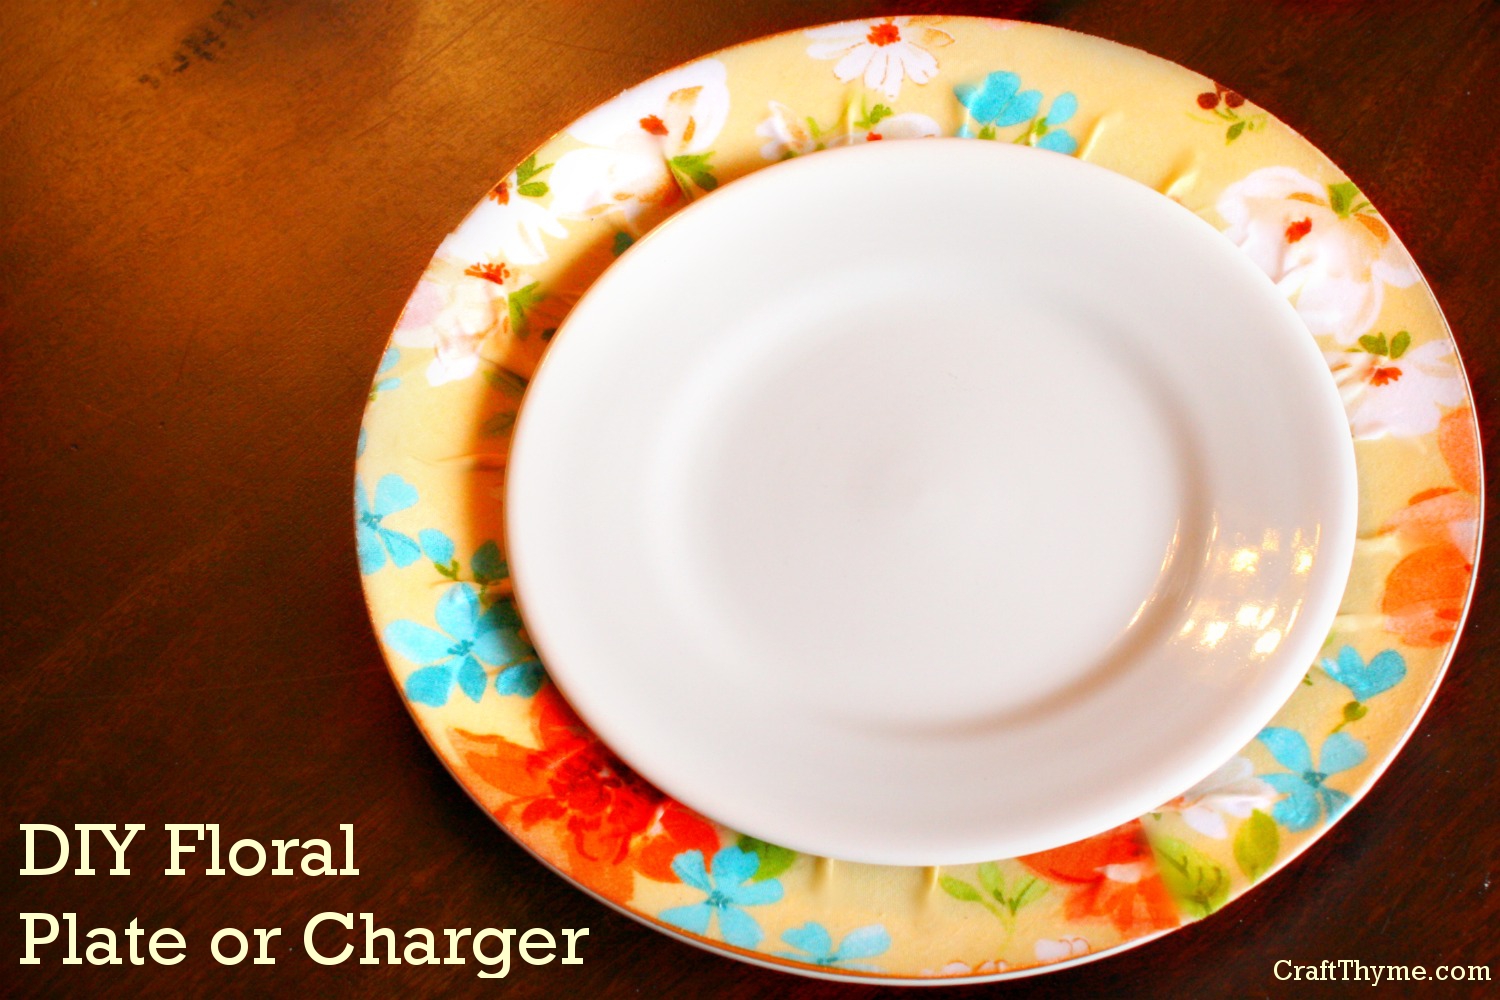
You might ask yourself: What the hell is a charger? Not only will I answer that question, I’ll show you how to make a pretty floral charger for your Easter table setting. While a charger is technically a car and the thing you use to make your cellphone keep working, in this case we are discussing a decorative plate. It goes under your regular plate for decorative purposes.
Basically a charger = a useless plate that you can’t eat off of. But damn do they look good.
Damn that is a mighty fine looking useless plate
Supplies
Plates that can get ruined made awesome (these lovelies we .50 a pop at Goodwill)
Fabric
Decoupage Glue
Something to paint the glue on with (foam brush, paint brush, fingers, whatever)
Ruler
Scissors (I happen to have rotary cutters but as long as you can cut fabric you’ll be fine)
Step 1 Cut Fabric on the Bias
You can see that I am very exact in my measurements #Sarcasm
Decide how large of a fabric rim you want on your plates. Mine had a natural edge so I chose that to be the width of my fabric strips. Use that width to cut multiple bias strips. Why bias? Well… I wanted the very outside edge to lay neatly on the plate and to create a “gathered” look towards the center of the plate. I’m not going to get into a lot of technical fabric mojo here, but bias cuts allow this. If you don’t know what a bias cut is or how to do one, let me google that for you. There are a variety of tutorials that will show you how to do that in a flash.
Step 2 Sticking the Fabric
You’ll note that I put down some old newspaper. Modge Podge is a beotch to scrape off the table.
Note: I thinned my decoupage glue with a bit of water because fabric really soaks it up, and frankly that stuff is expensive!
Take the glue and cover a few inches of the rim. Carefully stretch the fabric along the edge, pressing gently to adhere and smooth. Leave the center all ripply.
Step 3 Getting Messy
I hope the glue really is non-toxic since I basically decoupaged my hand.
Stay with me because this should probably be a video instead of a still photo.
Take the fingers of one hand and form the extra fabric into little gathers, while holding the edge so it doesn’t slip. Now take your other hand and apply glue from the rim to center (a downward motion). This takes a little dexterity, but, no worries!. The glue makes it nice and slippery so if anything slides etc. you can nudge it back into place.
Step 4 Let it Mostly Dry
Yet another photo that looks like I need a manicure and have some flaky skin disease. I promise it is the glue!
When the glue turned mostly clear you will want to take your plates and press down on all the gathers. I did this to make the charger flatter so the dinner plate will set level. I also did this for aesthetic reasons as it gave me an opportunity to smooth out any air bubbles and remove any excess glue. After smoothing the plate I put a second coat of decoupage glue to seal the fabric fully.
Notes
These chargers aren’t washable nor are the meant to be eaten on. With the multiple coats of decoupage glue they are wipeable.
If your strip fabric doesn’t go all the way around just add a second. I cut the end straight and overlapped it slightly right on one of the gathers. With the gathers and pattern it is hardly noticeable.
Regular Readers
I am mixing it up a bit. Usually I post the finished mantel, table setting, etc. first and then add the tutorials. This week we are going backwards! I’ll post the link to the final Easter table setting here when we get to it.
Enjoy these articles? Get periodic updates by joining my mailing list (no spam, no way, no how) or subscribing to my RSS feed.
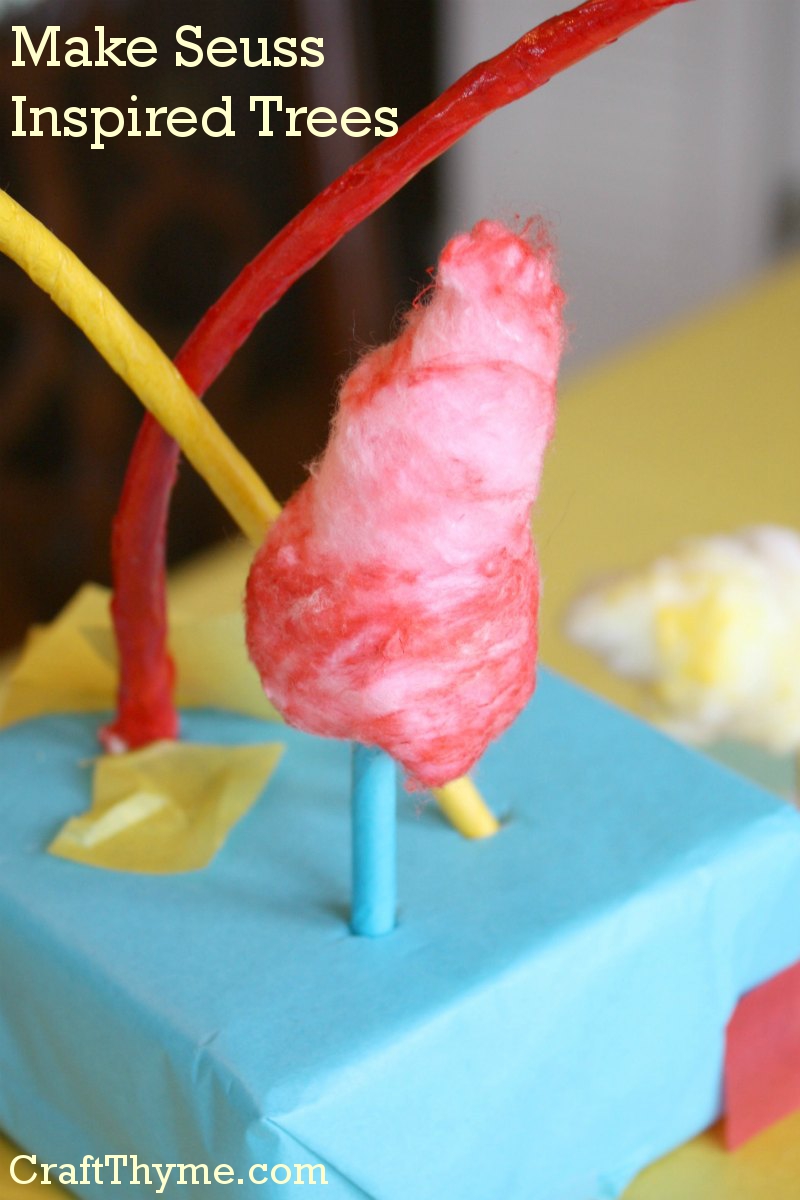
Want to make Dr Seuss inspired trees? Then you have found the most esoteric tutorial on the web. Hopefully this how-to will answer your extremely specialized questions. I debated making a tutorial on how to create Seuss like trees, but I personally wanted to recreate the pointy-one in the first picture as some sort of whimsical Christmas decoration. Plus I put some time in making these for Conlan’s Dr. Seuss themed first birthday, so why the hell not?
One of the most random tutorials on the web.
Supplies:
Dyed Cotton Balls (You can see a tutorial on how to dye them here)
Wooden Dowels or Bamboo Skewers
Styrofoam (Or something for a base)
Modge Podge (or thinned white glue)
Tissue Paper (Traditional Dr. Seuss colors are Yellow, Red, and Aqua/Turquoise)
Optional: Hot Glue
Step 1 Bending Dowels
Soak wooden dowels or bamboo skewers in water. I threw mine in a pot the night before: That means around 8 hrs of soak time. This will make them supple enough to bend into curvy shapes. You can see in the above picture that I just stuck mine in my, rather dirty, heating vent grate to dry. You WILL break a few and some may split a bit. I saved the broken pieces to make short trees, while, the splits can be trimmed off and will be covered in the next step.
After they were dry, I stuck ends into the bases to make sure that I had enough and to get an idea of the final placement.
Step 2 Adding Embellishment
Holy Hell! I swear that is glue peeling off my fingers… Not some horrible skin disease.
Dr Seuss’ illustrations of trees have color and curves and the magical element of poof. To color the “trunks” cut a strip of tissue paper and lightly coat the dowel with a little glue. Then wrap the tissue paper around the dowel. You can leave a little on both ends uncovered as it will be sticking in the base.
Once covered, I lightly coated the tissue with gloss Modge Podge to give the trunk a nice sheen and make sure the tissue was nice and stuck.
Step 3 Add Poof
Pretend you are trying to make some amazing ‘Southern Hair’
Simply take the dyed cotton balls and lightly stretch them into cones, swirls, and puffs. I then used hot glue to attach 1-3 cotton balls per tree. To hide the unsightly bases I wrapped them in an extra piece of tissue and simply poked the bottom of the dowel through the thin paper.
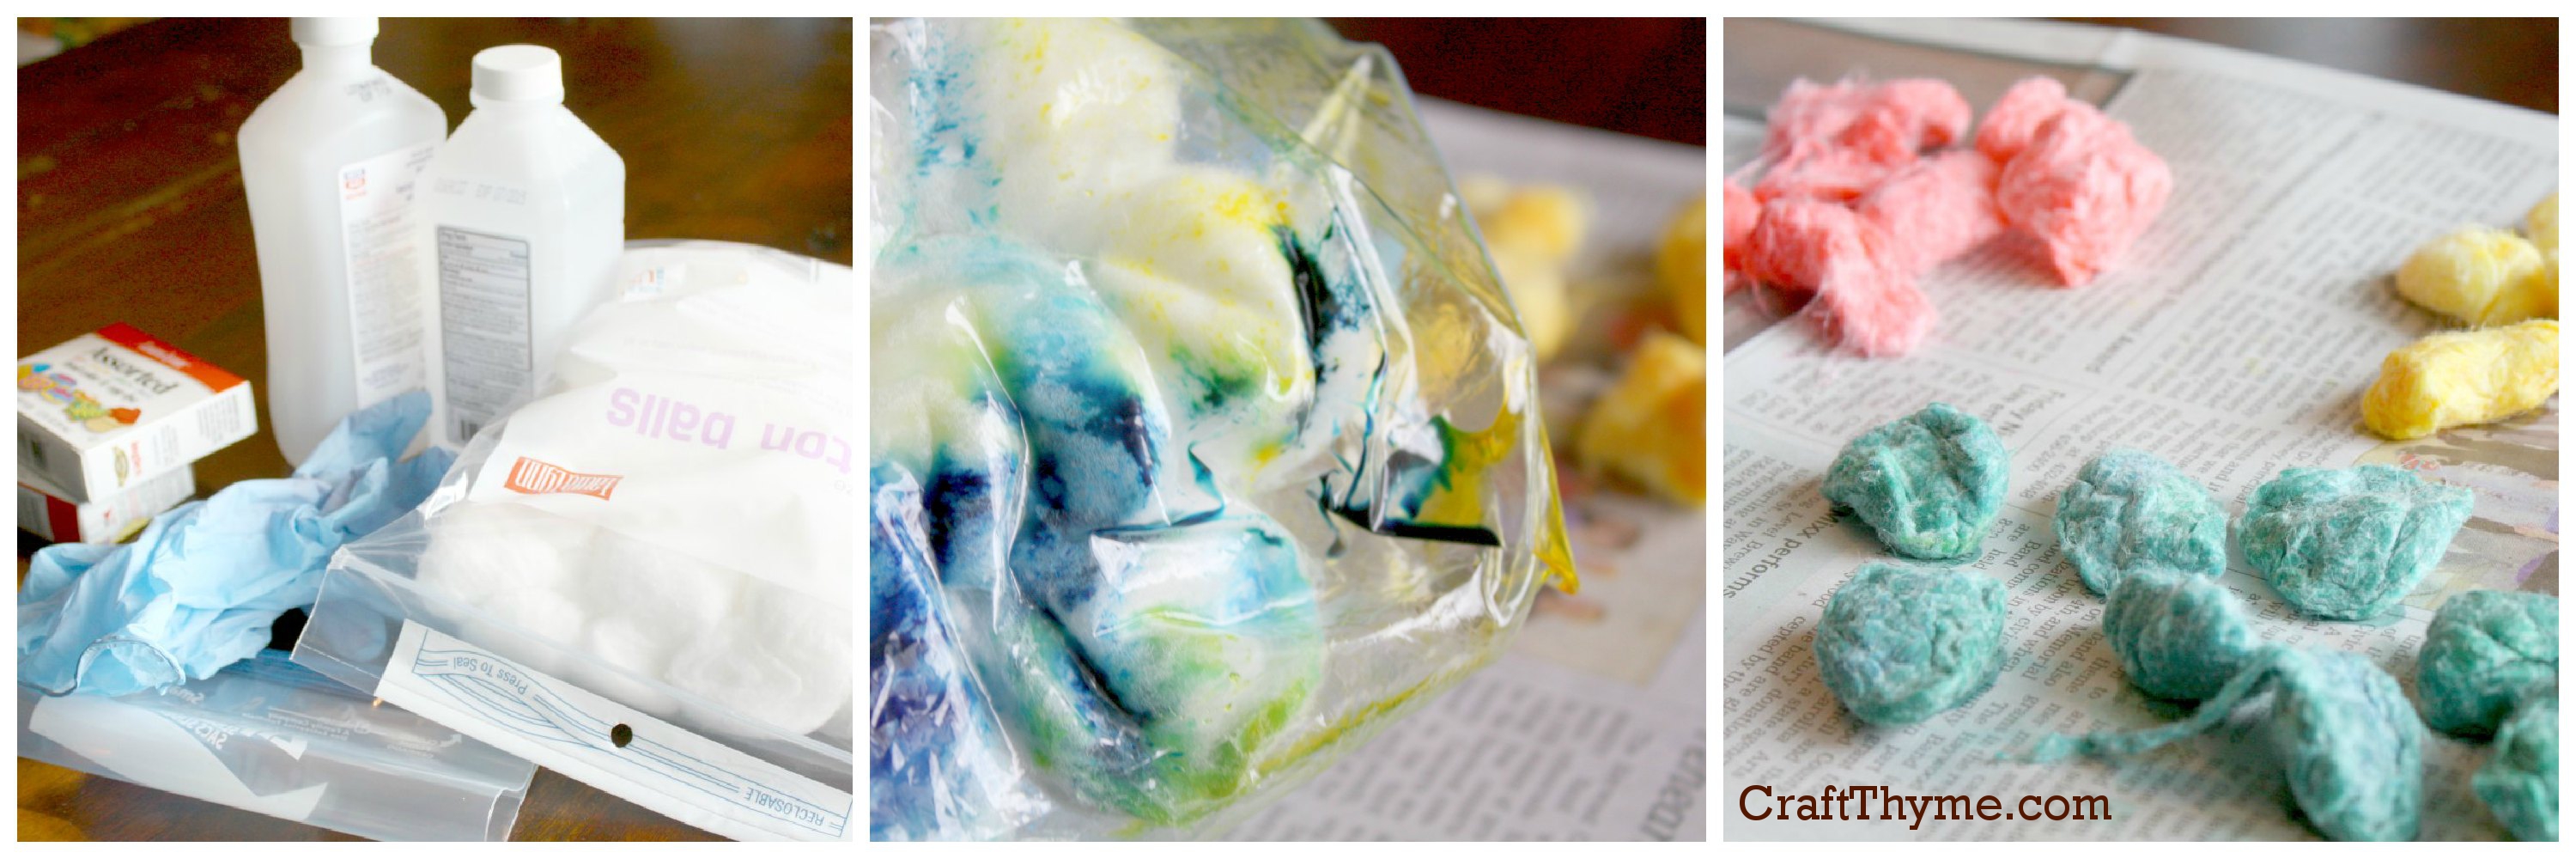
To create my Dr. Seuss inspired trees I had to dye cotton balls. It got me thinking, there are a ton of household items that you can dye. Here is my quick tutorial on dyeing cotton balls plus 9 10 other household items (meaning things you can pick up at the grocery store).
1. How to Dye Cotton Balls
Supplies:
Rubbing alcohol, food coloring, cotton balls (duh), and a plastic baggy. Gloves and newsprint are a nice bonus.
Steps:
Throw cotton balls into a baggy with a few drops of food coloring (I was trying for a turquoise in the middle picture… Needed way more blue) and a splash of alcohol. Remove the air from the baggy and squish the cotton balls around until the are evenly colored. Pour them out on a newspaper to dry. When dry you can fluff the cotton which will reveal the white making the colors much lighter. You can see the final product on my Dr. Seuss inspired tree centerpiece.
My youngest son turned 1 last week. I’d love to say I had it all together, realized that Dr. Seuss’ 100th birthday was occurring and picked the perfect theme for Conlan’s First Birthday. Alas, I would be lying… I wanted a Dr. Seuss themed birthday for McClain’s first (two years ago) and ordered the licensed plates, napkins, etc. The decorations came exactly one day after his party and were promptly shoved in the basement. I got my Dr. Seuss theme on the second go-around.
To complement the purchased party items I made a few decorations. Some Seussian-like trees for the wrapped box centerpiece and hand-dyed crepe paper ruffles.
While, I imagine that very few people will need to recreate the trees I think I may just give a run-down on how to make them next week. It might be fun to do something whimsical like that for Christmas.
Balloons and Streamers! Can’t have a birthday without them.
The guests (adults and kids alike) enjoyed the balloons. They made great decorations in the colors of red, white, turquoise, and yellow & doubled as entertainment. Everyone seemed to enjoy the basic snacks and of course a color themed cake. Conlan, seemed to enjoy all the extra attention.
Okay… Maybe Conlan enjoyed the balloons more. Oddly, he was not smiles about the cake.
While, the Dr. Seuss theme looked great and added nice color pops to the family photos (yes, I keep my friends off my blog) I did manage to miss getting one awesome picture. The cake smash! Why? Because Conlan was totally NOT about it. He stuck one hand in, and looked at me to wipe it off. Patrick gave him a taste of the icing, and he promptly made a face like it tasted horrible. Clearly he is missing some important sweet-tooth gene I should have passed to him. Anyway, enjoy one more photo of decoration details and scroll down for the connected tutorials.