There are plenty of metallic fabric paints on the market, and while they excel at adding shimmer they don’t have that rich metallic leaf look that is so popular on various commercial t-shirts. It took a little bit of research but I finally figured out how they get gold leaf on fabric and keep it washable. Allow me to introduce you to Gold Foiling Fabric.

Supplies

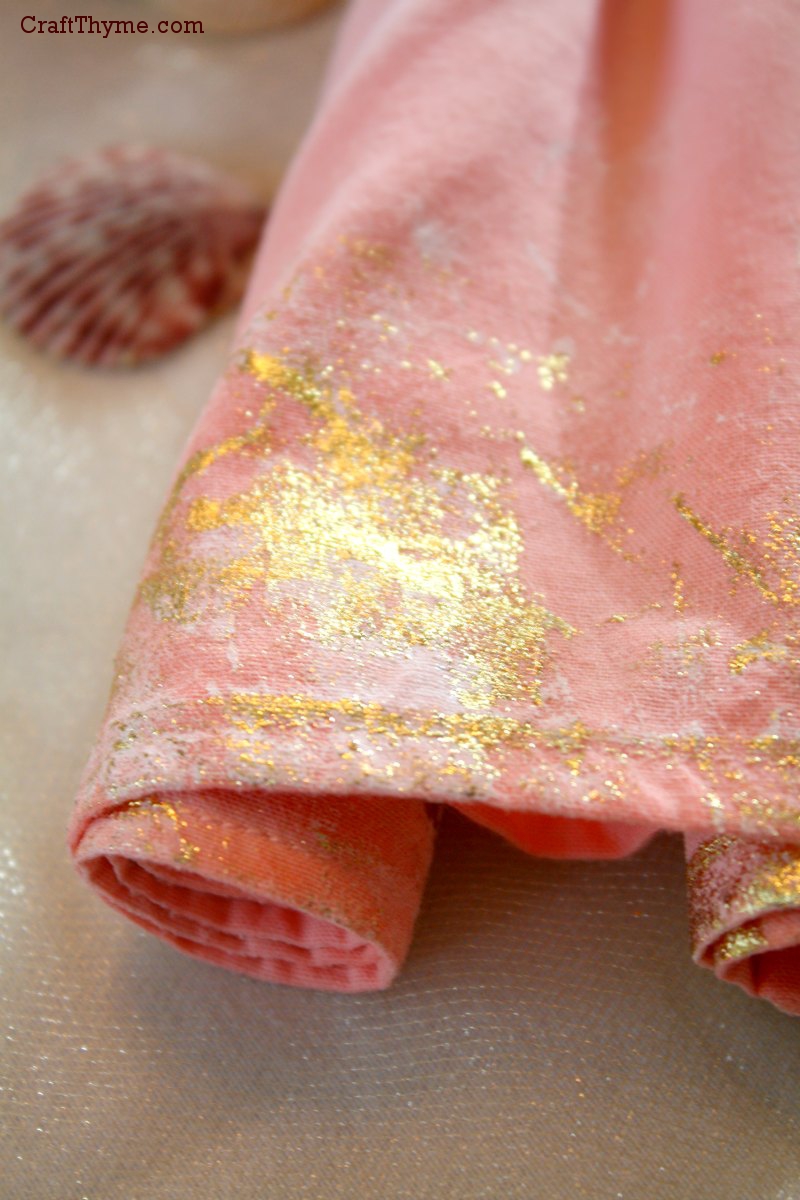
Fabric -This fabric had been ombre dyed using this tutorial
Transfer Adhesive* (Full disclosure about this affiliate link: I wasn’t thrilled with the Martha Stewart Transfer Glue I used here. I might try a different brand. The important point is that is is tacky when set and stays adhered through gentle washing. Maybe it was user error…)
Metallic Foil Sheets* (These are different than gold leaf. They are thicker and have a backing to the metallic portion)
Sponge applicator
Step 1: It’s Sticky

I wanted a random/worn pattern to my finished foil look so I put the glue at random and used varying thicknesses of glue. You can get a smoother finish by putting a nice, thick, even application of glue. You can even use a stencil and apply glue in a pattern. The important part is to get enough on that the glue quits soaking into the fabric and leaves an even coat on the top layer.
The directions will tell you how long to let the glue set. My suggestion is to lightly test with your finger. The glue should stick to your finger but not leave the fabric when set.
Step 2: Burnish and Repeat

Alright, I know this probably makes sense to everyone else, but put the shiny side up… You are gluing the backing to the fabric. That was one of my duh moments. To get a really good bond press the sheet into the glue. Then burnish the top of the foil with a precision instrument paint brush handle. Mostly because that was what I had laying around.
Slowly peel the foil from the fabric. The plastic sheet should peel off and the gold leaf effect remain. Leaving you with some nice shimmer like this.

These final napkins where used in my Summer Pink Lemonade Table Setting seen here.
Notes
I already mentioned one important point. Shiny-side up. When done I let mine sit for 24 hours to fully cure.
I did hand wash them and the gold stayed put. I believe it would hold up through a gentle cycle as well. I just wouldn’t put these napkins up to a BBQ or Crab leg challenge. But for a special occasion they work great.
It took a bit of practice to do a good application of glue and foil. If it is your first time I would suggest buying an extra sheet or two of foil to practice with. The napkins were completed after many trial runs that took to realize how to apply the glue and that burnishing helped.
Finally save your foil sheets if they have any left. The little flecks make for an interesting effect when pressed into glue
Enjoy these articles? Get periodic updates by joining my mailing list (no spam, no way, no how) or subscribing to my RSS feed.
Do you know if this is ok to do on silk?
Yep! You might look around and see if there is a particular type of sizing meant for silk, but otherwise I would go for it. Silk is fairly washable and very paintable. I have seen lots of silk kimono with gold thread and leaf interspersed in the design.
If anyone reads this and still needs to find adhesive, Deco Foil who mkes the gold foil sheets has a BUNCH of different adhesives under their brand name – they have a pen, sheets of hot melt, a gel, and here is an amazon link for a spray (not an affiliate link – just a helpful lady) https://www.amazon.com/Therm-Deco-Foil-Liquid-Adhesive/dp/B00SW6KEV4
You can also order online thru walmart and joann fabrics….nobody has it in store for some weird reason. Google deco foil adhesive ???
I have never tried the spray. Thanks for the link.
I know this is a really old post so taking a chance!! I love your tutorial but can’t find that adhesive ANYWHERE!!
Do you have any suggestions on another to use??
If you are looking for adhesive for gold foil here is a link. I had to order mine on the web. Totally worth it if you plan on washing them ever.
http://www.amazon.com/gp/product/B007C7XKOW/ref=as_li_tl?ie=UTF8&camp=1789&creative=390957&creativeASIN=B007C7XKOW&linkCode=as2&tag=crathy04-20&linkId=M4CM6XOI5LQQK5UE
http://www.amazon.com/gp/product/B007F10X9A/ref=as_li_tl?ie=UTF8&camp=1789&creative=390957&creativeASIN=B007F10X9A&linkCode=as2&tag=crathy04-20&linkId=5GZLYP4CADIUDME7
Omg you’re so awesome thanks for replying and yes definitely plan on washing so this is very helpful! Thanks again ??
No problem! If you run into any issues let me know. Practice the adhesive and foil. There is an art to getting enough adhesive but not too much!
Is this foil you used machine washable? Can you provide a new Amazon link, o think it expired, thank you kindly
Yes it is! Here is another option: https://amzn.to/3S0H4Cr
[…] pink are a match made in heaven, so imagine our excitement upon discovering these DIY napkins from Craft Thyme! These are easy to make but have that exclusive designer look about […]
These are beautiful! Love the gold-spattered pattern you got with your technique. How thick would you say the napkins are that you’re using? And what kind of fabric are they? I’m trying to play with gold foil for the first time and doing a napkin project too. I’m using the DecoFoil adhesive and it is NOT working well. Have tried thicker/thinner glue applications, shorter/longer dry times, and nothing ends in nice foil coverage. Any other tips from your trials?
Honestly, I would try a different adhesive. The stickiness of your adhesive is really key in getting the foil to release from the backing. You also might try leaving the foil on the adhesive and really rubbing it a lot before trying to remove the backing to make sure you have a good grip.
Thanks for the great directions. I make costumes for the opera department of a small private university and this technique will look great on some of the more fantastical characters.
How do you think this would do on tights/stockings? Thanks!
Not very well in my opinion. The fabric foil that I used is not stretchy enough to move with the tights well. Maybe there is a stretch version?
Hello, so nice , thank you . May I ask you from where I can buy a foil for the fabric and glue? Thank you))
I got mine off Amazon. Martha Stewart makes a kit. Just search for fabric foil.
What brand of gold foil did you use?
Martha Stewart
Recently I finished a project of mine, a music box using a porcelain half doll and an emu egg as the “skirt”. The fabric is some kind of foil glued to knitted yarn. Very unusual. Reading your directions, it occurred to me that your method might work for my music boxes. It’s a pain to cut away the yarn on the torso part, (it adds extra thickness which I would like to avoid. So, here is my question: Which brand of foil can I use? There are a lot of them on the market out there.
If you like, I can email you pictures of my music box so you can see the foil I would like to get, I should say the foil on top of the yarn is rather resilient, does not tear easily.
Victoria
You are more than welcome to email me. However any of the foil marked for fabric should fit what you need. The reason is that fabric foil, unlike gold leaf, has a backing for resilience.
The issue you will likely have would be transferring it. It takes some heavy burnishing to get the foil to stick to the glue and if it is on a 3-d object this could prove problematic.
Have you considered using something along the lines of rub n buff. Or liquid leaf? Might be easier to coat the yarn and since it doesn’t sound like it will be washed would suffice.
Hi! I have never seen this before! I had never thought about trying foil on fabric. I have some of the thinner foil (different colors) lying around. Do you think that would be something worth trying?
Thanks for sharing!
Gina @ Gina’s Craft Corner
It might be. I got foil specifically okayed for fabric. But I’m a big one for trying things out and seeing the results! Let me know if other types work.
Brianna,
“Shiny-side up”…great point, I probably would have done it backwards. :-) Thanks for sharing this at the Inspiration Gallery!
~Sarah
I know. For some reason it just seems like the gold should stick! I think it is because I didn’t realize the gold is attached to the thicker backing making it sturdy enough to handle a light washing.
Or if it is just because I want to stick the gold to the fabric.