Posted on 11 Comments

How to Squirrel Proof a Bird Feeder

How to hang a squirrel proof bird feeder

In my youth, we had bird feeders, and I have found there are two types of families: Those that allow whatever to come and feed and those that fight the squirrels. Adam’s family has perfected the art of how to squirrel proof a bird feeder.  While mine comes from the live and let live bird feeder camp. Adam wanted to hang bird feeders, I thought it was unfair since we have out door cats.  Lazy outdoor cats but small furry predators none-the-less.  Oddly enough Adam’s family squirrel fighting secret also makes the feeders cat proof.  Here are the tips he taught me!

How to Hang Squirrel Proof Bird Feeders

How to hang a squirrel proof bird feeder

Supplies/tools

Bird Feeders*: Bonus points if you pick colorful feeders.  They will add some color in the winter months when all the flowers are gone.

Pulleys*

Nylon Rope*

Hooks*

Lighter

Ladder

Step 1 Gather Everything & Repeat

Get all your supplies and tools, take your ladder and set it under the eave you want to hang the bird feeder from.  Realize your ladder is about 5 feet to short.  Call a friend and have them bring a taller ladder over.  Joking aside, one of the first steps in keeping animals out of the bird feeders is to find a location that is relatively high.  We selected one that allowed us an eye level view from inside but was a good 10-12 feet off the ground outside. Also, thanks to Richard, for the ladder! (And you thought we were joking)

How to hang a squirrel proof bird feeder
A nice boring eave just waiting for a squirrel proof bird feeder

Step 2 and The Secret

The secret is a set of pulleys.  This allows you to hang your bird feeders high, while, allowing for you to easily lower them for refill.  Take your hooks and push them into the wood.  Then hang a pulley from the hook.  You can see the pulleys below.

Step 3 The Tricky Part

The next step is not hard but certainly annoying.  You’ll have to run your line through the pulley, tie it to your bird feeder (leave it empty!!!), and then figure out the height you need to be able to lower it to a level where it is low enough to fill but keep your rope from being so long it drags all over the yard.  In our case we wanted three hung, so we had the added bonus of trying to get them the correct matching heights.  I’m pretty sure we never resorted to yelling, but there was at least one huff had in the process.  “Up an inch. No too high.  Down a little.  No that’s too low.” That is a lot to deal with, while 4 kids run about like crazy fiends and someone else stands outside, on a 12 foot ladder, in 20 degree weather trying to gauge height.

How to hang a squirrel proof bird feeder

Step 4 Hook, Line, and Sinker

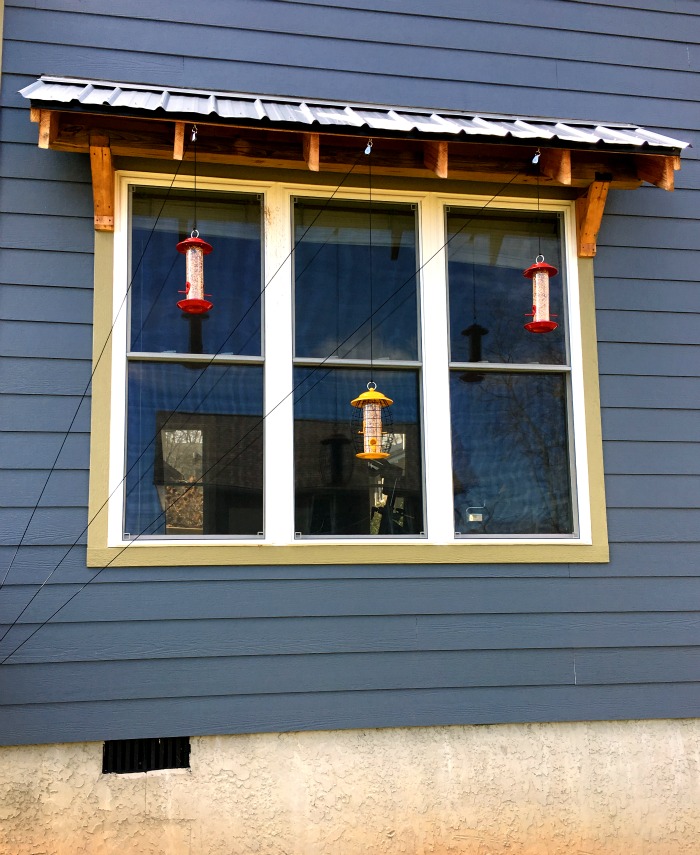
You will need another hook to loop the ropes over at the bottom.  We chose one hook because we liked the way the lines looked pulled to one side and they double as perches for the birds.  You could easily add a hook under each feeder and take the line straight down if you wanted the rope to be less noticeable.

Step 5 Tying the Knot

Once all heights have been decided you will want to firmly tie a loop in two places on the rope.  One for where it will hang everyday and one at the end of the rope.  The one at the bottom of the rope will allow a single person to lower the bird feeders and fill them without needing to take them off the pulleys.  When we were completely satisfied with the two heights (which necessitated a second trip to Lowes for more rope) we took a lighter and lightly singed the ends of the rope and knots.  This will keep them from unravelling and coming untied.  BE VERY CAREFUL.  Fire and melty nylon is no fun.  Getting sued because a reader melted a rope to their finger is even less fun.  You have been warned.  You can skip this step and everything will be just fine.

How to hang a squirrel proof bird feeder
I love the added pops of color the feeders add in the winter.

Why This Works

First, for everyone who can not see the obvious, birds fly; cats and squirrels do not.  The high level keeps the birds safe from the cats.  If a squirrel decides to try to run up the ropes they are too heavy for the bird feeder and end up moving it around on the pulley.  The instability makes the squirrel jump off.  So far it has worked like a charm.  The kids love seeing the birds from inside the house.  I have to grudgingly admit I am also impressed.

How to hang a squirrel proof bird feeder

Posted on 5 Comments

How to Make Raised Beds or Wooden Planter Boxes

Raised beds with peas

[sam id=”1″ codes=”true”]

Do you want to know how to make your own decorative wooden planter boxes or raised beds?  Well then let me give you this How To Make Raised Beds tutorial. But first a little background! I have never done raised bed gardening before.  My family had always preferred to till or double dig a garden plot.  So when faced with the hard-pottery like surface of my yard I assumed it would be a year or two before I could remediate enough soil to plant a nice vegetable garden. We have been more focused on attempting to get some grass to grow and beds mulched before the entire yard became a pile of weeds.

I am sitting at work when this text comes through:

Hauling lumber in a CRV
And that is how you haul an ungodly amount of lumber in a CRV and take a selfie at the same time

Adam came through with planter boxes.  Not just some crappy raised beds!  No I was getting full, wooden, decoratively accented, planter boxes.  You might ask why we are about to get, yet another, Adam tutorial.  Well let’s face it folks, spreading mulch and planting 10 billion strawberries just doesn’t make for that great of a tutorial!  Which is all I have done the last few weeks, mulch, weed, plant, repeat.  Good for the soul, not so good for the interwebs fame.  On to the tutorial:

How to Make Raised Beds or Wooden Planter Boxes

DIY raised bed or wooden planter boxes

Material List

(Yet again furnished by Adam someone who actually makes note of these things)

  • Lumber:
    6 – 2″ x 8″ x 12′ untreated lumber. Unit cost: $8.05 Total cost: $48.30
    2 – 2″ x 8″ x 10′ untreated lumber. Unit cost: $6.63 Total cost: $13.26
    1 – 2″ x 4″ x 8′ untreated “cull” (second) lumber Discounted cost: $0.94
  • Metal Conduit: 10 – 10′ x 1/2″ . Unit cost: $2.30 Total cost: $23.00
  • Compression Coupling: 5 pack 1/2″ Unit cost: $2.16
  • Conduit Tube Straps: 25 pack 1/2″  Unit cost: $3.75
  • Wood Screws:
    1lb pack of 2-1/2″ exterior wood screws Unit cost: $8.47
    2 – #10 x 1 Wood Screw 10 Pack Unit cost: $1.18 Total cost: $2.36

Total Material Cost: $102.24 (99 square ft of garden space)

We can totally get into a discussion about treated versus untreated if you want.  Personally I would rather be on the safe side.  You can use expensive cedar etc if you like but I would read the analysis in this article about Raised Beds and False Economies from Northwest Edible and make a decision on the material you want to use.  We went with the cheaper, yet more often replaced version.

Cut List

  • Lumber:
    2 – 2″ x 8″ x 12′
    2 – 2″ x 8″ x 9′
    2 – 2″ x 8″ x 3′
    4 – 2″ x 8″ x 6′
    10 – 2″ x 8″ x 10″
  • Conduit:
    8 – 6′
    2 – 9′
    2 – 3′
  • Cull lumber:
    7″ sections to act as joining block in bed corners

Step 1: Cut Me Right Back Down to Size

I might just have aged myself with that title…  However, the first step is to make all your cuts, if you didn’t get the home improvement store to do it already.  As I mentioned in the matching Wooden Trellis post, it might be a good idea to get them to cut it.  Otherwise you need specialty blades and safety goggles for the conduit especially.   Please be careful and cut responsibly.  I don’t want anyone to lose a finger and/or sue us.  You decide which one worries me the most.

Step 2: Sides, Sides, Everywhere sides

Assemble each side as follows.  Screw two decorative end pieces to each end of the lumber.  They should be flush at the bottom, 1.5 inches on the side, and stick up 2.75 inches above. As Adam had to explain to me an 8″ board is really only 7.25 inches.  Hence the 2.75″ height on the 10″ cut end caps. Trust me I argued the math on that one before he reminded me about the measurements of dimensional lumber.   You can see the edge spacing a bit better in the next couple of pictures if my verbal description didn’t make sense. Note: He even made the screw holes into nice satisfying triangular shapes.

After you have all the wood joined, take your matching pieces of conduit and strap them down with the conduit tube straps.  Pick a height you think looks good.  Adam wrestled with the idea of making nice wooden joins to hold the conduit.  I reminded him that A) it would rot that much quicker and B) this was meant to hold dirt and plants.  Not survive the scrutiny of furniture design.  No one was going to come take points off for using straps…  The plants would cover the interior anyway!  My logic won the day and made the project much easier and faster.

Wooden Planter Box Side

Step 3: Screw It

Take your sides and overlap each piece the 1.5″ you left and screw them together, or take your cull lumber and use it as a block to join each side by screwing from the inside to the outside.  What is the difference?  Option 1 results in extra screw holes on the outside but is easier to hold in place and screw.  Option 2 leaves no new holes on the outside but really takes two people to hold all the pieces together and make a join.  We actually joined them together both ways.  The road facing side has the pretty joins as I was home and able to help at that point.

REMEMBER, you are going to want to screw the pieces together very near the final destination.  Like within inches!!!!  You are only going to want to scoot and shimmy these to make them square when all assembled.

joining wooden raised beds
Note the 1.5 inch overlap. You can screw those directly together of place your 7″ block on the inside and screw out to minimize visible screw holes.

Step 4: If I’m Lining I’m Crying

This next step is purely optional.  My yard is not level, not even close to level.  And I personally wanted as much of the box to show as possible, which means not burying it in the yard.  We could have leveled the ground but who the hell has time for that?  Or you can take some landscaping fabric and staple it to the interior.  I am sure the idea of landscaping fabric is not new BUT I felt pretty smart figuring it out on my own.  I took the 3 ft wide section and cut it into 1/4 sections that were 7′ to 13′ long.  Then I stapled the hell out of it along the interior bottom of the wood.  Why?!  Because usually I loathe landscaping fabric with a passion but I didn’t want all the dirt to wash out of the un-level areas.  It does have its uses. Note: I made sure not to go to far into the box either in case an intrepid root want to attempt to penetrate the godawful dirt below.

Once you have everything together and fabric stapled you will need to kind of shimmy all of into perfect square. This is a great time to argue about actually square versus what looks square in your yard.  It is even a more excellent time to keep readjusting the square after looking at it from various angles and arguing some more.  I bet you can guess this is about the part in the process that I came home.  I have the unique ability to complicate a project in less than .002 seconds.  Call it my DIY super power.

lined planter boxes

Step 5: Fill ‘Er Up

We bought soil (see the aforementioned craptastic clay lot we own) and it was my job to fill the beds.  We did throw in some lovely clay soil at the corners and to hold down the landscaping fabric.  Why?  Because we were planting some trees at the same time and it was so dang windy that day.  Seemed like a good place to dump it and hold it down.  On top of that I poured bag after bag of garden soil and mixed in some compost.  Note: The soil will settle so make sure to fill it slightly higher than you want for the final level.

DIY decorative raised beds
Just note… You should really get everything square before you offload the dirt like this. Else you will be spending your time moving the dirt twice. Ask me how I know…

The kids were so excited to plant seeds!!!  And I have been pleased by how weed free and easy to maintain they have been.  It has not hurt that I get compliments by all the joggers and walkers that pass by!  Hopefully I’ll have a nice small harvest to show for all this work!

Raised beds with peas


Posted on 7 Comments

How to Make a Garden Trellis

I always admired a garden trellis covered in beautiful flowering vines behind the mailbox.  At my previous house the mailbox was actually located on the neighbor’s property so I was never able to fulfill my garden trellis dreams.  Since we have a blasted landscape of barren nothingness at the new house it seemed appropriate to try for that garden trellis.  However, a nice trellis is not exactly cheap.  In comes the DIY partner with a quick and cheap fix.

I thought it would be nice to mimic the porch railings, especially since we were planning a similar treatment around the god-awful transformer (fodder for another post).  After poorly describing, gesticulating, and finally kind of just pointing we were able to figure out a simple trellis design for the total project cost of $11.74! That is on par with the crappy wooden trellises at big box stores.  Ours was actually cheaper because we had some left over materials from recently constructed garden beds.

Inexpensive DIY Garden Trellis

Easy conduit garden trellis tutorial

Materials:

I had the construction manager, aka. Adam, send me the stats.  That is why there is such a nice cohesive breakdown of materials.  Not like my usual dash of this, smattering of that…

  • Metal Conduit: 2 – 10′ x 1/2″  (produced 10 total pieces cut to 22.5″ lengths).  Unit cost: $2.30.  Total cost: $4.60
  • Treated Lumber: (this is not going near our food producing garden beds, so treated lumber it is!) 2 – 2″ x 4″ x 8′  (4 cuts – 2 @ 6′, 2 @ 21″) Unit Cost: $3.57.  Total cost: $7.14
  • Drill
  • Drill Bit: 3/4″ (The conduit is measured by the inside so the outside is actually larger than 1/2″), and phillips-head that fits the screws
  • Exterior Wood Screws:  we used 8 – 2-1/2″ but any one that will go through the thickness of the 2″X4″ will work

Total Material Cost $11.74

conduit-trellis

 Step 1: A Cut Above

Make all the above cuts.  They are simple straight cuts.  NOW that being said, I personally, suggest getting whatever home improvement store you buy the conduit and wood from to make those cuts.  I will not even discuss how ours came to be cut (though I sometimes wonder about other un-named person’s common sense) for fear of getting sued by someone stupid enough to try that at home.  In fact use absolute caution when cutting any material.  Do not come crying to me if you end up losing an eye or finger.  I always prefer to pay the .25 for extra cuts at the home improvement store.  Makes it easier to transport in a small car and no one has to lose a digit in the process.

Step 2: Drill Team

Time to put the drill to use.  Take the long sides of the trellis.  Measure the distance from the top of the board to the thickness of your 2″X4″.  This is not going to be exactly 2 inches.  Make a mark as that is where you will join the two sides.  Then measure 6 inches down the entire length of the board for 11 places (This should result in 12 marks) Drill holes in marks 2-11. Mark 1 and Mark 12 are where you will place the crossbeams (short cuts of wood).  Make sure to drill only 1/4″-1/2″ into the thickness of the wood.  You ware not going to want to have an unsightly hole on the outside.   If you want longer posts to bury in the ground so that you can see the bottom crossbeam (we buried ours) you could space them every 5-5.5″ instead.

CAREFULLY repeat the same process on the other side.  If these do not match up then the join will result in a wonky, non-right angle, trellis.

garden trellis inprogress

drilling holes in garden trellis
Here is another view to see what we are trying to achieve by drilling

Step 3: Teamwork

Place all of your conduit in one side of the wood.  Get a partner to help you carefully match up the other side.  Cuss a bit as conduit fails to easily slide into place, drop some conduit on the ground, make a minor adjustment and have to start the whole fitting together from scratch.  Have your partner leave disgusted at being chastised for their inability to line things up properly.  Complete the line up and fit in one of the cross braces at the top and bottom.  Take your wood screws and place two on either side of the wood (8 attachments total).  Make sure to keep the wood at a 90 degree angle.  While it will still be a little shakey until you bury the post bottoms this ensures a better join.

joining the trellis crossbeams
Joining the garden trellis crossbeams

Step 4: Dig time

Step back and admire your handiwork.  Potentially on such a lovely back drop as your trashcans.  Then start digging a hole to place the trellis in.  In our case that means cutting through hardpacked red clay, seeded with the most god-awful collection of rocks.  You can potentially argue some more over whether your partner is holding their post straight as you backfill the dirt in OR also about whether the entire trellis is  even centered around the mailbox.


Check that out! And you can also get a good view of my trashcans and wrecked car (another story)

Once all parties are satisfied with the placement truly stand back and enjoy!  Now we just have to find the perfect vine… Suggestions?

Posted on 2 Comments

Beginner Drip Irrigation

Many of my past garden failures have been due to neglect. Usually at some point that coincides with the deep, humid heat of summer I get a little less enthusiastic about sweating in the sun and a lot more enthusiastic about sipping sangria in the shade. Want to know the number one task I neglect? Watering.  So it only makes sense that I would look at drip irrigation.

I never set up a sprinkler because I feel bad for wasting the water, but to hand water well you are going to be standing outside for a long time hose in hand. Luckily Western North Carolina gets large amounts of rainfall so watering is usually only necessary to get seeds started and in the deep summer. Which of course is the time I am least interested in standing around with a a garden hose.

Enter the idea for drip irrigation. The idea is to set up a series of little tubes that emit water at the base of the plant. That way water isn’t wasted on evaporation and is targeted exactly where it needs to go. Added bonus? No more watering the weeds in between your rows. After a lot of research I went with a very simple system that can be easily adapted with additional add-ons and/or retrofitted to use a rain barrel. That way as I find out our actual watering needs I won’t need to buy an entirely new system to make adjustments.

From my research I found out that most drip irrigation systems are pretty simple and made up of a few parts:

  1. Filter
  2. Pressure Regulator
  3. Main Line
  4. Items that emit water
  5. Misc. items to attach lines together

That’s pretty much the sum of the parts. The filter is necessary to keep the small driplines from clogging with sediment. The pressure regulator keeps the water from pouring out of the lines instead of dripping. The main line runs the water throughout the garden while the items that emit water attach to the mainline to, well, drip the water.

I got my items from Drip Works, which made it very simple by offering a basic kit with add-on kits to customize you irrigation for your space. I would caution you some of the add-on kits are more expensive than if you buy your pieces separately. Some of this is due to the fact you may not need exactly what was in the kit. So I got my ‘Heart of the Garden’ kit and just ordered my other pieces separately.

I really suggest watching their videos and checking out other drip irrigation sellers online to get an idea of what the market has to offer. Depending on what you are purchasing the prices can really fluctuate.

Drip Irrigation in Box
Our order

I will give you an idea of how our system is set up. The filter and pressure regulator go right at the main water hookup, which, in our case is just an outdoor faucet around the corner of the house. I made one miscalculation as to how low the filter and pressure regulator would make the hookup to the mainline and the curve is not so pretty. While it works I’ll probably need to order another small part to make my mainline sit flush along the porch.

Drip Irrigation home setup
McClain helping me unroll the mainline. It is much easier to lay out if you warm it in the sun first.

After the main line is hooked to the filter then it goes along the porch under mulch across the whole garden. I inserted a couple of elbows to make it around the corners as the main line is not very flexible so any place that makes a sharp turn is going to need them. Because the actual dripline can only run a certain amount of feet from the mainline and maintain pressure, I needed to run the lines not only across the garden but to the end of it. So that required two tees in the middle and I ran a main line down the center of each bed. The main line is the thick hose running down the center.

Example of the line spliced with a tee.

The final step was to hook up the drip line and space it around the beds to get water to the plants. This is where any system can get really complicated. There are microsprayers, single plant emitters, etc etc etc. I went with some basic drip line with openings ever 6 inches. Due to the fact I live on a giant pile of clay which really holds onto moisture, I’m not going to have to lay out a ton of lines. The water should spread out from the drip points. I put in the bare minimum I calculated I needed but bought extra so that I could tweak the system. One BIG suggestion if you are putting in a bunch of single emitters or a lot of lines in buy the extra insertion tool. I didn’t and my hands hurt badly. I had to have help with the final hook-ups.

Anyway here is the start of our drip irrigation season. I’m interested to see the changes I will need to make as I go. Anyone else use drip irrigation and can already point out my mistakes?