Posted on Leave a comment

The Urban Permaculture Plan

Urban Permaculture design

After a much needed break from DIY, blogging, and basically lots of work we are finally back and ready to hit the ground running.  I won’t go into all the details of why we were so spotty at posting new content in the last year but suffice to say that some major renovations (52 windows ya’ll!), getting the yard basically tamed (bush hogged), and working/raising kids it was just time for a break.  I can’t (always) speak for Adam, but I know that I was just kinda burnt out and trying to get quality posts together in the evenings just wasn’t happening, especially when there are chicken coops to build and plants to get in the ground.

However, now that we took some time off and had a lovely European vacation (Which you can see on our Instagram @craftthyme) and got a few posts up I finally felt ready to jump back into it.  We have made a holistic urban permaculture plan for the whole yard and started clearing land like we were god-damn pioneers and not urbanites.  Let this be a lesson on when not to neglect a yard for years…

SO much brush! Before and after clearing with even more clearing to go.
Just so much brush, even in the after shot!

I’ve always had a pretty good running obsession for organic gardening.  Not that I will snub all chemicals because I.Cant.Even. when it comes to poison ivy.  But I have always figured if I could use less chemicals then that would be good.  No chemicals would be even better!  Adam has been feeding that obsession of mine with a series of permaculture books, a surprise registration to this years Organic Grower’s Conference (squeeeee!), and unending patience as I listen and talk about podcast after podcast from Sow Edible Permaculture.  I/we want to take my gardening to the next level and design a whole yard system that works to create easy food, with no chemicals, for the whole family.

Plus we got chickens!  Who wouldn’t want to write about those lovely ladies?!  You may recall the great bear, fox, and god knows what else attack on the previous flock when we moved into this house.  We have held off raising another flock until we could create a secure environment like we had at our industrial style house and it took quite a bit of time to build the taj ma-coop.

SO many chicken butts! Chickens were integral to our permaculture design
Chicken butts! We now have a few chickens (according to Adam) and a lot of chickens (according to Brianna)

So how does this turn into an urban permaculture plan? (How to create one is a topic for another post)  Well, the long winded intro above was really to illustrate that while we have not been blogging, we have been reading, learning Sketchup, and drawing.  And drawing.  And drawing.  I also took an online intro to permaculture (Adam listened to a lot of the videos).

And even as we started clearing brush, we began more drawing…  We actually ended up moving the coop location from an earlier plan. It was going to be tucked away behind the garage so we could get a clear view out of the back windows and utilize a difficult space. But once we started removing brush we realized it was waaaay too damp for chicken respiratory systems, but potentially perfect for elderberries, blueberries, hazel nuts, or mushroom logs. So my guess is that as we start working from the plan things will have to change further.

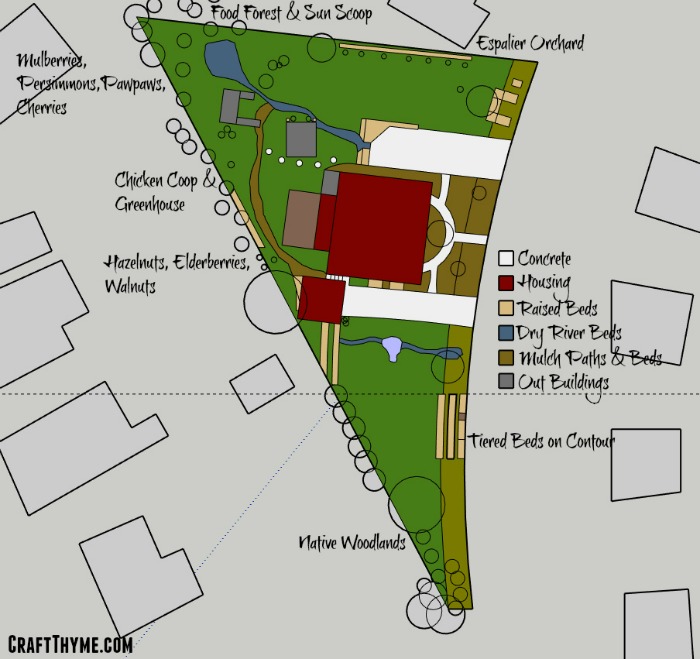
Urban Permaculture Plan Overview

Urban Permaculture design

Currently, we are working on the back corner area behind the garage.  It was the original planned location of the chicken coop but now is going to have elderberries, hazelnuts, and other semi-shade plants.  The chicken coop ended up just a little further down the property line in a drier area.  It is also on the northern side of our property but far enough away from the house that the sun hits the front area.  We accidentally planned a large sun-scoop (because sometimes I plan before I get through all my books, classes, and terminology) that has a chicken coop in the center.  It is kinda nice to finally be in a gardening place where you just know how sun and plants interact enough that you can design something and then have your plan validated by experts.  I’ve always wanted to have this little clearing edged into a mini-urban forest.  The only change is that a central forest lounge area is going to be a chicken coop instead.  This will allow the ladies wind protection, shade from the worst of the heat, but also, some good sunlight in the winter months to keep them warm.

We have cleared back the neglected brush and created a small retaining wall to hold nanking cherries, honey berries, and strawberries
Here we are taking back the forest and making a path to the chicken coop that includes honey berries and nanking cherries.

The plan as it stands is to clear out all the undergrowth, attack the english ivy/poison ivy/honeysuckle, and then replant the under story with a variety of perennial edibles.  Currently, we are eyeballing the removal of some spindly wild cherries and replacement with a couple of pawpaws in the back and nice dwarf plum or persimmon in the front.  Smaller berry bushes and canes, edible ferns, and wintergreen are also part of the foresty feel.  When it is all said and done I think we will add loads of mulch and top with pretty pine straw mulch to speed up the forest vibe.  It will take awhile for the canopy to evolve to fully shade the area.  We had a lot of trees removed in the last year.  My hope is between that and me removing all the invasive vines the grand oak at the end and the locusts, hickories, wild cherries and pears will fill in.  These are great for feeding the wildlife and pollinating the small espalier orchard planned along the side.

Young pawpaw seedlings
And while I say planning, what I mean is I have pawpaws in pots!

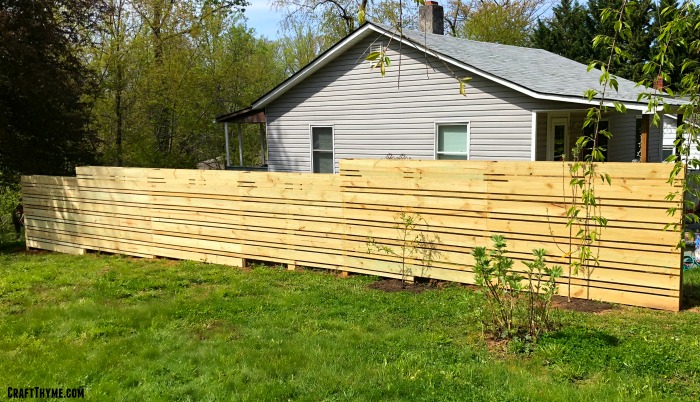
Light is probably the hardest part of the entire urban permaculture plan.  We are urban and urban = neighbors trees and buildings blocking the light.  To get enough light to fuel fruit production I really only have a singular location.  I can slot in trees on the other side of the house in a few places but mostly this section is it.  We are slightly down slope from the ridge and the neighbors across the street have some large trees that cut down on available sunlight.  Additionally, I am kinda just attached to the weeping cherry in the front and the 100+ year old cherry on the other side.  So I just have to carefully plan the sun loving crops up front and the shade tolerant items elsewhere. On that note the espalier fruit trees are in front of a wicked new composting fence we just wrapped.  It will also make a nice break between us and the renters next door.

We already added tons of raised beds along the driveways and in front of the cherry tree.  You might note there is this large square thing in the yard.  It is this ridiculously large concrete pad that housed a gazebo and large hot tub.  The gazebo was gone when we moved in and the hot tub had a large crack in it.  We ended up finding someone to take it for parts but we were left with a giant pad…  On that note we saved all the serviceable old windows when we got them replaced last fall in the hopes of building a greenhouse.  We opted to save those and look at making a semi-passive solar greenhouse in that place instead. With the removal of some trees this now looks like a decent place to build a greenhouse.  Maybe not perfection but with the existing structures it is one of the better places.  More over it will act as a wind break for the chicken coop when we do finally get it installed.

The front section will eventually house a number of smaller herbs, flowers, and perennial veggies.  It already has a beautiful Japanese Maple we managed to salvage after being covered with other trees for years.  We also planted two more ornamental trees, a weeping gingko, and a japonicum maple because as much as we love edible plants we also love beautiful plants.  Around these we are going to cut in some new sidewalks to repair the broken ones with pavers.  Adam has already prepped the site for the bricks and I started adding perennials from a local grower, Kenny’s Perrenials.

On the other side we started on the tiered garden beds last year and still plan to finish those.  They won’t get a ton of light due the the trees across the street, but I think the top two tiers could be a great place for blue berries and maybe an asparagus bed.  We moved a play area/patio section over here so that if we ever fully fix the pond and create a waterfall we will be able to enjoy them.  It also keeps us from having negotiate with the neighbors on removing a bunch of white pines.  At the top point of my lot I’ll probably leave that scrub for the next few years, but I can probably manage to fit in a couple more fruit trees or some chestnut hybrids along the road.  It will save the kiddos stepping on the chestnut burrs and allows me to expand what our yard has to offer. Plus I just happen to love chestnuts.

The slope by the garage is kinda useless as-is, but I think that we can quickly get some use out of it by letting squash and pumpkins trail down the hill and planting Jerusalem artichokes at the bottom.  I dug a tiny swale midway down and planted corn below the squash layer.  Long term we could put in more raised tiered beds, but it really only gets great sun at the top.  So maybe frame out a top bed and then plant trailing items that take up a ton of garden space.

The Urban Permaculture Plan as a Whole

We have some issues with the water drainage; in that everything slopes to the back which still leaves the front beds without adequate rainfall at times. While permaculture, in a perfect world, works without a lot of human intervention and irrigation this urban lot may just have to have some rain barrels up front to supplement from time to time.  We are not willing to sacrifice aesthetics and create a berm in the lawn to keep all the water on the lot.  We’re hoping to make the urban permaculture plan as good looking as possible while still being as permaculture as possible.  It might be snubbed by permaculture enthusiasts, but I hope to make something beautiful that might serve as a potential show piece to other people who are interested in dabbling in the urban homesteading/permaculture concepts.  For example, I hope to make a solar powered waterfall for the kids.  It will serve little purpose other than being my garden folly and to attract wildlife!

Another issue with the plan is that most of the nitrogen creation by the chickens is going to be at the back of the lot.  Since we have a small lot (1/3 of an acre) I’m okay with the extra work it will take to move the site made fertilizer (aka composted poop) upwards in the garden.  I’m already moving the rabbit poop downwards ;).  Since we are going to have to move the poop we plan on two different composting areas one behind the chicken coop for cold compost where we add to it slowly.  By the eventual greenhouse we plan on a three bin system that will run hot compost in the fall/winter to try and use the compost as a method to warm the thermal mass of the concrete.

Finally this entire plan is NOT a year in the making.  Here is what we hope to accomplish on major projects.  It leaves out small things like rain barrels, drip irrigation etc.

Year 1

  1. Chicken Coop (Done)
  2. Composting Fence (Done)
  3. Terracing behind the garage (Mushroom Log area/ In-Progress)
  4. Finishing the tiered beds
  5. Small solar pump for the pond
  6. Front Sidewalks (In progress)
  7. Perennial Plantings
    1. Pawpaws
    2. Apples
    3. Pears
    4. Peaches
    5. Plum
    6. Mulberries
    7. Persimmons
    8. Elderberries, hazelnuts, etc

Year 2

  1. Green House
  2. Solar Powered Waterfall/ Stream
  3. Perennial Plantings
    1. Chestnuts
    2. Asparagus
    3. Smaller herbs, veggies, etc
  4. Bee Hives

Year 3

  1. Shade Patio
    1. Cob Pizza oven
    2. Permeable patio
  2. New back deck/Kitchen remodel
  3. Solar Panels?
  4. Hopefully start reaping the rewards and finish projects from year 1 & 2 that didn’t actually get complete

Year 4 & 5 TBD but probably some major indoor kitchen renovations if we haven’t gotten to all of that in year 3!

So we start with a plan and we modify it as we go.  Can’t wait to see how it turns out and we are really hoping you follow along. We use our Instagram and Facebook Stories to show the day to day urban-farm work.  We hope you will follow our progress on the urban permaculture plan and learn to create your own permaculture oasis.

Planning an urban permaculture oasis. Follow along to learn how you can make your own plan and watch ours in action.


Posted on 2 Comments

How to Make a Wooden Composting Fence

Wooden composting fence with espalier fruit trees

Ever heard of a composting fence?  If you want to know how to make a composting fence you can click the link below for our first design of a wire mesh composting fence or scroll right on past this intro for our tutorial on making a wooden composting fence.

I discovered the concept of a composting fence a few years back and Adam so kindly surprised me with the construction of a wire mesh composting fence at the previous house.  We could only find a quick reference in an article to what a composting fence’s purpose was and had to figure out how to build it on our own. The wire composting fence was cool, it worked, and we made some awesome instructions and a detailed tutorial on how to build your own composting fence (linked for your convenience).

Fast forward to now: Larger house, looootttttssss of yard waste: As in I have never seen so many sticks, I don’t even understand how the sticks keep appearing level of yard waste… Along side those sticks we have renters as neighbors. The current renters are nice, but they brought some um… interesting… items along with them. I’m not sure who moves an old pile of wood covered in a blue tarp and a large cable antenna hooked to nothing, but they did. I will admit I didn’t really want to see the stuff cause (I’m snotty like that and will pretend I don’t have hardware cloth scraps hanging out in the backyard at the moment). True story, the last renters were arrested in our front yard so I have other reasons than just aesthetics in wanting a bit of a border between the houses. The solution? Wooden Composting Fence 2.0 to the rescue.

Wooden composting fence with espalier fruit trees

Now to the meat for those of you that skipped the introduction:

How to Make a Wooden Composting Fence

There is one important piece you must understand about a composting fence before we continue:

It is meant to SLOWLY compost yard waste. Very dry, mostly carbon material. NOT your food scraps, wet items, etc.

Why? The items in the composting fence break down only at the ground level and never get hot like a nitrogen/carbon balanced compost pile. That being said, it is absolutely great for slowly feeding plantings around the base of the fence. It also takes care of a lot of things you might not put in your compost pile. Larger sticks, roots, lots of leaves, weeds, are all great to throw in there and those tend to take forever in the pile.

Tools and Supplies for a Composting Fence

Let’s just state this right up front: We use copper treated lumber. We have done a lot of research about the dangers and positives of using treated lumber. Not all treated lumber is created the same so we suggest reading the beginning of this article to decide if you want to use treated lumber. For untreated lumber applications I suggest finishing your fence waaaay higher off the ground so none of the boards come close to ground contact, coating your wood in some fashion, using locust or cedar wood, or using our previous design that utilized much less wood and more metal.  Otherwise be ready to replace your wood every few years.

Composting Fence Supplies

The supply list (may contain affiliate links) and directions cover how to make one panel of a wooden composting fence that is 5′ and 7′ wide. The pictured panels range from 5 to 6′ tall and 7′ wide. We built on a sloped lot and stepped them down accordingly over time. We have 7 panels shown in our photos. Why? Because that length covered the neighbors property and allows us to give a good wide spacing to espalier 4 apple trees, 2 peach trees, and 1 plum tree.

  • 2-bags Quikrete: (May not be ncessary to concrete each post if you have hard clay soil and/or you are attaching many posts. If you plan to espalier fruit trees you will need to be able to attach wire and the weight of the trees over time which is why we opted to concrete our posts in.
  • 2-4X6 posts (trust us, you do not want to pay for larger sizes
  • 4-2X4 boards
  • 22 – 8′ Dog Ear Fence Pickets I would suggest buying 2-3 extra in case you break or mis-cut one.
  • 24-3″ screws
  • 130-1.5″ screws
  • Water (Mix with Concrete)

Tools to Build Your Composting Fence

Step One: Post Assembly For Those Blessed with Upper Arm Strength

The first step is to get the posts assembled and in the ground. You are going to need upper arm strength all around, and if you don’t have it (I don’t) then there is equipment you can rent to dig post holes. I will also mention an alternative for post construction for those of us with T-Rex arms.

1. Dig a whole 2-3 feet down. Post holes are best dug wider at the bottom than the top. This keeps the concrete solid in freeze/thaw conditions. You can read more about elegant post holes here. Frankly, we just try to dig them down and level.
2. Assemble your massive post. Here is where I would diverge from the usual directions:

  • Adam, being the manly man, takes the 4X6 post and attaches the 2X4 boards to either side to make a massive with the 3″ screws (4 per board at least)  The final assembled ‘tree trunk’ like post is close to 8″ in width which allows space for pretty large sized yard waste. He could just pick up this giant honking post and position it in the hole.
  • I can barely move the 4×6. If I was doing this by myself (note: I wouldn’t), I would HAVE to place a 4 X 6 post in the dirt and concrete it in. Once it was set I would then add the 2X4’s to either side above the ground level.  So keep in mind how heavy the post gets!

Posts for composting fence

Step Two: Leveling and Setting The Tree Trunk Post

I’m not going to go into details about how to set and level a post because there are a ton of tutorials that already teach this technique better than us.  We pretty much follow this Quikrete tutorial (Written tutorial link here):

Couple things that make this job a bit easier are post levels because it makes getting both levels front to back a snap.  Trust me it is worth the extra money for the ease of leveling.  We also use 2-3 cinder blocks to hold the post in place while it sets.  We had them on hand and found it easier than using boards to hold them because you can make minor adjustments by nudging the blocks slightly.

Final tip:  If you plan on doing a whole long line of panels you will want to do the following.

  1. Dig a small post hole and set a temporary post in dirt only at the end of where you want one straight course of panels. (this could be the end of the fence, where it turns, etc)  You can even use a 2X4.
  2. Tie a string to the temporary post and bring it to the first post you plan to set.
  3. Attach it (we used a screw) around the post so that the string lightly lays along the face of the board on both ends.  This makes sure all your posts are facing the same angle and makes attaching the boards easy!
  4. Concrete your first post and continue down to your second post aligning it to the string as well.
  5. Once you have your Second post close to correct make sure to lay a board on top and make sure the height is level from post to post!

Step 3: Prepping Your Fence Face

If earlier you wondered why the fence pickets are 8′ but the fence panels are around 7′ well here is where you find out the mystery.  You have to cut the dog ear portion of each picket off first.  We used out miter saw to do 4-5 at a time.  After making a nice straight cut you will want to measure how long to make your boards. You have two options:

  • More than one panel: Measure from the end of the first post to the middle of the second post.  Measure in a few places.  If your post is truly straight and level the distance should be the same.  If not you can make micro adjustments on your cuts to get a nice straight line for the next panel.
  • One Panel: Measure edge to edge.  Again measure in a few places to make sure all the lengths are the same.

Cut your boards to the correct length. Each side will need the following:

  • 7- Full sized boards
  • 6- 2″ boards (3 full sized boards)

Total (20 boards! 10 for each side)

After that you will run three of the boards through a table saw to make 6- 2″ pieces. Note: try to find pickets with the least number of knots to run through the table saw.  Those tend to break or kick out.

We hate lumber waste!  We are using the extra 1.5″ to make garden stakes and markers and the extra foot or so to make native bee houses.

Step 4: Attaching the Fence Panels

The composting fence needs lots of light and air to flow through it so that the contents can dry and compact.  No one wants a wet-rotting mess for a fence.  In order to do so you will need space between each board.  There is an easy and hard way to get the space correct.  You can measure in between each board OR you can take some scrap wood and cut 2-3/4″ wide spacers.  Trust us, the spacers are easier!  Two people make this job sooooo much easier.

  1. Take one full sized board and line it up with the edge and top of your first post.  Your partner can do the same with the second post.  Check to see if the edges line up nicely (either at the edge or middle depending on your design)
  2. Use two 1.5″ screws to attached the board to post one
  3. Repeat on post two
  4. Yea!  Your first board is up.  Celebrate with a local brew!  (okay no, you have a bunch more to do)
  5. Take a two inch board and put a spacer underneath the first board to keep a nice 3/4″ space.
  6. Use a single screw to hook both ends
  7. Panic because the middle is sagging like crazy!

Alright don’t panic!  You will take and extra fence picket and attach it to the middle.  Measure down to the ground from the center and cut a picket.  Use two screws to attach it flat in the center of the first board.  Then use your spacer while a partner pushed the 2″ board into place and affix with a screw.

Repeat this process down the entire front of the fence, then continue these directions down the back

NOW: You can celebrate with a brew! And throw in some sticks!

Final Tips & Techniques

  • For more than one panel always measure your lengths front and back.  It can look level, be level, but a slight twist means a few boards might need a little extra or less cut off.
  • If you are stepping a fence down we found stepping down a full and 2″ board makes a nice attractive step down.
  • Don’t forget the boards at the top of the step down will be a lot longer than the ones below
  • When you are done don’t be afraid to add a small board along the bottom if the step down made the height off the ground look… wonky…

Now all you have to do is throw in all your leaves, sticks, and brush!  Our 7 panel composting fence will hold almost 150 cubic feet of yard waste!  Meaning we won’t need to have the city haul off  the brush and leaves our regular compost pile couldn’t handle anymore.

Posted on Leave a comment

September Report

Craft Thyme cucumbers also called mouse melons

Here at Craft Thyme we focus most of our efforts on creating quality tutorials.  There is a lot of planning (Adam), work, photo editing, grammatically poor writing (Brianna), and general craziness that goes into making a useful tutorial.  We love doing it and our readers seem to enjoy the efforts but there is so much more that goes on behind the scenes!

Did you know that we both work full time outside of the home?

Did you know that we have a combined household of 4 amazeball kiddos and two ferocious kitties?  (Don’t ask about the chickens… insert sad face here… Spring will see a new coop!)

Did you know I came home to a pelting of water balloons this week?

Did you know we have supplies to completely redo our entire front sidewalk and landscape, plans and supplies to build a sweet composting fence, and are working on a permaculture-principle inspired plan for the property?

Which got us thinking (Ut oh).  Despite being pretty private people perhaps we could let everyone in a little bit on what goes on behind the scenes.  The idea is that at the beginning of each month we let everyone know what they may have missed (Hint: Instagram/ Facebook) AND what our plans are for the coming month.  It is a little for you (Because who doesn’t want to know I was in a beer stein holding contest last weekend.  Spoiler: I lost).  And a lot for us so that we can keep track of what we are building, crafting, and gardening.

Craft Thyme beer competition
Here I am losing a second time at stein holding.

We will break it down to the pertinent sections so you can skip to what you want to follow along in.

DIY

It is Summer, which in Craft Thyme world, means 90% of our DIY is outdoors.  Yes, my kitchen is still atrocious, yes, the kids bathroom still is pink, blue, and some shall not be named cream color, and yes, the treadmill is gathering dust.  (Not exactly DIY related but just one of those failings)  BUT there is outdoors!

  • Butterfiles
  • Warm Breezes
  • Mosquitos (oh wait that’s a negative)

So, we build outside.  We built the first level of some hella cool tiered garden boxes that we still need to write up a post about.  And because we got such positive feedback we went ahead and wrote up the timber and pea gravel stairs into a nice tutorial.


Cause why stop at 1? Still have one more 8′ #raisedbed to go! On this level!!

A post shared by Craft Thyme (@craftthyme) on

Let’s see…  Adam changed out a toilet seat so we finally got rid of that awesome wood-70’s vibe toilet we had going on.  I cleaned like a mad woman after having the house cleaned because OMG! the kindergarten teachers come out and visit your house to meet your kids in this day and age.

We are kind of reaching the end of Summer in the mountains so we are flummoxed as to whether to continue on the beds, start on the composting privacy fence, start on the sidewalk, or head indoors and work on the sun porch…  One of these things will be happening this month!

Crafts

It feels like I should probably not call this Craft Thyme this month.  I think I might have sewn some super hero pillows but that may have been in July…  September is not looking so good on the crafts either because any of the above projects are going to take  …drumroll please… more digging.  Digging is tiring, goes faster with two people, and does make up for the lack of treadmill.

I do want to get some minimal fall decorations up in September.  I used to love decorating for each season but renovating this beast of a lovely home, keeping 4 kids alive, and working the day job is the most I seem to be able to manage lately.  So I am shooting for at least a crafty fall wreath this month.

Gardening

Oh gardening… Well I have a lot of cucumbers at least…  The aftermath of the great groundhog wars left the garden in shambles.  I’m JUST now getting ripe tomatoes, pulling carrots, and picking cucumbers.  They had to have ample time to regrow their leaves after the groundhogs decided to pillage and destroy.  The kohlrabi, beans, all the brassicas…ALL THE BRASSICAS, squash, melons, pumpkins, peppers, and and some flowers just did not make it through the ravaging.  Le Sigh… Perhaps next year.  I toyed with the idea of doing a fall/winter garden but just didn’t get it done.  I may throw in some garlic but will just plan it all out and start again next year.  I need some time to build up the soil anyway.

Craft Thyme cucumbers also called mouse melons
Cucumbers for days…

We did write a guide on prepping your raised beds!  It has served us well and worked really nicely through some very dry weather we had at the end of the summer.  Once I get some compost all worked in these should be really set for next year.  Our experimental method seems to hold water very well but still allow for good drainage.  Getting that optimal miz has been a real trial and error through the years.

I plan to get the raised garden beds all prepped for the fall/winter so they are set for a nice and fruitful growing season come spring.  Our big plans for this month are to clean out that end of summer ick from the garden. All the wasted spindly plants… Weeds that have crept in…  I mean just look at this sad garden.  At least it looks like the zinnias I threw in at the last minute will manage to bloom before frost.

Craft Thyme late season garden
OMFG can you see this?! Weeds, pests, just general neglect… Must. Clean. Up.

Lots of building, cleaning, and prepping in the month of September.  We will work on getting the raised bed tutorial up at least.  Additionally, I have been doing a ton of research on permaculture and edible perennial plants.  I hope to share some in-depth guides by the end of the month so you can get fall bare-root trees in place and plan for the spring!


Posted on 6 Comments

New Reaganskopp Homestead: A No Filter Home Tour

You might have noticed that it has been a little quiet around here but we are going to change that with a new home tour.  Well it all started with the decision to do a little yard sale shopping which ended up with us shopping for a yard.  Yep!  We have moved! A whole 1.8 miles down the road from our previous locale.  We have been known for our impulsiveness from time to time, but I am pretty sure this move takes the cake.  Our process in a nutshell: see a house you are interested in, go put your house on the market, and boom under contract in 19 hours.  The whole shebang set in motion in less than a week, which certainly did cause some scrambling since we hadn’t even put in an offer on another property.  As luck would have it we were able to work everything out so that life and Craft Thyme can continue on.

BUT the houses are oh so different this time.  We have gone from new and modern to old and well…old?  Oh yes, we have decided to plunge into the land of old home ownership with the purchase of a 1927 brick combined duplex.  Fun fact, when I (Brianna) was a kid I spent a lot of time in this house.  I loved all the pass throughs, strange staircases, fireplaces, nooks, crannies, and built ins. Seeing as this house is double the heated space and three times the yard size with an attic, two basements, and a garage?  What’s not to love?

But every fairy tale has to have the heroes triumph over adversity.  Our adversity? Tenants.  This home has had tenants for a long time and they have been well… tenants…  You really need someone who loves an older home to keep it up in style!  And guess what?  We are going to love this older home to renovation death.  The bones are amazing with hardwood floors, huge rooms, and built ins galore. But being us means we have huge plans.  Of course the huge plans have to happen after some basic changes.  We are currently in those first stages.  The ones where you get moved in, clean, clean, clean, paint, hang blinds, paint some more, try not to kill each other, and paint some more and clean again.  We will provide you with lots of before and afters but for right now we are going to do the tour AS IS.  Oh yes!  You get to see the new homestead in complete un-retouched glory.  #nofilter!

Let the Home Tour Begin:

The First Floor

The first floor contains an entryway that serves to combine the two sides, two living rooms, two dining rooms, a three quarter bath, and combined galley kitchen.  We are just going with pictures from here on out for the first floor of the home tour.  BUT take special note of those awesome fireplaces, built-ins, and staircases.  They are the bones of what will be AWESOME.

Home Tour Dining Room: We re-homed the piano. Best story from the previous tenants: No one knew where the piano came from. It just appeared one day.
We re-homed the piano. Best story from the previous tenants: No one knew where the piano came from. It just appeared one day.
Home Tour Living Room:You can't help but fall in love with these fireplaces and staircases! One for each side!
You can’t help but fall in love with these fireplaces and staircases! One for each side!
Just don't ask Adam his opinion of the kitchen.
Just don’t ask Adam his opinion of the kitchen.
The entry and sun-porch is pretty inviting.
Tiniest sink ever.
Tiniest sink ever.

The Second Floor

There are two ways to reach the second floor.  Matching winding staircases flank the fireplaces in both living rooms.  Both sides are mirrored making for two modest bedrooms, two gargantuan bedrooms with sitting areas, and two extremely modest (read that as tiny) bathrooms by today’s standards.  There is a pass through in the hallways that leads across to either side and up to the attic (Not pictured in the home tour).

Home Tour Bedroom:There are two of these smaller, yet still generous sized bedrooms. Needs new plaster and paint in both cases.
There are two of these smaller, yet still generous sized bedrooms. Needs new plaster and paint in both cases.
Tile. Lots of colorful tile.
Questionable stains... :P
Questionable stains… :P
Both master and shared boy bedrooms have neat bumpouts and a large reading nook. One bedroom contains stains the other eggplant paint. A real toss up on what to tackle first.

The Third Floor

What?!  There is a third floor?  You bet your sweet aspercreme there is!  Head up an oddly shaped and unfinished wood staircase to a large wooden floored attic.  Currently, it is not heated or plumbed but the kids adore running around up there and we have very awesome, secret plans for 5+ years in the future.  Right now I have lots of winter clothes and fine china stashed up there till I straighten out the closet situation and paint the beautiful builtins.

Color, color everywhere!

The Ground Floor

WTH? There is more!  Oh yes, there are two concrete basements down below.  The access to the basement is solely outside, which, is going to be fun in the winter.  Because guess what?!  That’s where the laundry is located.  We have more of those secret plans to handle that, but we will get to that later.  I really don’t have any pictures of dark, concrete areas to share.  You should thank me for saving you from that.

The Yard

Well what can I say about the yard…  It is extremely large, especially, for a city lot, but the tenants were N.O.T. into gardening.  Underneath the over growth there are tons of interesting plants, jack in the pulpits, day lilies in spades, and a host of other plants (including a run in with poison ivy twice now).  We won’t be doing much in the gardening area till next spring, but there is so much potential there it is exciting and a little overwhelming.  Kind of welcome to the jungle meets English cottage garden.

There is a pond out there... Somewhere....
There is a pond out there… Somewhere….
Under the tree cover we put a new mailbox.
We found a buried dog lot that housed the chickens for a short stint.


And that concludes our before tour.  We will be posting additional room details as we work to renovate our new home.  Expect to see a new style as we go for a more laid back bohemian mix of modern and classic.  Should be entertaining for both you and us!


Posted on 8 Comments

See Holi, India is Amazing

Our trip to Holi in India: Painted in Colors

The following is a real account of how our visit to see Holi in India went. It is a story format and makes a pretty fantastic tale. If you want tips and travel advice about seeing Holi or traveling to India let me know in the comments and I will get back to you or write up the information.

One year ago we visited India. I never wrote about our trip to India to see Holi because I wasn’t really writing anything personal about my life at the time and that is the kind of trip you need to digest over time. I’ve always wanted to go to the Holi Festival. Holi is basically the original color run. I mentioned my desire to go and how cool Holi was one lazy evening to my partner in crime. Plane tickets were bought, hotels in New Delhi, Vrindivan, and Jaipur were booked and away we went on a crazy adventure. You’ll note there was a lack of transport between locations… More on that in a bit.

Do I suggest making a trip to a foreign country of completely different values to see a festival of dubious nature? I most certainly do, IF you have the right temperament. We went on our own, without a tour, and without a super set plan. The culture shock alone keeps any trip like this from being a relaxing vacation. You are signing up for adventure. Adventure, as often left out of the books, involves a whole lot of fear, uncertainty, boundary pushing, and I imagine haggling for transport on your quest. Going to see Holi was all of the above, but completely worth it.

Our trip to Holi in India: Agra Street Scene

If you are thinking about visiting India, especially to see Holi, then do your research. We may not have planned every aspect but it still involved a whole lot of immunizations, visa purchases, and study of customs. Remember, Holi is a religious festival first and foremost. I was not about to go trounce upon another countries customs. At best it makes you seem like a turd of a tourist at worst it can get you arrested or killed in other countries.

So It Begins

You are looking at a 14-16 hour flight from the East Coast of the USA. Nothing like waking up from poor airline sleep to see your plane directly above Kabul, Afghanistan. But in reality it is after you leave the airplane that you realize there is no going back. Especially if you land in New Delhi. Customs is confusing, their hand print scanners are the things of nightmares, and the moment you walk out of the airport you are assaulted by the smell of wet, burnt firecrackers (pollution), people trying to hawk taxis and other items. Research pre-paid fares and make sure to find a stand that guarantees the amount to your destination and gives you a receipt. Otherwise you can get taken for a lot more money when you reach your destination. Basically always set a firm price before getting on any transportation. Oh and if you are like us make sure to do all of this at midnight India time. Cause there is nothing more exciting than being in an unfamiliar location in the dark.

If you are like us you will get in a car accident within you first hour, finally make it to an unbelievably posh hotel, and then have to face the fact you can’t open your mouth in the shower. Get 3-4 hours of sleep and then figure out how the hell you are going to get to Agra on your way to Vrindivan.

The Metro

Oh holy hell, I don’t even think I can describe the metro in morning rush hour in New Delhi. You would need to be there to experience it and that would be one suggestion I say skip if possible. My husband is a big guy. A Big. Red Bearded. Intimidating guy. That afforded us an additional 3 inches of room. If you do manage to brave that insanity then pick a place to meet if you get separated. We foolishly did not and I got ripped away from him by the physical push of the crowd. Panic ensued but some kind Indians physically pulled me from the train and threw me into his arms. Oh yeah, that actually happened and it is an experience i could have done without.

There is a huge long portion of the story where we meet one of the only other tourists we find on the trip. I nice Swede who had been there for a few weeks, taught us to haggle, and got us to a bus to Agra. Not a state bus just a bus. The kind you see in pictures with everyone and livestock piled inside, random stops in the middle of the highway, and no idea of where you are actually headed. It is hence forth the period where we were think “Well, shit, we have made a major mistake”. Luckily for both of us we are of the never give up temperament. Plus once you are stuck in a bus moving further and further away from the only airport that can get you home you kind of have to continue.

Our trip to Holi in India: India Traffic
Note the look of fear and the mopeds hurtling towards us…

But in general people around the world are still people. We found some that were nice, pointed out where to get off, where to get tuk tuks (Also known as three wheeled mopeds of death), and how to navigate the city. Just remember that nice comes at a price in India. The whole economy works on kickbacks and friends Recommendations are based on this process so you can ask for a recommendation of taxi and a person will give you one, but it is likely their cousin or friend’s taxi service, not necessarily the best/cheapest one around.

Our trip to Holi in India: Red Fort, Agra
The Red Fort. Ah-mazing! Yes, that is all hand cut red sandstone.

We saw the Taj Mahal from a distance. Don’t ever go with luggage as there is no good place to store it and they won’t let you take it in. Plus you have to fight a gauntlet of vendors and slums to get to any of the gates. The Red Fort was amazing but on the whole Agra was one of the poorest and dirtiest locations we saw. We managed to snag a taxi to Vrindivan find our surprisingly wonderful hotel and basically collapse. Holi was the next day, we had barely slept, and frankly the all day adrenaline charge we had had was more than enough to have us pass out.

Our trip to Holi in India: Red Fort Courtyard in Agra
Because the Red Fort also has white marble buildings inside.

See Holi, It Really Is That Wonderful

We made it. It was the start of Holi, we were in Krishna’s birth village, and it was the start of the festival. Despite our general misgivings we decided to walk the 1 mile to the village. We both wore outfits that we didn’t mind getting stained various colors. I also made sure to have a 3/4 sleeve loose blouse and full length skirt on. We planned on making our way to the main temple and I wanted to make sure to follow the general dress and customs.Our trip to Holi in India: Holi powders and cows

Walking was the BEST PLAN Ever! As we got closer to the town a tuk tuk comes veering off the road. Apprehensively we stood our ground, but to our surprise and delight a number of men jumped out, give us gigantic bear hugs, wiped colored powder all over our foreheads, and jovially yelled “HAPPY HOLI” the whole time. This was the process that was to continue for the next two hours of our lives, EXCEPT it also included thousands of pictures. We had managed to find the authentic Holi experience, which meant we were some of the only tourists there. My husband’s height and beard made us of immediate interest from a distance, my blonde hair just drew everyone. For the first time ever I finally understood why celebrities lose it. There is something exhausting about only being able to make it three feet before someone grabs you and takes a picture. But we kept smiling because everyone seemed so delighted to wish us a happy Holi.

Our trip to Holi in India: Vrindivan Colors
This is 1 of 10,000 selfies we were part of during the celebration

At one point I had, had a little more than I could take so we started cutting down some of the side streets. The crowds were less thick and we could watch the main happenings on the main street from a less involved distance. It was an amazing site to behold. Shouts of laughter as kids and adults chase each other around with colors while streams of brightly colored powder and liquid dye filled the air. Processions of orange robed Hindu Monks cut through all the chaos, reminding everyone that while this was a celebration it was also a religious festival.

tuk-tuk-holi-india
Oh yeah, you get pelted by moving vehicles too!

As we stood watching we noticed a bit of chaos behind us at a gate. Seeing as we hadn’t died yet we, as in Adam, decided we should go check that out. As headed down the alley Adam screams simply “MONKEY!”. Yep a large, over waist high, temple monkey decides to jump down next to Adam. Because, you know, we hadn’t already seen pigs, cows, dogs, camels, and horses. Of course all I can think is that we weren’t in time to take the recommended rabies vaccine before our trip and their direction was to stay away from local animals… Yeah, that can’t happen in India. The animals are as thick as the people and you will be up close to all types of livestock and apparently monkeys. Since no one was bit by the monkey we continued to the chaos which was a number of people attempting to enter a temple. At that very moment they open the gate to let a number of people in and out. So what do we do? Well of course we just push ahead and enter the temple.


Our trip to Holi in India: Temple Monkey
This is a small temple monkey. Some of them were almost chest high.
Our trip to Holi in India: Cows Everywhere
So many cows…

It was an oasis in the middle of chaos. Everyone is hushed, you can hear chants and music across the courtyard. We had to remove our shoes (much to Adam’s worry as his have gotten stolen in the most unusual circumstances), but the cool marble of the temple walkways felt amazing in the warm sun. Light filtered through colorful nets and garlands containing thousands of marigolds and bells. A cool breeze blew as we entered the temple proper. The hush, sprinkled with the beautiful marble carvings, and spring decorations everywhere gave it the most surreal feel. The temple security made everyone back away from us so that we have a few moments of peace from the picture taking bonanza. We actually met one of the only other American’s on our trip. He was Krishna monk who helped us sneak out the back of the temple. As he showed us around he explained his life’s goal was to serve and help. That he could reach a state of grace through such acts. Hearing such conviction in such a setting will always stay with me and remind me that for every awful thing we see there are good things as well.

Our trip to Holi in India: Painted in Colors

Our trip to Holi in India: Krishna temple
All those decorations are live flowers.

The Holi experience as a whole was amazing, we slipped around the back of the village making our way back to the hotel. We had only one rough experience where some young mean got a bit rough and handsy with me. Let’s just say I threw some elbows and my husband picked me up and carried me from the crowd. They actually ended up apologizing, but I would be wary to travel Holi as a single woman, alone. We never did make it to the main city temple, but I think that was good. Our trip led us to the back streets where we got to meet some of the residents. When we finally made it back to the hotel we had to spend close to 45 minutes removing as much color as we could. It still left my skin splotched and my hair a lovely shade of purple and hot pink. We snagged an evening massage and passed out with the knowledge we would have to figure out how to get halfway across the country to Jaipur in the morning.

To be continued when arrive in Jaipur…

Our trip to Holi in India: Temple Decorations with Marigolds
Personal favorite: Marigold garlands everywhere.