Posted on 12 Comments

Hardy Grape Kiwi: Plant Porn

Did you know there was such a thing as a grape kiwi (aka baby kiwi, kiwi berry, or hardy kiwi)?! Is it possible to get almost fan-girl squeely over a plant? Did you know that this kiwi not only comes in green and red, it grows in temperate zones? Oh yes folks! I can grow a kiwi in zone 6. A teeny tiny kiwi that you do not even have to peel! There are actually larger hardy kiwi’s, but this post isn’t about them. This is about the adorable grape kiwis.

Grape kiwi size comparison, Image by Hiperpinguino, CC License
Image by Hiperpinguino, CC License.  Check out the tiny kiwis in front for comparison

The Low Down on Grape Kiwi’s

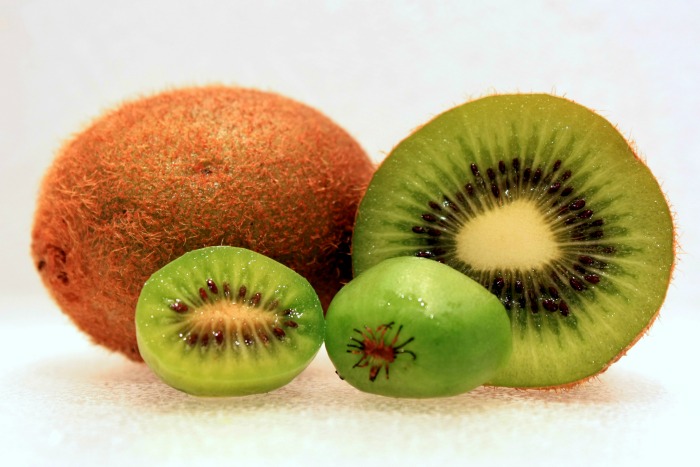
Grape Kiwis are a hardy kiwi type (Actinidia arguta). Say ak-ti-NID-e-a ar-GU-ta three times fast. The tiny kiwi’s grow in groupings that look much like grape bunches. They have thin edible skins and come in the traditional green kiwi color and also a red shade. Descriptions of the fruit are sweeter kiwi flavor with hints of pineapple. Yum!

These vines likely originated in Japan, China, or Russia which means they can survive temperatures of -34. Yippy for zones 5-9! Many of the cultivated vines you can buy have been bred in Russia, which, seems kind of cool. Maybe even give me some garden cred: “Check out my special Russian Kiwi!” I always picture scenarios where I am showing my lawn off to other gardeners… When in reality I am pretty sure I drive everyone around me nuts with my love of plants.

Annanasnaja kiwi from Raintree Nursery
Image from Raintree Nursery. I am thinking of buying these Annanasnaja kiwi

The deciduous vine grows glossy green leaves with scented white flowers. In perfect conditions you can have a 20 foot vine in a growing season so careful trellising can give you an ornamental attractive vine. Sitting in the shade of softly scented vine sounds like a summer pleasure to me. Bonus, the flowers and scent should be attractive to butterflies. Fruit should be ripe in the fall for fresh eating.

Edit: I just ended up buying these three kiwis!  I can’t wait to see how they do*:


How to Grow

Alright, there is a downside to the grape kiwi or maybe an upside depending on your space. You need to have at least 2 vines. Male and female (romantic lover vines ;)) are a must if you want to produce the fruit. Luckily one male is up to the challenge of pollinating anywhere between 6-8 female vines. That means you can have a red grape kiwi and a green grape kiwi and one male will work for both of them.

I have read conflicting information on how far to place the male and female plants away from each other. Most information points to one male being able to pollinate 8 female plants. You’ll need to space these suckers out because if they have the right conditions a single vine can grow 20 feet in a year. WOW! Sounds like a great way to make a vining screen, just remember they are deciduous so all the leaves will disappear in the winter. The recommended spacing is 10 feet apart. I personally am going to plant mine much closer, but I am into backyard orcharding so I plan to prune, prune, prune to keep these babies in shape and in size. WHICH! Is highly recommended. Do not forget this is a vigorous plant that grows for years. Have a sturdy trellis! We built one with 4×4 posts in concrete. Additional bracing to match our composting fence and 14 gauge wire with tightners (turnbuckles). This puppy is going no where.

Planting itself seems a bit finicky. Like every plant under the sun it needs organic, well draining soil. BUT unlike most plants this one NEEDS it. Apparently, they originally grew in forest type settings and are used to having a lot of organic matter and trees to climb. Additionally, heavy wet soils contribute to crown rot. On top of that site selection is muy importante to this plant if you want to get fruit. Sure they are hardy, but their spring growth is very frost sensitive. So you are going to need to find a location that keeps it cool as long as possible so it doesn’t come out of dormancy till the last minute and still gets full sun. Sounds like fun right? So here is my plan to place this plant in a zone 6b-7a. The mountains of Western North Carolina where I am assured to have 80 degree weather followed by a snowstorm in spring and I somehow managed to have a house built on a clay shelf so I have to deal with basically everything that will make this a PITA to get going.

  1. Dig a much deeper hole and put lots of soil amendment (tiny bark shavings) at the bottom. Layer in dirt and compost and plant the kiwi plants slightly above the ground line. Hilling them up will help with the drainage but I am going to have to remember to mulch the hell out of them in fall to protect the first year roots…
  2. The trellis site is on the southwest side of my house set slightly back. That means that it gets shaded in the mornings and some even in the afternoons but gets some amazing direct light during the day.
  3. We are going to use the male to train on our porch to the west side. First, he doesn’t have to be quite as protected. Secondly, you can prune the heck out of him. He just needs enough growth to set flowers. Finally, we will get the added benefit of some shade in the afternoons where our porch mostly bakes. In the winter we will still get the warm sun since the vine will lose its leaves.

I’m game to try these grape kiwis though from the planting info they seem like they may need a little extra care than a beginning gardener might want to try. Just being honest, I’m a tiny bit nervous about this purchase, but almost everyone agrees that if you can get them off to a decent start they are easy after the first year.


Image from Hiperpinguino, CC license

Kiwi Berry Care

Assuming that everything grows off without a hitch (Get it? har, har, har) the care is not that big of a deal once you get them established. Pruning the growth if you have a small space becomes incredibly important. You will want to train a central vine and then let it umbrella shape from there. Once it gets to the top of your trellis cut it off and focus on keeping it that height. The first year or two prune for shape and prune regularly throughout the growing season. Tie the main branches to the trellis to keep them from getting wound around. Small branches can twine without worry of causing bad growth later on. After the first couple of years you can read in depth articles about the best way to develop fruiting wood. Lots of opinions out there, but by that time you’ll be a seasoned kiwi grower able to experiment with different choices. Sources disagree on how long each variety takes to set fruit. I have read anything from year 2 to year 5! So I’ll update this with my own experiences later. Remember that it likes a lot of organic matter so side dress with compost regularly throughout the growing season and in the fall and spring like other fruit trees and bushes.

Once you get past the initial hard phase of growing hardy kiwis the vine is supposed to last for years and years. Just prune, fertilize and repeat. Flowers will set fruit that ripens September through October depending on variety.

So, I’m set to try my hand at growing a grape kiwi. This hardy plant should be good to go if I can get it established. Wish me luck on my tiny, hardy kiwi experience.

Posted on 21 Comments

How to Make a Glass Terrarium

How to make a DIY Glass Terrarium

I will admit to having a plant obsession, so, it was only a matter of time till I started in on glass terrariums.  But what fueled the new obsession?  Adam and I recently got married and while we agreed not to get gifts for each other someone decided to get me a new book on terrariums (*cough* Dork *cough*).  Holy plant porn!  Not every project was to my taste but all of them were inspiring.  I had never thought of decorating glass terrariums with feathers, sand, bark, etc.  It opened up a new world of decoration that allows me to bring plants indoors in a modern display.  While it is fairly easy to create a glass terrarium there are some tricks that I have discerned that make the process a LOT easier.  On to the tutorial:

DIY Glass Terrarium

How to make a DIY Glass Terrarium

Glass Terrarium Supplies

There are really three basics that you must have outside of a glass container:

  1. Plants*: these are some succulents I have been propagating and some air plants we picked up at a recent craft festival
  2. Soil*: Potting or fast draining cactus mix; unless you are using air plants
  3. Drainage Material
  4. Container: I went to Goodwill and scoured the shelves.  I was able to find a number of interesting glass containers for $1-$4.  Just make sure they are clear glass.  Tinted or colored glass can mess with the plant photosynthesis

Additional items that make the terrarium look really good:

  • Moss: Hardware stores often sell sheet moss cheaply.  Pretty reindeer moss is available in most craft stores.  We waited till we had a 40% off coupon and got a large bag.
  • Sand: Craft stores have a number of colors.  I also might try dyeing sand like I do in this tutorial, however, I would likely keep that to air plants so I do not wash out the color when watering.
  • Rocks
  • Feathers
  • Wood
  • Sea Shells
  • Etc : Anything that can withstand water or, if using air plants, you are pretty much unlimited

How to make a DIY Glass Terrarium

Step 1: Planning

A little planning goes a long way with a glass terrarium.  First, look at your plant and the conditions it needs to survive.  I also tried to find a plant that had a shape that complimented my tall glass container.  After matching up your plant consider HOW you will be planting it.  You can pour the dirt in the container but if you can not fit your hand in there you will have some issues. Long cocktail stirrers or chopsticks can help press the dirt firmly around the plant.

Step 2: Keep it Dry

My first big mistake was trying to plant a glass terrarium with damp materials…  Ugh.  Everything sticks to the glass, or plants, getting everywhere and becoming near impossible to remove until it is dry again.  Start by placing your drainage material at the bottom, and layering your dirt next.  I placed a layer of bark between the rocks and dirt to keep the distinct bands.  That step was purely for aesthetics.  Next plant the plant but do NOT water yet.

Step 3: Clean and Tidy

If you have not watered, then you have the opportunity to take a soft cloth and wipe off the glass.  You can also blow SOFTLY through a drinking straw to clean dust or move sand around. Removing the dust and dirt from above the soil line is what gives the terrarium a clean modern feel.  Take this opportunity to place smaller decorative objects.  I used some reindeer moss and a small (live) hen and chick next to the main succulent.  You could also place rocks, a layer of sand, etc.  The only limit is space, ability to withstand dampness, and your imagination.

How to make a DIY Glass Terrarium

Step 4: Tips and Tricks

Time to water!  This is where everything can and has gone South for me.  Water too fast and you end up making holes in the soil, or flooding the entire terrarium.  Trust me on this one, flooding it is bad, bad, bad.  I was talking instead of paying attention (imagine that) and ended up floating all my plants out of the soil and mixing in my sand.  I had to dump everything and start over.  The easiest way to insure a non-messy watering is use a spray bottle and let it trickle down the glass.  Otherwise, be super careful to only add a trickle of water.

Notes:

Make sure to pay attention to the microclimate you just created.  The sun can get very warm through the glass and/or the environment can easily get too wet or dry.  The nice thing is that the container is glass so you can actually look at the soil and drainage material to see your water level.  Also, remember there is not a lot of nutrients (as in none) coming into your terrarium.  You may need to add a liquid fertilizer every 3-4 months to keep your plants nice and healthy.

If you want some amazing inspiration this was the book I got as a gift:*


Otherwise a quick glance through Pinterest can really give some great ideas to get you started.

How to make a DIY Glass Terrarium

Posted on Leave a comment

Yard Transformation

Humorous depiction of our new construction yard.

The yard… Ugh.  What can I say about the yard?  We bought the house last fall and the grass was not much to look at.  I assumed that spring would bring a lot more green.  All I can say is nope.  Big ole cup of N.O.P.E.  It was as though our entire front yard had been salted, then compacted, and then sand blasted for good measure.  I am not certain I have ever seen soil that poor outside of depression era photos of the dust bowl.  The first photo I took, we had at least raked the debris from the yard in preparation for attempting to grow some grass.

Humorous depiction of our new construction yard.

It was during the raking, that I discovered the thrilling fact that our yard was chocked full of rocks, and rocks, and then some more rocks.  Think new construction lot at its finest.

Really bad yard
Okay, so maybe this is a more realistic depiction of the yard. Still pretty awful.

Here is the thing they never tell you

They never tell you that a blank canvas of a yard can be intimidating.  We had nothing… Not even real grass.  So, imagine, you have two people who both like to garden, in completely different ways, faced with the possibility of doing absolutely anything in the yard.  Sounds like a dream right?!  Except for the part where we got in a ‘heated discussion’ over bed layouts.  Or the honest to goodness fight over organic versus non-organic.  Sounds ridiculous right?  It was ridiculous, so ridiculous, we made some final decisions, found a tree we liked, and asked to borrow a truck from a friend to pick up mulch.  Because the first step is always to buy a 15 foot birch with absolutely no plan!  So if you want to follow our dubious planting advice keep on reading!

Materials:

  1. Massive tree
  2. Lots of mulch
  3. Free Plants/seeds/etc
  4. More Mulch
  5. Dirt
  6. Grass Seed
  7. Clearance section of big box stores
  8. Patience (You can substitute arguments here instead)

Before and after of yard

Step 1: Buy a ridiculously huge tree, with no way to transport it, and no real plan for planting it.

To our credit the tree was an amazing deal.  We loved the bark, we loved the idea of having A TREE at least.  While running by the hardware store we also happened upon two yoshino cherry trees.  We though the silver bark might look nice with the white of the birch.  Plus 3 trees!

Step 2: Pray someone is stupid enough to help you transport it…

Oh by the way, can we get some mulch?  Needless to say we had a good friend who not only helped us transport the tree, but get truck loads of mulch.  Notice the ‘S’ on loads?  Honestly, I have lost count of how much mulch we have used.

Step 3: Spreading mulch

Apparently, Adam has not lost track of how much mulch we used. 7 cubic yards of mulch… That is close to 3500 lbs of mulch hauled with trucks, in bags, via camels.  Okay maybe not camels, but we have been hauling mulch all summer long.  On the first weekend we used 3 cubic yards to make the basic beds.  In a perfect world we would have had all the beds prepped with cardboard or newspaper underneath the mulch to smother the grass.  However, we were flying by the seat of our pants, so we simply piled it on.  Our aforementioned friend also helped us spread the mulch along the sides of the house, under the back deck, and make the nice arching and kidney shaped beds around the new trees.  I was called upon to climb/crawl under the front porch to place the mulch. Pro tip: Call before you dig.  In North Carolina simply dial 811.  Every utility will come out and mark the lines for free.  Marking the lines allowed us to plant the trees without cutting the cable to the neighborhood.

First stage of transforming a barren landscape.

Step 4: Continue to rely on the kindness of strangers

It took most of a weekend just to complete stage one of yard transformation.  Stage 1 simply involved mulching, planting trees, and planting a number of freebie plants.  I put the call out on facebook and an email at work asking for anyone who was dividing perennials, had left over seeds, or just had extra plants they wanted to get rid of to let me know.  I would show up shovel in hand and get the plants.  Surprisingly I manged to snag a number of free plants: Lemon balm, strawberries, leaf mulch, 50+ seed packets, ornamental plum sapling, redbud sapling, various bulbs, daisies, etc. It was an amazing amount of plant love from the community.

Stage 1 Complete

To be fair, we also assembled raised beds, put in a trellis, added soil to bare patches, and seeded grass.  Basically lots of manual labor.

We got trees up in here, up in here

If I had only known then what I know now

Beds are great, grass is great, vegetables are great, but that is not really enough to hold down a landscape.  We truly lucked soon after the beds were placed.  We went to one of the big box hardware stores to pick up something (probably mulch) and walked past the clearance plants. Lo and behold they were marking tons down.  I still do not know how we managed to get what we did, but we got close to $150 of annuals and perennials for $30.  Finally we had something to put in the beds!  Which I thought was a great plan, until I realized that I actually had to plant all of them.  Which leads to:

Step 5: Collecting over time

The rest of the landscape has been a complete work in progress for the entire summer. Dig, plant, weed, seed, repeat.  We picked up a beautiful Japanese maple at the WNC herb festival, worked on a chicken coop/castle (post TBD), added stepping stones for the boys.  The usual lawn maintenance and gardening work.  We have added a number of perennials such as blueberry bushes, blackberry vines, passionflower vines, various herbs; some gifted, some  bought.  Apparently, yards aren’t built in a day.  Pro Tip: Find a local rock seller.  A single flagstone can cost $7-$11.  We got ours for about $1 a rock from a local stone dealer.

Stage 2: Complete

As the summer has progressed we now have grass for the boys to play in, vegetables for eating, and flowers to admire.

I can not stress enough that time and water are really what it takes to totally transform a yard.  The hardscapes and beds have given it the frame work, but it will be a few years before all of the plants have matured enough to give a truly lush landscape.  Still I am quite happy to enjoy my hard earned squash, listen to my happily clucking hens, and run my hands through the fragrant lavender.  Stage two of the yard transformation, planting


Posted on 8 Comments

How to Repot an Orchid in Bark

Orchid root ball

Before we even begin this post let me just say that repotting orchids and orchids in general are not my strong suit.  My mother seems to have the knack for keeping an orchid alive and all tips have been learned by watching her methods.  This bark method works well for what I call the general orchid; ones you can pick up at home improvement and grocery stores (phalaenopsis for the picky of us). However, there are many types.  Research your specific variety or you may end up with a dead orchid on your hands and these suckers are not cheap!

Materials needed

  • Pots: Make these well draining!!!  There are special pots with lots of holes on the side.  I find a fast drying terracotta also works well. NO plastic.  I have a tutorial on faux finishing pots for a rustic look if you want a way to jazz up the pots.
  • Orchid bark: Available at any home improvement store
  • Orchid: Going to need something to repot

Items needed to repot an orchid in bark

Step 1: Removing the Orchid

Most orchids you buy are crammed into these tiny plastic pots and packed with moss.  This is just… no.  Orchid roots need to breathe and have excellent drainage.  While they like moist conditions, soggy roots are just asking to rot the whole plant from the inside.  Get that poor sucker out of that tiny cup and start removing the packed in moss. Tease out the roots.  Important!!!!  If you see any mushy brown roots cut them off immediately.


Orchid root ball
As you can see this one also had styrofoam peanuts for drainage. I am just not a real fan of using plastic and styrofoam in my plants… Just not my thing.

Step 2: Save Some Moss

Unless the moss is in a poor or rotted condition I save a tiny amount to mix in the bark.  I do mean tiny!  I would not go more than a 1/4 of the mix of bark and moss.  You are trying to remedy the situation of trapped soggy roots, not add to it with compacted wet moss.  The reason I add the moss is to maintain a little more moisture.  My house is very dry, so you could skip the moss entirely if you live in humid locations.

Step 3: Plunk Orchid in Pot

I am sorry this is not more complicated…  Basically throw some bark/moss in the pot, fan out the orchid roots, stick in pot, and pour more bark on top.  If a root sticks out, no worries!!!  Be aware that orchids in bark are not terribly rooted down.  Basically do not put them in a high child or cat traffic areas where they will get constantly pulled out of the pot.  Ask me how I know this…  Once I have them in the bark I set them in the sink and give all the roots and bark a thorough wet down.  Do NOT soak! Just let the water run through.  Then repeat this type of watering whenever the bark dries out.

Orchid repotted in bark
Looks like a happy orchid to me!


Posted on 6 Comments

Rustic Terracotta Pots

Orchid in rustic terracotta pot

As luck would have it I am in the gardening mood and four free orchids were available at work.  Two of them came in lovely, rustic, aged terracotta pots.  Two of them in plastic.  Last time a I checked plastic cups are not the most attractive or healthy means to display an orchid.  I loved the look of the rustic terracotta pots, but in reality even the two pretty pots were to small for the plants they were holding.  So what is a person to do?  I don’t have time to soak and cover four pots so they organically mineralize and grow moss.  I decided to take my hand at creating faux aged garden pots.

After some practice, playing around, and testing I came up with the following how-to:

How to Faux Finish Terracotta Pots for an Aged, Rustic Look

aged terracotta pot with orchid

Materials Needed

  • Terracotta pots
  • Cream acrylic paint
  • Plaster of Paris (Optional if you have matte paint)
  • Old toothbrush: I guess you could use a new one, but seems like a waste to me.
  • Sponge or paint brush
  • Plastic cups (2)
materials needed to faux finish pots for a rustic look
As you can see here I had some old semigloss white and some cream ‘mistake’ paint I found at the hardware store.


Step 1: Making Matte Paint

Here comes my world famous guestimate instructions.  First, take around 1 ounce of water and put it in a plastic cup or whatever you will be using to mix paint.  Then take a couple of spoonfuls of plaster.  Mix with the water till it makes something around the consistency of pancake batter.  Then pour in some paint.  I would guess and try to keep a 3 paint to 1 plaster ratio.  Now that I have told you that ratio it is time to ignore it, because you are attempting to make two types of paint.  One thick and one watery.  I started with the same base on both paints and then added more water to one and a little more plaster to the other.

Step 2: Painting

I looked at my first pots for reference and made a few changes.  First I took the old toothbrush and dipped it in the wetter paint.  I laid the pot on a suitable surface.  Meaning I laid out an old Christmas paper plate, and when that didn’t prove large enough to handle the paint splatter I put more cardboard underneath.  Of course this was after cleaning the table of paint splatters… Just run your thumb along the bristles 3-4 inches above to give it some splatter.

I looked at the original pot for reference.  The water marks happened in bands of white mostly focused on the bottom.  I took a sponge brush and lightly dipped it in the thick paint and started brushing around the pot.  I also dribbled some water in the wet paint and let it wick a bit to give it a more realistic look.  I find it is easier to start lighter and add more.  I also went back and added more paint on top of the previous areas so it would have a thick dimension like the source material.

techniques for aging pots with faux painting

Notes and the Final Look

  • The paint dries super quickly on the terracotta.  Which is great for layering and a PITA when you are trying to feather it out.
  • I have had no issues with water harming the finish.  That being said these are indoor orchids.  I water them in the sink and set them back in their various places.  I have not subjected the finish to the turmoil of actual weather.  Though, I assume a natural finish would slowly replace the paint.  In fact… I may need to give that idea a go.

After I replanted the orchid this was the final look:

Orchid in rustic terracotta pot