Posted on 21 Comments

How to Make a Glass Terrarium

How to make a DIY Glass Terrarium

I will admit to having a plant obsession, so, it was only a matter of time till I started in on glass terrariums.  But what fueled the new obsession?  Adam and I recently got married and while we agreed not to get gifts for each other someone decided to get me a new book on terrariums (*cough* Dork *cough*).  Holy plant porn!  Not every project was to my taste but all of them were inspiring.  I had never thought of decorating glass terrariums with feathers, sand, bark, etc.  It opened up a new world of decoration that allows me to bring plants indoors in a modern display.  While it is fairly easy to create a glass terrarium there are some tricks that I have discerned that make the process a LOT easier.  On to the tutorial:

DIY Glass Terrarium

How to make a DIY Glass Terrarium

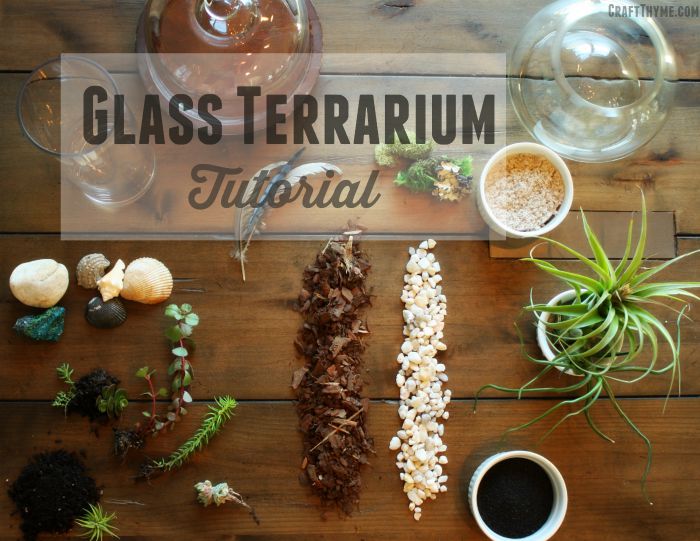
Glass Terrarium Supplies

There are really three basics that you must have outside of a glass container:

  1. Plants*: these are some succulents I have been propagating and some air plants we picked up at a recent craft festival
  2. Soil*: Potting or fast draining cactus mix; unless you are using air plants
  3. Drainage Material
  4. Container: I went to Goodwill and scoured the shelves.  I was able to find a number of interesting glass containers for $1-$4.  Just make sure they are clear glass.  Tinted or colored glass can mess with the plant photosynthesis

Additional items that make the terrarium look really good:

  • Moss: Hardware stores often sell sheet moss cheaply.  Pretty reindeer moss is available in most craft stores.  We waited till we had a 40% off coupon and got a large bag.
  • Sand: Craft stores have a number of colors.  I also might try dyeing sand like I do in this tutorial, however, I would likely keep that to air plants so I do not wash out the color when watering.
  • Rocks
  • Feathers
  • Wood
  • Sea Shells
  • Etc : Anything that can withstand water or, if using air plants, you are pretty much unlimited

How to make a DIY Glass Terrarium

Step 1: Planning

A little planning goes a long way with a glass terrarium.  First, look at your plant and the conditions it needs to survive.  I also tried to find a plant that had a shape that complimented my tall glass container.  After matching up your plant consider HOW you will be planting it.  You can pour the dirt in the container but if you can not fit your hand in there you will have some issues. Long cocktail stirrers or chopsticks can help press the dirt firmly around the plant.

Step 2: Keep it Dry

My first big mistake was trying to plant a glass terrarium with damp materials…  Ugh.  Everything sticks to the glass, or plants, getting everywhere and becoming near impossible to remove until it is dry again.  Start by placing your drainage material at the bottom, and layering your dirt next.  I placed a layer of bark between the rocks and dirt to keep the distinct bands.  That step was purely for aesthetics.  Next plant the plant but do NOT water yet.

Step 3: Clean and Tidy

If you have not watered, then you have the opportunity to take a soft cloth and wipe off the glass.  You can also blow SOFTLY through a drinking straw to clean dust or move sand around. Removing the dust and dirt from above the soil line is what gives the terrarium a clean modern feel.  Take this opportunity to place smaller decorative objects.  I used some reindeer moss and a small (live) hen and chick next to the main succulent.  You could also place rocks, a layer of sand, etc.  The only limit is space, ability to withstand dampness, and your imagination.

How to make a DIY Glass Terrarium

Step 4: Tips and Tricks

Time to water!  This is where everything can and has gone South for me.  Water too fast and you end up making holes in the soil, or flooding the entire terrarium.  Trust me on this one, flooding it is bad, bad, bad.  I was talking instead of paying attention (imagine that) and ended up floating all my plants out of the soil and mixing in my sand.  I had to dump everything and start over.  The easiest way to insure a non-messy watering is use a spray bottle and let it trickle down the glass.  Otherwise, be super careful to only add a trickle of water.

Notes:

Make sure to pay attention to the microclimate you just created.  The sun can get very warm through the glass and/or the environment can easily get too wet or dry.  The nice thing is that the container is glass so you can actually look at the soil and drainage material to see your water level.  Also, remember there is not a lot of nutrients (as in none) coming into your terrarium.  You may need to add a liquid fertilizer every 3-4 months to keep your plants nice and healthy.

If you want some amazing inspiration this was the book I got as a gift:*


Otherwise a quick glance through Pinterest can really give some great ideas to get you started.

How to make a DIY Glass Terrarium

Posted on 8 Comments

Sea Shells & Lemonade = Table Decor?

Sea shell inspired table decor.

I initially had the idea for this table setting from some sea shells I found when scrounging through my mess of a basement.   I had saved a small bag of pink scallop shells and thought they would make a good basis to start my summer decor.  Though I live  in the mountains my second love is the beach.  I wish I was a lake girl, since so many lakes are so much closer, but the mud, the dark water, the…  Nope it is sand and surf for me.  However, any good mountaineer knows overdoing the surf theme just seems out of place.  So here is my hybrid of pink, salmon, & gold.  Call it pink sand, shore, and lemonade inspiration.

Table decor inspired by pink sea shells
I’m so good at naming tablescapes… #sarcasm. Please suggest better names in the comments! Please!

The table setting is anchored by a diy ribbon chandelier (tutorial here) above and gold tulle net runner below.  The gold accents unify the various shades of pink that run from rose to salmon.  Shoo… okay I can say I used my art degree today to critique my design.  Now on the the fun stuff!

PINK LEMONADE CUPCAKES!

I knew I wanted some fun pink desserts and, thank the grocery gods, I walked by a display for Pillsbury pink-lemonade cupcakes.

Table setting inspired by pink seashells
Read below to learn more about my awesome baking skills.

Yes I can bake…  But can I decorate a cake?  Oh hell no.  It is a crafting skill that is just beyond me.  Knowing this, I often take the easy way out with mixes, pre-made icing, and sugar sprinkles.  As far as I can tell sugar sprinkles cover a multitude of sins.  Plus who could walk away from a thing of icing labeled ‘Pink Lemonade”.  And I swear I am not getting paid by Pillsbury to say all this awesome stuff.  Though, if they would like to, feel free to give me a ring.

Pink and Gold table decor
I like to call this the sugar, sugar, sugar portion of the table

Oh my!  I almost forgot mixed berry sangria!  Perhaps I should preface this with my Facebook status:pink-fb-statusNot to be a braggart but I make multiple awesome sangrias.  Citrus, berry, peach, etc… One for every season.  The recipe for this mixed berry and lemonade one will be up Thursday!

Salmon and Pink place settings
Gold Finger! A tutorial for creating your own gold sea shells and sand dollars from paper clay is in the works.

One of the things I enjoyed most about creating this display was learning to gold foil fabric (tutorial coming).  I thought the ombre dyed napkins (another upcoming tutorial) really set of each place setting because of the gold edging.  I’ll leave you with one more picture and a list of craft tutorials and how-tos required to recreate this summer table decor.

Sea shell inspired table decor.


I would love to have a better name and ideas on what you like or would improve.  Every table display is a learning experience so please leave comments.  Other than the cupcakes… Those mo-fo’s were delicious!

Tutorials:

How to Dye Sand

Permanent Sea Glass Finish

Modern Ribbon Chandelier (yes it is supposed to look like that)

Mixed Berry Sangria

Ombre Dyed Napkins

Gold Foiling Fabric August 8, 2013

Mold Making from Polymer Clay (Gold Seashells and Sand Dollars) I have photos and how tos but I am not sure how many people like to sculpt and make molds…  I may or may not post a tutorial.

Enjoy these articles?  Get periodic updates by joining my mailing list (no spam, no way, no how) or subscribing to my RSS feed.

See more great crafts and decor at these link parties: Our Home Away From Home, Today’s Creative Blog, Daisy Cottage Designs, Shabby Creek Cottage, House of Hepworths, Live Laugh Rowe, The Crafty Blog Stalker

Posted on 13 Comments

Faux Permanent Sea Glass Tutorial

Tutorial to create permanent faux sea or beach glass

I saw a how-to for creating beach glass from Elmer’s Glue and food coloring on Pinterest.  While lovely, I wanted to create a more permanent sea glass finish for some cake stands (NOT FOOD SAFE FINISH please don’t sue me if you eat off this and get sick) I was making.  That way they could be gently washed and I wouldn’t have to worry about moisture making the finish tacky or white.  After, oh so many attempts…. I came up with a good working finish. Thank goodness glass plates are cheap at Goodwill.  On to the tutorial:

Tutorial to create permanent faux sea or beach glass


Supplies

Translucent Glass Paint/Stained Glass Paint (A watered down enamel did not work)

Glass Frosting Spray Paint

Water or Glass Paint Thinner w/ a container to mix them in

Soft brush or Foam Brush

Clear Glass Items

Supplies to create faux beach glass
Your eyes are deceiving you.
You do not see the stiff paint brush in this picture… You see a foam brush.

Step 1 Clean & Paint

Clean your glass well.  Did you get it clean?  Good clean it again, wipe it down with rubbing alcohol and try not to touch it.  I may sound a little crazy here but if you want your paint to adhere clean the glass.  Depending on the paint you have chosen you may water it down with water or a specific thinning agent.

Why am I watering it down?  Because you want to achieve a nice thin even coat of transparent to translucent paint.  The thicker the paint the more brush strokes showed.  The more brush strokes that show the less it looks like sea glass and the more it looked like a hot mess.  You can still see some drips and mess ups if you look closely in these photos.  The key is multiple coats of thin paint.

Oh and some paints say to dry of oh… 20 days… Um hell no. Ain’t nobody got time for that.  Usually you can bake them for a faster finish, but read the directions for your particular paint.

Painting translucent finish on glass as the first step in faux sea glass tutorial
You can now see why I have such a large and well used drop cloth. I am messy.

Step 2: Spray Paint Against All Directions

Take the frosting spray….  Now I know you are supposed to be well away from the object etc when spray painting.  Ignore all that.  You want a THICK coat.  Get in close with that spray bottle!  You want it to pool in the niches and look glossy and wet before it dries.  This will insure a white textured finish akin to actual sea glass.  And if it just looks frosted when done, get closer and spray more!

Using glass frosting spray paint to mimic beach glass finish
Spray Away!

Step 3: Use As Is

That is really the only steps to making a more permanent beach glass finish, suitable for hand washing.  I went and finished mine with a little E-6000 glue.  Just simply attached my plates to a cup and candle stick to make two cake plates in two shades of pink.  The frosting spray says nothing, zip, zero, zilch about being food safe.  So I plan to use a paper doily under any food, just to be safe.

creating faux beach glass cake plates

Notes:

Spray Away!, Hand Wash, and not food safe!  Otherwise you should be good to go.

The key is piling on the frosting spray!

DIY faux beach glass cake stands