Posted on 23 Comments

How to Build a Hugelkultur Raised Bed and Why You Should

Roma tomatoes that did not crack due to hugelkutlur raised beds

Every fancy gardening website extols the virtues of raised beds. I personally, resisted them for years but a combination of hugelkutlur and raised beds changed my mind! Before, we get into how to build a hugelkutlur raised bed, let’s discuss the why you should build a hugelkultur raised bed.  Also, we can answer the all important question:

What the hell is Hugelkultur and how the hell do you say it?

The easiest definition of Hugelkultur (hoogle – cult – er) is it is a hilled bed where the center of the bed is large trunks of wood and debris covered in dirt.  I added that stab at pronunciation because one time I asked readers how to pronounce diatomaceous… 80+ helpful comments later I decided to edit the article and never ask for help on that score again ;).

But back to hugelkultur; There are a lot of benefits to this traditional style of hugelkultur beds, such as cost, size, soil warmth, etc, but for me the aesthetics just weren’t what I was looking for.

2 year old hugelkultur raised beds full of basil, peppers, kohlrabi, and tomatoes
I just like a nice sharp edge.  Especially when I have neglected my trimming and weeding… This hugelkutlur bed is untidy at the end of the summer but still going strong! No watering needed.

Why Your Raised Beds should be a Hugelkultur Raised Bed

I have always been resistant to raised beds. My vegetable gardens growing up always were in-ground. I can recall the tilling and dirt clod smashing needed to prep a garden from very early years. As a side note, I can’t, to this day, explain why may parents insisted on having a garden growing up. It wasn’t their “thing” and we always spent summers angrily hoeing and yelling at groundhogs. At one point there was an incident where we electrocuted an opossum. Which, while an awesome display of electricity was not exactly the intended result. It did, however, keep the F’ing groundhogs at bay for some time. Till we finally realized the fried opossum had grounded the whole apparatus out. Which resulted in the loss of All. The. Corn.

Also groundhogs can suck it.

However, back to my garden, I was resistant to raised beds due to the added cost of whatever material you use to surround the bed, then the cost of dirt, the labor of construction, and the constant fight to keep the beds from drying out. I know lots of other gardeners who feel the same way.  With all that against raised beds how can building a hugelkultur raised bed change everyone’s minds?

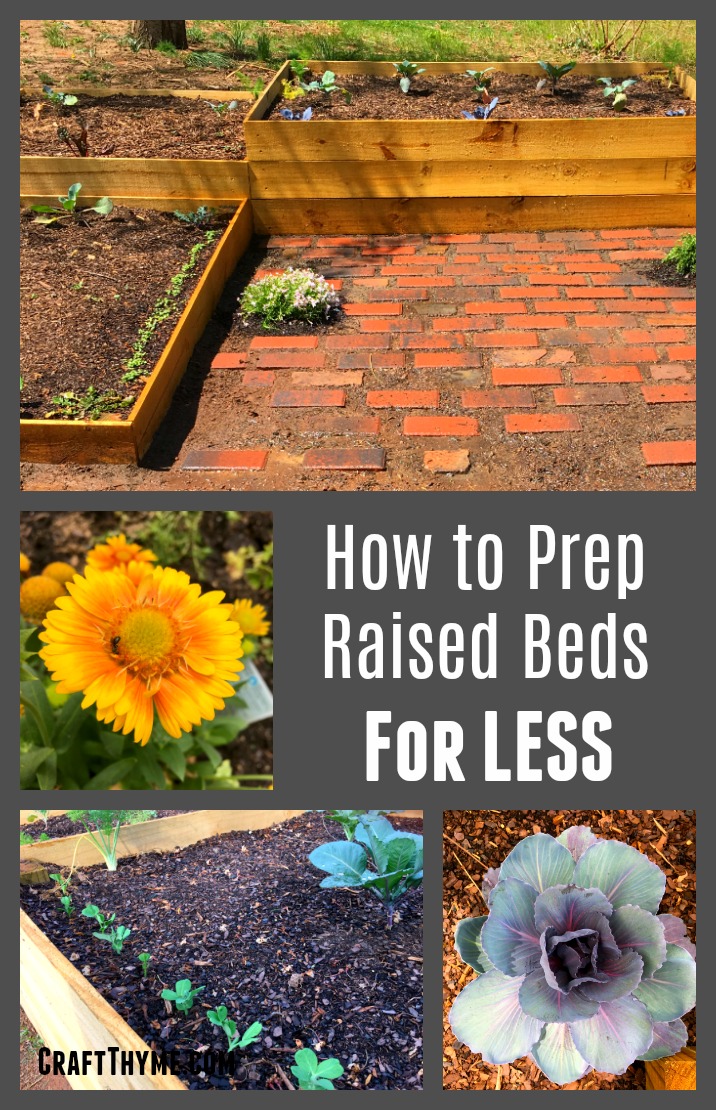
First, there are ways to prep raised beds for less. So much so, we wrote about it right here! Also, let’s be frank: Raised beds look good. As a permaculture enthusiast I shouldn’t give a twit about “looks” and focus on functionality but my artistic background just wants to make beautiful things. Raised beds are easy to edge, weed, fertilize, decorate, etc. But the watering. Oh the watering… Raised beds can be like a terracotta pot and need watering on a daily basis (twice daily?). Ain’t nobody got time for that.

Modified hugelkultur raised beds that need no water but grow herbs, raspberries, and other vegetables
I maaaayyyy have let this hugelkultur raised bed get a little crazy. I have not watered it all summer but it is packed with lemon balm, basil, sage, and fresh fall raspberries.

Hugelkultur raised beds saved me from that fate of standing around with a hose and it can save you too! A lining of spongy wood and chips soaks up the water, then, releases it back to the dirt and plants slowly. Added bonus of a hugelkultur raised bed is the fungal cultures they bring. I attended a soil scientist’s (what a cool job title) class this spring at Organic Growers School and learned so much about how microorganisms and fungus assist the health of your plants. BUT that is a topic that needs its own series of posts. What was most important is that, outside of seedlings and a month of drought I haven’t watered my raised beds. During the drought I didn’t water the established perennials in these beds AT. ALL. I feel like an infomercial but damn… It is kind of amazing.

Have I sold you on having a hugelkultur raised bed? I bet we have! Now what? You got to build those puppies!

How to Build a Hugelkultur Raised Bed

We have detailed articles on building regular raised beds and fancy ones (Linked for your convenience). We even talk about how to fill and prep those raised beds for less. But if you are lazy, like me, here is a quickly tutorial on how to make a hugelkultur raised bed.

Step 1: Build some Raised Beds

Not some of those ridiculous 2 inch raised beds either… We are going to need some deep old boxes to make a good hugelkultur raised bed. I suggest building them at least 6 inches deep and actually follow my own advice. Though it doesn’t always look like it. On the below hugelkultur raised beds we had this brilliant idea to level them in the landscape and then spent an entire day digging only to end up with one of the sides being buried about a foot into the ground.  However, they are damn level.

Raised beds leveled in a sloped landscape.
This took a whole lot of digging!!!!

Step 2: Wood is Good

Depending on how deep your bed is, you are going to fill the bottom 1/3 to 1/2 with wood matter.  Deeper beds can take more wood matter and still have room for lots of dirt. In our deeper beds we used old logs we found in a wood pile, then branches (some of them fresh), then tiny sticks the kids picked up in the yard.

Modify hugelkultur to make a water-wise raised bed

Step 3: Chips Aren’t Just for Snacking

Even if you have a low raised bed you can follow this step. Our top layer was simple ground wood chips. These break down fast but hold water well. I even use wood chips in the bottoms of large containers so I do not have to water the containers as often.

That’s really it, just add dirt on top. But I make it seem a lot more complex and fancy in this in-depth tutorial about prepping beds for less.

It all sounds so great, amiright? But I bet you are wondering how these hugelkultur raised beds held up in the long run. Well, I’d be happy to say they have held up fabulously! The pictured beds above are two years old and going strong.

I plan to pressure wash the wood in the fall and stain, to help protect them, but as for fertility, water retention, and general upkeep?! I can not complain. Honestly, they still look good and grow like crazy.  I’ve been neglectful in keeping up with the harvest (and weeds) due to the rate of growth, even in the heat of summer.

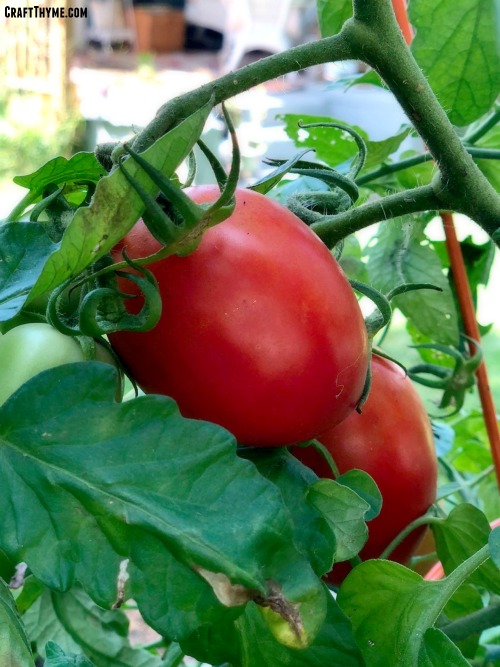
But if that isn’t enough for you then let’s take a second to check out these tomatoes… Certainly, these are a variety of heirloom Roma’s which are resistant to cracking, but LOOK, like really LOOK, no cracking! Through days of no water and days of deluge every evening I have managed to get tomatoes that aren’t cracked. I have never, in ground, or regular raised beds, managed to make that happen without a lot of TLC.

Roma tomatoes that did not crack due to hugelkutlur raised beds
See Ma?! No cracking!

Tomatoes crack when water isn’t regulated. Guess what regulates the hell out of some water?! A Hugelkultur Raised Bed, That’s what! Anything that keeps me from having to babysit my plants will earn a place in my gardening secrets list.

So if you want to reap the benefits of good soil culture and water retention all while maintaining aesthetics then I think a hugelkutlur raised bed should be in your near future.  If you try this techniques please let me know in the comments how well it works for you!

How to make hugelkultur raised beds and why you should make them

Posted on 6 Comments

How to Prepare Raised Garden Beds: Weed Free Style

How to fill your raised beds with good soil, that maintains moisture, keeps out weeds, and doesn't cost a fortune.

Do you want to know the best way to prep raised beds once you have them built?  The soil mixture you use for your raised beds is a hotly contested subject; and everyone has their own techniques.  However, we have developed our own unique method that is cost effective (a nice way of saying cheap as possible), retains moisture, and keeps weeds from coming up through the bottom of your bed.  I feel pretty secure that our method will give you a good weed free start on your raised garden beds.  We have been working with it all summer and despite the groundhog setback the beds have been yielding lots of pretty veggies and flowers. We got the idea from hugelkultur beds (a topic for another post) and tested it out in our newest DIY garden boxes.  It is working great! First let us give you the lowdown on some of the problems of raised garden beds and then get onto prepping those beds.

Raised Garden Bed Issues

We can all agree raised beds have a lot of advantages.  You have more control of the soil, attractiveness, soil drainage, etc.  BUT, in our experience some of the great things about raised garden beds can also be issues.

  • Raised garden beds can dry out very quickly. Like whoa…
  • Weeds, especially grass, like to pop in from the bottom/sides
  • It costs a lot to fill a raised bed

Craft Thyme’s process for preparing raised garden beds addresses all the above issues and helps make the beds virtually weed free! Affiliate links may follow.

Supplies

  1. Landscaping Fabric (Yes, I am suggesting making a deal with the Devil)
  2. Stapler (Like a construction stapler, not a red swingline)
  3. Scissors
  4. Wood branches/chips/logs (see below)
  5. Topsoil
  6. Garden Soil
  7. Compost (Optional)
  8. Plain Cardboard or lots of Newspaper

Step 1: One of only two times you will hear me say use Landscaping Fabric

As a matter of course landscaping fabric is the devil.

Landscaping fabric is the thong of gardening.  It serves a small purpose and is always in the way forever after.

However, in preparing raised garden beds I have found it very useful.  Start with a long sheet of landscaping fabric.  I try for at least the length of one side of the raised garden bed and fold it in thirds.  But if you happen to be folding it outside on a windy mountain day, well you are going to curse and probably cut shorter sheets). Cut along those fold lines to make three strips of landscaping fabric that is about 12 inches wide (Most standard rolls come in 3ft widths.  Obviously, cut accordingly if you buy one of those big honking rolls).

Take the fabric and staple the fabric no more than 6 inches high on the wood of the bed.  Anytime you hit a corner or have to start a new piece fold the fabric and overlap.  More fabric is not bad in this case.

Found the perfect use for landscape fabric: A way to keep expensive soil inside a raised bed

This process is, in my humble opinion, and excellent squat workout.  Adam built a lot of beds… Let’s just say I got quit the glute workout.  You can staple it lower if you have small beds, but you want to insure that the fabric overlaps the ground below.  This will work as a barrier to keep dirt from leaking out of your beds and weeds from poking in on the sides.  Remember we are going for weed free raised garden beds!

Step 2: Wrap it up

Take sheets of cardboard or 5-6 sheets of newspaper and cover the entire bottom of the bed.  If you have issues with the newspaper blowing around you can wet it down to make it stick to the ground. It should overlap over the landscaping fabric.  This will make sure the fabric stays down when you start filling the beds.  The cardboard/paper will decompose over time and the roots of plants will be able to go past it to dig in the soil below.

How to prep a raised bed to minimize weeds and cost

Step 3: Wood is Good

NEXT LAYER!  Not sure why I needed to scream that, but it felt right.  So the next layer is dependent on the height or your bed.  Shallow beds will get just wood chips, deep beds get sticks covered with wood chips, deeper beds get logs, then sticks, then wood chips.  Hopefully you get the idea.

Modify hugelkultur to make a water-wise raised bed

The wood acts like a sponge and holds water in the raised bed.  I have heard the decomposition of wood can rob the soil of nitrogen, but so far we have been good because the soil is going to suck anyway.  Read further to see the discussion on supplementing the soil and how to tackle that going forward.

When gauging the depth of the bed, leave a minimum of 6 inches of room for actual dirt from the top!  Cause plants can’t live on wood alone, mushrooms are another story.  Few tips for selecting wood:

  • Old rotting logs are best
  • Small dry sticks and old leaves will also work
  • We happened to have a lot of fallen logs and wood chips from tree work we had done in the fall.  If you do not have your own; try to find twigs, branches, etc from the neighborhood.  It is always easy to collect fallen limbs after a storm.  Unless you live in a desert… Or grass lands…   If you have to buy bags of wood chips try for the non-colored/Untreated types where available

How to use rotting wood chips to keep moisture in the bottom of your raised beds

Step 4: 5 Second Rule (Dirt don’t hurt)

In case I hadn’t already diverged from traditional gardening advice enough…  You have two options available for dirt.  You can spend a fortune and get the best, compost-ful dirt you can find.  Almost every post you will read on the internet will suggest spending as much as possible on dirt.  Maybe that is a great way, but I follow the second method: 3 inches of cheap topsoil and the 3 inches of whatever gardening soil is available for sale at the local big box store.  I turn a blind eye to the label for this one moment in time and throw whatever horrible bag it is in the bed.

Adding topsoil to a DIY raised bed soil mixture
Can you say C-H-E-A-P topsoil?

Trust me these bags are labeled as fertilizer for 10,000 months!  Grow an Amazeballs Garden!  Etc.  They aren’t good, they do not last a quarter as long as they say, and I feel bad, but they are cheap, get your garden going, and give you a base to build really awesome soil in the future.  I’d choose gardening some over gardening perfect everyday!

Adding the final layer of premium garden soil to get your raised garden beds off to a good start.

Now What?

That folks, is how you prep a raised garden bed.  The landscaping fabric/cardboard and purchased soil insure you start with a weed free bed!  Feel free to plant away!  If you follow this planting guide your veggies will help shade the ground and keep a lot of new weeds from sprouting.

But wait there’s more…

Couldn’t resist the infomercial appeal.  Once you start with this technique you are going to have a couple options to ‘raise’ these beds to a higher level.  Get it?  You have a small amount of soil on top of a lot of ‘not exactly nutrient rich’ material.  The wood material is what is helping keep your beds nice and moist, but it isn’t adding a lot of umph to the growing power of your plants.  We combat that by adding organic fertilizer the first year.  I also throw every single earthworm I find into the raised bed.  You could, alternatively, add lots, and lots of compost throughout the growing season.

In fall I cut all the old annual plants at the base and allow their roots to rot in the soil all winter long.  Additionally I rake in mostly composted chicken droppings and/or mostly finished compost and let the bed set.  Do not rake it deeply into the soil (a couple of inches or two is perfect.  You want to let the earthworms, fungi, and other bugs do most of the work).  After the first year, I transition the dirt into a more traditional organic method.  I focus on building good soil out of my cheap base which is an entire topic for another post. In short,  I add compost as the season continues and by that point the soil is usually healthy enough to support year round planting!  In short, though, you can expect to get one good season just out of the crap soil.  So go out and get planting! And yes these seedlings and seeds came from my favorite vendor Sow True Seed!

How to fill your raised beds with good soil, that maintains moisture, keeps out weeds, and doesn't cost a fortune.