Posted on 11 Comments

Pantry Door Ideas: A Quick Makeover

Navy blue door with orange accents

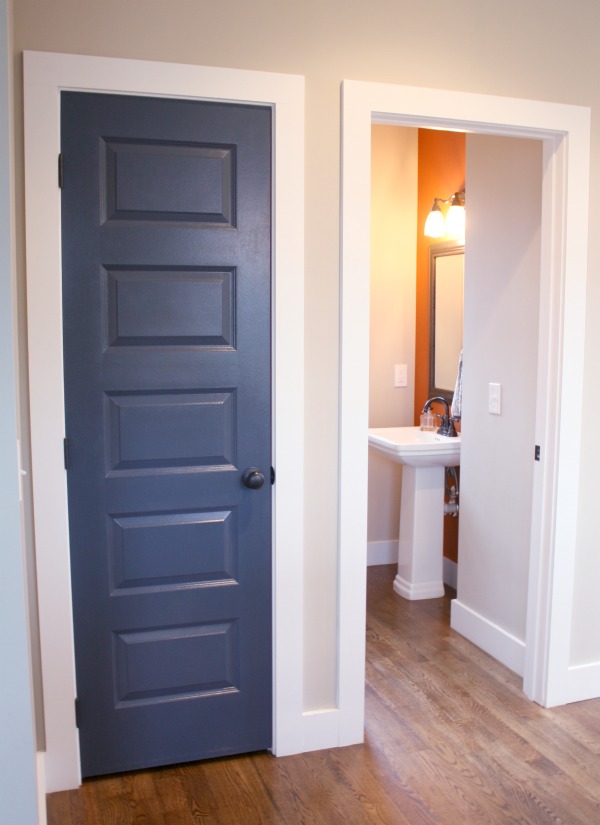
This is the first new construction house I have lived in.  Yea for 90 degree angles, boo for lack of character and patina.  Working to remedy the contractor white of the place led to a pantry door idea.  I thought I would give it a quick makeover with some navy blue blue paint.  Recalling an old Martha Stewart Article on doors, I thought it might be fun to also give the edge a pop. We had a bright orange left from painting an accent wall in the guest bathroom.  Since the navy and orange accents flowed through the entire downstairs it seemed like a good fit.

Pantry Door Ideas: Make Over Time!

Materials:

  • Paint
  • Sponge Roller
  • FrogTape :* Yes it is expensive, yes it is a name brand, yes it is worth every single cent, and no sadly frog tape is NOT paying me to say that.
Pantry Door Idea: Makeover Time
Just a plain pantry door in need of a little umph.  You can see the accent wall we added in the bathroom.

Quick Directions:

Paint the front of the door and then paint the edge…  So sarcasm aside, it is close to that easy.

First, I carefully taped the white edge, wisely realizing that it would take a number of coats of orange to cover any navy that smudges. NOT!

Of course I didn’t tape the edge the first time around.  But, I will get to that in a bit. I really wanted to take the door off the hinges, but it was impossible to get the last one loose.  Because of that I had to work really fast to not make roller marks in the glossy navy paint while only using the smallest amount of paint possible so it didn’t run down the vertical surface.  I failed, not once, not twice, but three coats.  Every evening the light would shine off the marks roller marks where I had hit an area that dried to quickly.  Ugh.

The only benefit of making that mistake is I had plenty of time to correct the door edge.  What a P.I.T.A.  I hate taping. Loath it.  However, after the first coat of orange I realized nothing short of taping a nice clean edge was going to give the effect I wanted.  I wanted the blue to show when closed and the orange to pop only when opening the door. Plus I wanted the edge to have a nice straight line.  The door had a slight bevel that was not noticeable until you ran a roller over it and smear blue or orange the wrong direction.  Seriously!  Take the time to tape this project. I was so much happier with the details once it was complete.

Navy blue door with orange accents
Just a nice navy blue door.
Navy blue door with orange accent
The kapow! Pop of orange edge.
Posted on 7 Comments

How to Make a Garden Trellis

I always admired a garden trellis covered in beautiful flowering vines behind the mailbox.  At my previous house the mailbox was actually located on the neighbor’s property so I was never able to fulfill my garden trellis dreams.  Since we have a blasted landscape of barren nothingness at the new house it seemed appropriate to try for that garden trellis.  However, a nice trellis is not exactly cheap.  In comes the DIY partner with a quick and cheap fix.

I thought it would be nice to mimic the porch railings, especially since we were planning a similar treatment around the god-awful transformer (fodder for another post).  After poorly describing, gesticulating, and finally kind of just pointing we were able to figure out a simple trellis design for the total project cost of $11.74! That is on par with the crappy wooden trellises at big box stores.  Ours was actually cheaper because we had some left over materials from recently constructed garden beds.

Inexpensive DIY Garden Trellis

Easy conduit garden trellis tutorial

Materials:

I had the construction manager, aka. Adam, send me the stats.  That is why there is such a nice cohesive breakdown of materials.  Not like my usual dash of this, smattering of that…

  • Metal Conduit: 2 – 10′ x 1/2″  (produced 10 total pieces cut to 22.5″ lengths).  Unit cost: $2.30.  Total cost: $4.60
  • Treated Lumber: (this is not going near our food producing garden beds, so treated lumber it is!) 2 – 2″ x 4″ x 8′  (4 cuts – 2 @ 6′, 2 @ 21″) Unit Cost: $3.57.  Total cost: $7.14
  • Drill
  • Drill Bit: 3/4″ (The conduit is measured by the inside so the outside is actually larger than 1/2″), and phillips-head that fits the screws
  • Exterior Wood Screws:  we used 8 – 2-1/2″ but any one that will go through the thickness of the 2″X4″ will work

Total Material Cost $11.74

conduit-trellis

 Step 1: A Cut Above

Make all the above cuts.  They are simple straight cuts.  NOW that being said, I personally, suggest getting whatever home improvement store you buy the conduit and wood from to make those cuts.  I will not even discuss how ours came to be cut (though I sometimes wonder about other un-named person’s common sense) for fear of getting sued by someone stupid enough to try that at home.  In fact use absolute caution when cutting any material.  Do not come crying to me if you end up losing an eye or finger.  I always prefer to pay the .25 for extra cuts at the home improvement store.  Makes it easier to transport in a small car and no one has to lose a digit in the process.

Step 2: Drill Team

Time to put the drill to use.  Take the long sides of the trellis.  Measure the distance from the top of the board to the thickness of your 2″X4″.  This is not going to be exactly 2 inches.  Make a mark as that is where you will join the two sides.  Then measure 6 inches down the entire length of the board for 11 places (This should result in 12 marks) Drill holes in marks 2-11. Mark 1 and Mark 12 are where you will place the crossbeams (short cuts of wood).  Make sure to drill only 1/4″-1/2″ into the thickness of the wood.  You ware not going to want to have an unsightly hole on the outside.   If you want longer posts to bury in the ground so that you can see the bottom crossbeam (we buried ours) you could space them every 5-5.5″ instead.

CAREFULLY repeat the same process on the other side.  If these do not match up then the join will result in a wonky, non-right angle, trellis.

garden trellis inprogress

drilling holes in garden trellis
Here is another view to see what we are trying to achieve by drilling

Step 3: Teamwork

Place all of your conduit in one side of the wood.  Get a partner to help you carefully match up the other side.  Cuss a bit as conduit fails to easily slide into place, drop some conduit on the ground, make a minor adjustment and have to start the whole fitting together from scratch.  Have your partner leave disgusted at being chastised for their inability to line things up properly.  Complete the line up and fit in one of the cross braces at the top and bottom.  Take your wood screws and place two on either side of the wood (8 attachments total).  Make sure to keep the wood at a 90 degree angle.  While it will still be a little shakey until you bury the post bottoms this ensures a better join.

joining the trellis crossbeams
Joining the garden trellis crossbeams

Step 4: Dig time

Step back and admire your handiwork.  Potentially on such a lovely back drop as your trashcans.  Then start digging a hole to place the trellis in.  In our case that means cutting through hardpacked red clay, seeded with the most god-awful collection of rocks.  You can potentially argue some more over whether your partner is holding their post straight as you backfill the dirt in OR also about whether the entire trellis is  even centered around the mailbox.


Check that out! And you can also get a good view of my trashcans and wrecked car (another story)

Once all parties are satisfied with the placement truly stand back and enjoy!  Now we just have to find the perfect vine… Suggestions?

Posted on 9 Comments

String Art Project: Kids Names

String Art Child Name

This string art project… Well I need to fess up.  I was the assistant! However I watched the painstaking process and tied lots of little knots.  Use this ‘how to string art’ as a guide so you can skip all the mistakes we made.  The final project was much easier than our initial attempts.

We recently moved into a new house, and have been so focused on making sure all the essentials are in that any artwork has been neglected.  Yes, I chose to be able to have a shower curtain rod and blinds over something pretty on the walls.  Where are my priorities?!  We have been working hard to blend our family structure and Adam wanted to make each of the kids a special name decoration for their rooms.  In comes lots of string! On to the project:

String Art Children’s Names

String Art Child Name

Materials Needed:

  • Base for Nails(2.5-3 ft long): You can use wood, if you really are insane and like nailing hundreds of tiny nails.  Our suggestion: Foam Insulation or Double Layered Foam Board
  • Paint: For the Base
  • Lots of tiny nails as known as Wire Nails*
  • String: Embroidery Floss* was cheap, easy, and came in tons of colors. 3-4 skeins are needed per name.
  • Print Out of Letters (2.5-3 ft long)

Step 1: All about the Base

We tried wood.  Painted lovely planks.  Then started nailing, and nailing, and hammering, and nailing some more…  And here was the final result:String Art Fail

Oh yeah, that is one letter… Just one letter! and we had four children’s names to complete.  I had the idea to use something else.  Searching the web turned up cork as an alternative.  Have you priced out that much cork?  Oh. hell. no.  Cork was not going to work.  We had mostly resigned ourselves to weeks of nailing when taking the kids to the craft store I spotted some foam board.  While it was not thick enough as is, I said “Hey!  Let’s laminate this together.” Adam look dubious, but I took the sheets home, cut out rectangles, and sprayed adhesived those beotches together.  Of course they curled up, but I remedied that by laying lots of heavy art books on top of the panels over night.  Who says I never use my art degree?

Though after doing all that we realized the giant panels of foam insulation at home improvement stores would work just as well. Doh!

Of course the finish of the panels is very plastic looking.  So we just took some paint and rolled it on.  Then dry brushed the surface a bit to give it some brush marks and texture.  Much better and looked like the original wood panels.

BONUS: The panels were so lightweight they could be hung using command strips

Step 2: Just Lay It All Out There

Yes, we had to print out the letters a bunch of times.  Basic math seemed to be beyond us (even though one of us has a math degree) and the letters were either too big or too small.  Once we had the font the right size we cut them apart so work with the panels and letter spacing a bit.

Laying out the text for string art

Step 3: Nail’er? I barely even knew her.

I know in the above fail-photo the nails were driven through the paper.  Unless you like the idea of pulling out 100’s of tiny pieces of paper DO NOT do it that way.  Simply take one nail and poke small indention around the outside of your letter.  Remove the letter and then press the nail into the foam.  Then repeat, and repeat, and repeat.  Keep pushing nails until your fingers are bloody tips.  Get smarter about it and use the hammer to lightly push them through.

Nail layout for string art
So many nails…

Step 4: String them Up

This is the fun artistic part! Weaving the string can take many forms.  We chose a random pattern, but you can carefully lay out the string to make all types geometric forms.  You can look at my craft board on Pinterest to see some other string layouts.  For fun we let the boys pick out their colors.  We may or may not have influenced the selection a bit…  The hardest part of wrapping all the string is just making it look consistent and tying the tiny knot at the end.  That was my job!

The final signs were hung over beds and on doors to give each child a nice piece of personalized artwork.

Completed string art kids names


Posted on 8 Comments

How to Repot an Orchid in Bark

Orchid root ball

Before we even begin this post let me just say that repotting orchids and orchids in general are not my strong suit.  My mother seems to have the knack for keeping an orchid alive and all tips have been learned by watching her methods.  This bark method works well for what I call the general orchid; ones you can pick up at home improvement and grocery stores (phalaenopsis for the picky of us). However, there are many types.  Research your specific variety or you may end up with a dead orchid on your hands and these suckers are not cheap!

Materials needed

  • Pots: Make these well draining!!!  There are special pots with lots of holes on the side.  I find a fast drying terracotta also works well. NO plastic.  I have a tutorial on faux finishing pots for a rustic look if you want a way to jazz up the pots.
  • Orchid bark: Available at any home improvement store
  • Orchid: Going to need something to repot

Items needed to repot an orchid in bark

Step 1: Removing the Orchid

Most orchids you buy are crammed into these tiny plastic pots and packed with moss.  This is just… no.  Orchid roots need to breathe and have excellent drainage.  While they like moist conditions, soggy roots are just asking to rot the whole plant from the inside.  Get that poor sucker out of that tiny cup and start removing the packed in moss. Tease out the roots.  Important!!!!  If you see any mushy brown roots cut them off immediately.


Orchid root ball
As you can see this one also had styrofoam peanuts for drainage. I am just not a real fan of using plastic and styrofoam in my plants… Just not my thing.

Step 2: Save Some Moss

Unless the moss is in a poor or rotted condition I save a tiny amount to mix in the bark.  I do mean tiny!  I would not go more than a 1/4 of the mix of bark and moss.  You are trying to remedy the situation of trapped soggy roots, not add to it with compacted wet moss.  The reason I add the moss is to maintain a little more moisture.  My house is very dry, so you could skip the moss entirely if you live in humid locations.

Step 3: Plunk Orchid in Pot

I am sorry this is not more complicated…  Basically throw some bark/moss in the pot, fan out the orchid roots, stick in pot, and pour more bark on top.  If a root sticks out, no worries!!!  Be aware that orchids in bark are not terribly rooted down.  Basically do not put them in a high child or cat traffic areas where they will get constantly pulled out of the pot.  Ask me how I know this…  Once I have them in the bark I set them in the sink and give all the roots and bark a thorough wet down.  Do NOT soak! Just let the water run through.  Then repeat this type of watering whenever the bark dries out.

Orchid repotted in bark
Looks like a happy orchid to me!