Posted on 124 Comments

How to Make a Chicken Dust Bath

Why you should make a chicken dust bath for your flock

So would you like to know how to make a chicken dust bath? Or even why you should provide a chicken dust bath? While, we aren’t chicken newbies anymore we still have a lot to learn about chickens. One of the things we completely missed the boat on was that chickens need to bathe. But they need to do so in dirt! I saw a picture on Pinterest of chickens laying in tires full of dirt. It was kind of an ah-ha moment as I have often observed our chickens digging holes in the run, flinging wood chips all over their selves, and then laying in the sun. Honestly, I just kind of thought my chickens were weird (and a bit lazy) and didn’t realize chickens take dust baths until I started researching it.

Why Do You Need a Chicken Dust Bath

As with everything in life, I had to over research the hows and whys of chicken dust bathing. But hey, Dear Reader, this works out for you. Chickens naturally take dirt and dig loose holes in dry soil. These soil divots are then used to fling the dry dirt all over their bodies. If you watch they will roll, flap their wings, dig, and fling dirt everywhere. Our coop is built on a concrete pad, so while there are lots of wood chips we do not have a lot of soil. I think many chicken owners who build runs with the deep litter method are in the same boat with chickens kicking up a lot of wood chips on a regular basis.How to make a chicken dust bath for your flock

But the dirt is key. A dust bath supplies chickens with a way to clean excess oil from their feathers and remove pests like mites from their feathers and skin. The chicken dust bath consists of them kicking up dirt, rolling, and flapping their wings in an attempt to coat dust all the way down throughout their feathers. The dirt soaks up oil (Picture one of those lovely mud masks ladies wear on their faces) and the grit knocks pests loose. Additionally, dust bathing is a social activity with hens. They do the activity together, often preening and napping as a flock afterward.

How to Make Chicken Dust Bath

Great! You now know why you need a dust bath but what does that look like? Well I can tell you from painful practice that if you do not provide one, the chickens will supply one for themselves. Ours are constantly digging up their run, toppling water, and generally making a huge mess! As a stop gap we are making a small dust bath out of a galvanized tub. Once we are finished with the chicken coop extension we bought an even larger tub so that multiple chickens can use it together. It is quite simple to make one you just need two items:

A Box & Dirt!

But you can make better and more attractive dust baths with a few more options. We found some attractive galvanized containers and worked to make a dust mix. All items we purchased ourselves but the links below may be affiliate in nature.Why you should make a chicken dust bath for your flock

Chicken Dust Bath Supplies
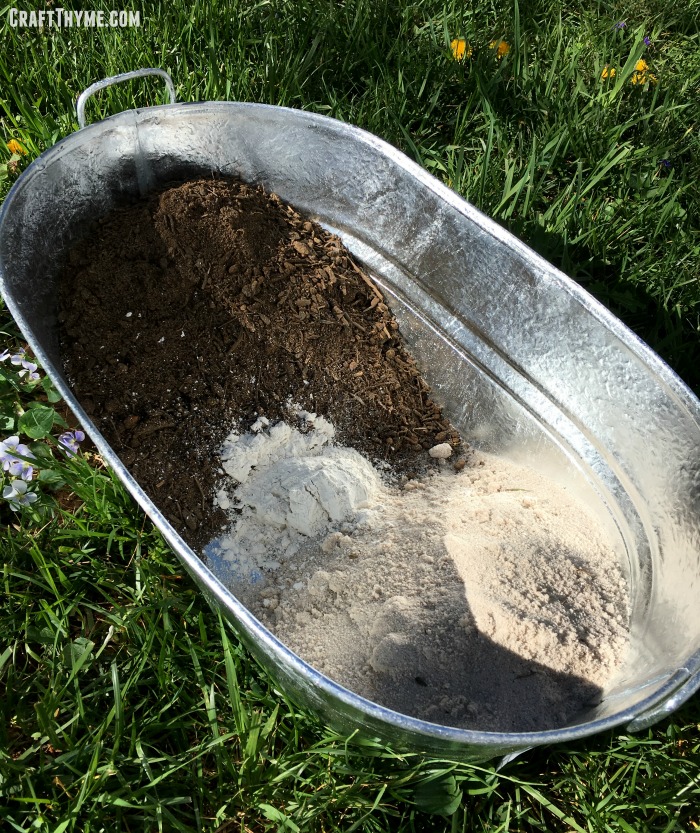
Galvanized Tub
Organic Garden Soil
Sand
Diatomaceous Earth (FOOD GRADE ONLY)
For a 5.5 gallon tub I add about 4-5 inches of depth in material. It is almost a 50/50 mix of sand and soil with a cup full of diatomaceous earth. Research shows that many people substitute sand or soil with wood ash. Also the use of diatomaceous earth can be conversational. Often used as an organic pesticide, the product is made of mining deposits of small fossilized sea creatures. It is microscopically sharp and causes insects to die by slicing them up. To humans and chickens it feels like soft talc powder. It can even be eaten (though I am not exactly sold on this idea) and is safe for kids and pets.

Some people worry that it can cause respiratory distress in chickens. I personally weighed the benefits of pest control and decided to add a bit to the bath. I live in a city limits and have to keep the ladies in a run most of the time. Closed up chickens are more likely to contract mites and pests. I try to give my girls lots of space and keep a clean coop to minimize this but I opted for a little additional aid in their bath. If you go with the diatomaceous earth feel free to tell me how we are supposed to be pronouncing it!

edit: Thank you kind readers.  I can now pronounce diatomaceous in the finest of company.

I went ahead and ordered the big bag with the thought that the cost was so much cheaper per pound and I could use this to combat slugs and the godforsaken sugar ants. Let us not get off topic about the ants! Unless I decide I really do want to start eating it or making tons of facial scrub products (yep it is good for that too) I probably have enough for years of dust baths! So the investment will be minimal.

Our New Dust Bath and Future Plans

Why you should make a chicken dust bath for your flock

The new dust bath was a hit with the ladies. Well after they decided the galvanized tub did not signal their impending chicken doom! The pros of putting it in a container is that I can make sure their is a nice clean mix that doesn’t fill the run with mud. Additionally I think it is attractive. The con is that it takes the social aspect of dust bathing away from the chickens as it only fits one or two chickens at a time. Our plan is to add this 15 gallon tub in the extension. We already purchased this bigger version and will add it to the coop when we have the space.

In the future (like next house/farm future) I would love to have free range chickens with fancy dust bathing areas like the versions you see on Pinterest. However, making one in a container is so easy I can’t believe we didn’t do it sooner. Of course it would have helped to know they existed :), but now that I know how useful and healthy a chicken dust bath is for my flock I plan to keep them well supplied.

How to make a chicken dust bath for your flock

Posted on 5 Comments

Orange or Red Front Door?

How to paint an orange front door.

I have always loved a good solid red front door.  I love the pop of color, my mother has a beautiful red door, and red front doors are even supposed to be good luck.  BUT, what happens when you have green tinted trim?  Well I can decidedly say that mauve is not the answer.  Whomever decided that a mauve front door surrounded by green-grey trim and dusty dark blue was a good combo should probably be transported back to the 80’s where they belong.

So fine, the mauve had to go (I hated it from day one) but what color to replace the front door?  I wanted it to pop but I didn’t want to be known as the Christmas house.  So a red front door had to be out.  So, what looks good with blue and green? An analogous color would blend and give the necessary contrast plus orange is my current favorite color.  Adam picked up lots of dark/muted orange swatches on his way home from work.  The rest of the house looks like the blue and green had been muted with grey.  We wanted a pop of color not a freaking eye sore.  So this is how we choose front door colors.  Actually, this is how we choose all colors.:

  1. Whoever did NOT pick them out does an initial sort.  We assume the first person only picked colors they thought might work for the color situation.
  2.  Walk to the place we plan on painting.
  3. Hold up swatches and go: No, No, Maybe, No, Oooohhhh  I like that one, No, Maybe etc.  I particularly like where we toss the No’s around with abandon.  This process should not take more than 3-5 minutes.  Just a gut choice of possible or no.
  4. Repeat step 3 with the maybe’s.
  5. Hold up the final 2 or three, possibly tape them in place (only if it is a major tie), step back and make a decision.
  6. Pick up all of those no’s or ask one of the kids to take them to the trash.

I’m pretty sure we have never spent more than 15 min choosing a paint color, and so far, have never been unhappy.  More time <> better color.

Orange Front Door Color Chosen!

Paint decided, drive to the closest hardware store and holy-mother-of-$20+ for a quart of the chosen color.  Oh hell no, I have to paint one side of one door…  We can’t use samples as they are only interior base and you really need the more elastic exterior paint for a front door; even a porch protected one like ours.  We end up consulting with the paint counter specialists.  They point us to a much cheaper brand.  You may have to put on an extra coat but the end result is just as durable and color rich.  They end up color matching our chosen swatch and away we go!

Time to Paint the Orange Door

The same person who chose the horrific mauve also hired the laziest painters in the world.  Our house was new construction and for some unknown reason the painted the door, in place, with the hardware on.  Drips, brush marks, and paint splattered hardware abound.  The only way to truly fix all those issues was to sand it away.  Frankly, I have a life so we opted to smooth out their mistakes by removing the door hardware, taking the door down, painting it on sawhorses, and using a smooth foam roller.  That way I could get a smooth even coat with a thickness to hide some of the worst brush strokes.  Oh and did I mention this is a wood door clad in metal. Yeah I have no idea what is going on with that either.  What I do know is how a wood door is made, so, I painted all the sections as if they were assembled and had a wood grain.

Deciding on a red front door versus orange front door.
Check out the mauve situation we had going on.

First Coat

ROOKIE mistake.  I have been painting a long time.  What should you never do? Paint in the direct sun. Especially a god-forsaken door.  Painting a door is already a race to try to get all the panels painted with vertical strokes and the top, middle, and bottom in horizontal center pieces. ALL with smooth brush strokes. I thought I could get away with it since it was on the cooler side.  Nope.  Big cup of nope.  If this happens to you then do what I did and just rolled on a THIN patchy first coat let it dry in the .5 seconds it will take and move your painting location.  I moved to the backyard in a nice shady spot to roll on a nice thick coat.  Seriously, move to the shade.  Joking aside, it allows for a nice wet edge.  That is great when you want to make sure all the roll marks match on the panels.

Rolling Away

As the mauve paint disappeared and the orange darken I was certain we had made the right choice.  A nice pop, toned to mesh well with the existing house colors.  We liked it so much we even made ‘Orange Front Doors’ for the chicken coop.  They have winter panels we have to make them warmer when it is cold.

How to paint an orange front door
Adam said we needed an action shot. Here is my attempt to make rolling paint interesting.

Even if you can not do a red door think about a fun door.  Orange, yellow, a deep emerald green; so many choices beyond a basic white front door.  THOUGH, white is going to be a vast improvement over mauve.  What colors do you have for your front door? I would love to hear in the comments or email me a picture!

How to paint an orange front door.
I need to make a pretty vanity shot! We installed new hardware too.


Posted on 12 Comments

Hardy Grape Kiwi: Plant Porn

Did you know there was such a thing as a grape kiwi (aka baby kiwi, kiwi berry, or hardy kiwi)?! Is it possible to get almost fan-girl squeely over a plant? Did you know that this kiwi not only comes in green and red, it grows in temperate zones? Oh yes folks! I can grow a kiwi in zone 6. A teeny tiny kiwi that you do not even have to peel! There are actually larger hardy kiwi’s, but this post isn’t about them. This is about the adorable grape kiwis.

Grape kiwi size comparison, Image by Hiperpinguino, CC License
Image by Hiperpinguino, CC License.  Check out the tiny kiwis in front for comparison

The Low Down on Grape Kiwi’s

Grape Kiwis are a hardy kiwi type (Actinidia arguta). Say ak-ti-NID-e-a ar-GU-ta three times fast. The tiny kiwi’s grow in groupings that look much like grape bunches. They have thin edible skins and come in the traditional green kiwi color and also a red shade. Descriptions of the fruit are sweeter kiwi flavor with hints of pineapple. Yum!

These vines likely originated in Japan, China, or Russia which means they can survive temperatures of -34. Yippy for zones 5-9! Many of the cultivated vines you can buy have been bred in Russia, which, seems kind of cool. Maybe even give me some garden cred: “Check out my special Russian Kiwi!” I always picture scenarios where I am showing my lawn off to other gardeners… When in reality I am pretty sure I drive everyone around me nuts with my love of plants.

Annanasnaja kiwi from Raintree Nursery
Image from Raintree Nursery. I am thinking of buying these Annanasnaja kiwi

The deciduous vine grows glossy green leaves with scented white flowers. In perfect conditions you can have a 20 foot vine in a growing season so careful trellising can give you an ornamental attractive vine. Sitting in the shade of softly scented vine sounds like a summer pleasure to me. Bonus, the flowers and scent should be attractive to butterflies. Fruit should be ripe in the fall for fresh eating.

Edit: I just ended up buying these three kiwis!  I can’t wait to see how they do*:


How to Grow

Alright, there is a downside to the grape kiwi or maybe an upside depending on your space. You need to have at least 2 vines. Male and female (romantic lover vines ;)) are a must if you want to produce the fruit. Luckily one male is up to the challenge of pollinating anywhere between 6-8 female vines. That means you can have a red grape kiwi and a green grape kiwi and one male will work for both of them.

I have read conflicting information on how far to place the male and female plants away from each other. Most information points to one male being able to pollinate 8 female plants. You’ll need to space these suckers out because if they have the right conditions a single vine can grow 20 feet in a year. WOW! Sounds like a great way to make a vining screen, just remember they are deciduous so all the leaves will disappear in the winter. The recommended spacing is 10 feet apart. I personally am going to plant mine much closer, but I am into backyard orcharding so I plan to prune, prune, prune to keep these babies in shape and in size. WHICH! Is highly recommended. Do not forget this is a vigorous plant that grows for years. Have a sturdy trellis! We built one with 4×4 posts in concrete. Additional bracing to match our composting fence and 14 gauge wire with tightners (turnbuckles). This puppy is going no where.

Planting itself seems a bit finicky. Like every plant under the sun it needs organic, well draining soil. BUT unlike most plants this one NEEDS it. Apparently, they originally grew in forest type settings and are used to having a lot of organic matter and trees to climb. Additionally, heavy wet soils contribute to crown rot. On top of that site selection is muy importante to this plant if you want to get fruit. Sure they are hardy, but their spring growth is very frost sensitive. So you are going to need to find a location that keeps it cool as long as possible so it doesn’t come out of dormancy till the last minute and still gets full sun. Sounds like fun right? So here is my plan to place this plant in a zone 6b-7a. The mountains of Western North Carolina where I am assured to have 80 degree weather followed by a snowstorm in spring and I somehow managed to have a house built on a clay shelf so I have to deal with basically everything that will make this a PITA to get going.

  1. Dig a much deeper hole and put lots of soil amendment (tiny bark shavings) at the bottom. Layer in dirt and compost and plant the kiwi plants slightly above the ground line. Hilling them up will help with the drainage but I am going to have to remember to mulch the hell out of them in fall to protect the first year roots…
  2. The trellis site is on the southwest side of my house set slightly back. That means that it gets shaded in the mornings and some even in the afternoons but gets some amazing direct light during the day.
  3. We are going to use the male to train on our porch to the west side. First, he doesn’t have to be quite as protected. Secondly, you can prune the heck out of him. He just needs enough growth to set flowers. Finally, we will get the added benefit of some shade in the afternoons where our porch mostly bakes. In the winter we will still get the warm sun since the vine will lose its leaves.

I’m game to try these grape kiwis though from the planting info they seem like they may need a little extra care than a beginning gardener might want to try. Just being honest, I’m a tiny bit nervous about this purchase, but almost everyone agrees that if you can get them off to a decent start they are easy after the first year.


Image from Hiperpinguino, CC license

Kiwi Berry Care

Assuming that everything grows off without a hitch (Get it? har, har, har) the care is not that big of a deal once you get them established. Pruning the growth if you have a small space becomes incredibly important. You will want to train a central vine and then let it umbrella shape from there. Once it gets to the top of your trellis cut it off and focus on keeping it that height. The first year or two prune for shape and prune regularly throughout the growing season. Tie the main branches to the trellis to keep them from getting wound around. Small branches can twine without worry of causing bad growth later on. After the first couple of years you can read in depth articles about the best way to develop fruiting wood. Lots of opinions out there, but by that time you’ll be a seasoned kiwi grower able to experiment with different choices. Sources disagree on how long each variety takes to set fruit. I have read anything from year 2 to year 5! So I’ll update this with my own experiences later. Remember that it likes a lot of organic matter so side dress with compost regularly throughout the growing season and in the fall and spring like other fruit trees and bushes.

Once you get past the initial hard phase of growing hardy kiwis the vine is supposed to last for years and years. Just prune, fertilize and repeat. Flowers will set fruit that ripens September through October depending on variety.

So, I’m set to try my hand at growing a grape kiwi. This hardy plant should be good to go if I can get it established. Wish me luck on my tiny, hardy kiwi experience.

Posted on 15 Comments

Goodnight Moon Theme Birthday

Details of how to create your own Goodnight Moon birthday Party
Goodnight Moon has been a staple throughout my Son’s lives.  I have to admit that I originally did not see the appeal but after reading the book 6+ years I have grown to love it.  It seemed fitting to have a Goodnight Moon theme party for our last son’s first birthday.

However, have you ever tried to find goodnight moon themed items for parties?  Apparently, this book hasn’t reached massive commercialization.  I found some good items on Etsy but instead of purchasing I decided to DIY it.  Never underestimate the power of a scanner!

One of the most notable parts of the book is the color scheme.  Can we say “Great Green Room”?  The shades of green, red, yellow, and blue are unmistakable.  I used those colors as the base for my decorations.  We purchased matching plates, napkins, and silverware in a mix of those colors.

Details of how to create your own Goodnight Moon birthday Party

Since I wasn’t using the book for my own commercial gain I felt inclined to scan away and looked through google images to find source material.  I printed out some of my favorite scenes to place in frames and make a centerpiece for the buffet.  I also sat out the tattered copy of Goodnight Moon and Our World (the companion book).  Adam, filled out that buffet space with lots of yummy grilled items!
Details of how to create your own Goodnight Moon birthday Party

It is possible to purchase some adorable mouse wrapping paper.  However, by the time I found it, it was too late to get it shipped to my house.  You know what does work?  Tiling images in Picmonkey and taping together sheets of paper.  Trust me, no one year old actually notices his present is made of lots of small sheets of paper.  For that matter I do not think anyone noticed and it added a pretty pop of on theme color.
Details of how to create your own Goodnight Moon birthday Party

Obviously, at a Goodnight Moon theme party you will need a moon of some sort.  I looked through my cardstock stash and found some metallic white and silver paper.  I used a plate to make a nice circle and cut out a moon and then hand cut lots of stars.  The cutting took a bit but it was fun.  I lightly drew lopsided stars in pencil and then cut out a couple of sheets at a time.  The book has all kinds of wonderful and playful star shapes so my hand cut items matched perfectly.  I simply taped them to fishing wire and hung everything from the light fixture Adam hand crafted.

Details of how to create your own Goodnight Moon birthday Party


No first birthday party is complete without CAKE!  Well cupcakes in this case.  You may think what you like but I ordered them from Sam’s Club.  They were super helpful matching the colors and they tasted great.  To make them extra special we printed out tiny scenes from the book and made toppers with similarly colored toothpicks.  Keaton got a special moon on top of his too!  I would say he very much enjoyed his treat!


Details of how to create your own Goodnight Moon birthday Party


Finally, I made a fun game for both the adults and kids in attendance.  I printed out 10 1/2″ images of the elusive mouse from the books.  I then took the tiny mouse and taped him throughout the downstairs to windowsills, doors, Keaton’s highchair, etc.  Everyone spent the day trying to find all 10!

With just a little ingenuity and a lot of Goodnight Moon inspiration we were able to come up with a creative and affordable theme party to celebrate the last first birthday in our house.  Well that is until we have the grandkids.  :)  If you are not into DIY like we are or wanted some great gifts Amazon has some adorable merchandise.  Affiliate links below.


Details of how to create your own Goodnight Moon birthday Party

Posted on 18 Comments

It Is Not Too Late to Start Seeds

Start Seeds with this template

Guess what? If you live Zone 7 and above March and even into April is not too late to start seeds indoors and you have the WHOLE outdoor seed planting season ahead. (Get those peas and spinach out today!) If you have no idea of the timing of seed planting both indoors and outside I will walk you through the process and offer free Seed Planting Guides for vegetables at the end of this post.  These free seed starting templates are meant to be used for whatever zone you live in! I have even had someone from the Southern Hemisphere say they work for them.

Start Seeds with this template


So What Can You Plant?

Joking aside the peas and spinach need to go outside ASAP. They should have been out the first couple of weeks of March, but depending on how hot spring is you should be able to get a good crop of snap peas and spinach in before they wane and bolt. So now that, that is out of the way here are some things you can start indoors today to plant out in early may.  Affiliate links to my favorite local seed vendor to follow!  In case you want to order some of these beautiful seed packets for yourself.

Summer Squash: Zucchini, Patty pan, Yellow, etc
Winter Squash: Butternut, Acorn, etc
Melons: Watermelons, Cantaloupe
Eggplant
Nasturtium
Zinnia
Marigold

Obviously, most of these plants grow well planted straight outside, but if you have a shorter season (as I do in mountainous Western North Carolina) getting an extra month can be really useful to get larger, riper, fruit. Plus who doesn’t love flowers?Seed Starting Guide


How to Know When Can you Plant

When to plant your seeds indoors and outdoors all depends on the frost! You can find your average frost free day by Googling. Also the Farmers Almanac has a great list by major cities. So once you have this all important date you’ll need to know how many days before or after that date your seeds can be planted. Such as 7 days before, will tolerate light frost, -1 week, etc. Then you will also need to know how many days the transplants need to actually grow. Additionally you can factor in how long germination takes and WHOA! Are you overwhelmed yet? Trust me it is not too late to plant yet AND I am going to break this down so it is super easy! And if the breakdown still doesn’t make sense then I am going to offer you a free spreadsheet or google doc that you can just plug in numbers and get your dates! How much more simple is that?

The Magic Formula

To Plant Indoors: Frost Date + (Weeks Before Or After Frost – Weeks Needed to Grow Indoors)
To Plant Outdoors Seeds or Transplants: Frost Date + (Weeks before Or After Frost)

Let’s run through an example:

Cabbage can be transplanted. It needs about 42 days (6 weeks) of indoor growth and can tolerate frost. So we can plant it about -21 (3 weeks) days prior to the last frost free day. My average frost free date is 4/24/2016.

Indoors: 4/24/16 + (-3 – 6 weeks) = 2/21/2016
Outdoors: 4/24/16 + -3 weeks = 4/3/2016

So, are you saying?! “Ugh, math? And where do I find all this information anyway?” Well I have the answer for you. For the old school I have a printable pdf Seed Planting Guide for vegetables, flowers, and herbs so you can calculate when to start seeds for yourself. It has additional information about depth, spacing, thinning, and seed saving. You will still have to do the math and look at a calendar. Though you can use this handy website to plug in weeks and get a date.

For the New school I am offering a free spreadsheet where all you need to do is plug in your frost free date and when to start seeds, both indoors and out, just populates throughout the sheet. I also have a pared down version of the Seed Planning Guide in a Google Doc you can copy and use for yourself. I know not everyone has excel just hanging out on their computer or phone.

Free seed starting planning

Excel Seed Starting Template

PDF Seed Starting Template

Google Seed Starting Template

Free Seed Starting Templates