Posted on Leave a comment

A Felt Christmas

We want to wish you a Merry Felt-mas!  While much of our Christmas decor was Star Wars themed the other side of the house was all about felt Christmas.  I fell in love with some small felt Christmas birds a couple of years ago and the felt just grew from there.  Now we have even more felt birds, banners, trees, wreaths, table runners…  The felt list goes on and on.  You name it and we have felt Christmas’d it.  So to finish out this year’s Christmas posts and give you a final tour we welcome you to our felt Christmas.

Felt Christmas Decorations

In keeping with the felt Christmas theme we try to keep everything simple, cozy, and shades of red, green, and white.  The mantel features enough stockings for our family of six, a simple cut fabric banner, felt wreath, and some little felt animals.  We have a few Christmas pillows, that while not felt, have a warm crewel embroidered snowflake and birds.  Oddly, enough I don’t really even like birds that much IRL.  Apparently, I just like the felt ones.

Felt Christmas Mantel

In case you need some of your own felt Christmas birds I found these adorable ones on Amazon. (Affiliate links to follow)

Felt Christmas Birds

Since this is our main living room we put the live Christmas tree in there.  You will notice that the wreath is hung with the same ribbon on the tree.  I try to be all uniform and snazzy like that.  I have finally managed to replace 95% of my plastic ornaments with glass ones.  If you look closely you can see some mercury glass ornaments with everyone’s initials.  That was a splurge (even when they were on sale) from Anthropologie last year.  To add some pops we have started collecting white ceramic and glass ornaments.  Nothing really pops like white on a dark green tree.  Adam and I spent a lot of time carefully placing and re-placing each other’s ornaments.  Until we gave up on either of us getting them exactly like we wanted them.  Compromise is the soul of Christmas right?

Mercury glass letter Christmas ornaments

We add LOTs of lights (Cause why not make it glow like a thousand suns?!), crystals, but also some pretty cardboard stars to keep it glimmery but in keeping with the rustic felt Christmas theme.

Red, white, and gold Christmas tree in a felt Christmas living room.

The TV stand features a cut snowflake runner in… you got it… red felt.  With a matching tree like the one on the mantel and, of course, more felt animals.

Finally the bookcase showcases my true obsession with felt animals.  In case the fox and squirrel vignette wasn’t enough we also have a quartet of birds in felt camping and snow gear.  Don’t worry there are also Christmas books for the kids on the bookcase and a nice wooden ‘JOY’ sign to break up all the felt goodness.

Felt Christmas Animal Vignette

So if you are feeling our felt (and even if you aren’t) we just want you to know we wish you a Merry Christmas and a Happy New Year… felt Christmas style!

–Sincerely,

Adam & Brianna

Felt Christmas Birds

Posted on 15 Comments

Goodnight Moon Theme Birthday

Details of how to create your own Goodnight Moon birthday Party
Goodnight Moon has been a staple throughout my Son’s lives.  I have to admit that I originally did not see the appeal but after reading the book 6+ years I have grown to love it.  It seemed fitting to have a Goodnight Moon theme party for our last son’s first birthday.

However, have you ever tried to find goodnight moon themed items for parties?  Apparently, this book hasn’t reached massive commercialization.  I found some good items on Etsy but instead of purchasing I decided to DIY it.  Never underestimate the power of a scanner!

One of the most notable parts of the book is the color scheme.  Can we say “Great Green Room”?  The shades of green, red, yellow, and blue are unmistakable.  I used those colors as the base for my decorations.  We purchased matching plates, napkins, and silverware in a mix of those colors.

Details of how to create your own Goodnight Moon birthday Party

Since I wasn’t using the book for my own commercial gain I felt inclined to scan away and looked through google images to find source material.  I printed out some of my favorite scenes to place in frames and make a centerpiece for the buffet.  I also sat out the tattered copy of Goodnight Moon and Our World (the companion book).  Adam, filled out that buffet space with lots of yummy grilled items!
Details of how to create your own Goodnight Moon birthday Party

It is possible to purchase some adorable mouse wrapping paper.  However, by the time I found it, it was too late to get it shipped to my house.  You know what does work?  Tiling images in Picmonkey and taping together sheets of paper.  Trust me, no one year old actually notices his present is made of lots of small sheets of paper.  For that matter I do not think anyone noticed and it added a pretty pop of on theme color.
Details of how to create your own Goodnight Moon birthday Party

Obviously, at a Goodnight Moon theme party you will need a moon of some sort.  I looked through my cardstock stash and found some metallic white and silver paper.  I used a plate to make a nice circle and cut out a moon and then hand cut lots of stars.  The cutting took a bit but it was fun.  I lightly drew lopsided stars in pencil and then cut out a couple of sheets at a time.  The book has all kinds of wonderful and playful star shapes so my hand cut items matched perfectly.  I simply taped them to fishing wire and hung everything from the light fixture Adam hand crafted.

Details of how to create your own Goodnight Moon birthday Party


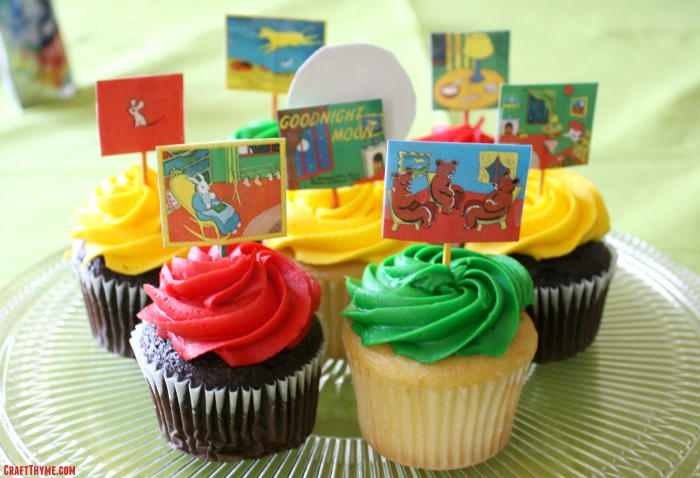
No first birthday party is complete without CAKE!  Well cupcakes in this case.  You may think what you like but I ordered them from Sam’s Club.  They were super helpful matching the colors and they tasted great.  To make them extra special we printed out tiny scenes from the book and made toppers with similarly colored toothpicks.  Keaton got a special moon on top of his too!  I would say he very much enjoyed his treat!


Details of how to create your own Goodnight Moon birthday Party


Finally, I made a fun game for both the adults and kids in attendance.  I printed out 10 1/2″ images of the elusive mouse from the books.  I then took the tiny mouse and taped him throughout the downstairs to windowsills, doors, Keaton’s highchair, etc.  Everyone spent the day trying to find all 10!

With just a little ingenuity and a lot of Goodnight Moon inspiration we were able to come up with a creative and affordable theme party to celebrate the last first birthday in our house.  Well that is until we have the grandkids.  :)  If you are not into DIY like we are or wanted some great gifts Amazon has some adorable merchandise.  Affiliate links below.


Details of how to create your own Goodnight Moon birthday Party

Posted on 15 Comments

Vases from Butternut Squash

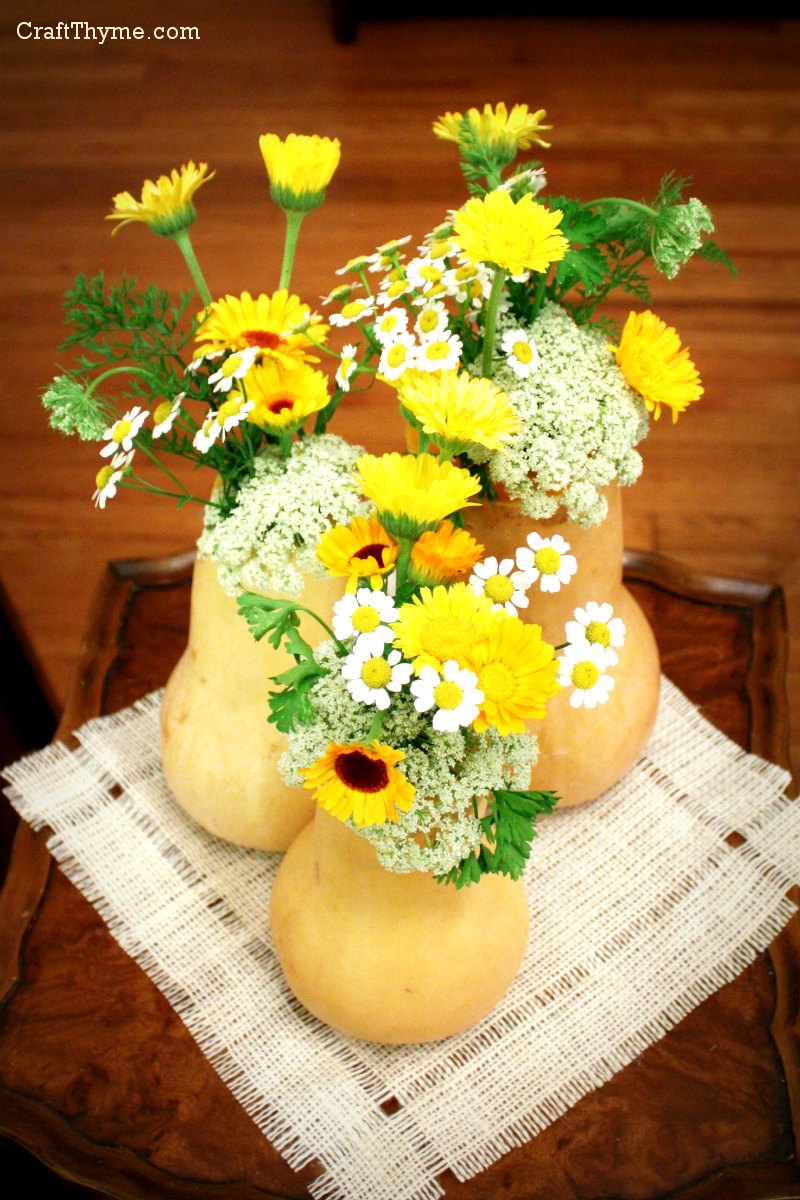
Autumn vases created from butternut squash

If you haven’t read Monday’s post this is going to seem like a rather odd tutorial. I have a few of those from time to time. But I’ll shall forge ahead showing you one of my favorite ways to use vegetables and fruit: As decorative containers.

Autumn vases created from butternut squash
See? This does look cooler than the title implies.

Supplies (not shown because… well you read the list)

Butternut Squash (or similar gourd-like vegetable)

Knife

Long Handled Spoon

Floral Foam/Oasis or Test Tube

Step 1: Get an adult who can actually use a knife properly

DIY squash containers step 1, cutting the lid

‘Knife Skills’ are not my specialty but I found using a sharp steak knife to saw at the squash allowed for a straighter, cleaner cut that could be completed while the squash was standing upright. This is important because no squash sits perfectly level. You have to actually sit them on a flat surface then cut parallel to the surface of you want a nice flat vase-like top.

Step 2: Scoops Away!

DIY Autumn vase from butternut squash, step 2 hollowing it out.
So much less yuck than cleaning out pumpkins!


Use the same knife to begin hollowing out the squash. Follow up with a long handled spoon to get way down in the neck.

Step 3: Hold your Water

Butternut Vases Step 3: Options to hold water

Depending on how long you want to keep your arrangements you can use one of the two methods. The first way I insert a vial to hold water. You can get them in floral supply sections, however, I use leftover plastic ones from my husbands home-brewing hobby. They started their life holding yeast cultures. This method works well for longer periods. The squash can dry a bit and that keeps it from molding and deteriorating as fast.

The second method just jams pre-soaked floral foam into the vase. I have found the butternut squash will hold the wet foam without leaking. However, because the squash is constantly in contact with moisture it will mold much quicker. This method is a great option if you want them for a dinner party or just for a couple of days. And much easier since you won’t have to hollow out the squash as far to accommodate the vial.

So am I crazy? Or does anyone else use fruits and vegetables in decorating? If you do I’d love to hear in the comments below.

Posted on 9 Comments

Liquid Leaf

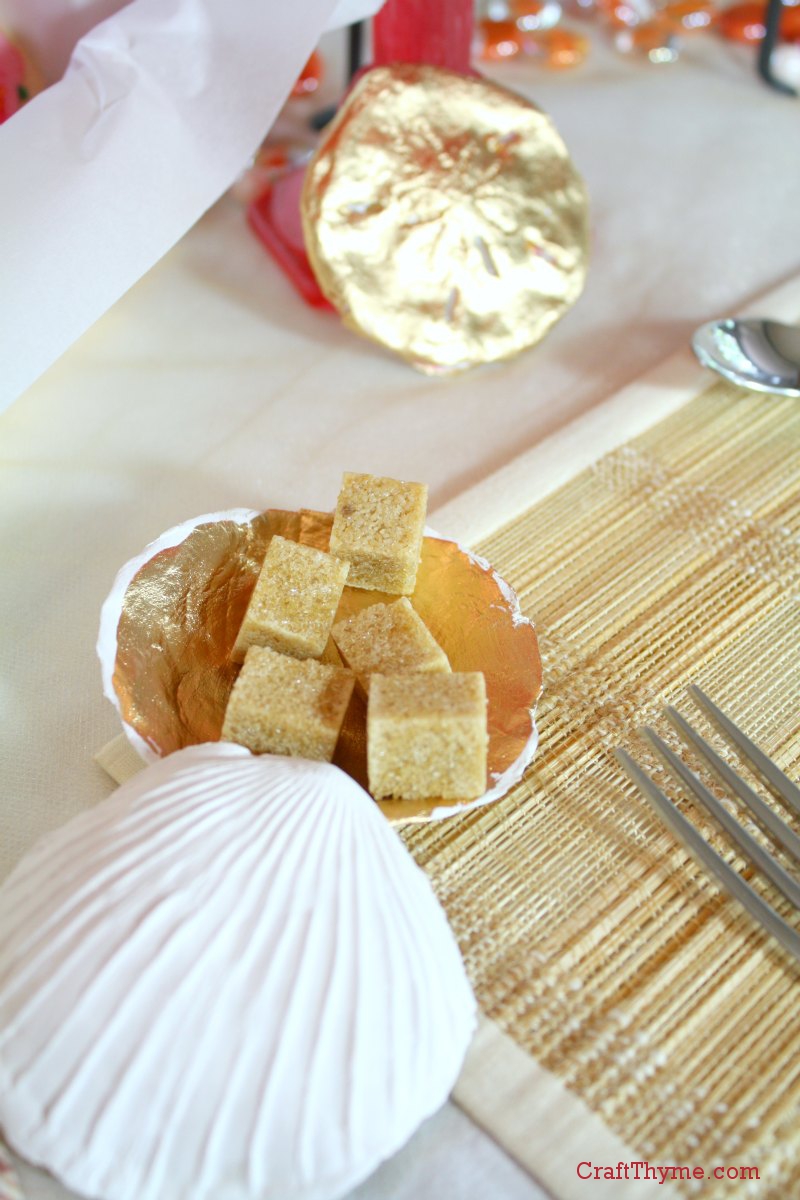
The sugar cube seashell holder and sand dollar were made out of paperclay and covered in liquid leaf. I like the poured look.

This isn’t so much a tutorial as more an answer to a few inquiries I had about the gold elements from the Pink Lemonade Table Decor.  There are a variety of metallic paints, waxes, glazes, leafs, foils, etc. for when you want to add shine to a project.  Each one has a place depending on the project and the look you are going for.  In this case I wanted a poured metallic look to cover the inside of real and scultped seashells and the outside of paperclay sand dollars.

I used Liquid Leaf* to finish these items. The below picture is from Plaid’s website. They have not paid me to say these nice things. In fact I doubt they know this website exists…

Liquid Leaf

You can achieve a leaf-like finish by thickly brushing on a coat and letting it dry.  I use some throw away flux brushes so I don’t have to worry about clean up.

The sugar cube seashell holder and sand dollar were made out of paperclay and covered in liquid leaf. I like the poured look.
The paperclay items did need a wash of thin white acrylic paint so that the leaf wasn’t immediately sucked into the surface. Trust me, I forgot to prime one of them and it used a ton of leaf and left lots of paint strokes.

You can get a metallic accent by brushing a thin coat on as I did with this Goodwill tray.  I did white-wash it with a layer of acrylic paint first and then used the liquid leaf along the bottom edge.

tray accented with liquid leaf

Finally liquid leaf works well on a lot of materials.  I finished the inside of real seashells as well as my faux created ones.

Vignette with various items accented in liquid gold leafTo be honest I initially planned on using rub-n-buff but I couldn’t find the tube in the basement.  However, I like the look of poured and cast metal that the liquid leaf created.  I’ll definitely use it again when I need this particular effect.

Notes

Make sure to put a thick coat on if you want a poured look.

DO NOT touch until fully dry.  Just don’t.  Let it dry.

You may need to cover the with a clear acrylic top coat.  Tarnish can occur and heavy use items will rub.

It stinks.  Ventilation is key.  Otherwise it is easy peasy to apply.

Enjoy these articles?  Get periodic updates by joining my mailing list (no spam, no way, no how) or subscribing to my RSS feed.