Posted on 15 Comments

Goodnight Moon Theme Birthday

Details of how to create your own Goodnight Moon birthday Party
Goodnight Moon has been a staple throughout my Son’s lives.  I have to admit that I originally did not see the appeal but after reading the book 6+ years I have grown to love it.  It seemed fitting to have a Goodnight Moon theme party for our last son’s first birthday.

However, have you ever tried to find goodnight moon themed items for parties?  Apparently, this book hasn’t reached massive commercialization.  I found some good items on Etsy but instead of purchasing I decided to DIY it.  Never underestimate the power of a scanner!

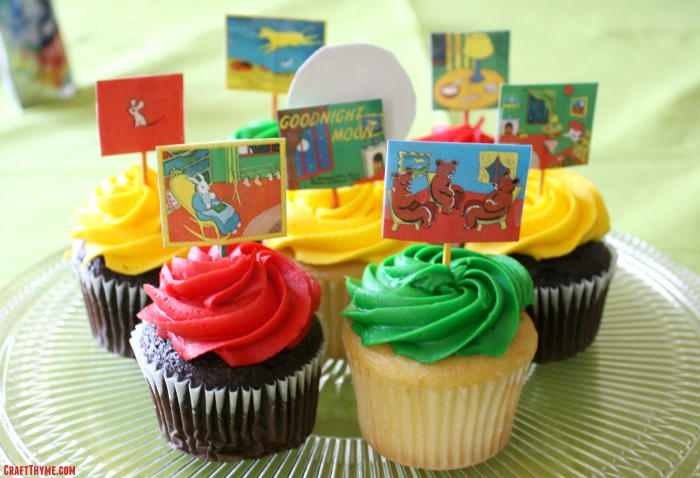
One of the most notable parts of the book is the color scheme.  Can we say “Great Green Room”?  The shades of green, red, yellow, and blue are unmistakable.  I used those colors as the base for my decorations.  We purchased matching plates, napkins, and silverware in a mix of those colors.

Details of how to create your own Goodnight Moon birthday Party

Since I wasn’t using the book for my own commercial gain I felt inclined to scan away and looked through google images to find source material.  I printed out some of my favorite scenes to place in frames and make a centerpiece for the buffet.  I also sat out the tattered copy of Goodnight Moon and Our World (the companion book).  Adam, filled out that buffet space with lots of yummy grilled items!
Details of how to create your own Goodnight Moon birthday Party

It is possible to purchase some adorable mouse wrapping paper.  However, by the time I found it, it was too late to get it shipped to my house.  You know what does work?  Tiling images in Picmonkey and taping together sheets of paper.  Trust me, no one year old actually notices his present is made of lots of small sheets of paper.  For that matter I do not think anyone noticed and it added a pretty pop of on theme color.
Details of how to create your own Goodnight Moon birthday Party

Obviously, at a Goodnight Moon theme party you will need a moon of some sort.  I looked through my cardstock stash and found some metallic white and silver paper.  I used a plate to make a nice circle and cut out a moon and then hand cut lots of stars.  The cutting took a bit but it was fun.  I lightly drew lopsided stars in pencil and then cut out a couple of sheets at a time.  The book has all kinds of wonderful and playful star shapes so my hand cut items matched perfectly.  I simply taped them to fishing wire and hung everything from the light fixture Adam hand crafted.

Details of how to create your own Goodnight Moon birthday Party


No first birthday party is complete without CAKE!  Well cupcakes in this case.  You may think what you like but I ordered them from Sam’s Club.  They were super helpful matching the colors and they tasted great.  To make them extra special we printed out tiny scenes from the book and made toppers with similarly colored toothpicks.  Keaton got a special moon on top of his too!  I would say he very much enjoyed his treat!


Details of how to create your own Goodnight Moon birthday Party


Finally, I made a fun game for both the adults and kids in attendance.  I printed out 10 1/2″ images of the elusive mouse from the books.  I then took the tiny mouse and taped him throughout the downstairs to windowsills, doors, Keaton’s highchair, etc.  Everyone spent the day trying to find all 10!

With just a little ingenuity and a lot of Goodnight Moon inspiration we were able to come up with a creative and affordable theme party to celebrate the last first birthday in our house.  Well that is until we have the grandkids.  :)  If you are not into DIY like we are or wanted some great gifts Amazon has some adorable merchandise.  Affiliate links below.


Details of how to create your own Goodnight Moon birthday Party

Posted on 8 Comments

Sea Shells & Lemonade = Table Decor?

Sea shell inspired table decor.

I initially had the idea for this table setting from some sea shells I found when scrounging through my mess of a basement.   I had saved a small bag of pink scallop shells and thought they would make a good basis to start my summer decor.  Though I live  in the mountains my second love is the beach.  I wish I was a lake girl, since so many lakes are so much closer, but the mud, the dark water, the…  Nope it is sand and surf for me.  However, any good mountaineer knows overdoing the surf theme just seems out of place.  So here is my hybrid of pink, salmon, & gold.  Call it pink sand, shore, and lemonade inspiration.

Table decor inspired by pink sea shells
I’m so good at naming tablescapes… #sarcasm. Please suggest better names in the comments! Please!

The table setting is anchored by a diy ribbon chandelier (tutorial here) above and gold tulle net runner below.  The gold accents unify the various shades of pink that run from rose to salmon.  Shoo… okay I can say I used my art degree today to critique my design.  Now on the the fun stuff!

PINK LEMONADE CUPCAKES!

I knew I wanted some fun pink desserts and, thank the grocery gods, I walked by a display for Pillsbury pink-lemonade cupcakes.

Table setting inspired by pink seashells
Read below to learn more about my awesome baking skills.

Yes I can bake…  But can I decorate a cake?  Oh hell no.  It is a crafting skill that is just beyond me.  Knowing this, I often take the easy way out with mixes, pre-made icing, and sugar sprinkles.  As far as I can tell sugar sprinkles cover a multitude of sins.  Plus who could walk away from a thing of icing labeled ‘Pink Lemonade”.  And I swear I am not getting paid by Pillsbury to say all this awesome stuff.  Though, if they would like to, feel free to give me a ring.

Pink and Gold table decor
I like to call this the sugar, sugar, sugar portion of the table

Oh my!  I almost forgot mixed berry sangria!  Perhaps I should preface this with my Facebook status:pink-fb-statusNot to be a braggart but I make multiple awesome sangrias.  Citrus, berry, peach, etc… One for every season.  The recipe for this mixed berry and lemonade one will be up Thursday!

Salmon and Pink place settings
Gold Finger! A tutorial for creating your own gold sea shells and sand dollars from paper clay is in the works.

One of the things I enjoyed most about creating this display was learning to gold foil fabric (tutorial coming).  I thought the ombre dyed napkins (another upcoming tutorial) really set of each place setting because of the gold edging.  I’ll leave you with one more picture and a list of craft tutorials and how-tos required to recreate this summer table decor.

Sea shell inspired table decor.


I would love to have a better name and ideas on what you like or would improve.  Every table display is a learning experience so please leave comments.  Other than the cupcakes… Those mo-fo’s were delicious!

Tutorials:

How to Dye Sand

Permanent Sea Glass Finish

Modern Ribbon Chandelier (yes it is supposed to look like that)

Mixed Berry Sangria

Ombre Dyed Napkins

Gold Foiling Fabric August 8, 2013

Mold Making from Polymer Clay (Gold Seashells and Sand Dollars) I have photos and how tos but I am not sure how many people like to sculpt and make molds…  I may or may not post a tutorial.

Enjoy these articles?  Get periodic updates by joining my mailing list (no spam, no way, no how) or subscribing to my RSS feed.

See more great crafts and decor at these link parties: Our Home Away From Home, Today’s Creative Blog, Daisy Cottage Designs, Shabby Creek Cottage, House of Hepworths, Live Laugh Rowe, The Crafty Blog Stalker

Posted on 3 Comments

Creating a Modern Ribbon Chandelier

How to make a modern ribbon chandelier

DIY ribbon chandeliers are showing up everywhere from weddings to backyard dinners.  This tutorial will show you how to create a modern take on a ribbon chandelier.  The pink and gold color scheme is part of an overall sea themed summer table setting I will be revealing over the next few weeks, provided no more of my crafts fail.  Let’s get down to bid-ness:

How to make a modern ribbon chandelier

Supplies:

Ribbons

2 Hoops in 2 sizes (You can use wire, hoola hoops, etc. but at 1.20 the inside of an embroidery hoop was where it was at)

Wire (Thin floral wire is fine, unless you plan on wiring a heavy light or are making a very large hoop)

Spray Paint

Hot Glue (if you have a low-temp glue gun that’s a good choice here)

Scissors

Note on Ribbon Selection:

I laid a bunch of ribbon out first to see if I liked the color combination.  I wanted to make sure

Supplies for a diy ribbon chandelier

Step 1: Wiring the Hoops (This step is the longest.  I promise.)

The arrangement of hoops is what will give the chandelier a more modern shape so this first step is really the base of your foundation.  I take my time here to give a nice sturdy start, because after that it really becomes a ribbon hot glue nightmare…

Take wire and very tightly cross from one side to the other through the center.  Repeat on the other side to form 4 equal areas.  Did I say tight?  Pull it tighter.  Take another small piece of wire and tie it around the center.  I like to make a nice clean loop.  To do this I simply wound it a few times around a kids marker.

Next comes the hellacious part.  I suggest cutting three lengths of wire the same length,  divide the first hoop (mentally) into three equal sections and tie the wire.  Then get the smaller hoop figure out how far you want it to hang below the first and lightly tie wire it.  You may find it easier to hang the whole thing at this point.  I hung mine from a light fixture, shower curtain rod, and finally a wire I strung across my craft area.  Once you have it at the proper height secure one wire well.  Then play with the other two to get an off kilter angle.  Secure all wires tightly.

creating the chandelier frame with wire and hoops

Step 2: Holy Crap you made it through step 1…  Okay.  Step 2 is Spray Painting

Now that you have your base spray paint the hell out of it.  This is why the ugly green floral wire didn’t matter.

Step 3: Ribbons and Glue

Now comes the fun part burning your fingers adding ribbons.  To really create a modern look to the ribbon chandelier this step is more important than one would think.  Draping the ribbons and connecting them to the rings in a clean manner gives a sharper look than the bohemian feel of other styles.  I wouldn’t necessarily spend this time on a ribbon chandelier that would be 20 feet in the air, however my plan is for this to be right over an intimate table setting.

I cut a bunch of ribbons after figuring out around what length I needed then tightly glued all of the ribbons to the top ring on the inside and bottom so they would lay flat.  Burning only my pinkie on the top ring and saying for the 1000th time that I needed to purchase a low temp glue gun.  After connecting them all I then slowly began the process of looping them in an undulating pattern to the bottom ring.  They are actualy glued to the outside of the ring and hang loosely in the middle.  REMEMBER:  The center ring is smaller than the top so the ribbons will have to overlap.  While this is basic geometry I seemed to have blanked and had to rip a bunch off and start again.  Cussing gleefully the whole time and burning my ring finger to the point of blistering.

Construction of the ribbon chandelier

Step 4: Scissor Time

I wanted the bottom to be asymmetrical like the top, so I grabbed the ribbons in a handful and chopped them at a diagonal.  After that I went and finished each edge in double points and made some minor adjustments to the length. Then you are done!

Completed pink and gold ribbon chandelier

Notes:

  • Wired Ribbon is a BEOTCH.  I thought it might be easier, but trying to get it to mimic the natural fall of the other ribbon was an exercise in patience.  Oh and god forbid you hit it on anything and have to start the whole process of bending the wire again.
  • The second hoop is going to swing and bend and basically act like a wild animal in your grasp.  It is okay, the ribbon will cover a multitude of sins.
  • Battery operated tea lights tied on fishing wire and hung from the cross wires can light the interior at night

Enjoy these articles?  Get periodic updates by joining my mailing list (no spam, no way, no how) or subscribing to my RSS feed.

See more great crafts and decor at these link parties: Making The World Cuter, Today’s Creative Blog, Cherished Bliss, One Artsy Mama, I Should Be Mopping the Floor