Posted on 15 Comments

Re-homing An Unwanted Rooster

10 tips for dealing with an unwanted rooster. How we rehomed our cockerel. #chickens #rooster

Despite our best efforts and attempts at denial we had to admit that we had a rooster among our hens.  We had wondered about the growing comb on his head and larger tail, but the crowing that began right around 11 weeks of age was the final straw.  We had to re-home the unwanted rooster pronto or find out if we really were capable of culling the flock.  If you are trying to deal with an unwanted rooster you can scroll to the bottom for 10 tips on how to deal with your unexpected cockerel.

Being responsible people we tried the absolute best we could to not have a rooster.  We knew it was illegal to have a rooster in town so we bought from a company that guaranteed 98% accuracy on sexing of small batches of chickens…  Clearly we should have bought lotto tickets the day we ordered our chicks since we fell in that lovely 2%.  We were obviously concerned that we would be unable to find a home for Ginsburg (yes we had a rooster named after Ruth Ginsburg, the irony…).  After asking around our facebook friends and getting no where we put a post up on our local freecycle boards.   With in an hour we had a bite and we were sooooo lucky.

10 tips for dealing with an unwanted rooster.  How we rehomed our cockerel. #chickens #rooster
Around 8 weeks we started to get nervous… See the tail feathers? None of the other hens had those.

A gentleman with a 15 free range hens wrote that he had been considering a rooster; could meet us after work that very day and take the rooster off our hands.  Personally, I did not care if he came in a van marked “Chicken Meat for Sale”. We needed rid of the unwanted rooster before we became the neighborhood pariah.  He had already been crowing all weekend long.  When our rooster savior and his family appeared we spent a bit chatting and I really thought our rooster was going to go to a good family.  His name was Adam too so that alone seemed like good luck.  They were so thrilled to have him and told us all about their flock.

10 tips for dealing with an unwanted rooster.  How we rehomed our cockerel. #chickens #rooster
Oh yeah. That is clearly a rooster. No doubt about it.

Little did we know that Ginsburg was going to the proverbial motherland of hens with awesome chicken owners. Chicken-Adam has been excellent.  It has been like the open adoption of roosters.  He has awesomely let us know how he fared his first night, how he was learning to integrate with the flock, asked us some questions about his breed, and sent us some amazing photos!  If I had to end up with a rooster I couldn’t be happier with how it turned out.

10 tips for dealing with an unwanted rooster.  How we rehomed our cockerel. #chickens #rooster
Now this is a happy rooster. You can see his flock and free range home in the background. So lucky to have found such a great owner for him.  Thanks Adam for keeping us up to date!

If you do not end up as lucky as us here are some ideas on how to take care of your unwanted rooster!

10 Tips on Re-Homing Your Unexpected Rooster

  1. Craigslist – You might be able to get $5-$15 for an unwanted rooster, but your best bet for quick placement is FREE.  Make sure to hit the free section and the farm + garden.
  2. Freecycle – Obviously you will need to offer the rooster for free on this site.  It is not quite as ubiquitious as Craigslist, but our Asheville, NC group seems pretty active
  3. Facebook groups – We have a local and very active group (+16K members) who buy, sell, trade and generally chat.  They help rehome all types of animals on the West Asheville Exchange.  If you search the name of your town or a close city you can usually find a number of groups to join.
  4. Local Feed Stores – They probably will not take your rooster BUT they know every poultry keeper in the surrounding area.  Ask them if they know anyone looking for a rooster.  If you are willing to let the bird be culled they will often know a farm or two that take free roosters for the eating
  5. Do the Deed – Oh yes, the traditional way to get rid of unwanted roosters!  Frankly, as a chicken owner I feel like you may need to know this technique even if you never plan on killing your chickens.  If one of them gets incredibly hurt or sick you may need to complete a mercy killing.  I thought this video was not terribly graphic but gave a good idea of how to complete the deed.
  6. Call your local animal control – They may take the bird (which will likely end with its death) or know local organizations that will help.
  7. Contact local 4-H groups –  Please do not do this is you have an aggressive rooster, but if you have a nice one then their may be kids looking for a rooster for their flock.
  8. Photos – With any of the above posting places you need photos.  Let me repeat add a photo.  People want to see what they might be getting.  A nice, healthy, plump rooster is much more appealing than a text ad.
  9. Words – Although I think a photo is a key ingredient in re-homing a rooster,  the text you type is also really important.  You also need to tailor it for your audience.  The local facebook group will band together if you have a good reason to need help.  I would have made certain to discuss how gentle he was, how good with the hens, the attempts we had gone to to NOT have a rooster etc.  Craigslist I would have made sure to discuss statistics like size, breed, feed, general health.  Make sure to give the information each platform needs and wants
  10. Bundle your rooster – If you can stand to lose a hen, or feed, or a cage etc it can make the offer that much more attractive.  Especially if the rooster is a fancy breed.  You can sell a breeding pair or just require that if someone wants to buy a hen they have to take the rooster too.

Bonus tip:

American Poultry Association – I am adding this as a bonus option.  They deal with clubs all over the US, but they are really only going to be helpful if you have a very nice purebred rooster on your hands.  You can look through a list of contacts by state to contact.

10 tips for dealing with an unwanted rooster. How we rehomed our cockerel. #chickens #rooster


Posted on 21 Comments

How to Make a Glass Terrarium

How to make a DIY Glass Terrarium

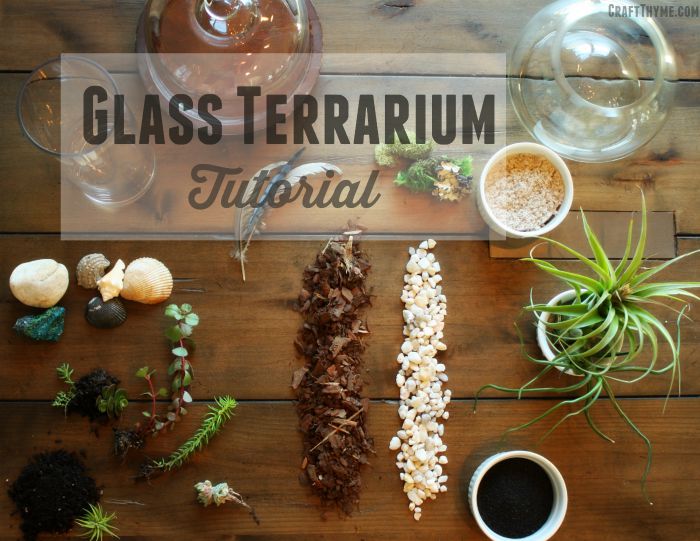
I will admit to having a plant obsession, so, it was only a matter of time till I started in on glass terrariums.  But what fueled the new obsession?  Adam and I recently got married and while we agreed not to get gifts for each other someone decided to get me a new book on terrariums (*cough* Dork *cough*).  Holy plant porn!  Not every project was to my taste but all of them were inspiring.  I had never thought of decorating glass terrariums with feathers, sand, bark, etc.  It opened up a new world of decoration that allows me to bring plants indoors in a modern display.  While it is fairly easy to create a glass terrarium there are some tricks that I have discerned that make the process a LOT easier.  On to the tutorial:

DIY Glass Terrarium

How to make a DIY Glass Terrarium

Glass Terrarium Supplies

There are really three basics that you must have outside of a glass container:

  1. Plants*: these are some succulents I have been propagating and some air plants we picked up at a recent craft festival
  2. Soil*: Potting or fast draining cactus mix; unless you are using air plants
  3. Drainage Material
  4. Container: I went to Goodwill and scoured the shelves.  I was able to find a number of interesting glass containers for $1-$4.  Just make sure they are clear glass.  Tinted or colored glass can mess with the plant photosynthesis

Additional items that make the terrarium look really good:

  • Moss: Hardware stores often sell sheet moss cheaply.  Pretty reindeer moss is available in most craft stores.  We waited till we had a 40% off coupon and got a large bag.
  • Sand: Craft stores have a number of colors.  I also might try dyeing sand like I do in this tutorial, however, I would likely keep that to air plants so I do not wash out the color when watering.
  • Rocks
  • Feathers
  • Wood
  • Sea Shells
  • Etc : Anything that can withstand water or, if using air plants, you are pretty much unlimited

How to make a DIY Glass Terrarium

Step 1: Planning

A little planning goes a long way with a glass terrarium.  First, look at your plant and the conditions it needs to survive.  I also tried to find a plant that had a shape that complimented my tall glass container.  After matching up your plant consider HOW you will be planting it.  You can pour the dirt in the container but if you can not fit your hand in there you will have some issues. Long cocktail stirrers or chopsticks can help press the dirt firmly around the plant.

Step 2: Keep it Dry

My first big mistake was trying to plant a glass terrarium with damp materials…  Ugh.  Everything sticks to the glass, or plants, getting everywhere and becoming near impossible to remove until it is dry again.  Start by placing your drainage material at the bottom, and layering your dirt next.  I placed a layer of bark between the rocks and dirt to keep the distinct bands.  That step was purely for aesthetics.  Next plant the plant but do NOT water yet.

Step 3: Clean and Tidy

If you have not watered, then you have the opportunity to take a soft cloth and wipe off the glass.  You can also blow SOFTLY through a drinking straw to clean dust or move sand around. Removing the dust and dirt from above the soil line is what gives the terrarium a clean modern feel.  Take this opportunity to place smaller decorative objects.  I used some reindeer moss and a small (live) hen and chick next to the main succulent.  You could also place rocks, a layer of sand, etc.  The only limit is space, ability to withstand dampness, and your imagination.

How to make a DIY Glass Terrarium

Step 4: Tips and Tricks

Time to water!  This is where everything can and has gone South for me.  Water too fast and you end up making holes in the soil, or flooding the entire terrarium.  Trust me on this one, flooding it is bad, bad, bad.  I was talking instead of paying attention (imagine that) and ended up floating all my plants out of the soil and mixing in my sand.  I had to dump everything and start over.  The easiest way to insure a non-messy watering is use a spray bottle and let it trickle down the glass.  Otherwise, be super careful to only add a trickle of water.

Notes:

Make sure to pay attention to the microclimate you just created.  The sun can get very warm through the glass and/or the environment can easily get too wet or dry.  The nice thing is that the container is glass so you can actually look at the soil and drainage material to see your water level.  Also, remember there is not a lot of nutrients (as in none) coming into your terrarium.  You may need to add a liquid fertilizer every 3-4 months to keep your plants nice and healthy.

If you want some amazing inspiration this was the book I got as a gift:*


Otherwise a quick glance through Pinterest can really give some great ideas to get you started.

How to make a DIY Glass Terrarium

Posted on Leave a comment

Yard Transformation

Humorous depiction of our new construction yard.

The yard… Ugh.  What can I say about the yard?  We bought the house last fall and the grass was not much to look at.  I assumed that spring would bring a lot more green.  All I can say is nope.  Big ole cup of N.O.P.E.  It was as though our entire front yard had been salted, then compacted, and then sand blasted for good measure.  I am not certain I have ever seen soil that poor outside of depression era photos of the dust bowl.  The first photo I took, we had at least raked the debris from the yard in preparation for attempting to grow some grass.

Humorous depiction of our new construction yard.

It was during the raking, that I discovered the thrilling fact that our yard was chocked full of rocks, and rocks, and then some more rocks.  Think new construction lot at its finest.

Really bad yard
Okay, so maybe this is a more realistic depiction of the yard. Still pretty awful.

Here is the thing they never tell you

They never tell you that a blank canvas of a yard can be intimidating.  We had nothing… Not even real grass.  So, imagine, you have two people who both like to garden, in completely different ways, faced with the possibility of doing absolutely anything in the yard.  Sounds like a dream right?!  Except for the part where we got in a ‘heated discussion’ over bed layouts.  Or the honest to goodness fight over organic versus non-organic.  Sounds ridiculous right?  It was ridiculous, so ridiculous, we made some final decisions, found a tree we liked, and asked to borrow a truck from a friend to pick up mulch.  Because the first step is always to buy a 15 foot birch with absolutely no plan!  So if you want to follow our dubious planting advice keep on reading!

Materials:

  1. Massive tree
  2. Lots of mulch
  3. Free Plants/seeds/etc
  4. More Mulch
  5. Dirt
  6. Grass Seed
  7. Clearance section of big box stores
  8. Patience (You can substitute arguments here instead)

Before and after of yard

Step 1: Buy a ridiculously huge tree, with no way to transport it, and no real plan for planting it.

To our credit the tree was an amazing deal.  We loved the bark, we loved the idea of having A TREE at least.  While running by the hardware store we also happened upon two yoshino cherry trees.  We though the silver bark might look nice with the white of the birch.  Plus 3 trees!

Step 2: Pray someone is stupid enough to help you transport it…

Oh by the way, can we get some mulch?  Needless to say we had a good friend who not only helped us transport the tree, but get truck loads of mulch.  Notice the ‘S’ on loads?  Honestly, I have lost count of how much mulch we have used.

Step 3: Spreading mulch

Apparently, Adam has not lost track of how much mulch we used. 7 cubic yards of mulch… That is close to 3500 lbs of mulch hauled with trucks, in bags, via camels.  Okay maybe not camels, but we have been hauling mulch all summer long.  On the first weekend we used 3 cubic yards to make the basic beds.  In a perfect world we would have had all the beds prepped with cardboard or newspaper underneath the mulch to smother the grass.  However, we were flying by the seat of our pants, so we simply piled it on.  Our aforementioned friend also helped us spread the mulch along the sides of the house, under the back deck, and make the nice arching and kidney shaped beds around the new trees.  I was called upon to climb/crawl under the front porch to place the mulch. Pro tip: Call before you dig.  In North Carolina simply dial 811.  Every utility will come out and mark the lines for free.  Marking the lines allowed us to plant the trees without cutting the cable to the neighborhood.

First stage of transforming a barren landscape.

Step 4: Continue to rely on the kindness of strangers

It took most of a weekend just to complete stage one of yard transformation.  Stage 1 simply involved mulching, planting trees, and planting a number of freebie plants.  I put the call out on facebook and an email at work asking for anyone who was dividing perennials, had left over seeds, or just had extra plants they wanted to get rid of to let me know.  I would show up shovel in hand and get the plants.  Surprisingly I manged to snag a number of free plants: Lemon balm, strawberries, leaf mulch, 50+ seed packets, ornamental plum sapling, redbud sapling, various bulbs, daisies, etc. It was an amazing amount of plant love from the community.

Stage 1 Complete

To be fair, we also assembled raised beds, put in a trellis, added soil to bare patches, and seeded grass.  Basically lots of manual labor.

We got trees up in here, up in here

If I had only known then what I know now

Beds are great, grass is great, vegetables are great, but that is not really enough to hold down a landscape.  We truly lucked soon after the beds were placed.  We went to one of the big box hardware stores to pick up something (probably mulch) and walked past the clearance plants. Lo and behold they were marking tons down.  I still do not know how we managed to get what we did, but we got close to $150 of annuals and perennials for $30.  Finally we had something to put in the beds!  Which I thought was a great plan, until I realized that I actually had to plant all of them.  Which leads to:

Step 5: Collecting over time

The rest of the landscape has been a complete work in progress for the entire summer. Dig, plant, weed, seed, repeat.  We picked up a beautiful Japanese maple at the WNC herb festival, worked on a chicken coop/castle (post TBD), added stepping stones for the boys.  The usual lawn maintenance and gardening work.  We have added a number of perennials such as blueberry bushes, blackberry vines, passionflower vines, various herbs; some gifted, some  bought.  Apparently, yards aren’t built in a day.  Pro Tip: Find a local rock seller.  A single flagstone can cost $7-$11.  We got ours for about $1 a rock from a local stone dealer.

Stage 2: Complete

As the summer has progressed we now have grass for the boys to play in, vegetables for eating, and flowers to admire.

I can not stress enough that time and water are really what it takes to totally transform a yard.  The hardscapes and beds have given it the frame work, but it will be a few years before all of the plants have matured enough to give a truly lush landscape.  Still I am quite happy to enjoy my hard earned squash, listen to my happily clucking hens, and run my hands through the fragrant lavender.  Stage two of the yard transformation, planting


Posted on 9 Comments

Faux Galvanized Metal Finish

Tutorial on how to faux finish galvanized metal

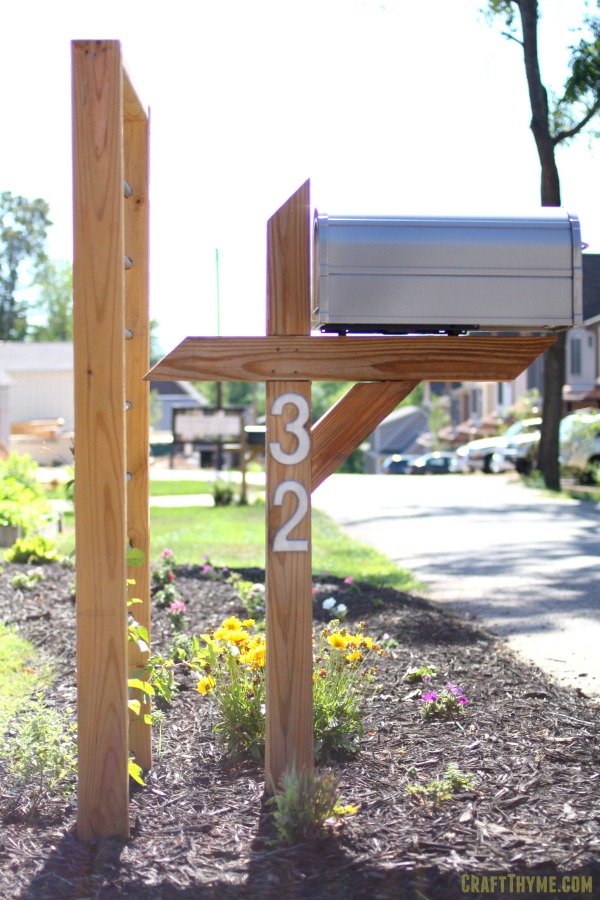
The exterior of our home has lots of galvanized metal finishes.  Our outdoor lights, conduit porch railings, galvanized accented DIY trellis and planter boxes all have that metal finish.  It was a no-brainer to continue to use the galvanized finish to accent our street numbers on the porch and mailbox.  However, when I started researching modern looking metal numbers, oh holy hell!  The cost!  Even if we bought the most basic metal numbers* off Amazon. We were looking at close to $40.00 for four numbers!  I can not imagine if you have one of those long street numbers and wanted to place it in more than one location. Enter faux galvanized metal finish to the rescue:

Galvanized Metal Finish: Super Easy Faux Finish!

Tutorial on how to faux finish galvanized metal

Materials

  1. Craft Paint*  (Cheap is fine here.  We are painting numbers, not the Sistine Chapel)
    1. Silver*
    2. Black*
    3. White*
  2. Brush*
  3. Wooden Numbers: We used 5″ numbers in a sans serif font (For a modern look). I am just going to tell you now that I can not, in good conscience, give you an affiliate link to wooden numbers.  They are WAY cheaper at a local craft store.  Think $1-$2 per number before the usual 40-50% off coupon.
  4. Finish Nails: For hanging.
  5. Paper towels or an old rag

Step 1: Slap it On

Yep, just paint a layer of straight silver.  The wood is going to soak it up, so you might have to slap a couple of coats on.

First coat of paint to create a galvanized metal faux finish

Step 2: Mix and Match

Mix two different shades of silver, one lighter and one darker.  The easiest way to do this is take a whatever surface you are using to mix paint (cardboard, paper plate, actual palette) and make two small pools of silver paint.  Maybe 1-2″ in diameter.  Then added 2 drops of black in one and 4 drops of white in the other.  Mix and repeat if the colors are not about two shades off from the original.  Always remember paint dries slightly lighter!

Step 3: Pattern Time

I had a chance to look at some pressed galvanized metal containers while I was at the craft store picking up the wooden numbers. You might take a gander at the floral section and see if they have any galvanized metal buckets.  I always find faux finishing easier if I just saw a real life example.  In case you can not find a real life example here is a decent picture from Andrew Beeston of what we are trying to achieve:

Galvanized metal by Andrew Beeston from Flickr

The easiest way to get the angular light and dark patches is to dip your brush and use the flat side to press into the number.  I did the dark first and then went back and did the light color… Or maybe the other way around… It really does not matter except that you want hard edges and overlap, not a wet paint blend.

Second coat of paint to create a galvanized metal faux finish

Step 4: On No!  We don’t have pictures!

Yes, I failed to adequately document this last step, but it is sooooo easy.  Once your layers of paint have dried you can do this final step to soften the paint strokes of step three and give it a bit of a weathered look.  Pour a tiny bit of black paint out and mix it half and half with water.  Quickly brush the black all over the surface of your letter.  DO NOT PANIC, that you have just completely ruined your hard work.  Count to 10 and then wipe the black paint mostly off the surface of the letter.  It should just leave the finest glaze of darkness over the silver paint and knock off a little of the shine.  Remember that galvanized metal is not super shiny!

If, for some reason, the black stuck to much just repeat the above step but with a watery silver.  Remember that in faux finishing you can always just repaint any mistakes!

Completed faux finish for galvanized metal numbers

Step 5: Clean Fresh and Modern

Since the numbers weigh next to nothing we were able to simply use a single nail to affix them to the mailbox and porch.  We choose to orient them in a straight vertical line to give a fresh, modern, vibe.

Replacing old tired numbers with faux metal finished street numbers.

Posted on Leave a comment

Love Wins

Marriage equality photo from https://www.flickr.com/photos/gazeronly/8592147315/

We do not often write posts of a personal nature, but we just feel so amazing that the USA has come through for all of her citizens.  Every family deserves love, respect, and protection under the law no matter your personal feelings about their life choices.  It makes us happier to raise our family in a country that respects individual’s right to choose their life, on their terms.


Marriage equality photo from https://www.flickr.com/photos/gazeronly/8592147315/
Photo from Torbakhopper on Flickr