Posted on 34 Comments

Paper Stars: How To Make 5 Pointed 3-D

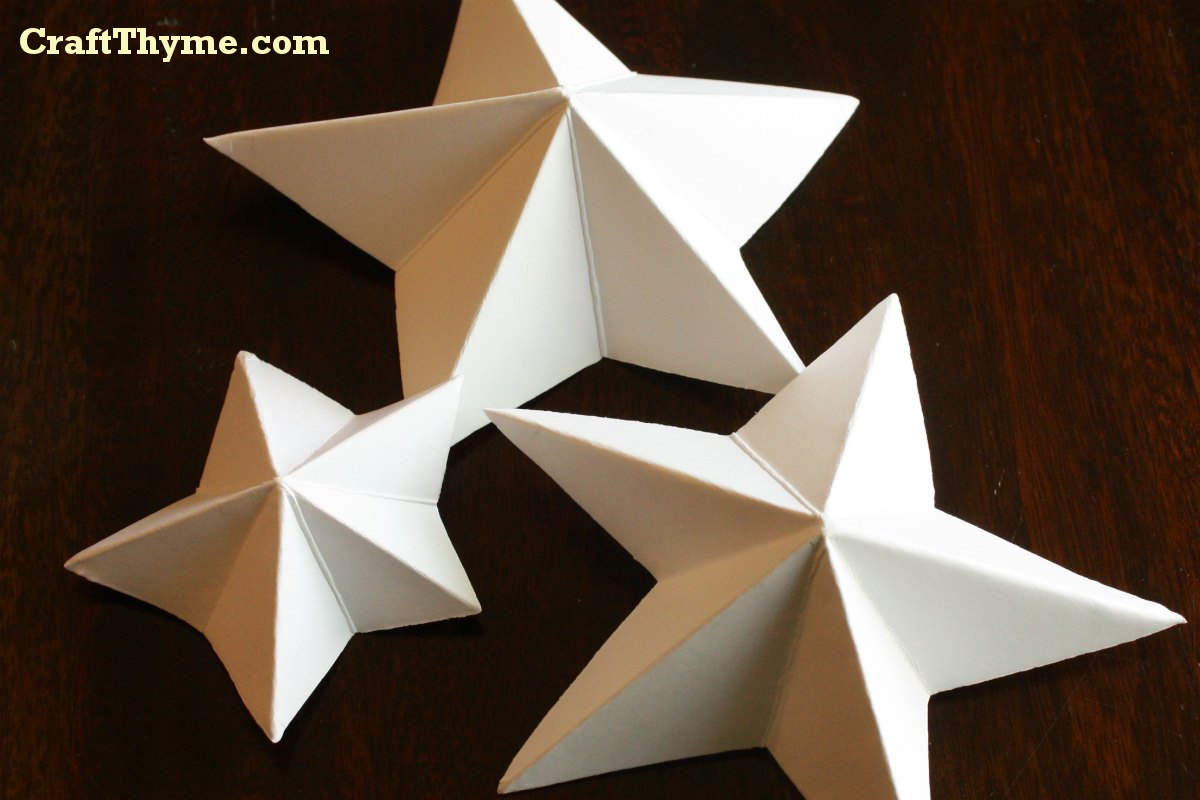
The following tutorial shows how to create a folded paper star that was used in my Fourth of July mantel.  The final star is raised, 3-dimensional, with 5 points.

Come on... I'm perfect for Pinning!
Come on… I’m perfect for Pinning! Just hover your mouse.

Supplies:

Rectangle of Paper (ratio like 8.5 X 11 in but can be smaller or larger)  The small stars in the above 4th of July mantel were a single sheet of 8.5 X 11 inch paper cut in half.  Thick/Cardstock Paper* holds its shape well.

Scissors

Folding steps:

  1. Fold paper in half

    I know this is a doozy of a step.  You can never be to careful folding in half...
    I know this is a doozy of a step. You can never be to careful folding in half…
  2. Take the left hand corner and fold it over to middle of the opposite side (halfway between 1 & 2)

    paper-star-step2
    Honestly, just eyeball the halfway mark. You didn’t see a ruler recommended in supplies did you?
  3. Take the point you just lined up halfway and fold it back on itself making a nice sharp crease from the point down

    Fold'er? I barely even knew'er!
    Fold’er? I barely even knew’er!
  4. Take the right hand corner that has just been hanging out till now and fold it as far over as it can go.

    We are just wrapping the paper around itself in this step.  Giving it a nice paper hug.
    We are just wrapping the paper around itself in this step. Giving it a nice paper hug.
  5. Take that same point and fold it back on itself just like you did on step 3

    For added fun, I crease the hell out of everything when I am done.
    For added fun, I crease the hell out of everything when I am done.

Cutting:

Here is where the magic happens!  Depending on how steep or shallow you cut the star will come out with fat or sharp points.

We won't discuss how the waste paper makes me cringe...
We won’t discuss how the waste paper makes me cringe…
  1. Makes a fat almost round star
  2. Normal American Flag 5 pointed star. (try to make the angles match)
  3. Pointy Christmas Star

Voila, unfold and re-crease the points make a 3 dimensional point.

Notes:

For good dimensional quality a thicker paper like a medium weight cardstock work the best because it holds its shape.  Also making nice sharp creases makes the final folds look the best.paper-stars

Posted on 2 Comments

Fourth of July Decorations

The 4th of July is right around the corner and I wanted to create some mantel decorations to move into Summer and mark the holiday.  We have had some job/educational changes recently so full blown decorating had to be done on the cheap.  In comes stars and firework paper-craft mantel decorations.  The entire thing was created with 6 sheets of decorative paper (.20 a sheet on sale) and 8 sheets white cardstock (from a giant pack so more around .10 a sheet).

Paper fourth of July Mantel

$2.00 for the new supplies put this mantel within budget.  I had a few supplies, like super sticky Zots, and staging items such as candles already on hand.  In fact the mirrors and candlestick were revamped Goodwill finds from a few years ago.

fourth-july-mantel-detail

The mantel was supposed to invoke a vintage Americana feeling.  I used a palette of subdued reds, blues, and golds with pops of clean white for interest.  Kind of a faded “old glory” theme.

4th-july-mantel-craft

The gold and mirrors act to reflect a little light reminiscent of the stars.  It twinkles nicely at night.

fourht-july-paper-medallions

The decorative paper was used to create the paper medallions to represent fireworks.

fourth-of-july-details

This look would be easy to recreate yourself.  I’ll post tutorials on making paper medallions and 3-D stars later this week and next.  You will find the links here when they are live.

Folded Paper Stars 6/20

Pleated Paper Medallions 6/24

Enjoy these articles?  Get periodic updates by joining my mailing list (no spam, no way, no how) or subscribing to my RSS feed.

See more great crafts and decor at these link parties: Do Small Things With LoveCrafty Confessions, Today’s Creative Blog, Not Just a Housewife, It Happens in a Blink, The Shady Porch, and The Winthrop Chronicles


Posted on Leave a comment

Easter Table Setting: Florals

Decorated table setting for Easter

I always have a ton of ideas when it comes to creating any table setting.  Easter is no exception.  It is more a case of me trying to stick with 1 theme and make a cohesive look for any of my crafts and decorations.  This year I settled on a floral theme.  Initially, when I thought of florals; I thought pink!  Well let’s be frank, for me, a little pink goes a long way.  So bring on a fresh new color for Easter.  Orange!

Easter Decorations and Table Setting

Obviously, these Easter place settings used my hand-made chargers, no-sew napkins, and patterned Easter eggs.  However, I always have to add some details.

DIY Floral Table Setting


I wanted to layer a number of patterns to create a bohemian feel.  Strips of various floral patterned fabric dressed up white table cloth.  While I quickly colored the floral part of various paper doilies to complement the colors already used in the fabrics.

Decorated table setting for Easter

I also tried to bring in a little spring green, white, and tan to balance out the colors.

Floral Easter Place Setting

I am pleased that the table setting and Easter decorations came out Spring-like and feminine without resorting to a pink bonanza.  Here is one more shot of some of the details.  Below that are all the accompanying tutorials for creating your own DIY Easter decorations.

Easter decorations and decorTutorials

Enjoy these articles?  Get periodic updates by joining my mailing list (no spam, no way, no how) or subscribing to my RSS feed.

Posted on 6 Comments

How to Make No Sew Fabric Napkins

No Sew Fabric Napkins

Fabric napkins always add a bit of ambiance to any table setting.  However, the cost of pretty embellished fabric napkins can add up quick.  My solution?  Make your own no-sew, embellished fabric napkins!  You could absolutely sew these napkins, but 1.  I hate dragging out the machine and 2.  not everyone sews. On to the tutorial:

No Sew Fabric Napkins


Supplies

No Sew Napkin Supplies
We will get to the purposed of that red and orange striped towel in a minute.
  • Fabric Squares: I have used a faux linen here.  You could also use a cheap plain fabric napkin.
  • Fabric strips: 17-20 inches in length and .5-1 inch in width
  • Heat’n Bond iron on adhesive
  • An iron
  • A towel An ironing board

Step 1 Prepare the Fabric (not shown)

I am going to save you the boredom of seeing a picture of me me cutting a 17 inch square of fabric.  Just remember if you aren’t going to hem the fabric pick a tight weave that you can fray a little bit of the ends.  If you are new to buying fabric look for a one that doesn’t have tons of strings hanging off the cut end.  Also cut some thin strips of fabric.  If you do not have excess/scrap fabric laying around, then I suggest just buy some of the tiny quilting samples (like the 1/8 yard).  You do not need a lot of fabric at all.

Step 2 Lay Out the Heat Bond

Laying out Heat'n Bond
I promise I will explain the towel in a second.

Lay out a one tiny strip of Heat’n Bond.  Make sure to start and end the strip right inside the fringe.  I know it is hard to imagine this almost transparent item will do anything, but I can promise it will!  Finally, lay one strip of colorful fabric over the top.

Step 3 Irons Away

Iron setting the heat'n bond
And now to that ugly beach towel!

Alright here is where I tell you, in the immortal words of Genesis’ Jesus He Knows Me , do the following directions as “I say, don’t do as I do.”

Here is where you should read the directions on the Heat’n Bond.  Iron carefully etc.

However, I have had mighty good results with throwing a towel down, cranking up the iron and slapping it together.  The ugly beach towel is a lot easier to grab than finding out where exactly I have stuffed the ironing board in the basement.

So step 3 really just consists of ironing.

Step 4 Trimming

Finishing no-sew cloth napkinsFinally, just trim the excess fabric to the edge of the fringe.  If any area doesn’t feel secure you can always tuck a little more Heat’n Bond under the fabric and iron.

Notes

Yes these are washable!  The fabric may fray more (though I like the look) and if you dry them with heat some of the Heat’n Bond may loosen.  I am so lazy that I keep some Heat’n Bond by the iron to fix no-sew items or torn hems on pants.

Thursday these napkins will get used to create the perfect in a full Place Setting.

Enjoy these articles?  Get periodic updates by joining my mailing list (no spam, no way, no how) or subscribing to my RSS feed.

Posted on 14 Comments

Patterned Easter Eggs

Folk Art Easter Eggs

Easter is just around the corner and I wanted to make some pretty floral patterned Easter Eggs.  These will be part of my Easter table setting (coming next week).  I blew out some eggs a couple of weeks ago and they have just been sitting…  Waiting… for divine Eggspiration.

Folk Art Easter Eggs
Bring on the Pattern

Got a wild hair and grabbed some permanent markers. Voila!  I did these all freehand while trying to throw a ball to McClain and keep Conlan from exercising his new found ability to crawl… off the porch.  Imagine if I had a stencil or even a reference pattern!

Easter Eggs that are Patterned

If using permanent markers I would strongly suggest to NOT eat the egg.  I wasn’t using hard boiled eggs, but I can’t imagine eating anything that smells like those markers do.  But, the markers make a quick and easy way to make colorful patterns on Easter Eggs.

Using Permanent Markers To Dye Easter Eggs

If you want to see these eggs in their final table setting I’ll post a link here when it goes live next week.

Enjoy these articles?  Get periodic updates by joining my mailing list (no spam, no way, no how) or subscribing to my RSS feed.