Remember our posts on Achieving an Industrial Décor with Black Iron Pipe – Part I, Part II, and Part III? In this post, Brianna and I are back for more tips on adding functional industrial décor with a quick tutorial for building some pretty awesome industrial pipe bookshelves with – you guessed it – black iron pipe and spare lumber.

Throughout our travels, Brianna and I have collected knick knacks from across the globe to remind us of where we’ve been, what we’re capable of, and where we can go if we put in the effort. Unfortunately, these precious mementos rarely have a place in our home at the time of purchase. This can lead to what might as well be a four-letter word: CLUTTER. (gasp)
Trying to get a handle on cleaning and clutter management in the new year, I can’t tell you the number of clickbait posts we’ve admittedly clicked on this January claiming hold the secrets to the latest storage and organization techniques that will completely transform your home. Let me save you the trouble of clicking through the masses and boil everything down into one simple point for you: Everything has a place. If your clutter isn’t in it’s place, put it there.
Our problem? We’d run out of space. The solution? Build more space! (In the form of bookshelves in our master bedroom)
Supplies
You can take a lot of liberties on how you attack this project. Styles and wall sizes vary, and the supplies listed below are those used for this particular adaptation.

In this project, we built 4 industrial pipe bookshelves in three different styles:
Short Shelves (times 2):
- 1 – 2″ x 8″ x 20″ Lumber
- 2 – 3/4″ Black Iron Floor Flanges*
- 2 – 2-1/2″ x 3/4″ Welded Steel Nipple*
- 2 – 3/4″ 90-Degree Black Iron Elbow*
- 2 – 2″ x 3/4″ Welded Steel Nipple*
- 2 – 3/4″ Black Iron Cap*
- 8 – Heavy Duty Drywall Anchors
Long Shelf (Standard)
- 1 – 2″ x 8″ x 46″ Lumber
- 2 – 3/4″ Black Iron Floor Flanges*
- 1 – 3/4″ 90-Degree Black Iron Elbow*
- 3 – 2″ x 3/4″ Welded Steel Nipple*
- 1 – 3″ x 3/4″ Welded Steel Nipple*
- 2 – 3/4″ Black Iron Tee*
- 2 – 3/4″ Black Iron Cap*
- 8 – Heavy Duty Drywall Anchors
Long Shelf (Over Desk):
- 1 – 2″ x 8″ x 46″ Lumber
- 2 – 3/4″ Black Iron Floor Flanges*
- 4 – 2″ x 3/4″ Welded Steel Nipple*
- 2 – 3″ x 3/4″ Welded Steel Nipple*
- 2 – 3/4″ Black Iron Tee*
- 2 – 3/4″ Black Iron Cap*
- 2 – 3/4″ to 1/2″ 90-Degree Reducing Black Iron Elbow*
- 1 – 3′ x 1/2″ Black Iron Pipe (Whaaaa? What do you need this for?? Keep reading!)
- 8 – Heavy Duty Drywall Anchors
Craft Thyme
For each shelf, the basic steps are the same:
- Select your lumber,
- Cut your lumber to size,
- Sand, rough, and buff,
- Cut your mounting holes,
- Test fit,
- Stain and poly,
- Assemble, Mark, Disassemble, Install, and Reassemble
Select Your Lumber
Selecting your lumber is strictly a matter of personal preference. You’ll do best to find a piece of wood that speaks to you. Spend time digging through the lumber stocks searching for that perfect knot, grain, or imperfection. For this order, I decided to leave the lumber we used up to the random choosing of a Lowe’s employee by ordering online for in-store pickup.
Cut your Lumber to Size
Each wall we were looking to fill was 62″ wide. Not wanting to fill the space from edge-to-edge, we chose 46″ for the widest (bottom) shelf and a smaller 20″ shelf to be placed as a higher accent piece. Cut your lumber to size using whatever mechanism you have at your disposal. We used our smaller miter saw to make the cuts.
Sand, Rough, and Buff
Once your cuts have been made, you’re going to want to distress your wood a bit. Why? 1) It looks cool, and 2) SAFETY! The way we’re going to mount the shelves will leave them sticking out 8″ from the wall. Sharp, fresh cut lumber corners jutting out from a wall are just an accident waiting to happen.

Take some time to sand down your newly cut corners and edges. Feel free to be overly drastic in how you do this – it will surely make your end result that much better! And leave those imperfections there for everyone to see.
Cut your Mounting Holes
Symmetry comes naturally to me; it’s just the way my mind thinks. (Brianna loves and hates this about me all at the same time.) For this project, I chose to drill out the mounting holes in the same position on either side of the shelves-to-be. Symmetry could be optional for you, just ensure that your shelf is properly supported in the design you chose to go with.

Use a 1-1/8″ hole saw or drill bit to cut the holes for your 3/4″ wide pipe. I’ve tried this many different ways (including rocking a 1″ bit when drilling) in an attempt to find the perfect hole size. Trust me, 1-1/8″ is the way to go. There’s no need to sand these cuts (unless you’re more of a perfectionist than I am), because the actual opening will be hidden in the final product.
Test Fit
It goes without saying that you should test fit your pipe into your newly drilled holes. Use the 2″ nipples to make sure that they fit well.

If they fall right through, don’t worry and remember that you’ll have a pipe cap and an elbow or tee on the other end for support. If the opposite happens and you find that your pipe doesn’t fit into your hole, you can either try the rocking method mentioned earlier (not recommended – you can hurt yourself if you aren’t careful), or use a rubber mallet to tap the nipple into place.
Stain and Poly
Once your lumber has been properly cut, sanded, and drilled, break out your favorite stain and polyurethane finish. For this application, we used Minwax Early American as the stain, and Minwax Semi-Gloss Polyurethane as a finish. Apply the stain, let it dry overnight if possible, and apply the poly the next day. Waiting for everything to dry is the hardest part, but the end result is well worth the wait.
Assemble, Mark, Disassemble, Install, and Reassemble
Yes, it sounds like a lot of steps in one, but at least they’re simple:
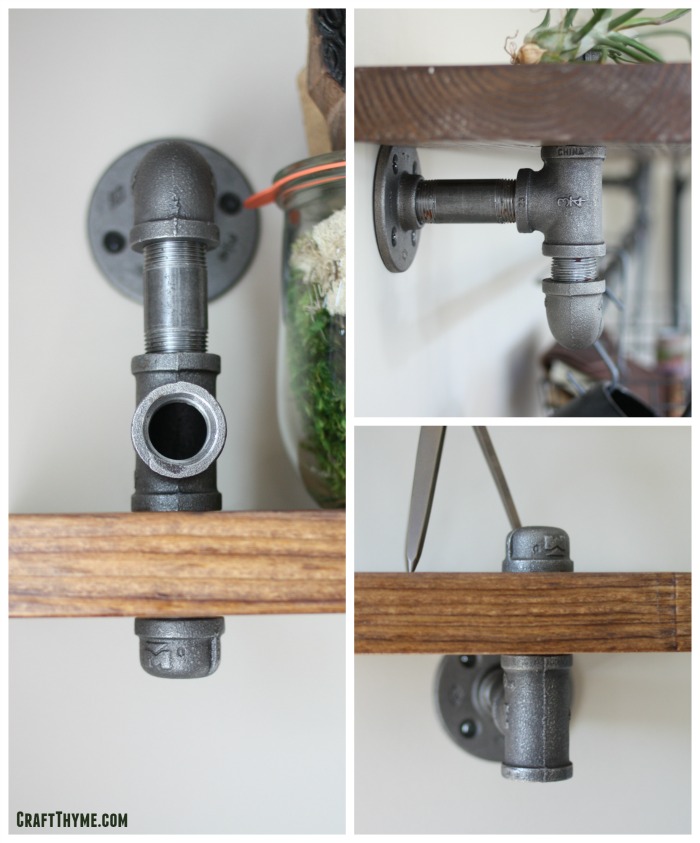
- Go ahead and assemble each shelf as you intend. HAND TIGHTEN ONLY. (Interested in what we did? See the final orientation of parts in the photos below.)
- With a partner, hold and level the shelf where you’d like it to hang.
- Mark the holes in the flanges with a pencil. (Pro tip: Have two pencils – one for each of you. You’ll avoid yelling about loosing level status this way)
- Pull the shelf down, and disassemble.
- Install your drywall anchors where your marked your flange holes. (I go over the top here and use anchors capable of supporting 143 lbs each)
- Install your flanges (only) using your freshly installed anchors and provided screws.
- Into the flanges, install all of the hardware you plan to install besides the shelf itself and the black pipe caps.
- Install your shelf over the nipples that you test fitted earlier.
- Secure your shelf by adding the black pipe caps to the nipple peering out of your shelf. A strong hand-tightening should be sufficient to ensure stability.
The Final Industrial Pipe Bookshelves


[…] via craftthyme.com […]
I am thinking of trying this for my entry coat closet! The shelf will be great and the rod across the bottom should be able to withstand the coats that I will hang in there! What do you think? Should I try it?
[…] craftthyme […]
[…] > DIY: How to Make Floating Shelf by craftthyme.com […]
These look amazing! I’m looking to create a desk base with the same pipe, but after digging around Zoro’s site I can’t find the welded steel color, just black. Any suggestions on where I can find that?
If you are wanting the silver pipe try searching zoro for galvanized steel pipe fittings. They have them, I just checked. Galvanized is more expensive than the black iron. I have used it in our new house as I wanted the silver look, but it isn’t nearly as budget friendly.
[…] craftthyme […]
Where do I find the containers hanging from the pipes?
We got those at World Market a couple of years ago.
[…] http://craftthyme.com/industrial-pipe-and-wood-bookshelves/ […]
[…] Build this shelf […]
Looking at using this for our kitchen cabinets. I will be using 2×12 so I plan to add an extension. Any advice.
Go for it! No advice but if you run into any issues let us know.
Super newb here and not well versed in tools. With the 1 1/8 drill bit, do I need any special adapters for it to fit in my drill? (This is a very similar model to the drill we have: https://www.lowes.com/pd/BLACK-DECKER-20-Volt-Max-3-8-in-Cordless-Drill/1000036977)
Or do most drill bits that large fit in most standard drills? Thanks!
Great question, Gina! The bit you have should fit in your drill just fine with no need for a special adapter. Good luck with your build!
Como fazer para comprar, pois residuo no Brasil.
Não tenho certeza! Desculpa!
What would you recommend for stain for the pipes?
Ty
We left our pipes plain. The wood got stain but we just liked the pipes as-is. You could potentially clean them well and give coat them with a paint made for metal.
So let me start by saying THANK you for such a comprehensive DIY explanation. After some playing around with some lumber I had and buying a bunch of nipples, flanges, 90degrees, etc… I totally under stand the concept of how to build multiple different wall anchors for the shelves.
Here is my issue… when working with a 2″ x 8″. A 2″ nipple is too short, and when I use a 2.5″ nipple I can seem to get the fittings tight enough when I put the cap on? Should I be filling the gap with some washer or something?
Thanks in advance.
A 2″ nipple should do the trick. Your 2″x8″ is actually 1.5″x7.25″, so that should (emphasis on the should) give you 0.5″ to work with when attaching to your elbow and cap. If not, it might be worth giving the nipples you have a measure with a ruler or tape measure to make sure you received the right size – we’ve come across misshipped orders or wrongly placed items at Lowe’s about 1,000 different times.
If NONE of those things work, you’ve already identified the best solution around – washers! Pop one of those babies on either side (based on your goal aesthetic), and you should be good to go.
[…] Build this shelf […]
I love these shelves! Getting ready to start making the long shelf now! But I was just at Lowe’s and the employee there just said there was no way a 1/2” pipe would work with a 3/4” flange and I couldn’t help but think the same thing? Lol. Please help me make sense of it!
The longer 3-foot piece is in fact 1/2” in diameter. We were able to do this through the use of a 3/4 to 1/2 reducing elbow. From the flange, everything is 3/4” as you and the Lowe’s rep indicated, but as you go to put the hanging bar in place, that reducing elbow is what makes the smaller conversion for you.
If you still have any questions about how to wrap up this project, feel free to write us at brianna@craftthyme.com and we will attack this in more detail; we want you to have a fabulous end result!
Love these! Where did you find the hooks to use on the pipe that underneath? Thinking it’s perfect for my son’s baseball hats!
We got them at World Market. I believe they were in the kitchen organization section. Here is a link (non-affiliate) https://www.worldmarket.com/product/modular+kitchen+wall+storage+collection.do
[…] from craftthyme.com […]
Hi Adam,
I’m interested in making the longer shelf, but even longer than 46 inches. I’m thinking 60 inches.
Would you mind letting me know how many parts/pieces I need to make sure the shelf of that length and weight would be stable on the wall. (i.e. how many center supports I’d need). Appreciate the assist on a parts list. Also, when you order your black pipes on Zoro, are they sticky/greasy? If so, do you clean them before painting, and, if so, with what do you clean them with? Thanks, Susie Turpin
Portland, OR
Hi Susan!
For a 60″ shelf, you’ll definitely want to add a third support. The support doesn’t necessarily need to fall in the middle, but somewhere close by (perhaps on the nearest stud) should provide ample support. As far as which parts to use for this additional brace, you’ll want to add: 1 – flange, 1 – 2″ nipple, 1 – 3″ nipple, 1 – 90-degree elbow, and 1 cap. This arrangement of parts will will allow you to build a simple support in the form of a J. If you want something a little different, replace the cap with a 3/4″ tee for an extra bit of mechanized pop!
As far as cleaning the pipes is concerned, we typically just use a household cleaner to knock off the “factory grime.” Just make sure your pipe parts are completely dry when you finish wiping them down – you don’t want to lend to premature rusting! And we never paint our pipes. The black iron really lends a great industrial feel, and we’ve never felt the need (in our applications) to paint them to be more consistently colored. If you’re worried about future rusting, you can always spray them with a clear coat. And if you’re inclined to spray paint them, cleaning them in the same way should be sufficient, and a second coat should ensure a great looking finish on your final product.
hey, if I am using the 2×12 and need the 5 or 6 inch nipple, do I also need a 2 inch or 3 inch? also, are all the other parts the same as you have listed.
Out of the parts listed, you would be replacing the 3″ nipple with the 5″. Everything else would be the same.
thanks….also, if I use an 2x12x8 would I need a support in the middle?
I would definitely recommend it!
hey…if I were using 2×12 inches boards, how long should my nipple be? Thanks!
A 5″ nipple should do the trick (a 6″ would work too if that’s easier to find)
For the long shelf with hanging bar, do you think a 10 inch board will work?
that would work fine, just make sure to drill your support holes towards the middle. This will require a longer nipple between the flange and the elbow.
Why is the long rod 1/2″ but elbows are 3/4″? Will this fit well or should I go with a 3/4″ rod?
It is a reducing elbow. So it goes from the 3/4″ to the 1/2″. We did this as the hanging baskets and containers needed to have a 1/2″ rod.
Love this! Your instructions are so clear and helpful.
I priced the hardware at Lowe’s and was shocked at the prices. The on-line retailers are less than half the cost. Is there a huge difference in the look and/or quality of the on-line supplies?
Thanks!
The products from Zoro have always met or exceeded the quality of what you’ll find at Lowe’s. The price difference is unbelievable. We’re constant and repeat customers and have now outfit two separate homes with their products.
Thank you! This is very helpful!!
Any pictures or ideas on how to do bath towel holders? I love your stuff!! You finally gave me a TP holder idea that I love!! Thank you!
There are TONS of great options for bath towel holders! You can build a simple towel bar by using two flanges, two close nipples, two elbows, and a length of pipe to fit the space. Think of it as a very wide and short letter U. You could make multi-tiered bars, towel hooks, towel pegs – the options are endless! If you want to discuss your particular space more and have us give you feedback on potential designs for your space, write us at brianna@craftthyme.com and we’d be glad to chat!
For the longer shelves, where the flanges are underneath the shelf, does the flange actually bear some of the shelf weight? (i.e. does the shelf actually sit on the flange at all?) Or is all the weight still just on the tee?
Thanks!
The shelves do not rest on the flange, so all the weight is on the tee. Make sure you cap the tee and screw it down as far as it goes, as this acts as the primary stabilization for the shelf.
Thanks for the reply, Adam. I’m just about to order my hardware and I noticed that for the short shelf you have 2″ and 2.5″ Welded Steel Nipples, while for the longer shelves you have 2″ and 3″. If you’re using 2x8s for all the shelves, why are the parts different sizes? Did you cut the holes closer to the wall for the shorter shelf?
Almost there! Thanks for all your help and for the detailed instructions!
The difference between the 2.5″ and 3″ nipples was simply a design choice. In our application, the short shelves were on top, and we wanted them to appear closer to the wall, hence the use of the 2.5″ nipples. Feel free to use whichever you like for your build. The 3″ is probably the better choice for greater shelf support, as the combination of that and the elbow will provide a more centralized hole location when using a 2″x8″.
[…] 3. Industrial Pipe and Wood Bookshelves […]
For the long shelf with the hanging bar at the bottom, how in the world did you get the full bar attached to the flanges once they were mounted on the wall? Worked on this project yesterday and trying to figure out how to screw the whole thing together on the wall was quite the brain bender, couldn’t help but feel like we were missing a key step.
Indeed, this is a super tricky step…. Sorry for the lack of instruction!
To install the hanging bar, first turn one of your reducing elbows so that it points straight out from the wall. Into this elbow, screw in one end of the hanging bar as far as you can without having to strong-hand it to go in any further (you’ll need to be able to loosen it easily in a second). Screwing it in this far SHOULD provide you with enough clearance to now rotate the elbow/bar back in alignment with your wall and fit into the elbow on the opposite side. From here, you should be able to screw the other end of the bar into the fitting and complete the installation. As you do this, you’re actually unscrewing from the first elbow, hence the mention about not overdoing it when attaching to the first elbow. Let us know how it goes!
I would love to do shelves like this in the kitchen. Do you know the weight load they can handle?
Thanks!
It all depends on the studs/anchors used for installation. We used 150lb anchors because that’s what we had on hand at the time. Would we ever try putting 150 lbs on them? Probably not. But, we used the same anchors for our pipe banisters, and they have held the weight our four kiddos (at the same time) with no problem.
[…] Source: craftthyme.com […]
[…] via craftthyme.com […]
Nice variation on the iron pipe shelf theme. I particularly like the upside down bracket idea, it works really well, I’ve got to try that. I have a few tips to pass on (and a little plug).
If you going to make a few of these then the price of the pipe and fittings at your local big box hardware store will quickly add up. Try a local plumbing supply house instead. No guarantees but they can be a lot cheaper. Pipe and fittings come in two types: galvanised and ‘black pipe’. Galvanized is silvery, won’t rust, but is more expensive. If you plan on painting them anyway, look for black pipe. The downside is black pipe is usually greasy and nasty. Which brings me to my plug: my little company Blackfriars Ironworks has all these parts, pre-cleaned, degreased, deburred and electrostatically painted (tough as nails), all for less than you’d pay in Lowes or Home Depot. Happy to help with custom projects too. https://blackfriarsironworks.com or https://www.etsy.com/shop/BlackfriarsIronworks
Thanks! And nice little shop you have there with good tips for the DIYer.
These are amazing! I love how the shelves turned out. Thanks for sharing your tutorial. Pinning!
I love how they look too. It is great having a crafty creative partner for projects like these.
I am so amazed by these shelves…and your tutorial is just perfect! I am going to feature your project on my weekly newsletter for my email subscribers. Please sign up if you haven’t already so you can see your feature! Thank you so much for sharing this on Friday Favorites at Must Love Home!! – Christine
Thank you so much! I can’t wait to see the feature. Glad you liked them so much.
Your shelves, OMG! I have seen them before and they are on my wish list, but you did them using less plumbing fixtures than the norm. Loved that! I also giggled when you talked about symmetry, I know exactly what you mean, my brain needs it for home decor and sometimes it’s so hard to find for specific projects or rooms.
You did a fantastic job, so glad you shared this!
Thanks for the great feedback! You wouldn’t believe the conversations we have around symmetry… Brianna lets out an exasperated ::sigh:: every time I mention the concept in relation to decorating, gardening, construction, etc. It’s a ton of fun and we laugh throughout!
These came out really great! And not the usual way that they are normally made.
These are so cool! The way you used the pipes in different locations, love it! Would you be willing to share this at our link party? http://www.thestonybrookhouse.com/2016/03/dishing-it-digging-it-link-party-87.html
I love how these came out, they are so my style! All of the pipe projects you’ve created are so inventive, my in-laws were looking for a stair rail option for their garage entry and couldn’t figure out how to go about it, I shared your pipe stair railing post and they loved it, it will work perfect for them! Thanks so much for posting your ideas with great step by step tutorials!
I’m so glad you have found the tutorials useful. If you or your in-laws have any pipe questions please let us know!
The are awesome! I live in a house of boys, so girly decorations are kind of out of the question – these are perfect!
We have a house full of boys as well. Only me and the chickens holding it down for the females. I like the fact that they are just kind of gender neutral shelves. They look good with all my weck jars but would look just as nice with boys toys or large leather bound books.
Love these shelves Adam -thank you for sharing to Pin Worthy Wednesday
Your shelves look fantastic! I love how you changed up the types of pipe used, too.
Thanks Leslie! The variance really adds a nice touch.