Posted on 4 Comments

How to Build a Garden Box that Lasts

Completed version of our raised garden box. Also find information on how to prep your soil and make these goat wire trellises!

Before our last house I had never planted in raised beds, but let me tell you, it only took one planting season to make me a convert! Now that we (as in Adam) are in the new house we (as in I) had to build new garden boxes. But this time we wanted to figure out how to build a garden box that lasts, while not poisoning our veggies with lots of toxic chemicals from treated lumber OR spending a fortune on cedar.  Since we figured out this magic combo we thought we would share our raised garden box plans with you so that you could also save some moola and be able to use the raised beds more than a few years!

Time to get all gardening controversial right out of the gate.  Yes, shocking I know, but gardeners can have some very heated controversies.  Especially us younger new-comers on the gardening scene who refuse to blindly go all organic.  Yep, we scienced the heck out of these garden boxes.  First and foremost, not all treated wood is the same. Most of it is complete crap that you wouldn’t want to touch unless you have gloved hands.

Most treated wood = STAY AWAY Veggies!

BUT there is one form of treated wood that would be safe to use. Micronized copper treated wood.  While many still argue the safety we satisfied ourselves by reading page after page of research created by many extension agencies and laboratories.  The worst issue we could find was that it could potentially release the same amount of copper as a copper pipe water system in your home.  Additionally, if for some reason, large amounts of copper were leached into the soil your plants would die well before harvest.  I urge you to do similar research for yourself and boldly disclaimer my choices.  Basically be an adult, make your choices informed, and don’t sue us later if you do not like the outcome.

SHOOO, well now that all that science and research are out of the way let’s get on with learning how to build a garden box that lasts!

Garden Box Supplies

  • Fence Pickets
  • 4×4 Posts
  • 3″ Exterior Screws

Fence Pickets:  Why are we using fence pickets as garden bed walls???  I know it seems odd because we are going to have to make an extra cut to remove the top piece but, first, they are cheap.  Like cheap enough to make it worth the extra cut cheap. Secondly, there are two types of treated wood at our big box store.  Despite what common sense would tell you, the treatment referred to as Ecolife is DECIDEDLY NOT Eco… The other common treatment technique utilizes Micronized Copper Azole (or MCA) and has been tested and used for decades in these applications.

Craft Thyme!

The directions below are to create one, two-layer 4 x 6 foot box.  You can modify them to make any configuration you want.

Cut List

  • 4 – 10″ Corner Posts
  • 4 – 48″ Front/Back Bed Walls
  • 4 – 70.75″ Side Bed Walls

Cut list for DIY wooden garden boxes or raised beds

Step 1: Assembly Line

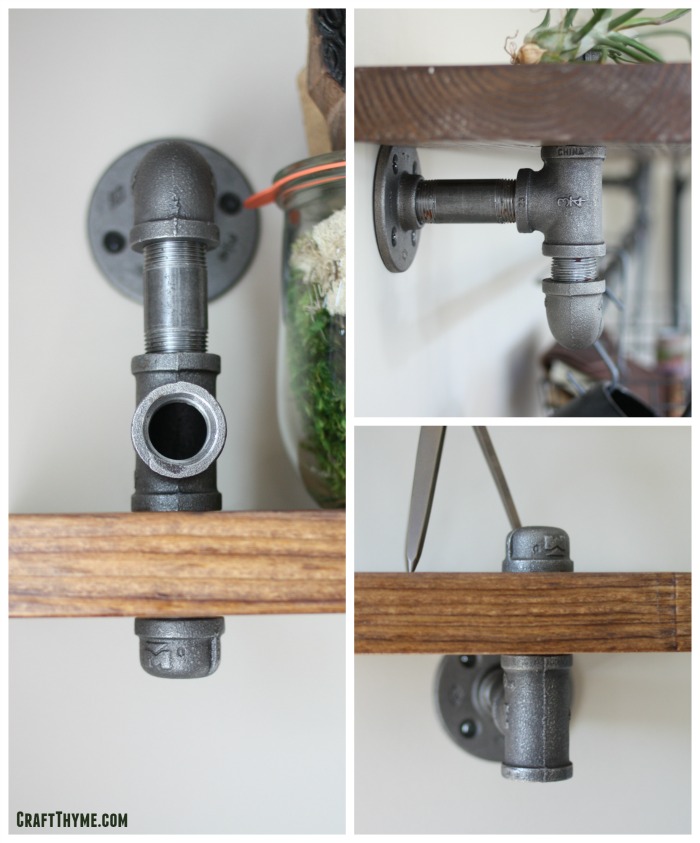
We decided to do this assembly line style and do all of the cuts up front.  Guess who got to cut too?!  Me!  I got a new saw for Adam’s birthday and his parents got him this hella cool stand for Christmas.  While we can (and have) cut wood old school with a crap saw on the ground, this certainly made the project a lot smoother.  Since this is a garden box we made square cuts.  While mitering the corners might look lovely, the purpose of these boxes are to hold dirt…  So cut time!  We start from the square end of the board and then when you are done the dog-eared end of the fence post will be tossed away.

Step 2: Screw It!

Now it is time to screw.  The easiest way to assemble is to start with the short end on a flat surface.  Lay your 4X4 posts down and place your flat boards on them.  Move the 4×4 posts in the width of one board (see the image) this will allow your long boards to sit flush when assembled.  Try to get these as straight/square/level as possible.  The straighter you have these sides the nicer your finished box will look.  However, there is wiggle room with the posts.  The end result will have small gaps the corners if your assembly is not straight.  This might be less aesthetically pleasing but will still function correctly!  I’m kind of the good enough camp… Adam had his level and square out… :)

Assembling a garden box
As you can see here we used a small piece of wood to gauge the space needed.

Screw each board using two screws into the 4×4 post.  Repeat for the other short side.

Assembling a DIY garden box
We placed two screws in each board down the post.

Step 3: Time to connect

This is a great time to connect with your loved ones… by having them hold boards, but if you do not have a build partner you are still going to connect, because now it is time to connect those boards! A partner can help hold everything in place, but for either instance find as flat/level of a place and stand up your pre-assembled 4 ft end.  Place the end of your board against the corner of the post starting at the bottom.  Push it flush against the boards and as level as possible and screw in place.  Take the other end of the board and connect it to the other short 4 foot end.  Why connect both?  Because when you have three sides assembled the structure becomes much more stable and easy to connect your boards.

Corner joint for DIY wood raised bed
Here you can see how we joined the edges and why a space was needed to attach the boards flush to the post.

Step 4: Rinse and Repeat

Connect one more board above the bottom layer and then connect the other side in the exact same manner as the first.  For added stability we took a small scrap of wood and screwed it in the middle of each long side as shown in the picture.  This step was simply to keep the boards nicely aligned.  After that your beds are D.O.N.E.  A bed this size is not lightweight but I could still easily drag it into place.  Keep in mind you might want to build it near your final site if you are not into lifting all that wood.

Center bracing on a wooden garden box.
Here is the optional center bracing. It doesn’t have to be beautiful as it will be covered with dirt.

Step 5: Prepping (but not with a concrete bunker)

How to fill and prep raised beds is a hotly contested topic.  No seriously!  Gardeners can get their collective yard-work granny panties in a wad over how you fill your beds.  I have my method outlined in the next post but for the purposes of making garden beds your last step is to install them.  You can choose to leave them on top of the slope or dig down to install them in level ground.  (Seriously, my method for prepping raised garden beds is cheap and awesome)

Finished DIY garden boxes or raised beds

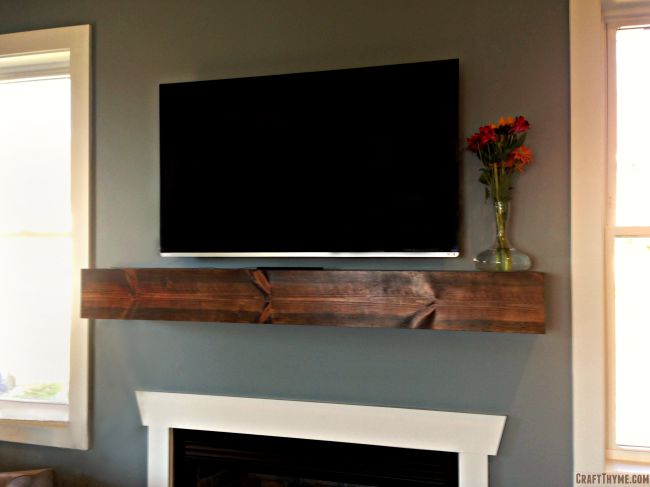
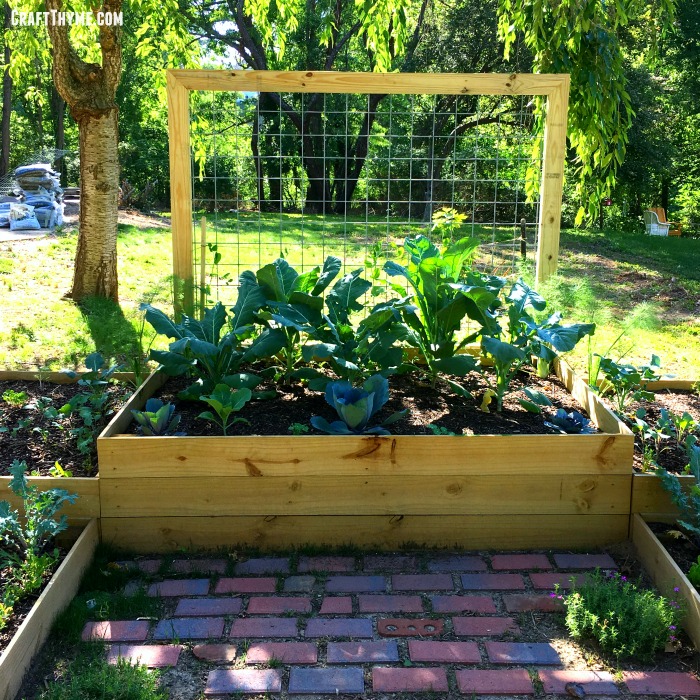
I have done both methods.  I also find both attractive.  You will see more of the box when simply laid on the ground (Plus it is MUCH easier) but having it level can be important if you are going for a certain look with goat wire trellises as we did in the photo below.  This choice is really up to you!  Once installed you then fill with planting material and get planting!!!

Raised beds leveled in a sloped landscape.
This took a whole lot of digging!!!! Trellis in the next photo!

Notes: Keeping soil from going through small gaps, soil mixes, how to reduce weeds, water retention, etc is all available in my how to prep bed post! Yeah, I am plugging myself but seriously it is awesome!

Complete Garden Box

Completed version of our raised garden box. Also find information on how to prep your soil and make these goat wire trellises!


Posted on

Building a Custom Industrial Wooden Desk

DIY stacked wood desk tutorial

The only thing that appears to be constant in our lives is change.  Our youngest son just began walking, he and the next youngest have moved into the same room, Brianna and I cleaned out our master closet, moved a dresser into said closet to further our organization effort, our oldest started Kindergarten, and Brianna had a career change that sees her working from home periodically.

Realizing that we have no good place to work (much less concentrate) amidst the chaos of our family of six, creativity was forced upon us.  We’ve always lacked an office space in our home (and with 6 people, we have no free rooms!), so our ability to set aside such a space has been significantly limited.  Moving Keaton in with Cooper freed up a nice little corner of our master bedroom.

We’d looked at buying an industrial desk for our space, but we couldn’t find that perfect piece.  Everything we’d looked at was either the wrong size or the wrong price.  So, as typical, we decided to build something of our own!

DIY stacked wood desk tutorial

Supplies

Craft Thyme

Brianna and I measured our available space, and after drawing out a few different options, our plan was to build an industrial desk that was 18″ D x 40″ W x 30″ H that matched the general décor of our home.  Follow along below to see how we got there and let us know how we did!

Lumber Selection and Initial Cuts

As always, pick out lumber that speaks to you.  On the random Tuesday that I took off of work to focus on this build, the hardware store had some great, partially grayed untreated lumber.  (Stress the on the untreated) Selection of colorful, knotted, and straight wood was easy. On to the lumber prep….

Step in creating DIY industrial desk from lumber and pipe

Given that the actual dimension of a 2″ x 4″ is 1.5″ x 3.5″, the easiest way to get to 18″ was to stack 12 2×4’s together (18 / 1.5 = 12).  Super easy!

To get to 40″ wide, all we had to do was cut 40″ sections out of our lumber.  If you’ve done the math, you’ll see that I have waaaaay more lumber than I needed for this project.  Why have have 600″ when all I really need is 480″?  I do this for two reasons: 1) I want to be able to use the most interesting sections of the lumber, and 2) I’m probably going to mess something up at some point.

There are multiple ways to handle your cuts.  You can cut all 40″ sections and call it good, or you can strategically cut random length sections whose total lengths equal 40″.  I chose the latter.  With this, I don’t have a true final cut list for you, constant reader.  Make it random and make it awesome.

But we didn’t stop there… oh no, that would be too easy.

Step in creating DIY industrial desk from lumber and pipe

While stacking 2×4’s together gave us the right depth dimension, there were two readily apparent design flaws:  1) 2×4’s aren’t square, they’re rounded squares; and 2) the thing was going to be really freaking heavy.  To remedy, we broke out the table saw and ripped both sides of the previously cut 2×4’s to make everything nice and square.  We ended up taking off around 1/4″ from each side.  The end result was nice, square lumber that weighed an average of 7% less.

“Assistance Needed in the Pipe Cutting Area”

Having drawn out the basic design for our industrial desk’s frame (using Pencil*), we already had an idea of how we wanted to put things together.

Sketch for our tutorial on creating a DIY pipe desk for our industrial decor.

We’d ordered everything except for the long length of pipe from Zoro.com and started calculating the lengths we would need to finish the frame’s build-out.  I pre-assembled the feet of the frame, connected the front feet to the back using the 12″ nipples (such a silly term for a foot-long pipe), and started measuring.  We needed the bottom of the desk for fall at 27″ high, and with some simple subtraction, we’d come up with the following pipe cut list:

  • 2 – 24 (Front legs)
  • 2 – 20 (Back legs)
  • 1 – 32 (Back brace/Foot rest)

At that point, it was off to Lowe’s!  Remember, your local big-box home improvement store will cut and thread pipe for you – most of the time for free!

Putting the Pieces Together – Industrial Desk Frame

Hands down, the easiest part of this project is the desk frame assembly.  In a nice, open area, lay all of your pipe parts out and start putting things together as you’d planned.  There’s no right or wrong order in this step.  Give everything a good hand tightening as you get the pieces in their final position.  Once you secure the frame to the desktop, everything will be stationary, so there’s no need to use any tools to aid you in this step.

Tutorial on how to create an industrial desk from wood and pipe
(Colorful Balls and Toy Cars Optional)

If you’ve got a long enough level, go ahead and check your frame at this step in the process.  Yes, you can always make adjustments later if necessary, but it is easiest at this point.

Putting the Pieces Together – Desktop

This step takes both time, and patience (frankly, personality traits I typically lack)….

Using large clamps and as flat of a surface you can find, lay out 2-3 pieces of your previously cut lumber in the order you’d like them glues together.  Liberally apply wood glue to the back of your face board (I am a big fan of the squiggle application method), but it up against the second piece of lumber in the series, and clamp that baby together as hard as you can.  For best results, clamp both on the ends AND in the middle.  Repeat this steps as many times as you have clamps on hand.

Step in creating DIY industrial desk from lumber and pipe

Then wait….

Most wood glues actually have a drying time of only one hour.  So while this process takes patience, you can probably knock it out over the span of the afternoon.  Once your newly glued sections have set for their hour, continue this process for your remaining pieces of lumber.  When you have 6 stacks of two, start gluing those together.  And so on, and so on.

Depending on the size of the clamps you have, the last step of combining two stacks of 6 may be difficult (or frankly impossible).  I had this problem, and for me, this spawned creativity.  I went under the house and pulled out my crank straps.  You know, the ones you use to tie a king-sized bed to an SUV that’s as wide as a full-sized bed?  Believe it or not, these types of tie-downs make excellent large application clamps.  Do your final gluing, wait an hour, and drink a beer as most of the hard work is complete.

Flattening out your Desk Surface

There are multiple ways to achieve that perfectly milled work surface.  The BEST way is to use a mechanical planer to do the job for you.  Unfortunately, we don’t own one of these bad boys.

So… we did what we could the old-fashioned way and used multiple grits of sandpaper to knock down edges quickly.  As you’ll see below, there are lots of wood joints, knots, and saw blade “imperfections” that would make writing on this newly made solid surface rather difficult.  Hitting the desk top with heavy-grit sandpaper on the powered hand-sander will take care of any significant surface changes.  When finished with the high-grit, move to medium-grit across the whole surface, and finish it off with a fine-grit.

Tutorial on how to create an industrial desk from wood and pipe
Before Sanding
Tutorial on how to create an industrial desk from wood and pipe
After Sanding

Time to Stain and Poly

Choose your favorite stain(s) and desired polyurethane and get to work.  For this project, we alternated the use of Minwax Early American with Rustoleum Dark Walnut.  “Color blocking” best describes my technique on this particular piece: A block of one color here, a block of the other color there.  Randomize the application of the stains (if you’re using more than one), wipe away, and see how it’s turning out.  You can always make areas darker if need be by allowing for longer set-times or applying a darker stain over a lighter area.

Tutorial on how to create an industrial desk from wood and pipe

Step in creating DIY industrial desk from lumber and pipe

I’ll admit, once the stain had been applied and had dried, I couldn’t wait to see how the industrial desk looked on the frame.  So… rather than apply the coat of poly on my nice grocery-bag covered work space, I hauled it outside and set it on the frame to get a sneak peek of what the final product might look like.

Tutorial on how to create an industrial desk from wood and pipe

Being happy with the progress we’d made, I decided just to keep the desktop sitting on the frame in order to apply a coat of Minwax Semigloss Polyurethane.  I also went ahead and used some bronze colored wood screws to mount the desktop to the frame.  One coat of poly was enough for this project.  Let things dry as per the provided instructions.

Tutorial on how to create an industrial desk from wood and pipe

Finished Product

Pipe legged desk and stacked wood top. Tutorial included.


Tutorial on creating an industrial desk from black iron pipe

How to make an industrial desk from pipe

Posted on 72 Comments

Industrial Pipe and Wood Bookshelves

Using pipe to make industrial brackets for shelves.

Remember our posts on Achieving an Industrial Décor with Black Iron Pipe – Part I, Part II, and Part III?  In this post, Brianna and I are back for more tips on adding functional industrial décor with a quick tutorial for building some pretty awesome industrial pipe bookshelves with – you guessed it – black iron pipe and spare lumber.

Using pipe to make industrial brackets for shelves.

Throughout our travels, Brianna and I have collected knick knacks from across the globe to remind us of where we’ve been, what we’re capable of, and where we can go if we put in the effort.  Unfortunately, these precious mementos rarely have a place in our home at the time of purchase.  This can lead to what might as well be a four-letter word: CLUTTER. (gasp)

Trying to get a handle on cleaning and clutter management in the new year, I can’t tell you the number of clickbait posts we’ve admittedly clicked on this January claiming hold the secrets to the latest storage and organization techniques that will completely transform your home.  Let me save you the trouble of clicking through the masses and boil everything down into one simple point for you:  Everything has a place.   If your clutter isn’t in it’s place, put it there.

Our problem?  We’d run out of space.  The solution?  Build more space! (In the form of bookshelves in our master bedroom)

Supplies

You can take a lot of liberties on how you attack this project.  Styles and wall sizes vary, and the supplies listed below are those used for this particular adaptation.

Industrial pipe bookshelves from pipe tutorial with step by step how to

In this project, we built 4 industrial pipe bookshelves in three different styles:

Short Shelves (times 2):

Long Shelf (Standard)

Long Shelf (Over Desk):

Craft Thyme

For each shelf, the basic steps are the same:

  1. Select your lumber,
  2. Cut your lumber to size,
  3. Sand, rough, and buff,
  4. Cut your mounting holes,
  5. Test fit,
  6. Stain and poly,
  7. Assemble, Mark, Disassemble, Install, and Reassemble

Select Your Lumber

Selecting your lumber is strictly a matter of personal preference.  You’ll do best to find a piece of wood that speaks to you.  Spend time digging through the lumber stocks searching for that perfect knot, grain, or imperfection.  For this order, I decided to leave the lumber we used up to the random choosing of a Lowe’s employee by ordering online for in-store pickup.

Cut your Lumber to Size

Each wall we were looking to fill was 62″ wide.  Not wanting to fill the space from edge-to-edge, we chose 46″ for the widest (bottom) shelf and a smaller 20″ shelf to be placed as a higher accent piece.  Cut your lumber to size using whatever mechanism you have at your disposal.  We used our smaller miter saw to make the cuts.

Sand, Rough, and Buff

Once your cuts have been made, you’re going to want to distress your wood a bit.  Why?  1) It looks cool, and 2) SAFETY!  The way we’re going to mount the shelves will leave them sticking out 8″ from the wall.  Sharp, fresh cut lumber corners jutting out from a wall are just an accident waiting to happen.

Industrial shelves from pipe tutorial with step by step how to

Take some time to sand down your newly cut corners and edges.  Feel free to be overly drastic in how you do this – it will surely make your end result that much better!  And leave those imperfections there for everyone to see.

Cut your Mounting Holes

Symmetry comes naturally to me; it’s just the way my mind thinks.  (Brianna loves and hates this about me all at the same time.)  For this project, I chose to drill out the mounting holes in the same position on either side of the shelves-to-be.  Symmetry could be optional for you, just ensure that your shelf is properly supported in the design you chose to go with.

Industrial shelves from pipe tutorial with step by step how to

Use a 1-1/8″ hole saw or drill bit to cut the holes for your 3/4″ wide pipe.  I’ve tried this many different ways (including rocking a 1″ bit when drilling) in an attempt to find the perfect hole size.  Trust me, 1-1/8″ is the way to go.  There’s no need to sand these cuts (unless you’re more of a perfectionist than I am), because the actual opening will be hidden in the final product.

Test Fit

It goes without saying that you should test fit your pipe into your newly drilled holes.  Use the 2″ nipples to make sure that they fit well.

Industrial shelves from pipe tutorial with step by step how to

If they fall right through, don’t worry and remember that you’ll have a pipe cap and an elbow or tee on the other end for support.  If the opposite happens and you find that your pipe doesn’t fit into your hole, you can either try the rocking method mentioned earlier (not recommended – you can hurt yourself if you aren’t careful), or use a rubber mallet to tap the nipple into place.

Stain and Poly

Once your lumber has been properly cut, sanded, and drilled, break out your favorite stain and polyurethane finish.  For this application, we used Minwax Early American as the stain, and Minwax Semi-Gloss Polyurethane as a finish.  Apply the stain, let it dry overnight if possible, and apply the poly the next day.  Waiting for everything to dry is the hardest part, but the end result is well worth the wait.

Assemble, Mark, Disassemble, Install, and Reassemble

Yes, it sounds like a lot of steps in one, but at least they’re simple:

  1. Go ahead and assemble each shelf as you intend.  HAND TIGHTEN ONLY.   (Interested in what we did? See the final orientation of parts in the photos below.)
  2. With a partner, hold and level the shelf where you’d like it to hang.
  3. Mark the holes in the flanges with a pencil.  (Pro tip: Have two pencils – one for each of you.  You’ll avoid yelling about loosing level status this way)
  4. Pull the shelf down, and disassemble.
  5. Install your drywall anchors where your marked your flange holes.  (I go over the top here and use anchors capable of supporting 143 lbs each)
  6. Install your flanges (only) using your freshly installed anchors and provided screws.
  7. Into the flanges, install all of the hardware you plan to install besides the shelf itself and the black pipe caps.
  8. Install your shelf over the nipples that you test fitted earlier.
  9. Secure your shelf by adding the black pipe caps to the nipple peering out of your shelf.  A strong hand-tightening should be sufficient to ensure stability.

The Final  Industrial Pipe Bookshelves

DIY pipe shelf tutorial with directions

DIY pipe shelf tutorial with directions

Industrial shelf made from pipe.

DIY industrial shelves. Tutorial and instructions.

DIY pipe shelf tutorial with directions

DIY industrial shelves and pipe desk. Tutorial and instructions.

How to make diy industrial shelves from black iron pipe.

Posted on 15 Comments

Fireplace Mantle Makeover

Completed wooden mantel

When we first bought our home, Brianna and I loved all but two things: the accent wall color in the living room and the fireplace mantle.  The accent wall was easy to take care of – just simply slap on a coat of paint!  (Valspar Winter Flannel for those curious minds.) Fixing our “dinky mantle” however required a little more work.  It, and the fireplace surround, were supposedly built to mirror the built-in shelves to the right of the room. Apart from being white, we just weren’t seeing it.  So in keeping with our theme, we took a day and decided to transform our mantle into something that really stood out in the space.

The Before: Behold the “Dinky Mantle”

This is the mantle we started with

Supplies

  • 3 – 1″ x 8″ x 8″ White Pine Lumber
  • 2 – Foam Brushes
  • Rust-Oleum Dark Walnut Stain
  • Rust-Oleum Semi-Gloss Polyurethane
  • Cotton Rags (for stain removal)
  • 1-1/4″ Brad Nails
  • Brad Nailer
  • Air Compressor

A few notes about your lumber selection:
You can work with any type wood.  White pine tends to be the most affordable of the “furniture grade lumber” and it fit into our budget the best at the time.  It’s a good standard lumber and it stains well.  If you hope to achieve a consistent look and feel with your finished piece, try to pick pieces of lumber with a similar wood grain.  The sizes and lengths noted above were what we needed for our application/space.  Your needs will most certainly differ.

Step-By-Step Instructions

This project is what I like to refer to as a beer project.  Outside of operating a saw and a nail gun (which you should ALWAYS do sober – 100% sober), there are a lot of “stain, wipe, dry” and “poly, dry, poly, dry” steps during which you should have ample opportunity to enjoy a tasty beverage.

Step 1: Measure

Ok, so you probably did this prior to purchasing your lumber in order to ensure you bought enough, but when it comes time to cut your lumber, you want to be certain that you’ve measured correctly. Measure again, take note of the dimensions you need to cut, translate those measurements by marking your lumber, and get ready to break out the saw of your choice.

measure-mantel

Step 2: Cut!

Carefully cut your wood to your desired dimensions.  For our project, our cut list was as follows:

  • 1 – 64″ (Mantle Front)
  • 2 – 61″ (Mantle Top & Bottom)
  • 2 – 7-1/4″ (Mantle Sides)

Yes, this left quite a bit of wood left over.  Think: FUTURE PROJECT!  You may be able reduce waste by purchasing longer lumber, but I very often have trouble finding straight lumber of this dimension in longer lengths.

Step 3: Stain and Rub Your Wood

With everything cut, break out your favorite shade of wood stain.  Apply your stain as per the provided instructions.  Wipe off the excess product after 2-3 minutes.  If you’re happy with the color, great!  If not, wait the indicated number of hours, apply a second coat, and rub everything down again.

Rubber gloves are essential to keeping your skin unstained. Somehow, I always forget this…

stain-wood-mantel

Step 4: Break out the Poly

When you’re happy with the look of your stain, it’s time to apply a protective coat of polyurethane.  The type of finish is up to you; matte, satin, semi-gloss, or gloss.  We’d played around with matte poly finishes in the past and weren’t too happy with the end result.  For this application, we ended up going with a semi-gloss finish and were thrilled with the final look.

It may take more than one coat of poly to achieve a uniform coat.  Let the polyurethane dry as per the manufacturer’s instructions and reapply.  Repeat until you’re happy with the resulting finish.

Step 5: Assembly and Installation

This is where all of your hard work comes together, and for us, this step was a breeze!  Our new mantle is simply a cover-up of the existing, so all of our major mounting was already taken care of for us.

  1. Starting with the top, center the piece of lumber you selected for this position over your existing mantle.  Using your brad nailer, fasten this board to the existing mantle.  Be generous with your use of nails; they’re tiny and you won’t see them.
  2. Add your side panels by nailing them to the ends of the top panel you just installed  Carefully align your nail gun and you should be able to shoot straight nails fairly easily.
  3. Mount your front panel.  Again, carefully position your nail gun, and you’ll shoot true. It helps to have a partner here to hold and square things up.
    • Pro tip: Don’t yell at your helper.  Treat them nicely.  They work better in pleasant working conditions.
  4. Install the bottom panel.  With all other facets in place, your bottom panel should fit in like a glove.  Shoot and be true.

mantel-assembly

Yes, I could have put everything together beforehand, simply slid the entire piece over the existing mantle, and nailed things down.  However, doing it the way we did allowed for on-the-spot micro adjustments and re-squaring.  So yes, more effort to do it my way, but a much “straighter” final product.

Step 6: Beer and Admiration

My favorite step! Grab another pour of your favorite beer, sit back, and admire your handiwork!

Completed wooden mantel

Of course, we didn’t stop there…

We loved the look of our new mantle; however, that fireplace surround just didn’t stand up to what we’d just created.  It was going to have to change….  Yippy!  Another project!  Stay tuned for our follow up post on how we continued to transform our fireplace to fit our style.