Posted on 26 Comments

Gold Foil, The Right Way to Gold Leaf Fabric

Fabric with washable gold foil or leaf added

There are plenty of metallic fabric paints on the market, and while they excel at adding shimmer they don’t have that rich metallic leaf look that is so popular on various commercial t-shirts.  It took a little bit of research but I finally figured out how they get gold leaf on fabric and keep it washable.  Allow me to introduce you to Gold Foiling Fabric.

Fabric with washable gold foil or leaf added
Adding bling to your napkins

Supplies

Supplies to gold leaf or gold foil fabric

Fabric -This fabric had been ombre dyed using this tutorial

Transfer Adhesive* (Full disclosure about this affiliate link: I wasn’t thrilled with the Martha Stewart Transfer Glue I used here.  I might try a different brand.  The important point is that is is tacky when set and stays adhered through gentle washing. Maybe it was user error…)

Metallic Foil Sheets* (These are different than gold leaf. They are thicker and have a backing to the metallic portion)

Sponge applicator

Step 1:  It’s Sticky

Transfer glue on fabric

I wanted a random/worn pattern to my finished foil look so I put the glue at random and used varying thicknesses of glue.  You can get a smoother finish by putting a nice, thick, even application of glue.  You can even use a stencil and apply glue in a pattern.  The important part is to get enough on that the glue quits soaking into the fabric and leaves an even coat on the top layer.

The directions will tell you how long to let the glue set.  My suggestion is to lightly test with your finger.  The glue should stick to your finger but not leave the fabric when set.

Step 2:  Burnish and Repeat

Placing gold foil on fabric

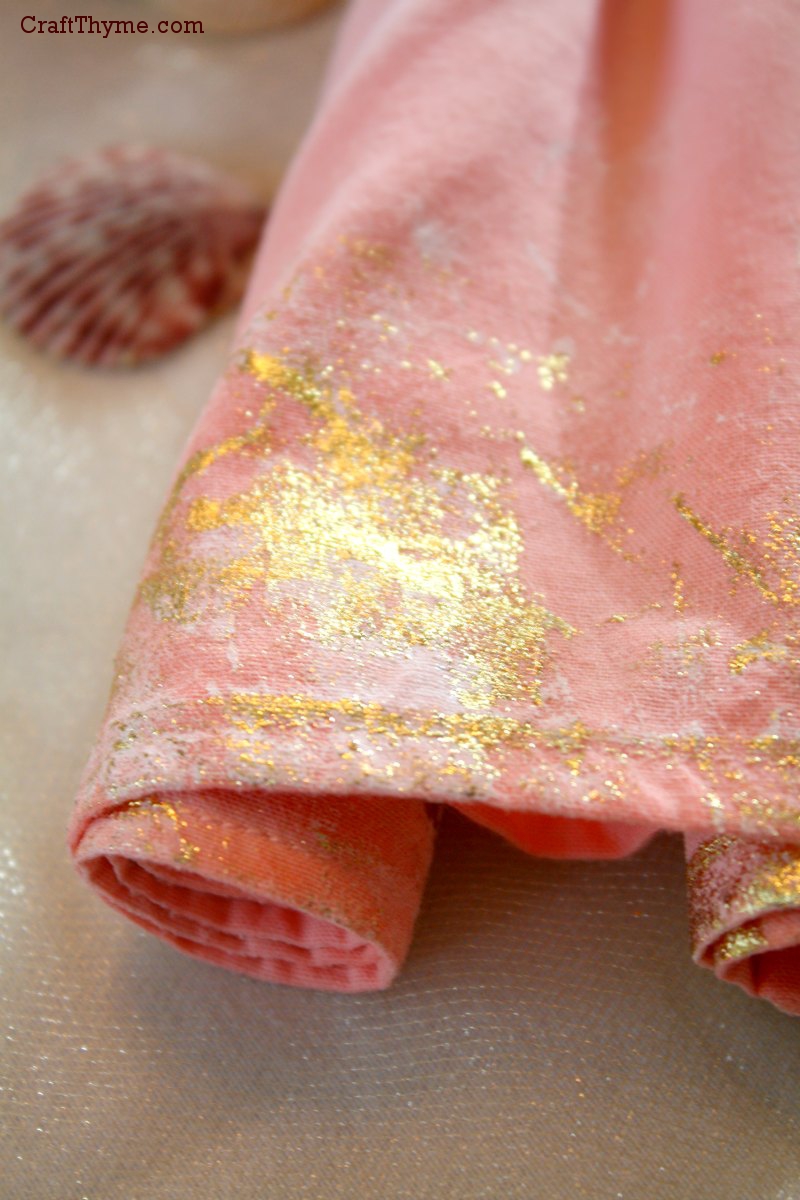
Alright, I know this probably makes sense to everyone else, but put the shiny side up…  You are gluing the backing to the fabric. That was one of my duh moments.  To get a really good bond press the sheet into the glue.  Then burnish the top of the foil with a precision instrument paint brush handle.  Mostly because that was what I had laying around.

Slowly peel the foil from the fabric.  The plastic sheet should peel off and the gold leaf effect remain.  Leaving you with some nice shimmer like this.

Ombre fabric with gold leaf edging turned into a napkin

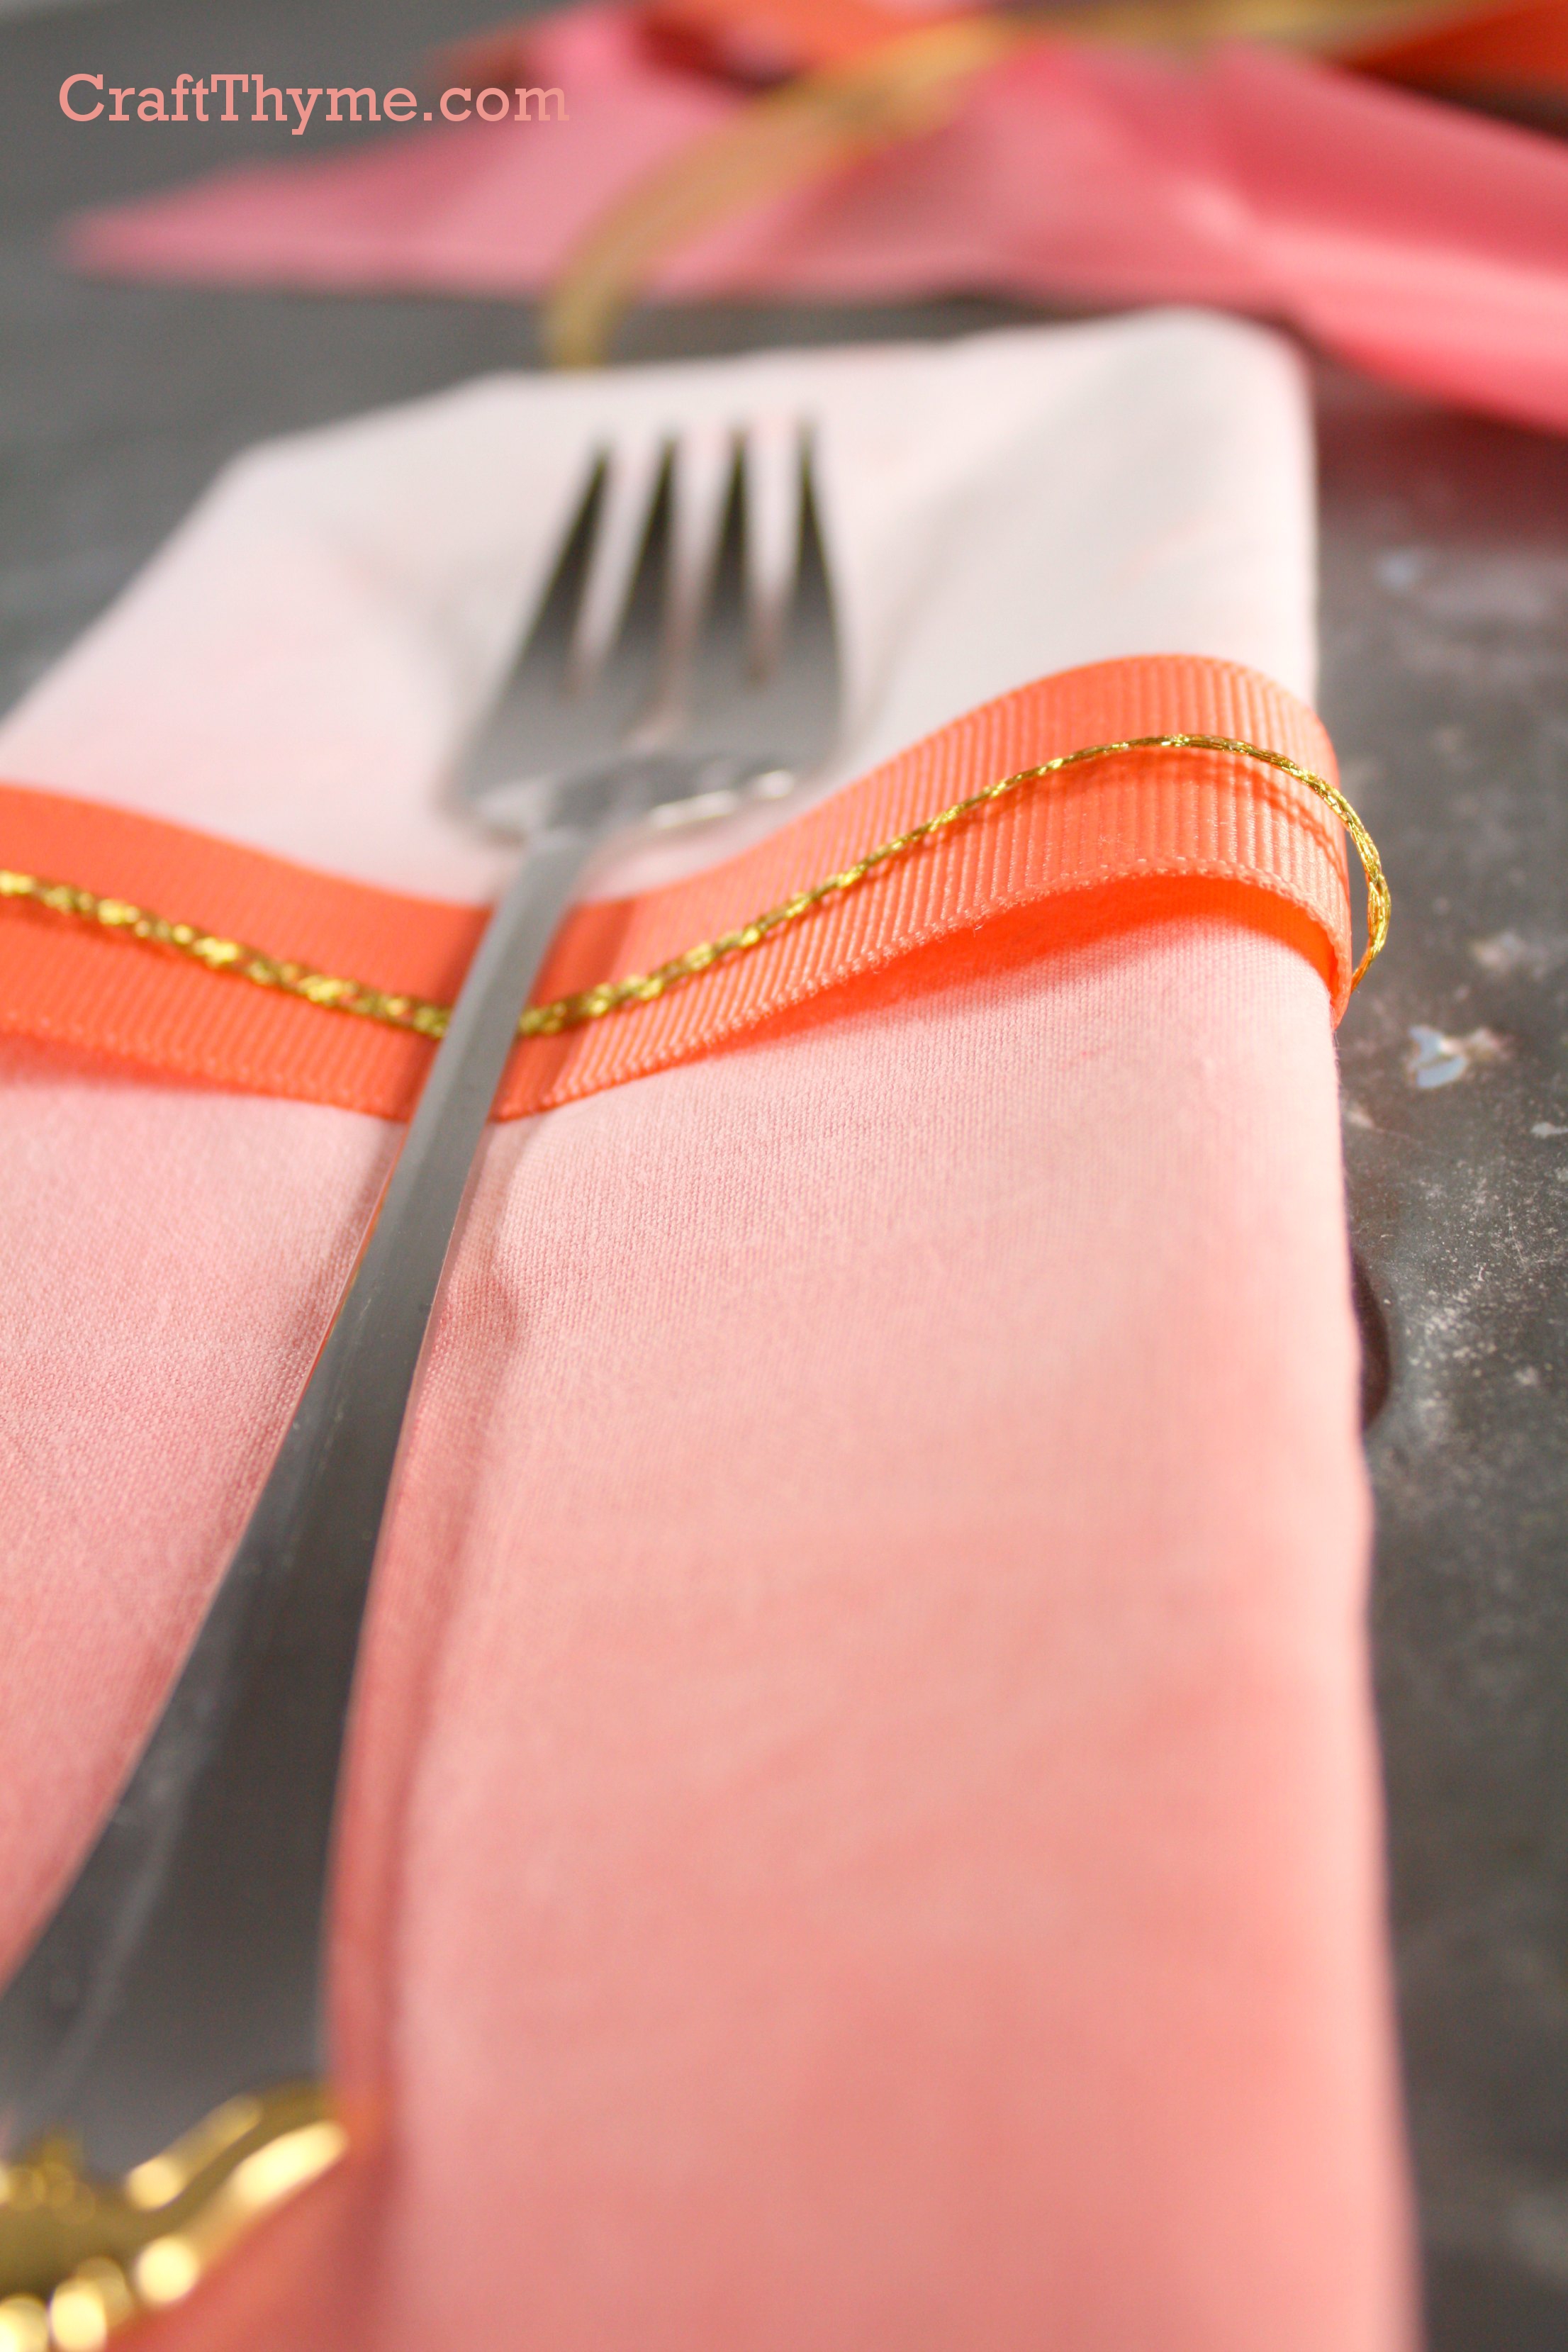
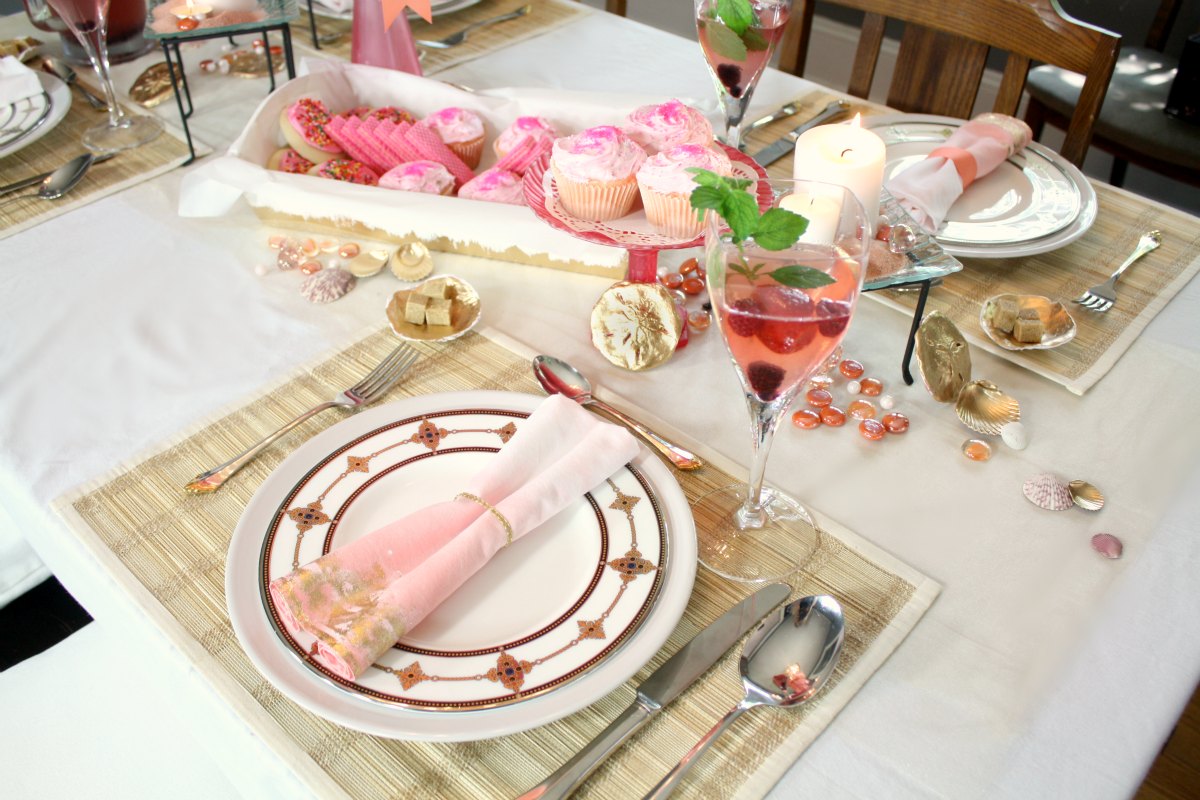
These final napkins where used in my Summer Pink Lemonade Table Setting seen here.

Notes

I already mentioned one important point.  Shiny-side up.  When done I let mine sit for 24 hours to fully cure.

I did hand wash them and the gold stayed put.  I believe it would hold up through a gentle cycle as well.  I just wouldn’t put these napkins up to a BBQ or Crab leg challenge.  But for a special occasion they work great.

It took a bit of practice to do a good application of glue and foil.  If it is your first time I would suggest buying an extra sheet or two of foil to practice with.  The napkins were completed after many trial runs that took to realize how to apply the glue and that burnishing helped.

Finally save your foil sheets if they have any left.  The little flecks make for an interesting effect when pressed into glue

Enjoy these articles?  Get periodic updates by joining my mailing list (no spam, no way, no how) or subscribing to my RSS feed.

Posted on 16 Comments

How to Ombre Dye Fabric

Ombre dyed napkin in peach and pink

I seriously doubt I am the First Hundreth blogger to give a tutorial on how to ombre dye fabric.  However, I am very particular about getting smooth even transition from color to color and this tutorial shows you how to achieve a better finish.  I used to dye costumes in college to match a certain director’s choices (I worked in a semi-pro costume shop as a stitcher) and I learned a lot about fabric and how it holds color. On to the directions for how to have a smooth ombre dye:

Ombre dyed napkin in peach and pink
See the smooth transition from pink to white…. Oh that is sooo nice.

Supplies

Supplies to ombre dye napkins

Dye (I tried Dylon Dye* for the first time in this post.  Rit Dye* works fine too)

Multiple large pans for dyeing

Water (very hot if you can’t heat it)

Salt or other chemicals to set the dye

Fabric (Cotton, Silk, and Rayon work best with most dyes.  Specialty dyes, temperatures or agents may be required for other fabrics.  Don’t be obstinate, read the directions)

Iron

Old Towel or piece of fabric

Pre-Step:

I can’t emphasize enough that the fabric be pre-washed.  Even if it ‘claims’ to be ready to dye.  During that pre-wash detergent that is used must be thoroughly rinsed out.   UNDER NO CIRCUMSTANCES use fabric softener in the pre-wash.

Step 1 Bathing the Dye or Preparing the Dye Bath :)

Preparing a dye bath with Dylon dye.
I’ll admit, I’m a little kid inside. I love to watch the dye swirl around.

Follow or Discard the directions on your dye.  While this may seem counter-intuitive what I mean is ask yourself a question.  Do I want the color of my fabric to come out even and exactly like the dye packet?  If yes, then follow the dye manufacturers guidelines.  If you are going to mix colors and experiment then go for it!  I added a ton of extra water and a little orange to get a pastel-peachy dye.  Totally not kosher according to the package.

Important: prepare the dye for the darkest color you want to achieve.

Step 2: How the Hell Do I Know How Dark It is?

Dye test strips
The more dye you mix the better you are at gauging how much you need. I thoroughly ‘fubar’ed my first bath up because Dylon dye is waaaay darker than Rit. Wasted a ton of dye which makes me angry. It isn’t exactly cheap.

Here is one of the MOST important steps in dyeing.  Test Strips.  I don’t care if you are peeling a string out of a hem. Get a thread to test with at least.  Because the chances the color is going to be right on first dye dip are slim.  You’ll need to adjust color or time in the bath.  And maybe even more important RINSE AND DRY THE TEST FABRIC.  I rinse under cold water and iron mine because I am impatient.  See how the middle sample is so much darker?  That is still wet, while the one on the right is partially dried by the iron.

Note: the old towel is used because a little dye comes off while ironing.

Step 3: Dilution

Watering down the original dye to make three colors

Once you have gotten the dye to your liking take some of it and add it to a bowl and dilute it in half. Basically add the same amount of water as you did prepared dye.  Then take the diluted solution and add it to a third bowl and dilute it in half again.  I like to test my dye and make sure the three colors are different enough to be noticeable.  Sometimes this requires adding a little dye or water to make three distinct colors.

Once you have them to your liking take your fabric and dip it in the lightest color as high as you want your ombre to go.  Finally set a timer and move it around a little (up and down) every few minutes. This will make the dye line more subtle.  My first dip was 15 min and I moved it around a little every 5.  I don’t pre-wet my fabric as I like the dye to wick up the fabric slightly during an ombre process.

Step 4: Dying for Dyeing

Three stages of ombre dyeing

Here is the boring part.  You have to do the same process as step three for all three solutions.  Next you dip in the medium strength solution about halfway up the dye part.  Wiggling it in and out of the dye line to make the edge more gradual.  Finally, you hit the tips with the darkest.  As you can see I did multiples at a time; moving one from one bath to the next in rotation.  It is really tempting to put a bunch of fabric in each pot to speed up the process…  Resist.  I repeat: Resist.

When you are done rinse them well under cold water BEFORE washing.  Extra dye will stain the white or light portion of the fabric no matter what.  Rinsing keeps this to a minimum.

Finally wash and dry your items as suggested by the dye manufacturer and fabric type.

Pink ombre dyed napkin
I folded the fabric in half and did both ends at once to get this ombre look on both sides of the napkin.  Also didn’t iron it… In case you were admiring the wrinkles.

Notes

As usual gloves are useful for not dyeing your hands… And as usual I did not have any and ended the day with nice pink fingers.

Fabric with washable gold foil or leaf addedWhile these napkins look pretty good, I took them one step further by adding gold foil (a kind of fabric friendly gold leaf) to the edges.  Tutorial for gold foiling fabric will be up 8/8.  Here is a preview.


Posted on Leave a comment

Mixed Berry Sangria

Mixed berry sangria garnished with lemon balm

Sangria is perfect for anytime of year.  But this mixed berry sangria recipe adds a hint of lemonade, making it perfect for summer. It is a super easy recipe for sangria that everyone will rave over at dinner parties.  You can pretend it took a lot of time and labor.  I won’t tell.Mixed berry sangria garnished with lemon balm

Ingredients

1/2 to 1 bottle of White or Blush Wine (don’t go for super expensive but don’t go for super cheap)

1/4 Cup Chambord

1/4 Cup Peach Schnapps

Lemonade

Superfine or Confectioners Sugar (if not using a sweet commercial lemonade)

2 Cups mixed berries (frozen or fresh)

Lemon Balm (for garnish)

Mixed berry and lemonade sangria recipe

Directions For Awesomeness

Fill a pitcher 1/2 full with wine.  Add the liqueurs and the berries.  Top off with lemonade.  Taste test and add sugar till sweet enough for your tastes (I like mine tart so I don’t add sugar).  Allow the mixture to set overnight as it will develop more berry flavor.  Pour into glasses and garnish with fresh lemon balm.

Pitcher of mixed berry sangria


While you are waiting for the Sangria to develop you probably have an almost full bottle of Chambord and Schnapps with a half a bottle of wine…  Do I need to fill your time in for you?

Have you ever had Chambord over ice cream?  I mean what is there not to like about alcohol and ice cream? Or Schnapps in lemonade? Or alcohol in alcohol… Did I mention I have two boys.  Ages 3 and 1. Yeah I know my way around some alcohol.  Hope you enjoy as well ;).

Enjoy these articles?  Get periodic updates by joining my mailing list (no spam, no way, no how) or subscribing to my RSS feed.

See more great crafts and decor at these link parties: Pink Recipe Box, Somewhat Simple, The Stitchin’ Mommy, Lovely Crafty Home, Pint Sized Baker

Posted on 8 Comments

Sea Shells & Lemonade = Table Decor?

Sea shell inspired table decor.

I initially had the idea for this table setting from some sea shells I found when scrounging through my mess of a basement.   I had saved a small bag of pink scallop shells and thought they would make a good basis to start my summer decor.  Though I live  in the mountains my second love is the beach.  I wish I was a lake girl, since so many lakes are so much closer, but the mud, the dark water, the…  Nope it is sand and surf for me.  However, any good mountaineer knows overdoing the surf theme just seems out of place.  So here is my hybrid of pink, salmon, & gold.  Call it pink sand, shore, and lemonade inspiration.

Table decor inspired by pink sea shells
I’m so good at naming tablescapes… #sarcasm. Please suggest better names in the comments! Please!

The table setting is anchored by a diy ribbon chandelier (tutorial here) above and gold tulle net runner below.  The gold accents unify the various shades of pink that run from rose to salmon.  Shoo… okay I can say I used my art degree today to critique my design.  Now on the the fun stuff!

PINK LEMONADE CUPCAKES!

I knew I wanted some fun pink desserts and, thank the grocery gods, I walked by a display for Pillsbury pink-lemonade cupcakes.

Table setting inspired by pink seashells
Read below to learn more about my awesome baking skills.

Yes I can bake…  But can I decorate a cake?  Oh hell no.  It is a crafting skill that is just beyond me.  Knowing this, I often take the easy way out with mixes, pre-made icing, and sugar sprinkles.  As far as I can tell sugar sprinkles cover a multitude of sins.  Plus who could walk away from a thing of icing labeled ‘Pink Lemonade”.  And I swear I am not getting paid by Pillsbury to say all this awesome stuff.  Though, if they would like to, feel free to give me a ring.

Pink and Gold table decor
I like to call this the sugar, sugar, sugar portion of the table

Oh my!  I almost forgot mixed berry sangria!  Perhaps I should preface this with my Facebook status:pink-fb-statusNot to be a braggart but I make multiple awesome sangrias.  Citrus, berry, peach, etc… One for every season.  The recipe for this mixed berry and lemonade one will be up Thursday!

Salmon and Pink place settings
Gold Finger! A tutorial for creating your own gold sea shells and sand dollars from paper clay is in the works.

One of the things I enjoyed most about creating this display was learning to gold foil fabric (tutorial coming).  I thought the ombre dyed napkins (another upcoming tutorial) really set of each place setting because of the gold edging.  I’ll leave you with one more picture and a list of craft tutorials and how-tos required to recreate this summer table decor.

Sea shell inspired table decor.


I would love to have a better name and ideas on what you like or would improve.  Every table display is a learning experience so please leave comments.  Other than the cupcakes… Those mo-fo’s were delicious!

Tutorials:

How to Dye Sand

Permanent Sea Glass Finish

Modern Ribbon Chandelier (yes it is supposed to look like that)

Mixed Berry Sangria

Ombre Dyed Napkins

Gold Foiling Fabric August 8, 2013

Mold Making from Polymer Clay (Gold Seashells and Sand Dollars) I have photos and how tos but I am not sure how many people like to sculpt and make molds…  I may or may not post a tutorial.

Enjoy these articles?  Get periodic updates by joining my mailing list (no spam, no way, no how) or subscribing to my RSS feed.

See more great crafts and decor at these link parties: Our Home Away From Home, Today’s Creative Blog, Daisy Cottage Designs, Shabby Creek Cottage, House of Hepworths, Live Laugh Rowe, The Crafty Blog Stalker

Posted on 13 Comments

Faux Permanent Sea Glass Tutorial

Tutorial to create permanent faux sea or beach glass

I saw a how-to for creating beach glass from Elmer’s Glue and food coloring on Pinterest.  While lovely, I wanted to create a more permanent sea glass finish for some cake stands (NOT FOOD SAFE FINISH please don’t sue me if you eat off this and get sick) I was making.  That way they could be gently washed and I wouldn’t have to worry about moisture making the finish tacky or white.  After, oh so many attempts…. I came up with a good working finish. Thank goodness glass plates are cheap at Goodwill.  On to the tutorial:

Tutorial to create permanent faux sea or beach glass


Supplies

Translucent Glass Paint/Stained Glass Paint (A watered down enamel did not work)

Glass Frosting Spray Paint

Water or Glass Paint Thinner w/ a container to mix them in

Soft brush or Foam Brush

Clear Glass Items

Supplies to create faux beach glass
Your eyes are deceiving you.
You do not see the stiff paint brush in this picture… You see a foam brush.

Step 1 Clean & Paint

Clean your glass well.  Did you get it clean?  Good clean it again, wipe it down with rubbing alcohol and try not to touch it.  I may sound a little crazy here but if you want your paint to adhere clean the glass.  Depending on the paint you have chosen you may water it down with water or a specific thinning agent.

Why am I watering it down?  Because you want to achieve a nice thin even coat of transparent to translucent paint.  The thicker the paint the more brush strokes showed.  The more brush strokes that show the less it looks like sea glass and the more it looked like a hot mess.  You can still see some drips and mess ups if you look closely in these photos.  The key is multiple coats of thin paint.

Oh and some paints say to dry of oh… 20 days… Um hell no. Ain’t nobody got time for that.  Usually you can bake them for a faster finish, but read the directions for your particular paint.

Painting translucent finish on glass as the first step in faux sea glass tutorial
You can now see why I have such a large and well used drop cloth. I am messy.

Step 2: Spray Paint Against All Directions

Take the frosting spray….  Now I know you are supposed to be well away from the object etc when spray painting.  Ignore all that.  You want a THICK coat.  Get in close with that spray bottle!  You want it to pool in the niches and look glossy and wet before it dries.  This will insure a white textured finish akin to actual sea glass.  And if it just looks frosted when done, get closer and spray more!

Using glass frosting spray paint to mimic beach glass finish
Spray Away!

Step 3: Use As Is

That is really the only steps to making a more permanent beach glass finish, suitable for hand washing.  I went and finished mine with a little E-6000 glue.  Just simply attached my plates to a cup and candle stick to make two cake plates in two shades of pink.  The frosting spray says nothing, zip, zero, zilch about being food safe.  So I plan to use a paper doily under any food, just to be safe.

creating faux beach glass cake plates

Notes:

Spray Away!, Hand Wash, and not food safe!  Otherwise you should be good to go.

The key is piling on the frosting spray!

DIY faux beach glass cake stands